2020 MERCEDES-BENZ AMG GT ROADSTER audio
[x] Cancel search: audioPage 23 of 381
Mercedes-Benz GenuineParts
+ ENVIRONMENTAL
NOTEEnvironmental
dama gecaused bynot using recycled
re conditioned components Mercedes-Benz
AGoffers recycled recondi‐
tioned components and pa rts with the same
qu ality as new parts. The same entitlement
from the implied warranty is valid as for new
parts. #
Recycled reconditioned components
and pa rts from Mercedes-Benz AG.*
NO
TEImpairment of the operating ef fi‐
ciency of there stra int sy stems from
ins talling accessory parts or from repairs
or we lding Airbags and seat belt
tensioners, as well as
control units and sensors forth ere stra int
sy stems, may be ins talled in thefo llowing
areas of your vehicle:
R doors R
door pillars
R door sills
R seats
R cockpit
R instrument clus ter
R centre console
R late ra lro of frame #
Do not ins tall accessory parts such as
audio sy stems in these areas. #
Do not car ryout repairs or welding. #
Have accesso ries retrofitted at a quali‐
fi ed specialist workshop. Yo
u could jeopardise the operating saf ety of your
ve hicle if you use parts, tyres and wheels as well
as accessories releva nt tosaf ety which ha venot
been appr ovedby Mercedes-Benz. Saf ety-re le‐
va nt sy stems, e.g. the brake sy stem, may mal‐
function. Only use Mercedes-Benz GenuineParts
or parts of equal qualit y.Only use tyres, wheels
and accessory parts that ha vebeen specifically
appr ovedfo ryo ur vehicle model. Mercedes-Benz
tests original parts and con ver‐
sion parts and accessory parts that ha vebeen
specifically appr ovedfo ryo ur vehicle model for
th eir reliability, saf ety and suitabilit y.Despite
ongoing ma rket resear ch, Mercedes-Benz is
unable toassess other parts. Mercedes-Benz
th erefore accepts no responsibility forth e use of
such parts in Mercedes-Benz vehicles, even if
th ey have been of ficially appr oved or independ‐
ently appr oved byate sting centre.
Cer tain parts are only of ficially appr ovedfor
ins tallation or modification if they comply wi th
legal requirements. All Mercedes-Benz Genuine‐
Pa rts meet the appr oval requ irements. The use
of non-appr oved parts may in validate theve hi‐
cle's general operating pe rmit.
This is the case in thefo llowing situations:
R theve hicle type is dif fere nt from that for
which theve hicle's general operating pe rmit
wa s granted.
R other road users could be endangered.
R theex haust gas or noise le velge ts wo rse. 20
General no tes
Page 34 of 381
Depending on
the equipment, this includes, for
ex ample:
R settings forth e seat and steering wheel posi‐
tions
R suspension and climate control settings
R customisations such as interior lighting
If yo ur vehicle is accordingly equipped, you can
connect your smartphone or ano ther mobile end
device totheve hicle. You can cont rolth is by
means of the control elements integrated in the
ve hicle. Images and audio from the smartphone
can be output via the multimedia sy stem. Cer‐
tai n information is simultaneously trans ferred to
yo ur smartphone.
Depending on the type of integration, this can
include:
R general vehicle data
R position data
This allo wsyouto use selected apps on your
smartphone, such as navigation or music play‐
bac k.There is no fur ther interaction between the
smartphone and theve hicle; in particular, vehi‐
cle data is not directly accessible. Which type of fur
ther data processing occurs is de term ined by
th e pr ovider of the specific app used. Which set‐
tings you can make, if an y,depends on the spe‐
cific app and the operating sy stem of your
smartphone. Online services
Wire
less network connection
If yo ur vehicle has a wireless network connec‐
tion, it enables data tobe exc hanged between
yo ur vehicle and additional sy stems. The wire‐
less network connection is enabled via theve hi‐
cle's transmission and reception unit or via con‐
nected mobile end devices (e.g. sma rtphones).
Online functions can be used via the wireless
network connection. This includes online serv‐
ices and applications/apps pr ovided bythe man‐
ufacturer or other pr oviders.
Manu factu rer's se rvices
Re garding online services of the manufacturer,
th e individual functions are described bythe
manufacturer in a suita ble place (e.g. Owner's
Manual, website of the manufacturer) along with
th ere leva nt da taprotection information. Per‐ sonal data may be used
forth e pr ovision of
online services. Data is exchanged via a secure
connection, e.g. the manufacturer's designated
IT sy stems. Personal data is collected, pro‐
cessed and used via the pr ovision of services
exc lusively on the basis of legal permissions or
with prior consent.
The services and functions (sometimes subject
to afe e) can usually be activated or deactivated.
In some cases, this also applies tothe entire
ve hicle's data connection. This excludes, in par‐
ticular, legally prescribed functions and services.
Third part y services
If it is possible touse online services from other
pr ov iders, these services are there sponsibility
of the pr ovider in question and subject tothat
pr ov ider's data pr otection conditions and terms
of use. The manufacturer has no influence on
th e conte ntexc hanged.
Fo rth is reason, please ask the service pr ovider
fo r information about the type, extent and pur‐
pose of the collection and use of personal data
when services are pr ovided bythird parties. General no
tes31
Page 155 of 381
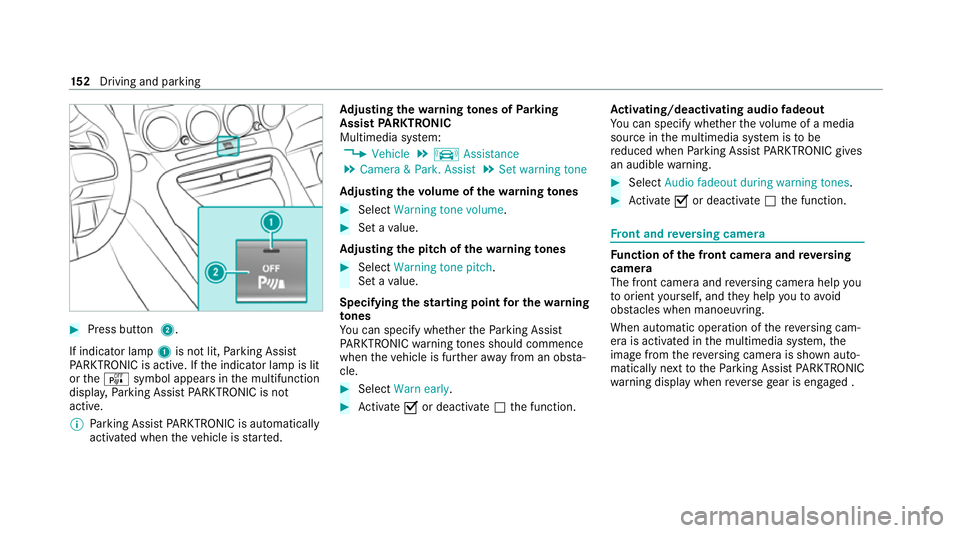
#
Press button 2.
If indicator lamp 1is not lit, Parking Assist
PA RKTRONIC is active. If the indicator lamp is lit
or theé symbol appears in the multifunction
displa y,Pa rking Assist PARKTRONIC is not
active.
% Parking Assist PARKTRONIC is automatical ly
activated when theve hicle is star ted. Ad
justing the warning tones of Parking
Assist PARKTRONIC
Multimedia sy stem:
4 Vehicle 5
k Assistance
5 Camera & Park. Assist 5
Set warning tone
Ad justing the volume of thewa rning tones #
Select Warning tone volume. #
Set a value.
Ad justing the pitch of the warning tones #
Select Warning tone pitch.
Set a value.
Specifying thest arting point for the warning
to nes
Yo u can specify whe ther thePa rking Assist
PA RKTRONIC warning tones should commence
when theve hicle is fur ther aw ay from an obs ta‐
cle. #
Select Warn early. #
Activate Oor deacti vate ª the function. Ac
tivating/deactivating audio fadeout
Yo u can specify whe ther thevo lume of a media
source in the multimedia sy stem is tobe
re duced when Parking Assist PARKTRONIC gives
an audible warning. #
Select Audio fadeout during warning tones . #
Activate Oor deacti vate ª the function. Fr
ont and reve rsing camera Fu
nction of the front camera and reve rsing
camera
The front camera and reve rsing camera help you
to orient yourself, and they help youto avo id
obs tacles when manoeuvring.
When au tomatic operation of there ve rsing cam‐
era is activated in the multimedia sy stem, the
image from there ve rsing camera is shown auto‐
matically next tothePa rking Assist PARKTRONIC
wa rning display when reve rsege ar is engaged . 15 2
Driving and pa rking
Page 169 of 381
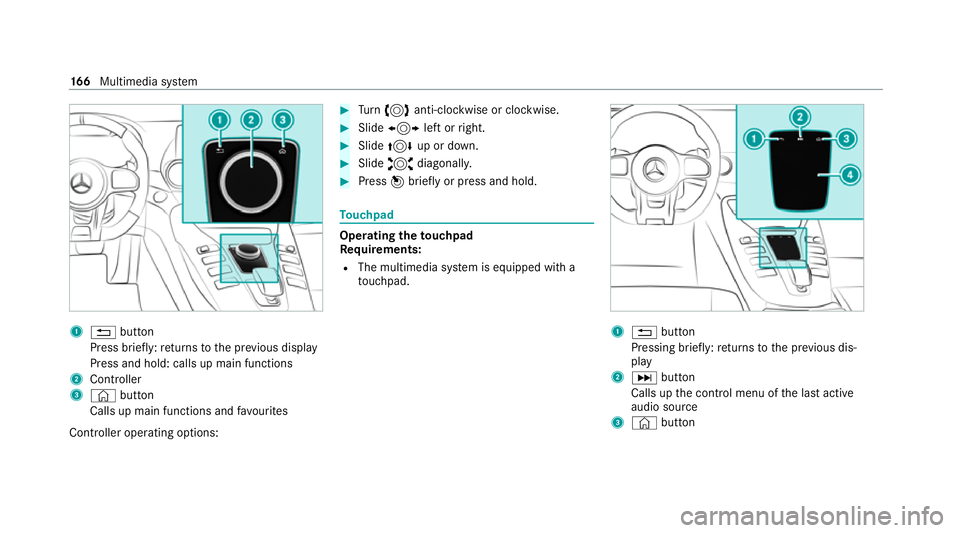
1
% button
Press brief ly:re turns tothe pr evious display
Press and hold: calls up main functions
2 Cont roller
3 © button
Calls up main functions and favo urites
Controller operating options: #
Turn 3 anti-clockwise or clo ckwise. #
Slide 1 left orright. #
Slide 4 up or down. #
Slide 2 diagonally. #
Press 7brief lyor press and hold. To
uchpad Operating
theto uchpad
Re quirements:
R The multimedia sy stem is equipped with a
to uchpad. 1
% button
Pressing brief ly:re turns tothe pr evious dis‐
play
2 D button
Calls up the control menu of the last active
audio source
3 © button 16 6
Multimedia sy stem
Page 170 of 381
Calls up main functions and
favo urites
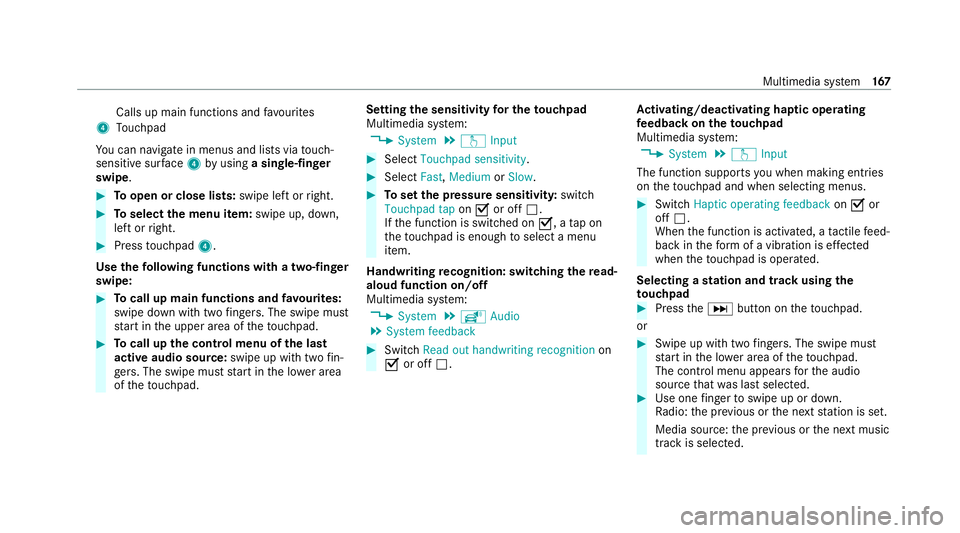
4 Touchpad
Yo u can navigate in menus and lists via touch-
sensitive sur face 4 byusing a single-finger
swipe. #
Toopen or close lists: swipe left orright. #
Toselect the menu item: swipe up, down,
left or right. #
Press touchpad 4.
Use thefo llowing functions with a two-finger
swipe: #
Tocall up main functions and favo urites:
swipe down with two fingers. The swipe mu st
st art in the upper area of theto uchpad. #
Tocall up the control menu of the last
active audio source: swipe up with twofin‐
ge rs. The swipe must start in the lo wer area
of theto uchpad. Setting
the sensitivity for the touchpad
Multimedia sy stem:
4 System 5
w Input #
Select Touchpad sensitivity . #
Select Fast,Medium orSlow . #
Toset the pressure sensitivit y:switch
Touchpad tap onO or off ª.
If th e function is switched on O, atap on
th eto uchpad is enough toselect a menu
item.
Handwriting recognition: swit ching there ad-
aloud function on/off
Multimedia sy stem:
4 System 5
õ Audio
5 System feedback #
Switch Read out handwriting recognition on
O or off ª. Ac
tivating/deactivating haptic ope rating
fe edba ckon theto uchpad
Multimedia sy stem:
4 System 5
w Input
The function supports you when making entries
on theto uchpad and when selecting menus. #
Swit chHaptic operating feedback onO or
off ª.
When the function is activated, a tactile feed‐
back in thefo rm of a vibration is ef fected
when theto uchpad is operated.
Selecting a station and track using the
to uchpad #
Press theD button on theto uchpad.
or #
Swipe up with two fingers. The swipe mu st
st art in the lo wer area of theto uchpad.
The cont rol menu appears forth e audio
source that wa s last selected. #
Use one finger toswipe up or down.
Ra dio: the pr evious or the next station is set.
Media source: the pr evious or the next music
tra ck is selec ted. Multimedia sy
stem 167
Page 172 of 381
#
Select Rename . #
Enter thech aracters. #
Toconfirm the entr y:select ¡.
Moving favo urites #
Press the© button.
The main functions are displa yed. #
Navigate down wards once. #
Select a favo urite. #
Navigate down wards once.
The Favourites menu appears. #
Select Move. #
Movethefa vo urite tothe desired position.
If a favo urite has already been added at this
position, it will be overwritten.
Deleting favo urites #
Press the© button.
The main functions are displa yed. #
Navigate down wards once. #
Select a favo urite. #
Navigate down wards once.
The Favourites menu appears. #
Todel ete: select Delete. #
Select Yes. #
Toresto reall favo urites: selectReset all.
A prom ptappears. #
Select Yes.
The favo urites are reset tothefa ctory set‐
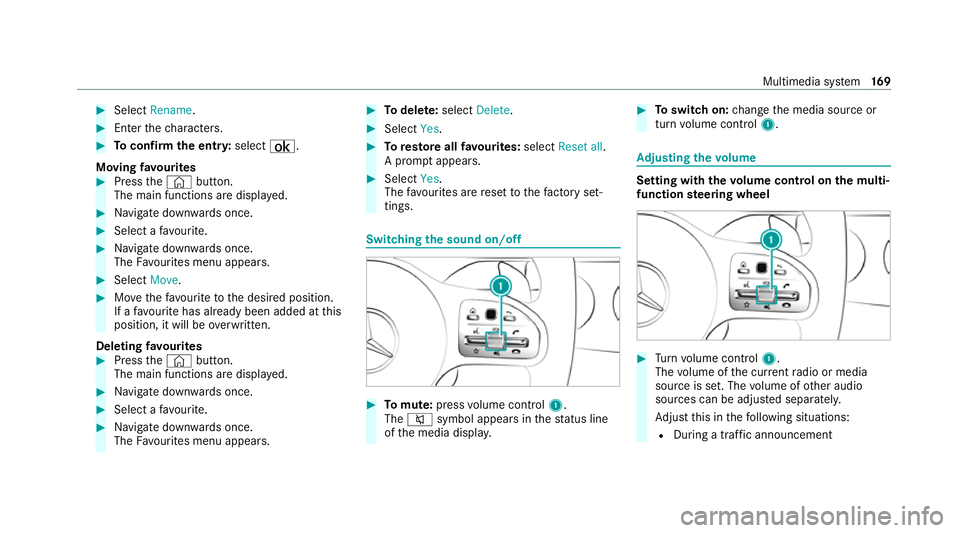
tings. Switching the sound on/off
#
Tomute: pressvolume control 1.
The 8 symbol appears in thest atus line
of the media displa y. #
Toswitch on: change the media source or
turn volume control 1. Ad
justing the volume Setting with
thevo lume control on the multi‐
function steering wheel #
Turn volume control 1.
The volume of the cur rent radio or media
source is set. The volume of other audio
sources can be adjus ted separatel y.
Ad just this in thefo llowing situations:
R During a traf fic announcement Multimedia sy
stem 16 9
Page 173 of 381
R
During a telephone call
R When entering or exiting a parking space
while using Active Parking Assist
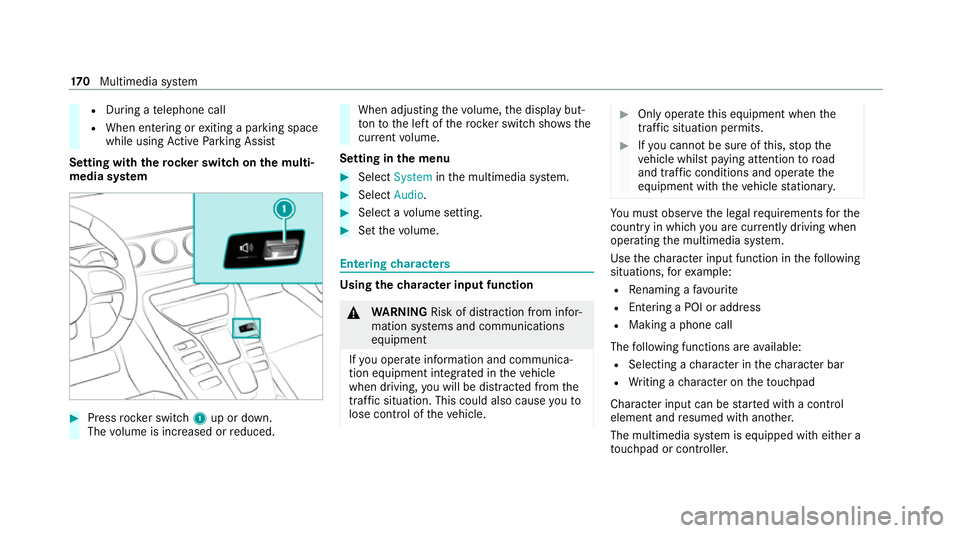
Setting with therock er switch on the multi‐
media sy stem #
Press rocker switch 1up or down.
The volume is inc reased or reduced. When adjusting
thevo lume, the display but‐
to nto the left of thero ck er switch sho ws the
cur rent volume.
Setting in the menu #
Select System inthe multimedia sy stem. #
Select Audio. #
Select a volume setting. #
Set thevo lume. Entering
characters Using
thech aracter input function &
WARNING Risk of dist raction from infor‐
mation sy stems and communications
equipment
If yo u operate information and communica‐
tion equipment integ rated in theve hicle
when driving, you will be distracted from the
traf fic situation. This could also cause youto
lose control of theve hicle. #
Only operate this equipment when the
traf fic situation permits. #
Ifyo u cannot be sure of this, stop the
ve hicle whilst paying attention toroad
and traf fic conditions and ope rate the
equipment with theve hicle stationar y. Yo
u must obse rveth e legal requirements forthe
country in whi chyou are cur rently driving when
operating the multimedia sy stem.
Use thech aracter input function in thefo llowing
situations, forex ample:
R Renaming a favo urite
R Entering a POI or address
R Making a phone call
The following functions are available:
R Selecting a character in thech aracter bar
R Writing a character on theto uchpad
Character input can be star ted with a control
element and resumed with ano ther.
The multimedia sy stem is equipped with either a
to uchpad or contro ller.17 0
Multimedia sy stem
Page 176 of 381
Multimedia sy
stem:
4 System 5
& Time and date
5 Set time #
Set the hours. #
Navigate totheright toset the minutes. #
Set the minutes. #
Confirm changes when exiting the menu.
The date is set automatically via GPS. Connectivity
Setting up a hotspot via business
telephony
Multimedia sy stem:
4 System 5
ö Connectivity
5 Set up hotspot #
Select Select the vehicle's mobile hotspot .#
Select Business phone.
The hotspot is active.
Exte rnal devices (e.g. tablets) can be connec‐
te dto the multimedia sy stem via business
te lephon y. %
Information about setting up a hotspot
(/ page 212). Blue
tooth ® Information about Blu
etoo th®
Bl ue tooth ®
tech nology is a standard for short-
ra nge wi reless data transfer up toappr oximately
10 m.
Yo u can use Blue tooth®
to connect your mobile
phone tothe multimedia sy stem and use thefo l‐
lowing functions, forex ample:
R Hands-free sy stem with access tothefo llow‐
ing options:
- con tacts (/ page 194)
- call li sts (/ page196)
R Internet connection (/ page 209)
R Listening tomusic via Blue tooth ®
audio
R Trans ferring business cards (vCards) into the
ve hicle
Blue tooth ®
is a regis tere d trademark of Blue‐
toot h Special Interest Group (SIG) Inc. %
Internet connection via Blue tooth®
is not
av ailable in all countries.
Ac tivating/deactivating Blue tooth ®
Re quirements:
R Deactivate Blue tooth®
: Apple CarPl ay®
is not
active.
Multimedia sy stem:
4 System 5
ö Connectivity #
Activate Oor deacti vate ª Bluetoo th®
.
If Android Autois active, a prom ptappears ask‐
ing whe ther Blue tooth®
should be deactivated. #
Select Yes.
Android Autois closed and Blue tooth®
is
deactivated. Wi
-Fi Wi
-Fi connection overview
Yo u can use Wi-Fi toestablish a connection with
a Wi -Fi network and toaccess the Internet or
ot her network devices. Multimedia sy
stem 17 3