2020 MERCEDES-BENZ AMG GT ROADSTER USB
[x] Cancel search: USBPage 33 of 381
In
general, this information documents thest ate
of a component part, a module, a sy stem or the
sur roundings such as:
R operating status of sy stem components (e.g.
fi ll le vels, battery status, tyre pressure)
R status messages concerning theve hicle or
its individual components (e.g. number of
wheel revo lutions/speed, longitudinal accel‐
eration, lateral acceleration, display of fas‐
te ned seat belts)
R malfunctions or faults in impor tant sy stem
components (e.g. lights, brakes)
R information on events leading tovehicle
damage
R system reactions in special driving situations
(e.g. airbag deployment, inter vention of sta‐
bility control sy stems)
R ambient conditions (e.g. temp erature, rain
sensor)
In addition toprov iding the actual control unit
function, this data assists the manufacturer in
de tecting and rectifying faults and optimising
ve hicle functions. The majority of this data is te
mp orary and is only processed in theve hicle
itself. Only a small portion of the data is stored
in theeve nt or fault memor y.
When your vehicle is serviced, tech nical da ta
from theve hicle can be read out byservice net‐
wo rkemplo yees (e.g. workshops, manufactur‐
ers) or third parties (e.g. breakdown services).
Services include, forex ample, repair services,
maintenance processes, warranty claims and
qu ality assurance measures. The read out is per‐
fo rm ed via the legally prescribed port forthe
diagnostics connection in theve hicle. The
re spective service network locations or third
parties collect, process and use the data. They
document tech nical statuses of theve hicle,
assist in finding faults and impr oving quality and
are transmitted tothe manufacturer, if neces‐
sar y.Fu rthermore, the manufacturer is subject
to product liability. Forth is, the manufacturer
requ irestech nical da tafrom vehicles.
Fa ult memories in theve hicle can be reset by a
service outlet as part of repair or maintenance
wo rk. Depending on
the selected equipment, you can
import data into vehicle con venience and info‐
ta inment functions yourself.
This includes, forex ample:
R multimedia data such as music, films or pho‐
to sfo r playback in an integrated multimedia
sy stem
R address book data for use in connection with
an integrated hands-free sy stem or an inte‐
grated navigation sy stem
R entered navigation destinations
R data about the use of internet services
This data can be sa ved locally in theve hicle or it
is located on a device which you ha veconnected
to theve hicle (e.g. a smartphone, USB flash
drive or MP3 pla yer). If this data is stored in the
ve hicle, you can dele teit at any time. This data
is sent tothird parties only at your requ est, par‐
ticular lywhen you use online services in accord‐
ance with the settings that you ha veselected.
Yo u can store or change con venience settings/
individualisations in theve hicle at any time. 30
General no tes
Page 92 of 381
R
always place the load behind unoccupied
seats if possible.
R secure the load with suf ficiently tear-resist‐
ant and wear-resis tant lashing ma terial. Pad
sharp edges for pr otection. St
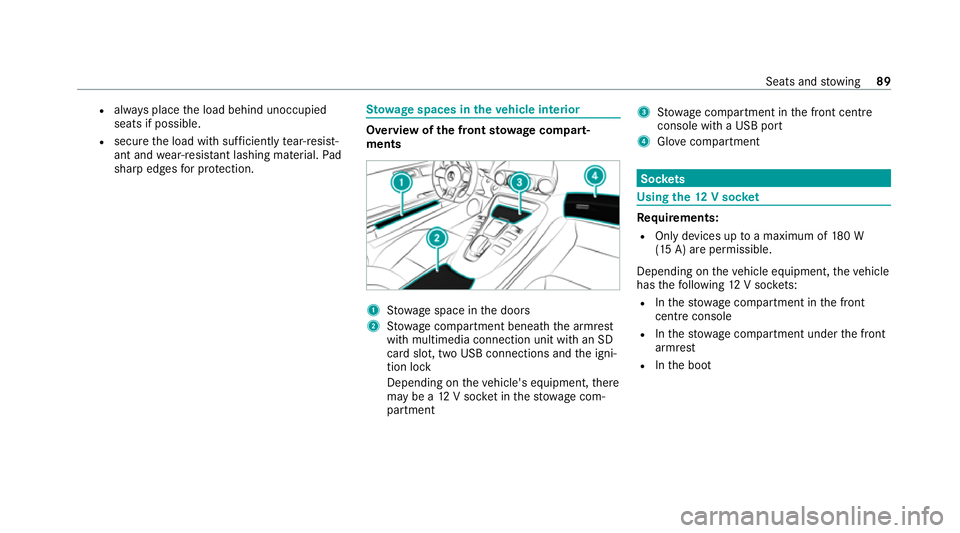
ow age spaces in theve hicle interior Overview of
the front stowage compa rt‐
ments 1
Stow age space in the doors
2 Stow age compartment beneath the armrest
with multimedia connection unit with an SD
card slot, two USB connections and the igni‐
tion lock
Depending on theve hicle's equipment, there
may be a 12V soc ket in thestow age com‐
partment 3
Stow age compartment in the front cent re
console with a USB port
4 Glovecompa rtment Soc
kets Using the
12V so cket Re
quirements:
R Only devices up toa maximum of 180 W
(15 A) are permissible.
Depending on theve hicle equipment, theve hicle
has thefo llowing 12V soc kets:
R Inthestow age compartment in the front
cent reconsole
R Inthestow age compartment under the front
armrest
R Inthe boot Seats and
stowing 89
Page 179 of 381
Genera
ting a new security key: #
Select Set up hotspot .#
Select Generate security key .
A connection will be es tablished with the
newly crea ted security key. #
Tosave a security key:select Save.
When a new security key is sa ved, all existing
Wi -Fi connections are then disconnected. If
th eWi -Fi connections are being re-es tab‐
lished, the new security key must be ente red. Sy
stem language Note
s onthe sy stem language
This function allo wsyouto determ ine the lan‐
guage forth e menu displa ys. The selected lan‐
guage af fects thech aracters available for entr y.
Setting the sy stem language
Multimedia sy stem:
4 System 5
Language #
Set the language. Setting
the distance unit Multimedia sy
stem:
4 System 5
% Units #
Select kmormi. #
Inthe multifunction display of the Instrument
Displa y,switch theAdditional speedometer
display on O. Data import and
export Data import/export function
The
following functions are possible:
R Trans ferring data from one sy stem or vehicle
to ano ther sy stem or vehicle.
R Creating a bac kup copy of your personal data
and loading it again.
R Protecting your personal data against un wan‐
te dex port with PIN pr otection.
% Please no tethat the NTFS file sy stem is not
suppor ted. The FAT32 file sy stem is recom‐
mended. Importing/exporting data
* NO
TELoss of da tadue topremature
re mo val #
Do not remo vethe data storage
medium when data is being expor ted.
Mercedes-Benz is not liable for any loss of
data. Re
quirements:
R The vehicle is stationar y.
R The ignition is switched on or theve hicle has
been star ted.
R The SD card is inser ted (/ page217) or the
USB device is connecte d (/page219).
Mul timedia sy stem:
4 System 5
System backup #
Select Import data orExport data.
Importing #
Select a data storage medium.
A prom ptappears asking whe ther youre ally
wish to overwrite the cur rent da ta. If da ta 176
Multimedia sy stem
Page 185 of 381
R
Date
R Weather #
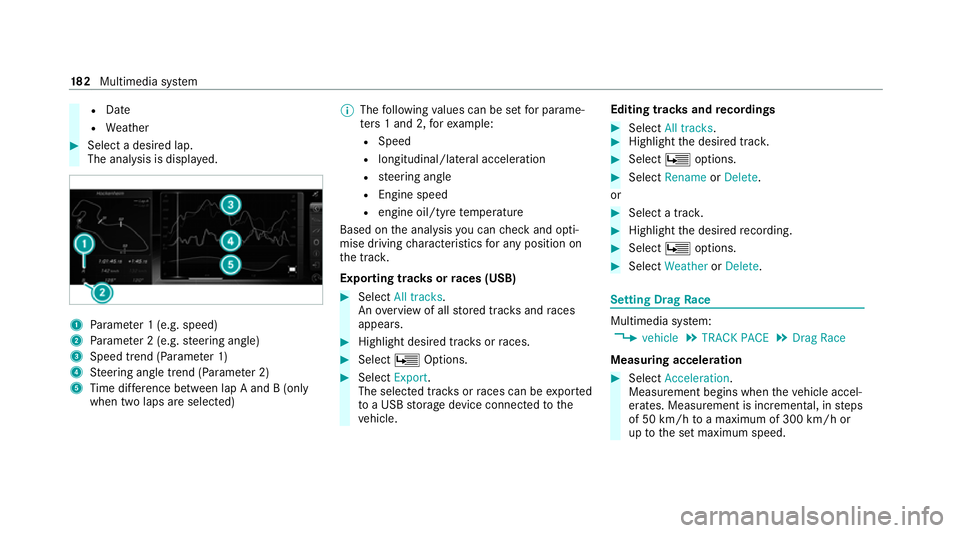
Select a desired lap.
The anal ysis is displa yed. 1
Parame ter 1 (e.g. speed)
2 Parame ter 2 (e.g. steering angle)
3 Speed trend (Parame ter 1)
4 Steering angle trend (Parame ter 2)
5 Time dif fere nce between lap A and B (only
when two laps are selected) %
The following values can be set for parame‐
te rs 1 and 2, forex ample:
R Speed
R longitudinal/lateral acceleration
R steering angle
R Engine speed
R engine oil/tyre temp erature
Based on the anal ysis yo u can check and opti‐
mise driving characteristics for any position on
th e tra ck.
Exporting trac ksorraces (USB) #
Select All tracks.
An ove rview of all stored trac ksand races
appea rs. #
Highlight desired trac ksorraces. #
Select ÜOptions. #
Select Export.
The selected trac ksorraces can be expor ted
to a USB storage device connected tothe
ve hicle. Editing trac
ksand recordings #
Select All tracks. #
Highlight the desired trac k. #
Select Üoptions. #
Select Rename orDelete.
or #
Select a trac k. #
Highlight the desired recording. #
Select Üoptions. #
Select Weather orDelete. Setting Drag
Race Multimedia sy
stem:
4 vehicle 5
TRACK PACE 5
Drag Race
Measuring acceleration #
Select Acceleration.
Measurement begins when theve hicle accel‐
erates. Measurement is incremental, in steps
of 50 km/h toa maximum of 300 km/h or
up tothe set maximum speed. 18 2
Multimedia sy stem
Page 198 of 381
Calling up contacts
Multimedia sy
stem:
4 Telephone 5
ª Contacts
Depending on thech aracter set, thefo llowing
options can be used tosear chfor contacts:
R sear ching byinitials
R sear ching byname
R searching byphone number #
Ente rch aracters into the sear chfield.
A selection of possible conta cts appears.
Entering more characters into the sear ch
fi eld nar rows down the number of possible
selections. #
Select the conta ct.
A contact can contain thefo llowing de tails:
R phone numbers
R geo-coordinates
R Internet address Editing
thefo rm at of a contact's name
Multimedia sy stem:
4 Telephone 5
Z Options 5
Contacts
5 Name format
The following options are available:
R Surname, first name
R Surname First name
R First name Surname #
Select an option.
Overview of importing contacts
Contacts from various sources Source
Requirements:
ò Memory car dThe SD memory card
is inser ted.
ò USB device The USB device is
inserted in the USB
port. Source
Requirements:
ñ Bluetooth ®
con‐
nection Blu
etoo th®
is activa‐
te d in the multimedia
sy stem and on the
re spective device
(see the manufactur‐
er's operating instruc‐
tions).
ó Mobile phone The mobile phone is
connectedtothe mul‐
timedia sy stem. %
Ifth e sending of vCards via Blue tooth®
is
suppor ted, vCards can be recei ved on
mobile phones or netbooks, forex ample.
Importing contacts into the contacts menu
Multimedia sy stem:
4 Telephone 5
Z Options 5
Contacts #
Select Import. #
Select an option. Multimedia sy
stem 19 5
Page 201 of 381
#
Todel ete a text message: selectDelete. Mercedes-Benz link
Overview of Mercedes-Benz Link
&
WARNING Risk of dist raction from infor‐
mation sy stems and communications
equipment
If yo u operate information and communica‐
tion equipment integ rated in theve hicle
when driving, you will be distracted from the
traf fic situation. This could also cause youto
lose control of theve hicle. #
Only operate this equipment when the
traf fic situation permits. #
Ifyo u cannot be sure of this, stop the
ve hicle whilst paying attention toroad
and traf fic conditions and ope rate the
equipment with theve hicle stationar y. Using Mercedes-Benz Link,
various functions
and selected mobile phone apps can be transfer‐
re dto the media displa y. The Mercedes-Benz Link contro
l box supplemen‐
ta ry equipment is requiredforth is. You can
obtain this at a Mercedes-Benz Service Cent re.
% The Mercedes-Benz Link contro l box uses
th e Android operating sy stem.
% The service pr ovider is responsible forth ese
apps and the services and conte nt connec‐
te dto it.
Connecting Mercedes-Benz Link with the
mu ltimedia sy stem #
Connect the Mercedes-Benz Link control box
with theç USB port of the multimedia
connection unit using a suitable connecting
cable.
% A suitable connecting cable is available sep‐
arately at a Mercedes-Benz Service Cent re.
Using Mercedes-Benz Link
Re quirements:
R The Mercedes-Benz Link control box is con‐
nec ted with the multimedia sy stem using the
ç USB port. Multimedia sy
stem:
4 Connect 5
Mercedes-Benz Link #
Select MB Link.
The mobile phone functions and apps are
av ailable and shown on the media displa y.
Yo u can find more information in the Mercedes-
Benz Link control box operating instructions.
Ending Mercedes-Benz Link
Multimedia sy stem:
4 Connect 5
Mercedes-Benz Link #
Select Disconnect.
The connection is ended.
The mobile phone continues tobe supplied
with elect ricity.
or #
Disconnect the connecting cable between
th e Mercedes-Benz Link control box and the
multimedia sy stem.
% Mercedes-Benz recommends disconnecting
th e connecting cable only when theve hicle
is stationar y. 19 8
Multimedia sy stem
Page 202 of 381
Apple CarPlay
® Overview of Apple CarPlay
®&
WARNING Risk of dist raction from infor‐
mation sy stems and communications
equipment
If yo u operate information and communica‐
tion equipment integ rated in theve hicle
when driving, you will be distracted from the
traf fic situation. This could also cause youto
lose control of theve hicle. #
Only operate this equipment when the
traf fic situation permits. #
Ifyo u cannot be sure of this, stop the
ve hicle whilst paying attention toroad
and traf fic conditions and ope rate the
equipment with theve hicle stationar y. Yo
u must obse rveth e legal requirements forthe
country in whi chyou are cur rently driving when
operating the multimedia sy stem.
iPhone ®
functions can be used via the multime‐
dia sy stem using Apple CarPlay ®
. They are oper‐
ated using the cent ral control element or theSiri
®
vo ice-operated control sy stem. You can
activate thevo ice-operated control sy stem by
pressing and holding theó button on the
multifunction steering wheel.
Only one mobile phone at a time can be connec‐
te d via Apple CarPlay ®
to the multimedia sys‐
te m.
The availability of Apple CarPlay ®
may vary
according tothe count ry.
The service pr ovider is responsible forth is appli‐
cation and the services and conte nt connected
to it.
Apple CarPlay ®
is a regis tere d trademark of
Apple Inc.
Information on Apple CarPlay ®
While using Apple CarPlay ®
va rious functions of
th e multimedia sy stem, e.g. telephony or the
media sources Blue tooth ®
audio and iPod ®
, are
una vailable.
Only one route guidance can be active at a time.
If ro ute guidance is active on the multimedia sys‐
te m, it is closed when route guidance is star ted
on the mobile phone. Connecting an iPhone
®
via Apple CarPlay ®
Re quirements:
R Apple ®
operating sy stem version iOS 8.3 or
abo veis ins talled on the iPhone ®
.
R An Internet connection is requiredforth e full
ra nge of functions for Apple CarPlay ®
.
R The iPhone ®
is connected tothe multimedia
sy stem via the USB port çusing a suita‐
ble cable (/ page219).
Mul timedia sy stem:
4 Connect 5
Apple CarPlay
Setting automatic or manual start
A messa geappears when connec tedfo rth efirst
time. #
Automatic star t:select Automatically.
Start automatically is activatedO.
Apple CarPlay ®
will now start immediately
af te rth e iPhone ®
is connected tothe multi‐
media sy stem using a USB cable. #
Manual star t:select Manually . #
Select the iPhone ®
in the device list. Multimedia sy
stem 19 9
Page 204 of 381
The service pr
ovider is responsible forth is appli‐
cation and the services and conte nt connected
to it.
Information on Android Auto
While using Android Auto,va rious functions of
th e multimedia sy stem, forex ample the media
source Blue tooth®
audio, are not available.
On lyone route guidance can be active at a time.
If ro ute guidance is active on the multimedia sys‐
te m, it is closed when route guidance is star ted
on the mobile phone.
Connecting a mobile phone via Android Auto
Requ irements:
R The firs t acti vation of Android Autoon the
multimedia sy stem must be car ried out when
th eve hicle is stationary for saf etyre asons.
R The mobile phone suppo rts Android Auto
from Android 5.0.
R The Android Autoapp is ins talled on the
mobile phone.
R In order touse thete lephone functions, the
mobile phone must be connected tothe mul‐
timedia sy stem via Blue tooth®
(/ page 187). If
th ere was no prior Internet connection, this
is es tablished with the use of the mobile
phone with Android Auto.
R The mobile phone is connected tothe multi‐
media sy stem via the USB port çusing a
suitable cable (/ page219).
R An Internet connection is requiredforth e full
ra nge of functions for Android Auto.
Multimedia sy stem:
4 Connect 5
Android Auto #
Select the mobile phone from the device list.
Ac cepting/rejecting the data pr otection reg‐
ulations
A message with the data pr otection regulations
appears. #
Select Accept & Start .
or #
Select Decline & End.
Ac tivating automatic start #
Select Start automatically O. St
arting manually #
Select the mobile phone from the device list.
Exiting Android Auto #
Press theò button on the multifunction
st eering wheel, forex ample.
% If Android Autowa s not displa yed in thefo re‐
ground before disconnecting, the application
st arts in the bac kground when reconnected.
Yo u can call up Android Autointhe main
menu.
Calling up the Android Autosound settings
Multimedia sy stem:
4 Connect 5
Android Auto 5
Sound #
Select theto ne menu (/ page 228).
Ending Android Auto
Multimedia sy stem:
4 Connect 5
Android Auto #
Select Disconnect.
The connection is ended.
The mobile phone continues tobe supplied
with elect ricity. Multimedia sy
stem 201