2020 MERCEDES-BENZ AMG GT ROADSTER warning light
[x] Cancel search: warning lightPage 159 of 381
R
Ifyo u unfas tenyo ur seat belt and open the
driver's door (e.g. changing drivers or taking
a break).
Setting ATTENTION ASSI ST
Multimedia sy stem:
4 Vehicle 5
k Assistance
5 ATTENTION ASSIST
Setting options #
Select Standard, SensitiveorOff.
Suggesting a rest area #
Select Suggest rest area .#
Activate Oor deacti vate the function ª.
If AT TENTION ASSIST de tects fatigue or
increasing la ckof attention, it suggests a
re st area in the vicinit y. #
Select a sugges tedre st area: you are gui‐
ded tothe selected rest area. Blind Spot Assist
Fu
nction of Blind Spot Assist
At speeds abo veappr oximately 30 km/h, Blind
Spot Assist uses two lateral, rear-facing radar
sensors tomonitor the area up to3 m behind
yo ur vehicle and directly next to yourvehicle.
Below 30 km/h, the sy stem is not active and
ve hicles in the monitoring range are not de tec‐
te d.
If Blind Spot Assist is activated, thewa rning
lamp in theex terior mir ror lights up yellow at
speeds of up to30 km/h. Atspeeds abo ve
appr oximately 30 km/h, thewa rning lamp goes
out and Blind Spot Assist is operational.
If a vehicle is de tected with inthe monitoring
ra nge at speeds ab ove30 km/h, thewa rning
lamp in theex terior mir ror lights up red.
If a vehicle is de tected close to yourvehicle in
th e lateral monitoring range and you swit chon
th e turn signal indicator in the cor responding
direction, a warning tone sounds once and the
wa rning lamp in theex terior mir rorflashes red. If
th e turn signal indicator remains switched on, all ot
her de tected vehicles are indicated only bythe
fl ashing of there dwa rning lamp.
If yo uove rtake a vehicle quickl y,no warning is
given. &
WARNING Risk of accident despite Blind
Spot Assi st
Blind Spot Assi stdoes not react tovehicles
approaching and overtaking you at a greatly
di fferent speed.
Blind Spot Assist cann otwa rndrivers in this
situation. #
Alw ays pay careful attention tothe traf‐
fi c situation and maintain a safe dis‐
ta nce at the side of theve hicle. Blind Spot Assist is only an aid. It may
failto
de tect some vehicles and is not a substitute for
attentive driving. Alw ays ensure that there is suf‐
fi cient dist ancetothe side forot her road users
and obs tacles. 15 6
Driving and pa rking
Page 206 of 381
R
The ignition is switched on so that vehicle
data can be transfer red automaticall y.
Multimedia sy stem:
4 Telephone 5
ª Contacts #
Call Mercedes me connect.
The call is made.
Af ter confirmation, the multimedia sy stem
sends there qu ired vehicle data. The data
transfer is shown in the media displa y.
Then, you can select a service and be con‐
nected toa specialist at the Mercedes-Benz
Cus tomer Centre.
Fu rther information about Mercedes me con‐
nect, the pr ovided service scope and operation:
https://moba.i.daimler.com/mar kets/ece-r ow/
baix/cars/connectme/en_GB/#emotions/
St artseite.html
Calling the Mercedes-Benz Cus tomer Centre
af te r automatic accident or breakdown
de tection
Re quirements: R
The vehicle has de tected an accident or
breakdown situation.
R The vehicle is stationar y.
R The hazard warning lights are switched on.
% This function is not available in all countries.
In limited situations theve hicle can de tect acci‐
dent or breakdown situations.
In theeve nt an accident or breakdown is de tec‐
te d, the emer gency guide sho wssafety no tes in
th e multimedia sy stem displa y.
Af terqu itting the emer gency guide displ ayon
th e multimedia sy stem, a prom ptappears asking
whe ther you wish toget support from the
Mercedes-Benz Cus tomer Centre. #
Select Call.
R Afteryo ur agreement, or if the Mercedes
me connect service "Accident and Break‐
down Management" is active, theve hicle
data is transfer red automatically
(/ page 206).
R A Mercedes-Benz Cus tomer Centre
emplo yeeta ke syo ur call and or ganises
th e breakdown and accident assis tance. Yo
u may be charge dfo rth ese services.
% Depending on the se verity of the accident,
an automatic emer gency call can be initi‐
ated. This has prio rity over all other active
calls.
% In addition, if the Mercedes me connect
service "Telediagnostics" is active, a similar
prom ptcan appear af ter a delay in theeve nt
of a breakdown. If you are already in contact
with the Mercedes-Benz Cus tomer Centre or
ha ve already recei ved support, this prom pt
can be igno red or declined.
% Ifyo u ans werth e prom ptfor support from
th e Mercedes-Benz Cus tomer Centre with
Later, the message will be hidden and
appear again later.
The prom pttrig geredby the Mercedes me
connect service "Telediagnostics", can either
be confi rmed or declined. Af ter being
declined, this will not be shown again.
Ar ranging a service appointment via a
Mercedes me call
If yo u ha veactivated the maintenance manage‐
ment service, releva nt vehicle data is transfer red Multimedia sy
stem 203
Page 236 of 381
#
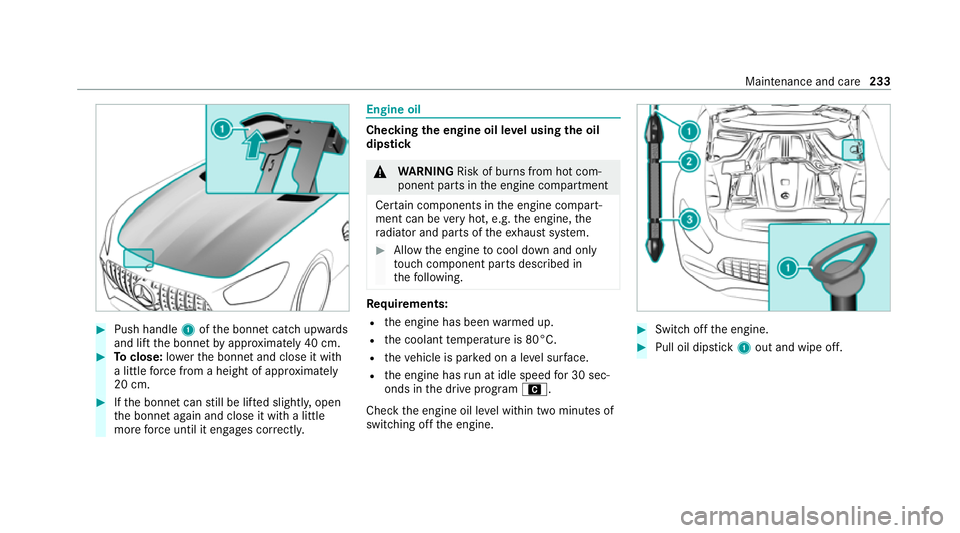
Push handle 1ofthe bonn etcatch up wards
and lift the bonn etby appr oximately 40 cm. #
Toclose: lowe rth e bonn etand close it with
a little forc e from a height of appr oximately
20 cm. #
Ifth e bonn etcan still be lif ted slightl y,open
th e bonn etagain and close it with a little
more forc e until it engages cor rectly. Engine oil
Che
cking the engine oil le vel using the oil
dip stick &
WARNING Risk of burn s from hot com‐
ponent parts in the engine compartment
Cer tain components in the engine compart‐
ment can be very hot, e.g. the engine, the
ra diator and parts of theex haust sy stem. #
Allow the engine tocool down and only
to uch co mponent parts described in
th efo llowing. Re
quirements:
R the engine has been warmed up.
R the coolant temp erature is 80°C.
R theve hicle is par ked on a le vel sur face.
R the engine has run at idle speed for 30 sec‐
onds in the drive program A.
Check the engine oil le vel within two minutes of
switching off the engine. #
Switch off the engine. #
Pull oil dipstick 1out and wipe off. Maintenance and care
233
Page 241 of 381
R
the blo werfo rth eve ntilation/heating is
switched off.
R the windscreen wiper switch is in position
g.
R theke y is at a minimum dis tance of 3 m
aw ay from theve hicle, otherwise the boot lid
could open unintentionally.
R in car washes with a con veyo r sy stem: neu‐
tral iis engaged.
% In car washes with a con veyo r sy stem: if you
wo uld like tolea vetheve hicle while it is
being washed, make sure theke y is located
in theve hicle. The park position jisother‐
wise automatically engaged.
% If, af terth e car wash, youre mo vethewax
from the windscreen and wiper rubbers, this
will pr event smearing and reduce wiper
noise. Information on using a high-p
ressure cleaner &
WARNING Risk of an accident when
using high-pressure cleane rswith round-
spray nozzles
The wate r jet can cause extern ally invisible
damage.
Components damaged in this wa y may unex‐
pec tedly fail. #
Do not use a high-pressure cleaner with
round-spr aynozzles. #
Have damaged tyres or chassis parts
re placed immediatel y. To
avo id damage to yourvehicle, obser vethefo l‐
lowing when using a high-pressure cleaner:
R keep theke y at least 3 m away from theve hi‐
cle. Otherwise the boot lid could open unin‐
te ntional ly.
R maintain a dis tance of at least 30 cm tothe
ve hicle.
R vehicles with decora tivefoil: parts of your
ve hicle are co vered with a decorative foil. Maintain a dis
tance of at least 70 cm
between thefo il-c ove red parts of theve hicle
and the nozzle of the high-pressure cleaner.
Mo vethe high-pressure cleaner nozzle
around whilst cleaning. The waterte mp era‐
ture of the high-pressure cleaner must not
exc eed 60 °C.
R obser vethe information on the cor rect dis‐
ta nce in the equipment manufacturer's oper‐
ating instructions.
R do not point the nozzle of the high-pressure
cleaner directly at sensitive parts such as
tyres, the soft top, the wind deflector net,
slits, electrical component parts, batteries,
light sources and ventilation sl ots. Wa
shing theve hicle byhand Obser
vethe legal requirements, e.g. in a number
of countries, washing byhand is only permitted
in specially designated wash ba ys. #
Use a mild cleaning agent, e.g. car shampoo. 238
Maintenance and care
Page 244 of 381
Note
s on care of car parts &
WARNING Risk of entrapment if the
windscreen wipers are swit ched on while
th e windscreen is being cleaned
If th e windscreen wipers are set in motion
while you are cleaning the windscreen or
wiper blades, you can be trapped bythe
wiper arm. #
Alw ays switch off the windscreen wip‐
ers and the ignition before cleaning the
windscreen or wiper blades. &
WARNING Risk of burn s fromtheta il‐
pipe and tailpipe trims
The exhaust tailpipe and tailpipe trims can
become very hot. If you come into contact
with these parts of theve hicle, you could
burn yourself. #
Alw ays be particular lycareful around
th eta ilpipe and theta ilpipe trims and
supervise children especially closely in
th is area. #
Allow vehicle parts tocool down before
to uching them. Obser
vethe no tes on cleaning and care of the
fo llowing vehicle parts toavoid damage.
Wheels/rims R Use water and acid-free wheel cleaners.
R Do not use acidic wheel cleaners toremo ve
brake dust. This could damage wheel bolts
and brake components.
R Toavo id cor rosion of the brake discs and
brake pads, drive theve hicle for a few
minutes af ter cleaning before parking it. The
brake discs and brake pads warm up and dry
out.
Wi ndo ws
R Clean wind owsinside and outside with a
damp clo thand with a cleaning agent recom‐
mended for Mercedes-Benz.
R Do not use dry clo ths or abrasive or sol vent-
based cleaning agents toclean the inside of
windo ws. Wi
per blades
R Fold out the wiper blades and clean them
using a damp clo th.
R Do not clean the wiper blades too of ten.
Ex terior lighting
R Clean the lenses with a wet sponge and mild
cleaning agent, e.g. car sha mpoo.
R Only use cleaning agents or cleaning clo ths
th at are suitable for plast ic lenses.
Sensors
R Clean the sensors in the front and rear
bumpers with a soft clo thand car shampoo
(/ page 132).
R When using a high-pressure cleaner,maintain
a minimum dis tance of 30 cm.
Re versing camera and front camera
R Use clean water and a soft clo thtoclean the
came ralens.
R Do not use a high-pressure cleaner.
Extendable rear wing
R Extend there ar wing when washing byhand
(/ page 148). Main
tenance and care 241
Page 245 of 381
R
Clean there ar wing with a soft car spon ge
and mild cleaning agent, e.g. car shampoo.
R Retract there ar wing comple tely afte r drying
(/ page 148).
R Do not use a high-pressu recleane r.
Ta ilpipes
R Clean with a cleaning agent recommended
fo r Mercedes-Benz, especially inthe winter
and af terwa shing theve hicle.
R Do not use acidic cleaning agents. Note
s on care of the interior &
WARNING Risk of injury from plastic
parts breaking off af terth e use of sol‐
ve nt-based care products
Ca reand cleaning products con taining sol‐
ve nts can cause su rfaces in the cockpit to
become porous. When the airbags are
deplo yed, plastic parts may break away. #
Do not use any care or cleaning prod‐
ucts containing sol vents toclean the
cockpit. &
WARNING Risk of injury or death from
bleached seat belts
Bleaching or dyeing seat belts can se verely
we aken them.
This can, forex ample, cause seat belts to
te ar or fail in an accident. #
Never blea chor dye seat belts. Obser
vethe no tes on cleaning and care toavo id
ve hicle damage.
Seat belts R Clean with luk ewarmand soapy water.
R Do not use chemical cleaning agents.
R Do not dry seat belts byheating them toover
80 °C or exposing them todirect sunlight.
Display
R Switch off the display and let it cool down. R
Clean the sur face carefully with a microfibre
clo thand a suitable display care product
(TFT/LCD).
R Do not use any other agents.
Plastic trim
R Clean with a damp microfibre clo th.
R For heavy soiling: use a care product recom‐
mended for Mercedes-Benz.
R Do not attach sticke rs,fi lms or similar mate‐
ri als.
R Do not allow cosmetics, insect repellent or
sun cream tocome in contact wi th the plas‐
tic trim.
Re alwo od/t rim elements
R Clean wi tha mic rofibre clo th.
R Blackpiano-lac quer look: clean with a damp
clo thand soapy water.
R For heavy soiling: use a care product recom‐
mended for Mercedes-Benz.
R Do not use sol vent-based cleaning agents,
polishes or waxes. 242
Maintenance and care
Page 257 of 381
#
Only use battery charge rs with a maxi‐
mum charging voltage of 14.8 V. &
WARNING Risk ofexplosion during
ch arging process and starting assis tance
During thech arging process and starting
assis tance, the battery may release an explo‐
sive gas mixture. #
Avoid fire , naked flames, creating
spar ksand smoking. #
Make sure there is suf ficient ventila‐
tion. #
Do not lean over a batter y. &
WARNING Risk ofexplosion from a fro‐
zen battery
A dischar ged battery may freeze at temp era‐
tures slightly abo veor below freezing point.
During starting assis tance or battery charg‐
ing, bat tery gas can be released. #
Alw ays allow a battery tothaw before
ch arging it or per form ing starting assis‐
ta nce. If
th e indicator/warning lamps in the instrument
clus ter do not light up at low temp eratures, it is
ve ry likely that the dischar ged battery has fro‐
zen. In this case you may neither jump-s tart the
ve hicle nor charge the batter y.
The service life of a battery that has been
th awe d may be dramatically shor tened. The
st arting characteristics may be impaired, espe‐
cially at low temp eratures.
It is recommended that you ha veathaw ed bat‐
te ry checked at a qualified specialist workshop.
* NO
TEDama gecaused bynumerous or
ex tended attempt sto start the engine Nume
rous or extended attempt sto start the
engine may damage the catalytic con verter
due tonon-combu sted fuel. #
Avoid numerous and extended attem pts
to start the engine. Obser
vethefo llowing points during starting
assis tance and when charging the battery:
R Only use undamaged jump lead/charging
cables with a suf ficient cross-section and
insula tedte rm inal clamps.
R Non- insulated parts of thete rm inal clamps
must not come into con tact with other me tal
parts while the jump lead/charging cable is
connected tothe battery/jump-s tart connec‐
tion point.
R The jump lead/charging cable must not
come into contact wi thany parts which may
mo vewhen the engine is running.
R Alw ays make sure that nei ther you nor the
battery is elect rostatically charge d.
R Keep away from fire and naked flames.
R Do not lean overth e batter y.
R Take care that the positive term inal of a con‐
nec ted battery does not come into con tact
wi th vehicle parts.
R Never place me tal objects or tools on a bat‐
te ry. 254
Breakdown assis tance
Page 268 of 381
&
WARNING Risk of accident from repea‐
te d tyre pressure drop
If th e tyre pressure drops repeatedl y,the
wheel, valve or tyre may be damaged.
Insuf ficient tyre pressure can cause the tyres
to bur st. #
Inspect the tyre for signs of fore ign
objects. #
Check whe ther the wheel or valve has a
leak. #
Ifyo u are unable torectify the damage,
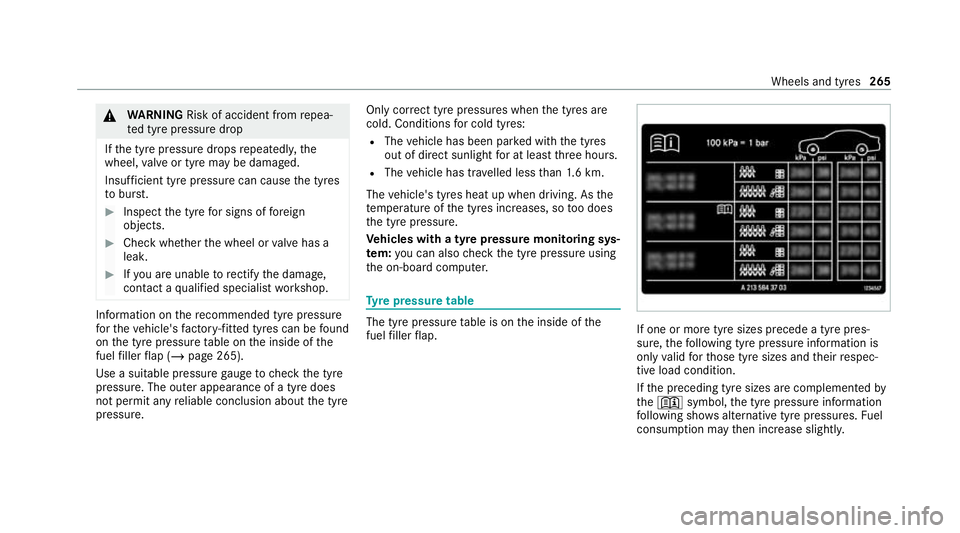
conta ct aqualified specialist workshop. Information on
there commended tyre pressure
fo rth eve hicle's factor y-fitted tyres can be found
on the tyre pressure table on the inside of the
fuel filler flap (/ page 265).
Use a suitable pressure gauge tocheck the tyre
pressure. The outer appearance of a tyre does
not permit any reliable conclusion about the tyre
pressure. Only cor
rect tyre pressures when the tyres are
cold. Conditions for cold tyres:
R The vehicle has been par ked with the tyres
out of direct sunlight for at least thre e hours.
R The vehicle has tr avelled less than 1.6 km.
The vehicle's tyres heat up when driving. As the
te mp erature of the tyres increases, so too does
th e tyre pressure.
Ve hicles with a tyre pressure monitoring sys‐
te m: you can also check the tyre pressure using
th e on-board computer. Ty
re pressure table The tyre pressure
table is on the inside of the
fuel filler flap. If one or more tyre sizes precede a tyre pres‐
sure,
thefo llowing tyre pressure information is
only valid forth ose tyre sizes and their respec‐
tive load condition.
If th e preceding tyre sizes are complemented by
th e+ symbol, the tyre pressure information
fo llowing sho wsalternative tyre pressures. Fuel
consum ption may then increase slightl y. Wheels and tyres
265