2020 MERCEDES-BENZ AMG GT R-ROADSTER oil
[x] Cancel search: oilPage 332 of 441

Note
s on inter changing wheels &
WARNING Risk of injury thro ugh dif fer‐
ent wheel sizes
Inter changing the front and rear wheels if the
wheels or tyres ha vediffere nt dimensions
may se verely impair the driving characteris‐
tics.
The disk brakes or wheel suspension compo‐
nents may also be damaged. #
Rotate front and rear wheels on lyifthe
wheels and tyres are of the same
dimensions. Inter
changing the front and rear wheels if the
wheels or tyres ha vediffere nt dimensions can
re nder thege neral operating pe rmit in valid.
The wear pat tern s on the front and rear wheels
dif fer:
R Front wheels wear more on the shoulder of
th e tyre
R Rear wheels wear more in the cent reofthe
tyre Do not drive wi
thtyres that ha vetoo little tread
dep th. This significantly reduces traction on wet
ro ads (aquaplaning).
On vehicles with the same front and rear wheel
size, you can inter change the wheels every
5,000 to10,000 km, depending on thewe ar.
Ensure the direction of rotation is maintained for
th e wheels.
Obser vethe instructions and saf ety no tes on
"Changing a wheel" when doing so
(/ page 330). Note
s onstoring wheels When
storing wheels, obser vethefo llowing
no tes:
R Afterre moving wheels, store them in a cool,
dry and preferably dark place.
R Protect the tyres from conta ct withoil,
grease or fuel. Overview of
the ty re-change tool kit Apart from some countr
y-specific variants, vehi‐
cles are not equipped with a tyre-change tool kit.
Fo r more information on which tyre-changing
to ols are required and appr oved for per form ing a
wheel change on your vehicle, consult a qualified
specialist workshop.
Re quired tyre-change tool kits may include, for
ex ample:
R Jack
R Chock
R Wheel wrench
R Cent ring pin
% The jack weighs appr oximately 1.2 kg.
The maximum load capacity of the jack can
be found on thest icke r af fixe dto the jac k.
The jack is maintenance-free. If there is a
malfunction, please conta ct aqualified spe‐
cialist workshop. Wheels and tyres
329
Page 337 of 441
#
Fitthe new wheel (/ page 334).Fi
tting a new wheel Re
quirements:
R The wheel is remo ved (/ page 333). &
WARNING Risk of accident from losing a
wheel
Oiled, greased or damaged wheel bolt/wheel
nut thre ads or wheel hub/wheel mounting
bolt thre ads can cause the wheel bolts/
wheel nuts tocome loose.
As a result, you could lose a wheel while driv‐
ing. #
Never oil or grease theth re ads. #
Intheeve nt of damage totheth re ads,
con tact a qualified specialist workshop
immediatel y. #
Have the damaged wheel bolts or dam‐
aged hub thre ads replaced. #
Do not continue driving. #
Obser vethe information on thech oice of
tyres (/ page 325).
Fo r tyres with a specified direction of rotation,
an ar row on the side wall of the tyre indicates
th e cor rect dire ction of rotation. Obse rvethe
direction of rotation when fitting.
* NO
TEDama getothe ceramic-brake disc
when changing a wheel Mercedes
-AMG vehicles with cera mic-
brake discs: during remo val and reposition‐
ing of the wheel, the wheel rim can strike the
ceramic-brake disk and damage it. #
Take particular care. #
Ask ano ther person for assi stance or
use a second centring pin. #
Slide the wheel tobe mounted onto the cen‐
tring pin and push it on. #
Notes on fitting an eme rgency spare wheel
(/ page 335). &
WARNING Risk of injury from tightening
wheel bolts and nuts
If yo u tighten the wheel bolts or wheel nuts
when theve hicle is raised, the jack could tip. #
Only tighten wheel bolts or wheel nuts
when theve hicle is on the ground. #
Be sure toobser vethe instructions and
saf ety no tes on "Changing a wheel"
(/ page 325). #
For saf etyre asons, only use wheel bolts
which ha vebeen appr ovedby Mercedes-
Benz and forth e wheel in question. #
Tighten the wheel bolts evenly in a diagonal
pattern in the order indicated until they are
fi nger-tight. #
Unscr ew the cent ring pin. #
Tighten the last wheel bolt until it is finger-
tight. #
Lowe rth eve hicle (/ page 335). 334
Wheels and tyres
Page 345 of 441
Ac
cording toEuropean standard EN 1694 2you
can find the compatibility indications at thefo l‐
lowing locations:
R ontheve hicle on the information label in the
fuel filler flap
R onthe fuel pump or pump nozzle suitable for
yo ur vehicle thro ughout Europe
The recommended octane number foryo ur vehi‐
cle can also be found on the information label in
th e fuel filler flap .
On lyrefuel using super-grade petrol with at least
98 RON if you wish toachie vemaximum engine
output. Alternatively, you can also refuel using
premium grade petrol with at lea st95 RON.
In exc eptional cases, if there commended fuel is
not available, you may also use regular unleaded
petrol with an octane number of at least 91RON.
This may reduce engine output and increase fuel
consum ption.
If only regular unleaded petrol with 91RON or
lo we r is permanently available toyou, you must
ta ke your vehicle toaqu alified specialist work‐
shop tohave it adap tedto this type of fuel. Ne
verre fuel using petrol with a lo werRO N.
Fu rther information on fuel can be obtained at a
fi lling station or a qualified specialist workshop.
Information on additives in petrol
Obser vethe no tes on operating fluids
(/ page 340).
* NO
TEDama gefrom use of unsuitable
additives Even small amounts of
the wrong additive
may lead tomalfunctions occur ring. #
Only add cleaning additives recommen‐
ded byMercedes-Benz tothe fuel. Mercedes-Benz
recommends that you use fuel
brands that ha veadditives.
In some countries, the fuel available may not
ha ve suf ficient additives. Residue could build up
in the fuel injection sy stem as a result. In this
case, in consultation with a Mercedes-Benz
service centre, the fuel may be mixed with the
cleaning additive recommended byMercedes-
Benz. Be sure toobser vethe no tes and mixing
ra tios speci fied on the conta iner. Ta
nk content and reser vefuel
The total capacity of the fuel tank may vary,
depending on theve hicle equipment.
Capacity Model
Total capacity
Mercedes -AMG GTR6 5.0 litres Model
of which reserve
fuel
Mercedes-AMG GTR1 0.0 litres Engine oil
Note
s on engine oil
Obser vethe no tes on operating fluids
(/ page 340). 342
Tech nical da ta
Page 346 of 441
*
NO
TEEngine damage causedbyan
incor rect oil filter, incor rect oil or addi‐
tives #
Do not use engine oils or oil filters
which do not cor respond tothe specifi‐
cations explicitly prescribed forthe
service inter vals. #
Do not alter the engine oil or oil filter in
order toachie velonger change inter vals
th an presc ribed. #
Do not use additives. #
Have the engine oil rene we d at regular
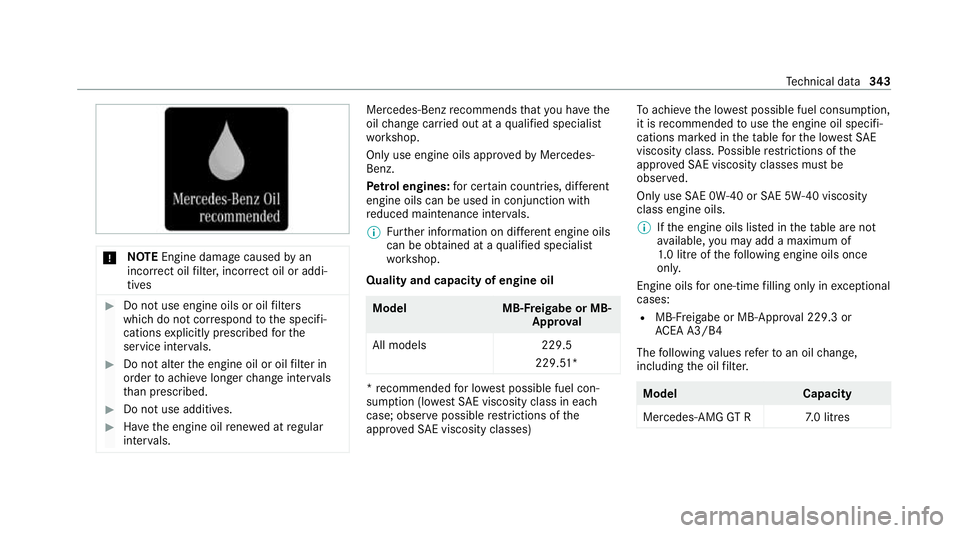
inter vals. Mercedes-Benz
recommends that you ha vethe
oil change car ried out at a qualified specialist
wo rkshop.
Only use engine oils appr oved byMercedes-
Benz.
Pe trol engines: for cer tain countries, dif fere nt
engine oils can be used in conjunction with
re duced maintenance inter vals.
% Further information on dif fere nt engine oils
can be ob tained at a qualified specialist
wo rkshop.
Quality and capacity of engine oil Model
MB-Freigabe or MB-
Appr oval
All models 229.5
229.51* *
re commended for lo west possible fuel con‐
sum ption (lo westSA E viscosity class in ea ch
case; obser vepossible restrictions of the
appr ovedSA E viscosity classes) To
achie vethe lo west possible fuel consum ption,
it is recommended touse the engine oil specifi‐
cations mar ked in theta ble forth e lo west SAE
viscosity class. Possible restrictions of the
appr ovedSA E viscosity classes mu stbe
obser ved.
Only use SAE 0W-40 or SAE 5W-40 viscosity
class engine oils.
% Ifth e engine oils lis ted in theta ble are not
av ailable, you may add a maximum of
1. 0 litr e ofthefo llowing engine oils once
onl y.
Engine oils for one-time filling only in exceptional
cases:
R MB-F reigabe or MB-Appr oval 229.3 or
AC EA A3/B4
The following values referto an oil change,
including the oil filter. Model
Capacity
Mercedes -AMG GTR7 .0 litres Te
ch nical da ta343
Page 347 of 441
Note
s on brake fluid Obser
vethe no tes on operating fluids
(/ page 340). &
WARNING Risk of an accident due to
va pour poc kets form ing in the brake sys‐
tem
The brake fluid cons tantly absorbs moi sture
from the air. This lo wersthe boiling point of
th e brake fluid. If the boiling point is too lo w,
va pour poc kets may form inthe brake sys‐
te m when the brakes are applied hard.
This impairs the braking ef fect. #
Have the brake fluid rene we d at the
specified inter vals. Ha
ve the brake fluid regularly replaced at a
qu alified specialist workshop.
Only use a brake fluid appr ovedby Mercedes-
Benz according toMB-F reigabe or MB-Appr oval
33 1.0. Coolant
Note
s on coolant
Obser vethe no tes on operating fluids
(/ page 340). &
WARNING Risk offire ‑ and inju ryfrom
antifreeze
If antifreeze comes into contact with hot
component parts in the engine compart‐
ment, it may ignite. #
Allow the engine tocool down before
yo uto p up the antif reeze. #
Make sure that no antifreeze spills out
next tothefiller opening. #
Thoroughly clean the antif reeze from
component parts before starting the
ve hicle. *
NO
TEDama gecaused byincor rect cool‐
ant #
Only use coolant that has been pre‐
mixed with therequ ired antifreeze pro‐
te ction.
Information on coolant is available at thefo l‐
lowing locations:
R inthe Mercedes-Benz Specification for
Operating Fluids 310.1
- at https://be vo.mercedes-benz.com
- inthe Mercedes-Benz BeVo app
R at a qualified specialist workshop *
NO
TEOverheating at high outside tem‐
peratures If an inapp
ropriate coolant is used, the
engine cooling sy stem is not suf ficiently pro‐
te cted against overheating and cor rosion at
high outside temp eratures. #
Alw ays use coolant appr ovedby
Mercedes-Benz. 344
Tech nical da ta
Page 361 of 441
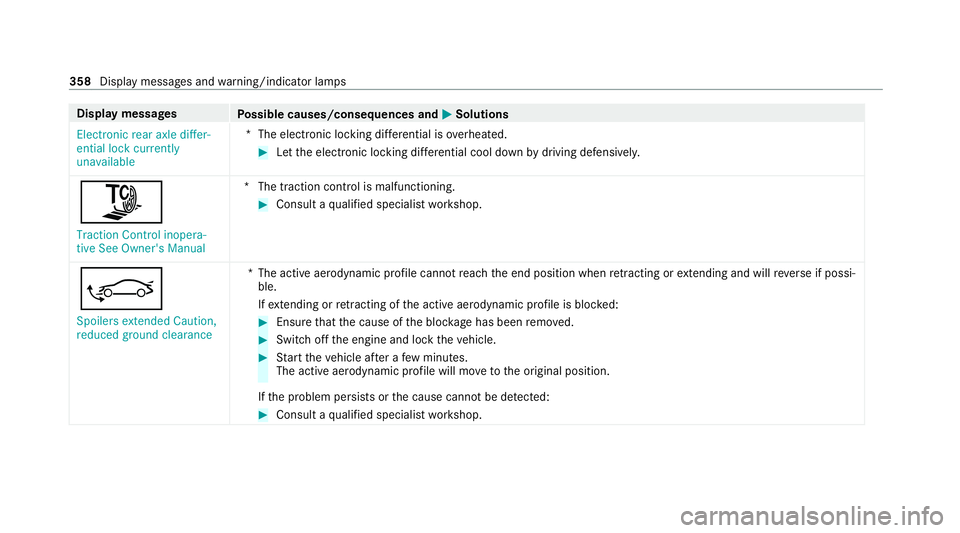
Display messages
Possible causes/consequences and M MSolutions
Electronic rear axle differ-
ential lock currently
unavailable *T
he electronic locking dif fere ntial is overheated. #
Let the electronic locking dif fere ntial cool down bydriving defensively.
Õ
Traction Control inopera-
tive See Owner's Manual *T
he traction contro l is malfunctioning. #
Consult a qualified specialist workshop.
| Spoilers extended Caution,
reduced ground clearance *T
he active aerodynamic profile cannot reach the end position when retracting or extending and will reve rse if possi‐
ble.
If ex tending or retracting of the active aerodynamic profile is bloc ked: #
Ensure that the cause of the bloc kage has been remo ved. #
Switch off the engine and lock theve hicle. #
Start theve hicle af ter a few minutes.
The active aerodynamic profile will mo vetothe original position.
If th e problem persists or the cause cann otbe de tected: #
Consult a qualified specialist workshop. 358
Display messages and warning/indicator lamps
Page 367 of 441
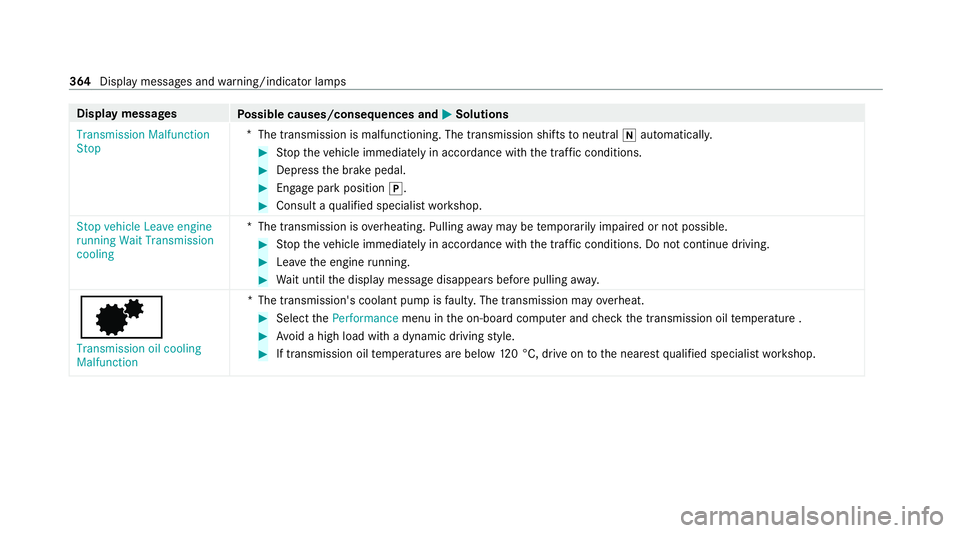
Display messages
Possible causes/consequences and M MSolutions
Transmission Malfunction
Stop *
The transmission is malfunctioning. The transmission shifts toneutral iautomatically. #
Stop theve hicle immediately in accordance with the traf fic conditions. #
Depress the brake pedal. #
Enga gepark position j. #
Consult a qualified specialist workshop.
Stop vehicle Leave engine
running Wait Transmission
cooling *T
he transmission is overheating. Pulling away may be temp orarily impaired or not possible. #
Stop theve hicle immediately in accordance with the traf fic conditions. Do not continue driving. #
Lea vethe engine running. #
Wait until the display message disappears before pulling away.
d Transmission oil cooling
Malfunction *T
he transmission's coolant pump is faulty. The transmission may overheat. #
Select thePerformance menu inthe on-board computer and check the transmission oil temp erature . #
Avoid a high load with a dynamic driving style. #
If transmission oil temp eratures are below 120 °C, drive on tothe nearest qualified specialist workshop. 364
Display messages and warning/indicator lamps
Page 368 of 441
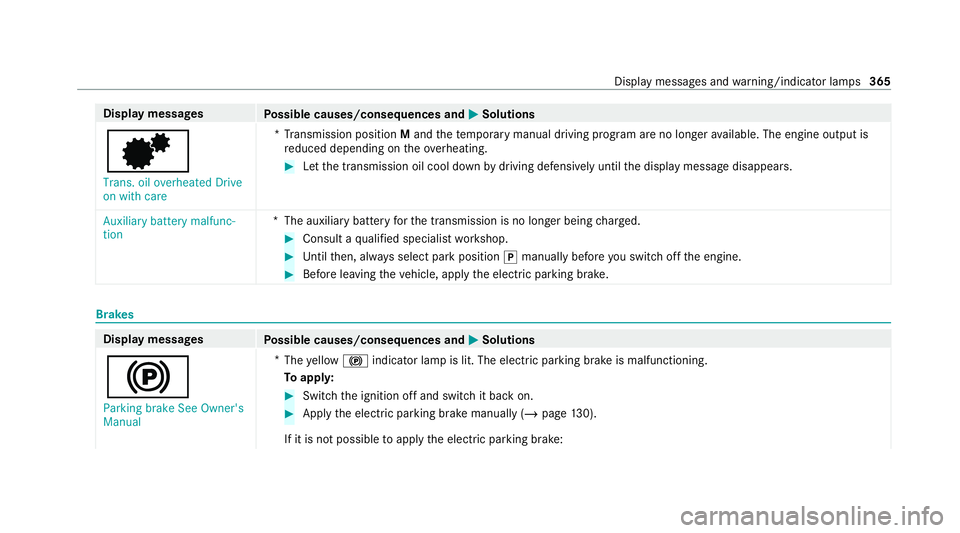
Display messages
Possible causes/consequences and M MSolutions
d Trans. oil overheated Drive
on with care *T
ransmission position Mand thete mp orary manual driving program are no longer available. The engine output is
re duced depending on theove rheating. #
Let the transmission oil cool down bydriving defensively until the display message disappears.
Auxiliary battery malfunc-
tion *T
he auxiliary batteryforth e transmission is no longer being charge d. #
Consult a qualified specialist workshop. #
Untilthen, alw ays select park position jmanually before you swit choff the engine. #
Before leaving theve hicle, apply the electric parking brake. Brakes
Display messages
Possible causes/consequences and M MSolutions
! Parking brake See Owner's
Manual *
The yellow ! indicator lamp is lit. The elect ric pa rking brake is malfunctioning.
To appl y: #
Switch the ignition off and switch it back on. #
Apply the electric parking brake manually (/ page130).
If it is not possible toapply the electric parking brake: Display messages and
warning/indicator lamps 365