2020 MERCEDES-BENZ AMG GT COUPE wheel bolts
[x] Cancel search: wheel boltsPage 114 of 433
When driving on a
racetrac k,make sure that the
brake fluid is not more than 12 months old.
Brake callipers, brake hoses and brake lines
Check thefo llowing for dama geeach time
before driving theve hicle on a racetrack:
R The du stboots on the brake callipers
R The brake hoses and brake lines
Re place them if necessar y.
Brake cooling
Special air deflectors and channels are fitted to
th e front and rear axles so that the brakes are
cooled suf ficiently. They supply the brake disks
with cooling air. Check that they are in per fect
condition and cor rectly fitted ea chtime be fore
driving theve hicle on a racetrac k.Excessi ve
we ar can be caused bydriving overke rbs, for
ins tance. Forth is reason, regularly check they
are all comple teand fitted securely.
In addition, check that the air guide plates are
seated securely and clean before and af ter driv‐
ing theve hicle on a racetrac k. Obser
vethe information on the cooling of com‐
ponents which are subject tostra in in when driv‐
ing on a racetrack (/ page 109). Wheels an
d tyres Note
s on wheels
* NO
TERestrictions relating tosuspension
settings and driving characteristics Driving with wheels with dif
fering dimensions
of thefo llowing features could lead torestric‐
tions relating tothe suspension settings and
driving characteristics of theve hicle:
R diame ter
R wheel of fset #
Only use the wheels pr ovided by
Mercedes-AMG for use on a racetrac k. #
Only use wheels with appr ovedge ome‐
tr y. Do not use slick tyres. Suspension and body
components may
otherwise be subjected to
exc essively high loads. Obser
vethefo llowing no tes on changing a
wheel:
R change the wheels af ter15 ,000 km on a
ra cetrack at the latest.
R toensure concent ricity and la tera l trueness,
ch eck the wheel conta ct surfacefor dama ge
when changing a wheel. These should also
be measured in theeve nt of imbalance.
The wheel bolts are subjected tohigh wear when
used on a racetrac k.To ensure the wheels are
bolted securely on a permanent basis, replace
th e wheel bolts in thefo llowing situations:
R afte r appro ximately 1,000 km on a racetrac k.
R afte rte n bolting procedu res at the latest.
Note s on tyres &
WARNING Risk of injury duetodamaged
tyres
Damaged tyres can cause tyre pressure loss. #
Check the tyres regularly for signs of
dama geand replace any damaged tyres
immediatel y. Driving and pa
rking 111
Page 115 of 433
Check
the tyres for dama geand the cor rect tyre
tread dep thboth before and af ter use on a race‐
trac k.Only then is it safe todrive on a racetrack
and on public roads.
As a result of the driving style and at high ambi‐
ent temp eratures, when driving on a racetrack it
may be necessary tocompensate forthe
inc rease in pressure in warm tyres byreleasing
air. Even forwa rm tyres, the specified tyre pres‐
sure may only be exceeded bymax. 0.5 bar.
Af terth e tyres ha vecooled down again, you
must readjust the tyre pressure in accordance
with the specifications in order todrive on public
ro ads. Suspension
Suspension settings
The
factory setting pr ovides a good compromise
fo r driving on public roads and on a racetrac k.
Ve hicle measurements
Even small changes tothe suspension settings
alter the driving characteristics of theve hicle. To
ensure optimal driving characteristics, the speci‐ fi
ed values and tolerances of the individual sus‐
pension settings must be complied with. The
driving characteristics of theve hicle may other‐
wise be undesirable.
Ve hicle measurements are requ ired in thefo llow‐
ing situations:
R theve hicle height has changed in relation to
th e optimised setting.
R theve hicle is frequently subjected tovery
high loads, e.g. when driving over kerbs.
Therefore, check theve hicle height at regular
inter vals and, if necessar y,per form vehicle
measurements.
Note s on suspension components
Despite regular checks, and rega rdless of
whe ther there leva nt suspension components
are in good condition, thefo llowing components
must be replaced af ter a cer tain amount of use
on thera cetrack:
R Wheel bolts (/ page 111 )
R Wheel hubs including the wheel bearings Note
s on engine oil Check
the engine oil le vel before operating in
ra cetrack mode. DY
NA MIC SELECT switch Fu
nction of theDY NA MIC SELECT switch Use
theDY NA MIC SELECT switch tochange
between thefo llowing drive programs:
R o (Slippery): optimised pulling away and
driving characteristics in wint ryand slippe ry
ro ad conditions
R = (Individual): individual settings
R A (Comfort): comfortable and economi‐
cal driving style
R C (Sport): sporty driving style
R B (Sport Plus): particularly sporty driving
st yle
R I (RACE): driving like on a race track
The I (RACE) drive program may not be
used on normal roads. I (RACE) must on ly 11 2
Driving and pa rking
Page 296 of 433
Scratches, cor
rosive deposits, areas af fected by
cor rosion and damage caused byincor rect care
cannot al ways be comple tely repaired. In such
cases, visit a qualified specialist workshop.
Yo u can obtain more information on care and
cleaning products from the manufacturer.
In the case of foil-wrapped sur faces, optical dif‐
fe re nces may occur between the sur faces that
we renot pr otected bya decorative foil af ter
re moving a decorative foil.
% Have wo rkor repairs todecorative foils car‐
ri ed out at a qualified specialist workshop,
e.g. in a Mercedes-Benz Service Centre. Note
s on care of car parts &
WARNING Risk of entrapment if the
windscreen wipers are swit ched on while
th e windscreen is being cleaned
If th e windscreen wipers are set in motion
while you are cleaning the windscreen or
wiper blades, you can be trapped bythe
wiper arm. #
Alw ays switch off the windscreen wip‐
ers and the ignition before cleaning the
windscreen or wiper blades. &
WARNING Risk of burn s fromtheta il‐
pipe and tailpipe trims
The exhaust tailpipe and tailpipe trims can
become very hot. If you come into contact
with these parts of theve hicle, you could
burn yourself. #
Alw ays be particular lycareful around
th eta ilpipe and theta ilpipe trims and
supervise children especially closely in
th is area. #
Allow vehicle parts tocool down before
to uching them. Obser
vethe no tes on cleaning and care of the
fo llowing vehicle parts toavoid damage.
Wheels/rims R Use water and acid-free wheel cleaners. R
Do not use acidic wheel cleaners toremo ve
brake dust. This could damage wheel bolts
and brake components.
R Toavo id cor rosion of the brake discs and
brake pads, drive theve hicle for a few
minutes af ter cleaning before parking it. The
brake discs and brake pads warm up and dry
out.
Wi ndo ws
R Clean wind owsinside and outside with a
damp clo thand with a cleaning agent recom‐
mended for Mercedes-Benz.
R Do not use dry clo ths or abrasive or sol vent-
based cleaning agents toclean the inside of
windo ws.
Wi per blades
R Fold out the wiper blades and clean them
using a damp clo th.
R Do not clean the wiper blades too of ten.
Ex terior lighting
R Clean the lenses with a wet sponge and mild
cleaning agent, e.g. car sha mpoo. Maintenance and care
293
Page 328 of 433
#
Position hub cap 1and turn until it is in the
ri ght position. #
Position soc ket2 on hub cap 1. #
Position wheel wrench 3on soc ket2 and
tighten hub cap 1.
Speci fied tigh tening torq ue: 25 Nm. Ra
ising theve hicle when changing a wheel Re
quirements:
R There are no persons in theve hicle.
R The vehicle has been prepared for a wheel
ch ange (/ page 324).
Important no tes on using the jack:
R Use only a vehicle-specific jack that has
been appr ovedby Mercedes-Benz toraise
th eve hicle.
R The jack is only designed forra ising and
holding theve hicle for a short time while a
wheel is being changed and not for mainte‐
nance workunder theve hicle. R
The jack must be placed on a firm ,fl at and
non-slip sur face. If necessar y,use a lar ge,
fl at, load-bearing, non-slip unde rlay.
R The foot ofthe jack must be positioned verti‐
cally under the jack support point. Ru
les of conduct when theve hicle is raised:
R Never place your hands or feet under the
ve hicle.
R Never lie under theve hicle.
R Do not start the engine and do not release
th e electric parking brake.
R Do not open or close any doors or theta il‐
gate. #
Using the wheel wrench, loosen the wheel
bolts on the wheel you wish tochange by
about one full turn. Do not unscr ewthe bolts
comple tely. Wheels and tyres
325
Page 330 of 433
#
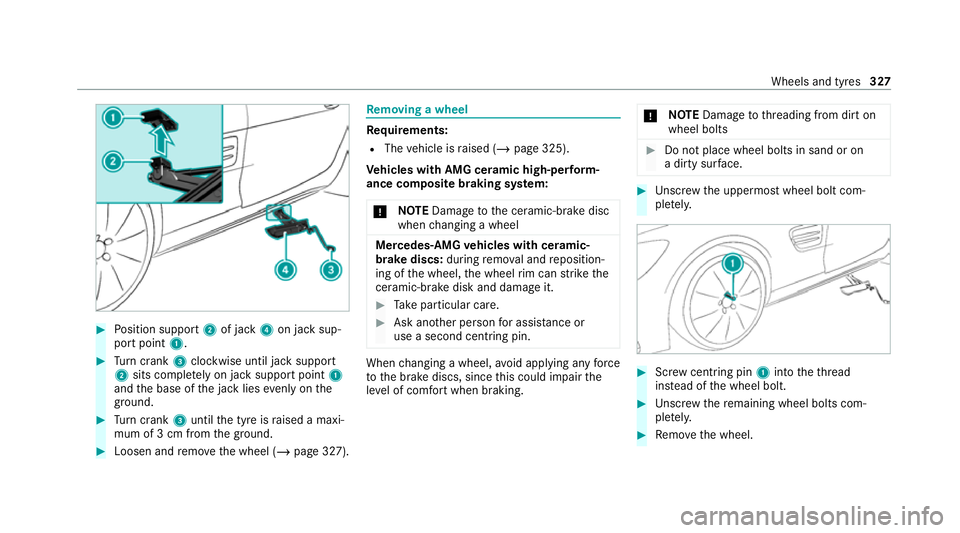
Position support 2of jack 4on jack sup‐
port point 1. #
Turn crank 3clockwise until jack suppo rt
2 sits comple tely on jack support point 1
and the base of the jack lies evenly on the
ground. #
Turn crank 3until the tyre is raised a maxi‐
mum of 3 cm from the ground. #
Loosen and remo vethe wheel (/ page 327). Re
moving a wheel Re
quirements:
R The vehicle is raised (/ page 325).
Ve hicles with AMG cera mic high-perform‐
ance composite braking sy stem:
* NO
TEDama getothe ceramic-brake disc
when changing a wheel Mercedes
-AMG vehicles with cera mic-
brake discs: during remo val and reposition‐
ing of the wheel, the wheel rim can strike the
ceramic-brake disk and damage it. #
Take particular care. #
Ask ano ther person for assi stance or
use a second centring pin. When
changing a wheel, avoid applying any force
to the brake discs, since this could impair the
le ve l of com fort when braking. *
NO
TEDama getothre ading from dirt on
wheel bolts #
Do not place wheel bolts in sand or on
a dirty sur face. #
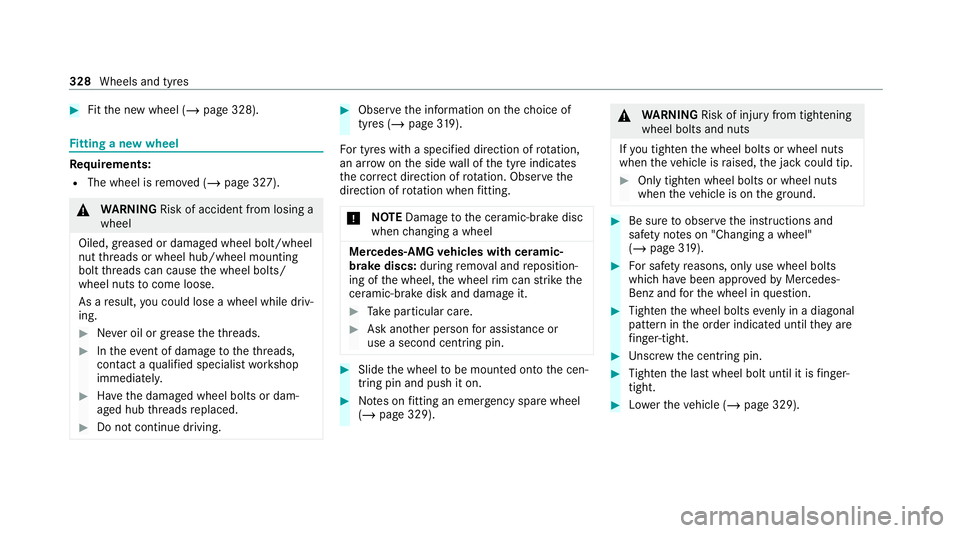
Unscr ew the uppermost wheel bolt com‐
ple tely. #
Screw centring pin 1into theth re ad
ins tead of the wheel bolt. #
Unscr ew there maining wheel bolts com‐
ple tely. #
Remo vethe wheel. Wheels and tyres
327
Page 331 of 433
#
Fitthe new wheel (/ page 328).Fi
tting a new wheel Re
quirements:
R The wheel is remo ved (/ page 327). &
WARNING Risk of accident from losing a
wheel
Oiled, greased or damaged wheel bolt/wheel
nut thre ads or wheel hub/wheel mounting
bolt thre ads can cause the wheel bolts/
wheel nuts tocome loose.
As a result, you could lose a wheel while driv‐
ing. #
Never oil or grease theth re ads. #
Intheeve nt of damage totheth re ads,
con tact a qualified specialist workshop
immediatel y. #
Have the damaged wheel bolts or dam‐
aged hub thre ads replaced. #
Do not continue driving. #
Obser vethe information on thech oice of
tyres (/ page319).
Fo r tyres with a specified direction of rotation,
an ar row on the side wall of the tyre indicates
th e cor rect dire ction of rotation. Obse rvethe
direction of rotation when fitting.
* NO
TEDama getothe ceramic-brake disc
when changing a wheel Mercedes
-AMG vehicles with cera mic-
brake discs: during remo val and reposition‐
ing of the wheel, the wheel rim can strike the
ceramic-brake disk and damage it. #
Take particular care. #
Ask ano ther person for assi stance or
use a second centring pin. #
Slide the wheel tobe mounted onto the cen‐
tring pin and push it on. #
Notes on fitting an eme rgency spare wheel
(/ page 329). &
WARNING Risk of injury from tightening
wheel bolts and nuts
If yo u tighten the wheel bolts or wheel nuts
when theve hicle is raised, the jack could tip. #
Only tighten wheel bolts or wheel nuts
when theve hicle is on the ground. #
Be sure toobser vethe instructions and
saf ety no tes on "Changing a wheel"
(/ page 319). #
For saf etyre asons, only use wheel bolts
which ha vebeen appr ovedby Mercedes-
Benz and forth e wheel in question. #
Tighten the wheel bolts evenly in a diagonal
pattern in the order indicated until they are
fi nger-tight. #
Unscr ew the cent ring pin. #
Tighten the last wheel bolt until it is finger-
tight. #
Lowe rth eve hicle (/ page 329). 328
Wheels and tyres
Page 332 of 433
Lo
weri ngtheve hicle af ter a wheel change Re
quirements:
R The new wheel has been fitted
(/ page 328). #
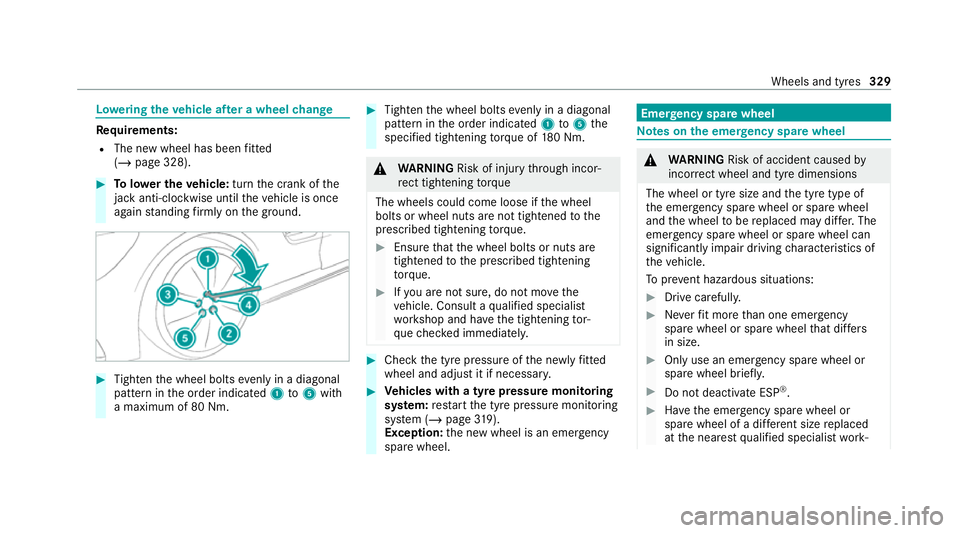
Tolowe r the vehicle: turnthe crank of the
jack anti-clo ckwise until theve hicle is once
again standing firm lyon the ground. #
Tighten the wheel bolts evenly in a diagonal
pattern in the order indicated 1to5 with
a maximum of 80 Nm. #
Tighten the wheel bolts evenly in a diagonal
pattern in the order indicated 1to5 the
specified tightening torque of 180 Nm. &
WARNING Risk of injury thro ugh incor‐
re ct tigh tening torque
The wheels could come loose if the wheel
bolts or wheel nuts are not tightened tothe
prescribed tightening torque. #
Ensu rethat the wheel bolts or nuts are
tightened tothe prescribed tightening
to rque. #
Ifyo u are not sure, do not mo vethe
ve hicle. Consult a qualified specialist
wo rkshop and ha vethe tightening tor‐
qu ech ecked immediately. #
Check the tyre pressure of the newly fitted
wheel and adjust it if necessa ry. #
Vehicles with a tyre pressure monitoring
sy stem: restart the tyre pressure monitoring
sy stem (/ page319).
Except ion:the new wheel is an emer gency
spa rewheel. Emer
gency spare wheel Note
s onthe emer gency spare wheel &
WARNING Risk of accident caused by
incor rect wheel and tyre dimensions
The wheel or tyre size and the tyre type of
th e emer gency spa rewheel or spare wheel
and the wheel tobe replaced may dif fer. The
emer gency spa rewheel or spare wheel can
significantly impair driving characteristics of
th eve hicle.
To preve nt hazardous situations: #
Drive carefully. #
Neverfit more than one emer gency
spa rewheel or spare wheel that dif fers
in size. #
Only use an emer gency spa rewheel or
spare wheel brief ly. #
Do not deacti vate ESP ®
. #
Have the emer gency spa rewheel or
spare wheel of a dif fere nt size replaced
at the nearest qualified specialist work‐ Wheels and tyres
329
Page 430 of 433
W
Wa rning lamps
see Warning/indicator lamps
Wa rning sy stem
see ATA (anti-theft alarm sy stem)
Wa rning triangle
Re moving ............................................ 296
Setting up ............................................ 297
Wa rning/indicator lamp
! ABSwarning lamp ...................... 391
J Brake sy stem warning lamp
(red) .................................................... 389
J Brake sy stem warning lamp
(yellow) ................................................ 389
ÿ Coolant warning lamp ................ 385
! Electric parking brake indicator
lamp (red) ............................................ 388
Ù Electric po werst eering warn‐
ing lamp (red) ...................................... 385
# Electrical fault warning lamp ...... 387
; Engine diagnosis warning lamp .. 387 p
Engine operating temp erature
wa rning lamp ...................................... .387
÷ ESP®
wa rning lamp .................... 392
8 Fuelreser vewarning lamp
lights up .............................................. 388
6 Restra int sy stem warning lamp .. 383
7 Seat belt warning lamp .............. 384
ä Suspension warning lamp (yel‐
low) ...................................................... 391
! The elect ric pa rking brake (yel‐
low) indicator lamp .............................. 388
h Tyre pressure monitoring sys‐
te m wa rning lamp ................................ 394
L Warning lamp for dis tance
wa rning function ................................ .390
Wa rning/indicator lamps .......................381
Overview ..............................................3 81
PA SSENGER AIR BAG ............................ .41
Wa rranty .................................................... 27Wa
sher fluid
see Windsc reen washer fluid
Wa shing byhand (care) .......................... 291
Wa ter tank
see Air-water duct
We ar
Brake discs .......................................... 11 0
Brake pads .......................................... .110
Wheel bolts .......................................... 111
We ather information ............................... 223
What3words Destination entry with a 3 word
address .............................................. .204
Wheel change
Fitting a new wheel ............................ .328
Fitting/removing plast ic hub caps .......324
Lo we ring theve hicle ........................... 329
Preparation .......................................... 324
Ra ising theve hicle .............................. 325
Re moving a wheel .............................. .327
Wheel change
see Emergency spare wheel
Wheel rotation ........................................ .323 Index
427