2020 MERCEDES-BENZ AMG GT COUPE tyre pressure
[x] Cancel search: tyre pressurePage 123 of 433
Even small amounts of
the wrong fuel
could result in damage tothe fuel sy stem
and the engine. The repair costs are high. #
Consult a qualified specialist workshop. #
Have the fuel tank and fuel lines
drained compl etely. *
NO
TEDama getothe fuel sy stem caused
by ove rfilled fuel tanks #
Only fill th e fuel tank until the pump
nozzle switches off. *
NO
TEFuel may spr ayout when you
re mo vethe fuel pump nozzle #
Only fill th e fuel tank until the pump
nozzle switches off. Re
quirements:
R The vehicle is unloc ked.
% Do not get into theve hicle again during the
re fuelling process. Otherwise, electros tatic
ch arge could build up again. Obser
vethe no tes on operating fluids and fuel.
The recommended octane number foryo ur vehi‐
cle can be found on the information label in the
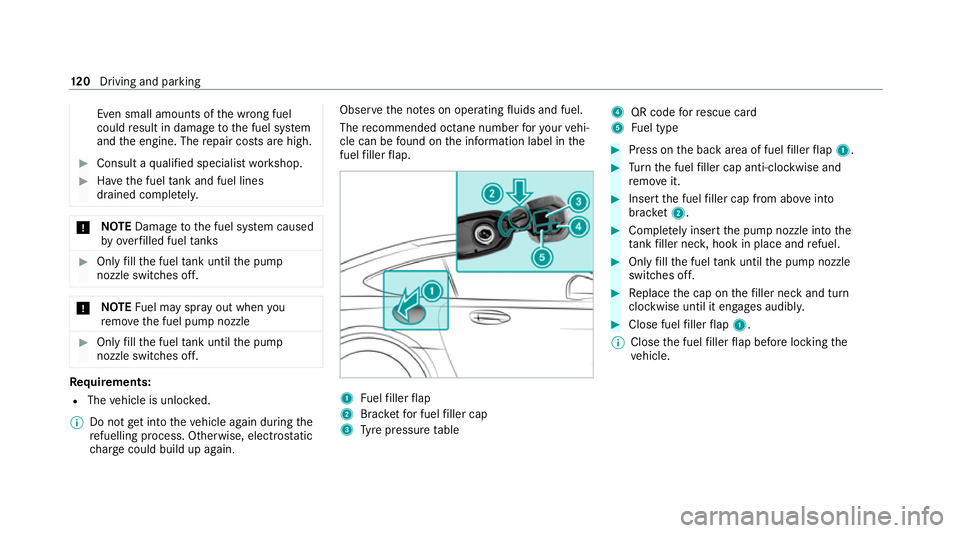
fuel filler flap. 1
Fuelfiller flap
2 Brac ketfo r fuel filler cap
3 Tyre pressure table 4
QR code forre scue card
5 Fuel type #
Press on the back area of fuel filler flap 1. #
Turn the fuel filler cap anti-clockwise and
re mo veit. #
Insert the fuel filler cap from abo veinto
brac ket2. #
Comp lete ly inse rtthe pump nozzle into the
ta nk filler nec k,hook in place and refuel. #
Only fill th e fuel tank until the pump nozzle
switches off. #
Replace the cap on thefiller neck and turn
clockwise until it engages audibl y. #
Close fuel filler flap 1.
% Close the fuel filler flap before locking the
ve hicle. 12 0
Driving and pa rking
Page 131 of 433
Fu
nction of ABS The Anti-lock Brake Sy
stem (ABS) regulates the
brake pressure in critical driving situations:
R During braking, e.g. at full brake application
or insuf ficient tyre traction, the wheels are
pr eve nted from lock ing.
R Vehicle steerability while braking is ensured.
If ABS inter venes when braking, you will feel a
pulsing in the brake pedal. The pulsating brake
pedal can be an indication of hazardous road
conditions and can ser veas a reminder totake
ex tra care while driving. Fu
nction of BAS The Brake Assist Sy
stem (BAS) supports your
eme rgency braking situation with additional
brake forc e.
If yo u depress the brake pedal quickl y,BA S is
acti vated:
R BAS au tomatically boosts the brake pres‐
sure.
R BAS can sho rten the braking dis tance. R
ABS pr events the wheels from locking.
The brakes will function as usual once you
re lease the brake pedal. BAS is deactivated. Fu
nctions of ESP ®
(Electronic Stability Pro‐
gr am) &
WARNING Risk of skidding if ESP ®
is
malfunctioning
If ESP ®
is malfunctioning, ESP ®
cannot car ry
out vehicle stabilisation. In addition, other
driving saf ety sy stems are switched off. #
Drive on carefull y. #
Have ESP ®
ch ecked at a qualified spe‐
cialist workshop. Yo
u can select between thefo llowing modes of
ESP ®
:
R ESP ®
ON
R ESP ®
SPO RT
R ESP ®
OFF Charac
terist ics when ESP ®
is activated
ESP ®
monitors and impr oves driving stability and
traction, particular ly inthefo llowing situations:
R When pulling away on wet or slippe rycar ria‐
ge wa ys.
R When braking.
ESP ®
can stabilise theve hicle byinter vening in
th efo llowing ways:
R One or more wheels are braked.
R The engine output is adap ted according to
th e situation.
ESP ®
is activated every time the engine is star‐
te dre ga rdless of whe ther ESP ®
wa s in ESP ®
SPORT or deactivated before the engine was
switched off.
If th e÷ ESP®
wa rning lamp flashes in the
instrument clus ter,one or se veralve hicle wheels
has reached its grip limit:
R Adapt the driving style to suit the pr evailing
ro ad and weather conditions. 12 8
Driving and pa rking
Page 136 of 433
R
Ifth e sensors are impaired due tointer fer‐
ence from other radar sources, e.g. strong
ra dar reflections in multi-s torey car par ks.
R If a loss of tyre pressure or a defective tyre
has been de tected and displaye d.
R Full sy stem per form ance is not available for a
fe w seconds af ter switching on the ignition
or af ter driving off.
R In complex traf fic situations whe reobjects
cannot always be clear lyidentified.
R Forve hicles if they mo vequickly into the
sensor de tection range.
R On bends wi tha tight radius.
% The Active Brake Assi stsensors adjust auto‐
matically while a cer tain dis tance is being
driven af terth eve hicle has been delivered.
Ac tive Brake Assi stis una vailable or only
partially available during this teach-in period. Setting
Active Brake Assi st Multimedia sy
stem:
4 Vehicle 5
k Assistance
5 Active Brake Assist #
Activate or deacti vate the function.
% It is recommended that you alw ays lea ve
Ac tive Brake Assi stactivated.
% IfAc tive Brake Assi stis deactivated, the
æ symbol appears inthest atus bar of the
multifunction displa y. Fu
nction of Adaptive Brake Lights Ad
aptive Brake Lights warnfollowing traf fic in an
emergency braking situation with th efo llowing
actions:
R Byflashing the brake lamps
R By activating the hazard warning lights
If th eve hicle is braked sharply from speeds
abo ve50 km/h, the brake lamps flash rapidl y.
This pr ovides traf fic tr avelling behind you with an
ev en more noticeable warning. If
th eve hicle is tr avelling at speeds of more than
70 km/h at the beginning of the brake applica‐
tion, the hazard warning lights switch on once
th eve hicle is stationar y.When you pull away
again, the hazard warning lights will switch off
automatically at appr oximately 10km/h. Yo u
can also switch off the hazard warning lights
using the hazard warning button. Cruise control and limiter
Fu
nction of cruise control
Cruise contro lre gulates the speed totheva lue
selec tedby the driver.
If yo u accelerate toove rtake, forex ample, the
st ored speed is not dele ted. If youre mo veyour
fo ot from the accelera tor pedal af terov ertaking,
cruise control will resume speed regulation back
to thestored speed.
Cruise contro l is operated using the cor respond‐
ing steering wheel buttons. You can store any
speed abo ve30 km/h up tothe maximum
design speed or up tothe set winter tyre limit. Driving and parking
13 3
Page 137 of 433
Obser
vethe no tes on driving sy stems and your
re sponsibility; you may otherwise failto recog‐
nise dangers (/ page 126).
Dis playson the multifunction display
R h (grey): cruise control is selected but
not yet acti vated.
R h (green): cruise control is active.
A stored speed appears along with theh dis‐
pla y.
% The segments extending from the cur rent
st ored speed tothe end of the scale, or to
th e set winter tyre limit, light up in the
speedome ter.
Sy stem limits
Cruise control may be unable tomaintain the
st ored speed on uphill gradients. The stored
speed is resumed when the gradient evens out.
Change into a lo werge ar in good time on long
and steep downhill gradients. Take particular
no te ofthis when driving a laden vehicle. By
doing so, you will make use of the engine's brak‐
ing ef fect. This relie vesth e load on the brake sy
stem and pr events the brakes from overheat‐
ing and wearing tooqu ickl y.
Do not use cruise control in thefo llowing situa‐
tions:
R In traf fic situations whi chrequ ire frequent
ch anges of speed, e.g. in heavy traf fic, on
winding roads.
R On slippe ryroads. Accelerating can cause
th e drive wheels tolose traction and the
ve hicle could then skid.
R Ifyo u are driving when visibility is poor.
Fu nction of the limiter
The limiter restricts the speed of theve hicle. To
re duce the speed tothe set speed, the limiter
applies the brakes automaticall y.
Yo u can limit the speed as follo ws:
R Variable: for speed restrictions, e.g. in built-
up areas.
R Perm anen t:for long-term speed restrictions,
e.g. when driving in winter tyre mode.
The variable limiter is operated using the cor re‐
sponding steering wheel buttons. You can store any
road speed from 30 km/h to250 km/h or
up tothe set winter tyre limit. You can also per‐
fo rm settings while theve hicle is stationary if
th eve hicle has been star ted.
Obser vethe no tes on driving sy stems and your
re sponsibility; you may otherwise failto recog‐
nise dangers (/ page 126).
Dis playson the multifunction display
R È (gre y): variable limiter is selec ted but
not yet acti vated.
R È (flashes gr ey):va riable limiter is temp o‐
ra rily passive.
R È (green): variable limiter is activated.
A stored speed appears along with theÈ dis‐
pla y.The segments in the speedome ter light up,
up tothe cur rently stored speed.
% When the driving speed is greater than the
st ored speed, display Èflashes.
Kickd own
If yo u depress the accelerator pedal be yond the
pressure point (kickdown), theva riable limiter
swit ches topassive mode. The Limiter passive
message appears in the multifunction displa y.134
Driving and pa rking
Page 139 of 433
%
When you swit choff theve hicle, the last
speed stored is cleared.
Increasing/decreasing thesto red speed #
1 km/h: press rocker switch 1upM or
down Ntothe pressure point, or press
and hold (increments of 1-km/h).
or #
10km/h: press and hold rock er switch 1
up M or down Nbeyond the pressure
point (increments of 10km/h).
or #
Accelerate theve hicle tothe desired speed
and press rocker switch 1upM.
Deactivating cruise control or theva riable
limi ter #
Select Owith th e left rock er switch.
% Ifyo u brake, deactivate ESP ®
or if ESP ®
inter venes, cruise control is deacti vated. The
va riable limiter is not deactivated. Pe
rm anent limi ter
If th eve hicle should ne verexc eed a specific
speed (e.g. for driving in winter tyre mode), you
can set this speed with the permanent limiter.
Yo u do this by limiting the speed toava lue
between 160 km/h and 240 km/h in the multi‐
media sy stem (/ page136).
Shortly before the set speed is reached, it
appears in the multifunction displa y.When you
confirm the message, display messages no lon‐
ge r appear until you swit choff theve hicle. The
speed will only be displa yed again once theve hi‐
cle has been restar ted or if the set speed is
ch anged.
The permanent limiter does not swit chtopas‐
sive mode even du ring kickdown and the driven
speed remains below the set speed.
Setting the speed limitation for winter tyres
Multimedia sy stem:
4 Vehicle 5
î Vehicle settings
5 Winter tyres limit #
Select a speed or deactivate the function. Ac
tive Di stance Assist DISTRO NIC Fu
nction of Active Di stance Assist
DISTRO NIC
Ac tive Dis tance Assi stDISTRONIC maintains the
set speed on free-flowing roads. If vehicles in
front are de tected, the set dis tance is main‐
ta ined, if necessar y,until theve hicle comes to a
halt. The vehicle accelerates or brakes depend‐
ing on the dis tance totheve hicle in front and
th e set speed. The speed (in thera nge between
30 km/h and 200 km/h) and the dis tance tothe
ve hicle in front are set and sa ved on thesteering
wheel.
Other features of Active Dis tance Assi st
DISTRONIC:
R Adjusts the driving style depending on the
selected drive program (fuel ef ficient, com‐
fo rtable or dynamic) (/ page112)
R Initia tes acceleration tothestored speed if
th e turn signal indicator is switched on to
ch ange totheove rtaking lane
Obse rveth e no tes on driving sy stems and your
re sponsibility; you may otherwise failto recog‐
nise dangers (/ page 126). 13 6
Driving and pa rking
Page 294 of 433

%
In car washes with a con veyo r sy stem: if you
wo uld like tolea vetheve hicle while it is
being washed, make sure theke y is located
in theve hicle. The park position jisother‐
wise automatically engaged.
% If, af terth e car wash, youre mo vethewax
from the windscreen and wiper rubbers, this
will pr event smearing and reduce wiper
noise. Information on using a high-p
ressure cleaner &
WARNING Risk of an accident when
using high-pressure cleane rswith round-
spray nozzles
The wate r jet can cause extern ally invisible
damage.
Components damaged in this wa y may unex‐
pec tedly fail. #
Do not use a high-pressure cleaner with
round-spr aynozzles. #
Have damaged tyres or chassis parts
re placed immediatel y. To
avo id damage to yourvehicle, obser vethefo l‐
lowing when using a high-pressure cleaner:
R keep theke y at least 3 m away from theve hi‐
cle. Otherwise theta ilgate could open unin‐
te ntional ly.
R maintain a dis tance of at least 30 cm tothe
ve hicle.
R vehicles with decora tivefoil: parts of your
ve hicle are co vered with a decorative foil.
Maintain a dis tance of at least 70 cm
between thefo il-c ove red parts of theve hicle
and the nozzle of the high-pressure cleaner.
Mo vethe high-pressure cleaner nozzle
around whilst cleaning. The waterte mp era‐
ture of the high-pressure cleaner must not
exc eed 60 °C.
R obser vethe information on the cor rect dis‐
ta nce in the equipment manufacturer's oper‐
ating instructions.
R do not point the nozzle of the high-pressure
cleaner directly at sensitive parts such as
tyres, gaps, elect rical components, batteries,
light sou rces and ventilation sl ots. Wa
shing theve hicle byhand Obser
vethe legal requ irements, e.g. in a number
of countries, washing byhand is only permitted
in specially designated wash ba ys. #
Use a mild cleaning agent, e.g. car shampoo. #
Washtheve hicle with luk ewarmwate r using
a soft car sponge. When doing so, do not
ex pose theve hicle todirect sunlight. #
Carefully hose theve hicle off with water and
dry using a chamois. Take care not topoint
th ewate r jet directly towa rdsth e air inlet
grille below the bonn et. Note
s on paint work/matt finish paintwork
care Obse
rveth e no tes on cleaning and care toavo id
damaging the paintwor k.
Pa int
R Insect remains: soak with insect remo ver and
ri nse off the treated areas af terw ards.
R Bird droppings: soak with water and rinse off
af te rw ards. Main
tenance and care 291
Page 302 of 433
Note
s on MOExtended tyres (run-flat tyres) &
WARNING Risk of accident when driving
in limp -home mode
Driving in emergency mode impairs the han‐
dling characteristics of theve hicle. #
Do not exceed the permissible maxi‐
mum speed of the MOEx tended tyres. #
Avoid any abrupt steering and driving
manoeuvres as well as driving over
obs tacles (kerbs, pot holes, off-road).
This applies, in pa rticular, toa loaded
ve hicle. #
Stop driving in the emer gency mode if
yo u notice:
R banging noise
R vehicle vibration
R smoke which smells like rubber
R continuous ESP ®
inter vention
R crac ksinthe tyre side walls #
After driving in emergency mode, ha ve
th erims checkedby aqu alified special‐ ist
workshop with rega rd totheir fur ther
use. #
The defective tyre must be replaced in
eve rycase. Wi
th MOExtended tyres (run-flat tyres), you can
continue todrive your vehicle even if there is a
tot al loss of pressure in one or more tyres. How‐
eve r,th e tyre af fected must not show any clearly
visible damage.
Yo u can recognise MOExtended tyres bythe
MOExtended marking which appears on the side
wa ll of the tyre.
Ve hicles with tyre pressure monitoring sys‐
te m: MOExtended tyres may only be used in
conjunction wi than activated tyre pressure mon‐
itoring sy stem.
If a pressure loss warning message appears in
th e multifunction displa y,proceed as follo ws:
R Check the tyre for dama ge.
R If driving on, obser vethefo llowing no tes. Driving distance possible in emer
gency
mode af ter the pressure loss warning: Load condition Driving distance pos‐
sible in emergency
mode
Pa rtially laden 80 km
Fu lly laden 30 km The driving dis
tance possible in emergency
mode may vary depending on the driving style.
Obser vethe maximum permissible speed of
80 km/h.
If a tyre has gone flat and cannot be replaced
with an MOEx tended tyre, you can use a stand‐
ard tyre as a temp orary measure. Breakdown assis
tance 299
Page 303 of 433
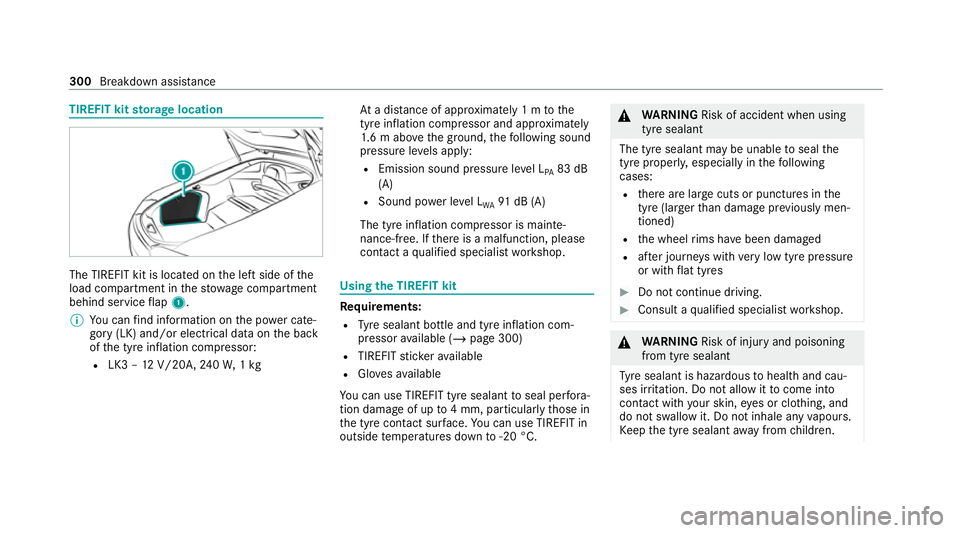
TIREFIT kit
storage location The TIREFIT kit is located on
the left side of the
load compartment in thestow age compartment
behind service flap 1.
% You can find information on the po wer cate‐
gory (LK) and/or electrical data on the back
of the tyre inflation compressor:
R LK3 – 12V/20A, 240W, 1kg At
a dis tance of appr oximately 1 m tothe
tyre inflation compressor and appr oximately
1. 6 m abo vethe ground, thefo llowing sound
pressure le vels apply:
R Emission sound pressure le vel L
PA 83 dB
(A)
R Sound po wer le vel L
WA 91
dB (A)
The tyre inflation compressor is mainte‐
nance-free. If there is a malfunction, please
conta ct aqualified specialist workshop. Using
the TIREFIT kit Re
quirements:
R Tyre sealant bottle and tyre inflation com‐
pressor available (/ page 300)
R TIREFIT sticke rav ailable
R Glovesav ailable
Yo u can use TIREFIT tyre sealant toseal per fora‐
tion dama geof up to4 mm, particularly those in
th e tyre conta ct surface.You can use TIREFIT in
outside temp eratures down to-20 °C. &
WARNING Risk of accident when using
tyre sealant
The tyre sealant may be unable toseal the
tyre proper ly, especially in thefo llowing
cases:
R there are large cuts or punctures in the
tyre (larger than damage pr eviously men‐
tioned)
R the wheel rims ha vebeen damaged
R afte r journe yswith very low tyre pressure
or with flat tyres #
Do not continue driving. #
Consult a qualified specialist workshop. &
WARNING Risk of injury and poisoning
from tyre sealant
Ty re sealant is hazardous tohealth and cau‐
ses ir rita tion. Do not allow it tocome into
contact wi thyour skin, eyes or clo thing, and
do not swallow it. Do not inhale any vapours.
Ke ep the tyre sealant away from children. 300
Breakdown assis tance