2020 MAZDA MODEL MX-5 MIATA trunk
[x] Cancel search: trunkPage 406 of 566

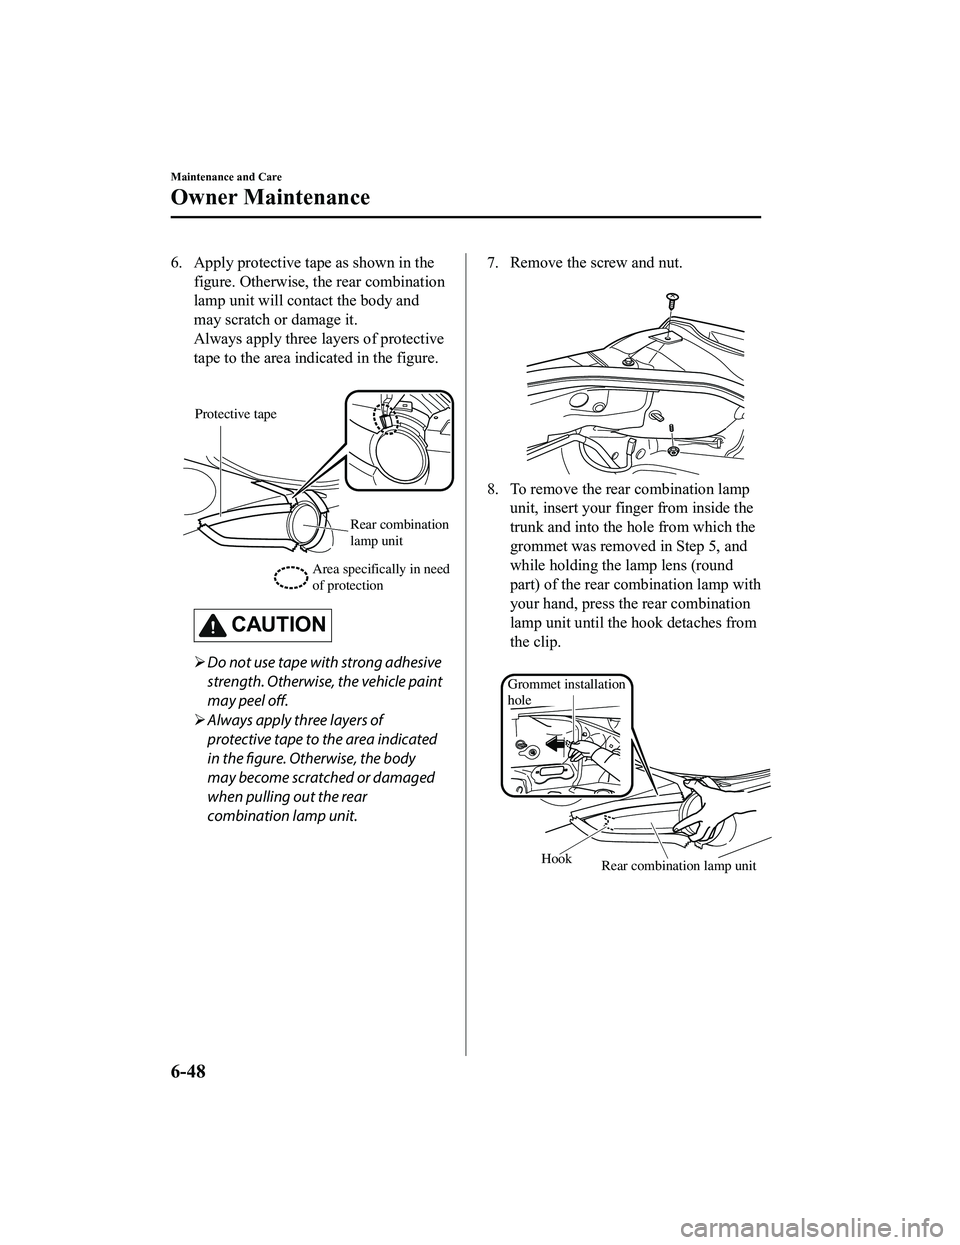
6. Apply protective tape as shown in thefigure. Otherwise, t he rear combination
lamp unit will contact the body and
may scratch or damage it.
Always apply three layers of protective
tape to the area indicated in the figure.
Protective tape
Rear combination
lamp unit
Area specifically in need
of protection
CAUTION
Do not use tape with strong adhesive
strength. Otherwise, the vehicle paint
may peel off.
Always apply three layers of
protective tape to the area indicated
in the
figure. Otherwise, the body
may become scratched or damaged
when pulling out the rear
combination lamp unit.
7. Remove the screw and nut.
8. To remove the rear combination lampunit, insert your finger from inside the
trunk and into the hole from which the
grommet was removed in Step 5, and
while holding the lamp lens (round
part) of the rear combination lamp with
your hand, press the rear combination
lamp unit until the hook detaches from
the clip.
Rear combination lamp unit
Hook
Grommet installation
hole
Maintenance and Care
Owner Maintenance
6-48
MX-5_8JA4-EA-19K_Edition1_old
2019-8-29 16:18:06
Page 409 of 566

▼Replacing Interior Light Bulbs
Overhead light
1. Wrap a small flathead screwdriver with
a soft cloth to prevent damage to the
lens, and then remove the lens by
carefully prying on the edge of the lens
with the flathead screwdriver.
2. Disconnect the bulb by pulling it out.
3. Install the new bulb in the reverseorder of the removal procedure.
Trunk light
1. Wrap a small flathead screwdriver witha soft cloth to prev ent damage to the
lens, and then remove the lens by
carefully prying on t he edge of the lens
with the flathead screwdriver.
2. Disconnect the connector from the unit.
3. Disconnect the bulb by pulling it out.
4. Install the new bulb in the reverseorder of the removal procedure.
Maintenance and Care
Owner Maintenance
6-51
MX-5_8JA4-EA-19K_Edition1_old 2019-8-29 16:18:06
Page 421 of 566

Do not spray water directly on the seam
area of the body and the convertible top
as it could result in water penetrating the
cabin and trunk.
Some leather treatment products can
ruin the convertible top's gloss. Be careful
of the one you choose.
Test on an inconspicuous, small corner of
the convertible top if you are not sure.
Do not wipe the convertible top using
alcohol, chlorine bleach, or organic
solvents such as thinner, benzene, or
gasoline. Otherwise, they may cause
discoloration or stains.
Do not get any car wax on the
convertible top.
If you do, remove it with a good leather
cleaner or mild detergent (about 5%
solution).
Too much treatment on the convertible
top can be as damaging as too little.
Follow the manufacturer's directions.
Do not overdo it!
Let the convertible top dry completely
before lowering after applying treatment
or dressing.
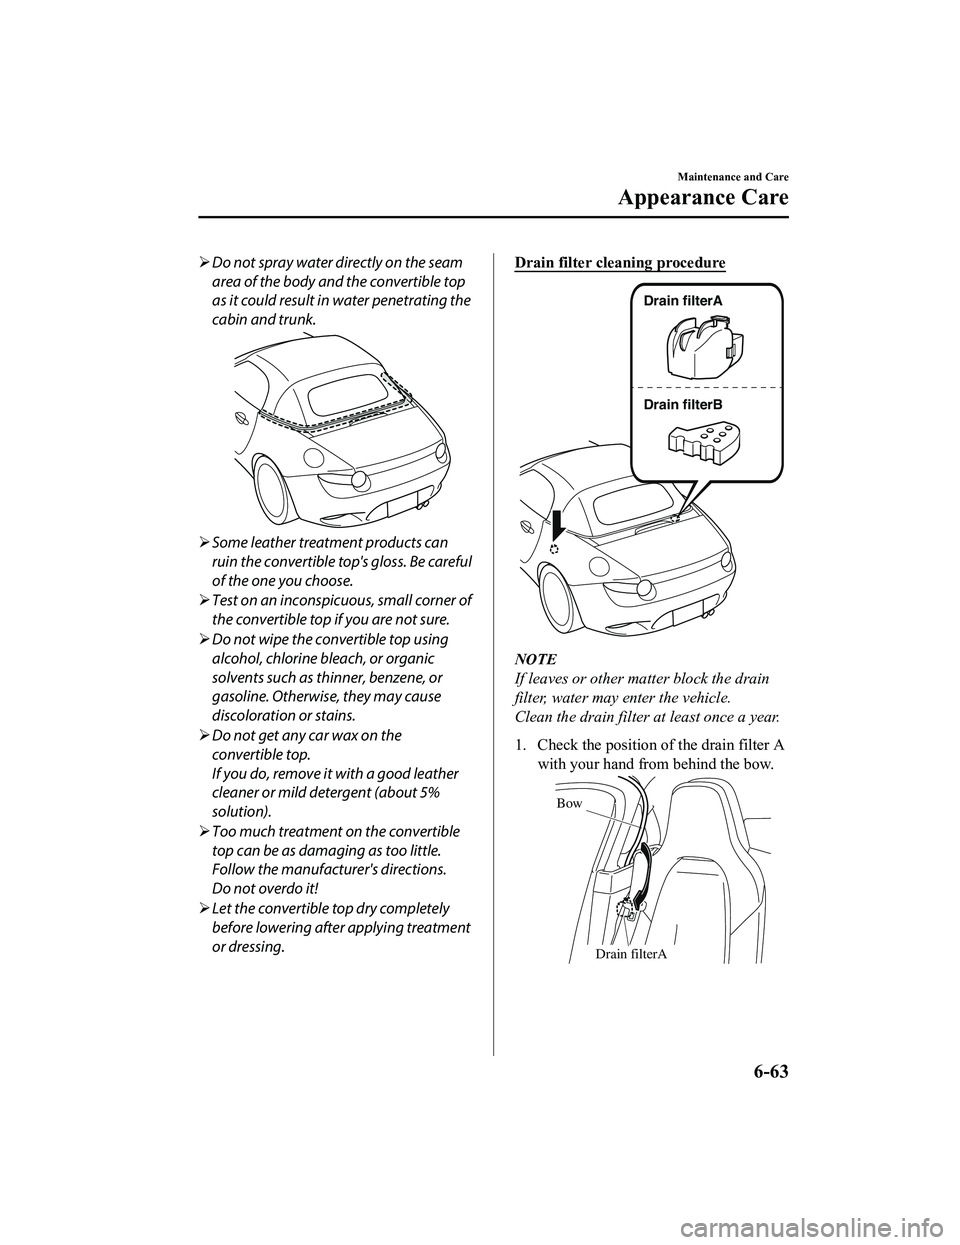
Drain filter cleaning procedure
Drain filterA
Drain filterB
NOTE
If leaves or other matter block the drain
filter, water may enter the vehicle.
Clean the drain filter at least once a year.
1. Check the position of the drain filter A
with your hand from behind the bow.
Drain filterA
Bow
Maintenance and Care
Appearance Care
6-63
MX-5_8JA4-EA-19K_Edition1_old
2019-8-29 16:18:06
Page 429 of 566

7If Trouble Arises
Helpful information on what to do if a problem arises with the vehicle.
Parking in an Emergency................. 7-2 Parking in an Emergency..............7-2
Flat Tire.............................................. 7-3 Tool Storage..................................7-3
Emergency Flat Tire Repair
Kit................................................. 7-5
Changing a Tire.......................... 7-17
Battery Runs Out............................ 7-23 Jump-Starting............................. 7-23
Emergency Starting.........................7-26 Starting a Flooded Engine.......... 7-26
Push-Starting.............................. 7-26
Overheating......................................7-27 Overheating................................ 7-27
When Fuel-Filler Lid Cannot be
Opened..............................................7-29 When Fuel-Filler Lid Cannot be
Opened........................................7-29
Emergency Towing.......................... 7-30
Towing Description.................... 7-30
Tiedown Hooks
*......................... 7-31
Warning/Indicator Lights and
Warning Sounds.............................. 7-33 If a Warning Light Turns On or
Flashes........................................ 7-33
Message Indicated in Multi-
information Display
*.................. 7-45
Message Indicated on
Display........................................7-46
Warning Sound is Activated....... 7-48
When Trunk Lid Cannot be
Opened..............................................7-52 When Trunk Lid Cannot be
Opened........................................7-52
When the Roof Cannot be
Closed............................................... 7-57 When the Roof Cannot be
Closed......................................... 7-57
*Some models.7-1
MX-5_8JA4-EA-19K_Edition1_old 2019-8-29 16:18:06
Page 438 of 566

CAUTION
The remaining sealant in the hose may
spray out when the hose is removed.
Remove the hose carefully because you
may not be able to remove the sealant
contacting clothing or other objects.
17. Install the tire valve cap.
18. Put the emergency flat tire repair kit into the trunk.
19. Start driving immediately to spread the sealant in the tire.
CAUTION
Carefully drive the vehicle at a speed of
80 km/h (50 mph) or less. If the vehicle
is driven at a speed of 80 km/h (50 mph)
or more, the vehicle may vibrate.
NOTE
If the tire is not properly inflated, the
tire pressure monitoring system
warning light will illuminate (page
4-27).
20. After driving the vehicle for about 10 minutes or 5 km (3 miles), connect the
air compressor to the tire using Step 9
of the procedure, and check the tire
inflation pressure using the tire
pressure gauge on th e air compressor.
If the tire inflation pressure is lower
than the specified tire inflation
pressure, turn the air compressor on
and wait until it reaches the specified
tire inflation pressure.
WARNING
If the tire inflation pressure has
decreased below 130 kPa (1.3 kgf/cm
2
or bar, 18.9 psi), stop driving and
contact an Authorized Mazda Dealer:
The repair using the emergency flat tire
repair kit was not successful.
If you see a decrease in the tire inflation
pressure, even if Steps 9 to 20 of the
procedure are performed repeatedly,
stop driving:
Contact an Authorized Mazda Dealer.
CAUTION
Before checking the tire inflation
pressure using the tire pressure gauge,
turn the air compressor switch off.
21. The emergency flat tire repair is completed successfully if the tire
inflation pressure does not decrease.
Carefully drive the vehicle to the
nearest Authorized Mazda Dealer
immediately and have the flat tire
replaced. Replacement with a new tire
is recommended. If the tire is to be
repaired or reused, consult an
Authorized Mazda Dealer.
If Trouble Arises
Flat Tire
7-10
MX-5_8JA4-EA-19K_Edition1_old 2019-8-29 16:18:06
Page 443 of 566

If the tire inflation pressure does not
increase, repair of the tire is not
possible. If the tire does not reach
the specified tire inflation pressure
within 10 minutes, it may have
received extensive damage. In this
case, the repair using the emergency
flat tire repair kit was not successful.
Contact an Authorized Mazda
Dealer.
If the tire has been over-inflated,
loosen the screw cap on the air
compressor and bleed some of the
air out.
20. When the tire inflates to the specified tire inflation pressure, turn the air
compressor switch off, turn the sleeve
of the air compressor hose to the left,
and pull it out o f the tire valve.
21. Install the tire valve cap.
22. Put the emergency flat tire repair kit into the trunk.
23. Start driving immediately to spread the sealant in the tire.
CAUTION
Carefully drive the vehicle at a speed of
80 km/h (50 mph) or less. If the vehicle
is driven at a speed of 80 km/h (50 mph)
or more, the vehicle may vibrate.
NOTE
If the tire is not properly inflated, the
tire pressure monitoring system
warning light will illuminate (page
4-27).
24. After driving the vehicle for about 10
minutes or 5 km (3 miles), connect the
air compressor to th e tire using Step 17
of the procedure, and check the tire
inflation pressure using the tire
pressure gauge on the air compressor.
If the tire inflation pressure is lower
than the specifie d tire inflation
pressure, turn the air compressor on
and wait until it reaches the specified
tire inflation pressure.
WA R N I N G
If the tire inflation pressure has
decreased below 130 kPa (1.3 kgf/cm
2
or bar, 18.9 psi), stop driving and
contact an Authorized Mazda Dealer:
The repair using the emergency flat tire
repair kit was not successful.
If you see a decrease in the tire inflation
pressure, even if Steps 17 to 24 of the
procedure are performed repeatedly,
stop driving:
Contact an Authorized Mazda Dealer.
CAUTION
Before checking the tire inflation
pressure using the tire pressure gauge,
turn the air compressor switch off.
If Trouble Arises
Flat Tire
7-15
MX-5_8JA4-EA-19K_Edition1_old 2019-8-29 16:18:06
Page 457 of 566

When Fuel-Filler LidCannot be Opened
If the battery is dead, the fuel-filler lid
cannot be opened.
In this case, the fuel-filler lid can be
opened by taking care of the dead battery
situation.
Refer to Jump-Starting on page 7-23.
If the fuel-filler lid cannot be opened even
if the dead battery situation has been
resolved, the electrical system may have a
malfunction.
In this case, the fuel-filler lid can be
opened using the following procedure as
an emergency measure.
1. Open the trunk lid.
Refer to Opening and Closing the
Trunk Lid on page 3-22.
2. Pull the center section of the plastic fastener and remove the fasteners.
3. Partially peel back the cover inside thetrunk, then pull the emergency release
lever.
Emergency release
lever
If Trouble Arises
When Fuel-Filler Lid Cannot be Opened
7-29
MX-5_8JA4-EA-19K_Edition1_old 2019-8-29 16:18:06
Page 469 of 566

SignalWarning Action to be taken
Seat Belt Warning
Light The seat belt warning light turns on if the
driver or passenger's seat is occupied and
the seat belt is not fastened with the ignition
switched ON.
If the driver or passenger's seat belt is un‐
fastened (only when the passenger's seat is
occupied) and the vehicle is driven at a
speed faster than about 20 km/h (12 mph),
the warning light flash
es. After a short time,
the warning light stops flashing, but re‐
mains illuminated.
NOTE
The warning light flashes for about 6
seconds if the driver's seat belt is not fas ‐
tened when the ignition is switched ON.
To allow the passenger occupant classifi ‐
cation sensor to function properly, do not
place and sit on an additional seat cush ‐
ion on the passenger's seat. The sensor
may not function properly because the
additional seat cushion could cause sen ‐
sor interference.
If a small child is seated on the passeng ‐
er's seat, the warning light may not oper ‐
ate. Fasten the seat belts.
Door-Ajar/Trunk
lid-Ajar Warning Indi‐ cation/Warning Light The light turns on if any door/trunk lid is
not closed securely.
Close the door/tr
unk lid securely.
Low Fuel Warning
Light The light turns on when the remaining fuel
is about 9.0 L (2.3 US gal, 1.9 Imp gal).
NOTE
The light illumination timing may vary be
‐
cause fuel inside the fuel tank moves
around according to the driving conditions
and the vehicle posture. Add fuel.
Check Fuel Cap Warn‐
ing Light If the check fuel cap warning light illumi‐
nates while driving, the fuel-filler cap may
not be installed properly.
Stop the engine and rein
stall the fuel-filler
cap.
Refer to Refueling on page 3-28
If Trouble Arises
Warning/Indicator Lights and Warning Sounds
7-41
MX-5_8JA4-EA-19K_Edition1_old 2019-8-29 16:18:06