Page 374 of 598
2. Confirming the surrounding conditions, reverse the vehicle.
1. (Display condition)
2. (Vehicle condition)
3. After your vehicle b egins entering the parking space, continue backing up slowly so that
the distance between the vehicle w idth lines and the sides of the parking space on the
left and right are roughly equal.
4. Continue to adjust the steering wheel until the vehicle width guide lines are parallel to
the left and right sides of the parking space.
When Driving
Rear View Monitor
4-230
Mazda3_8HZ1-EA-19G_Edition1_old 2019-5-17 13:49:03
Page 375 of 598

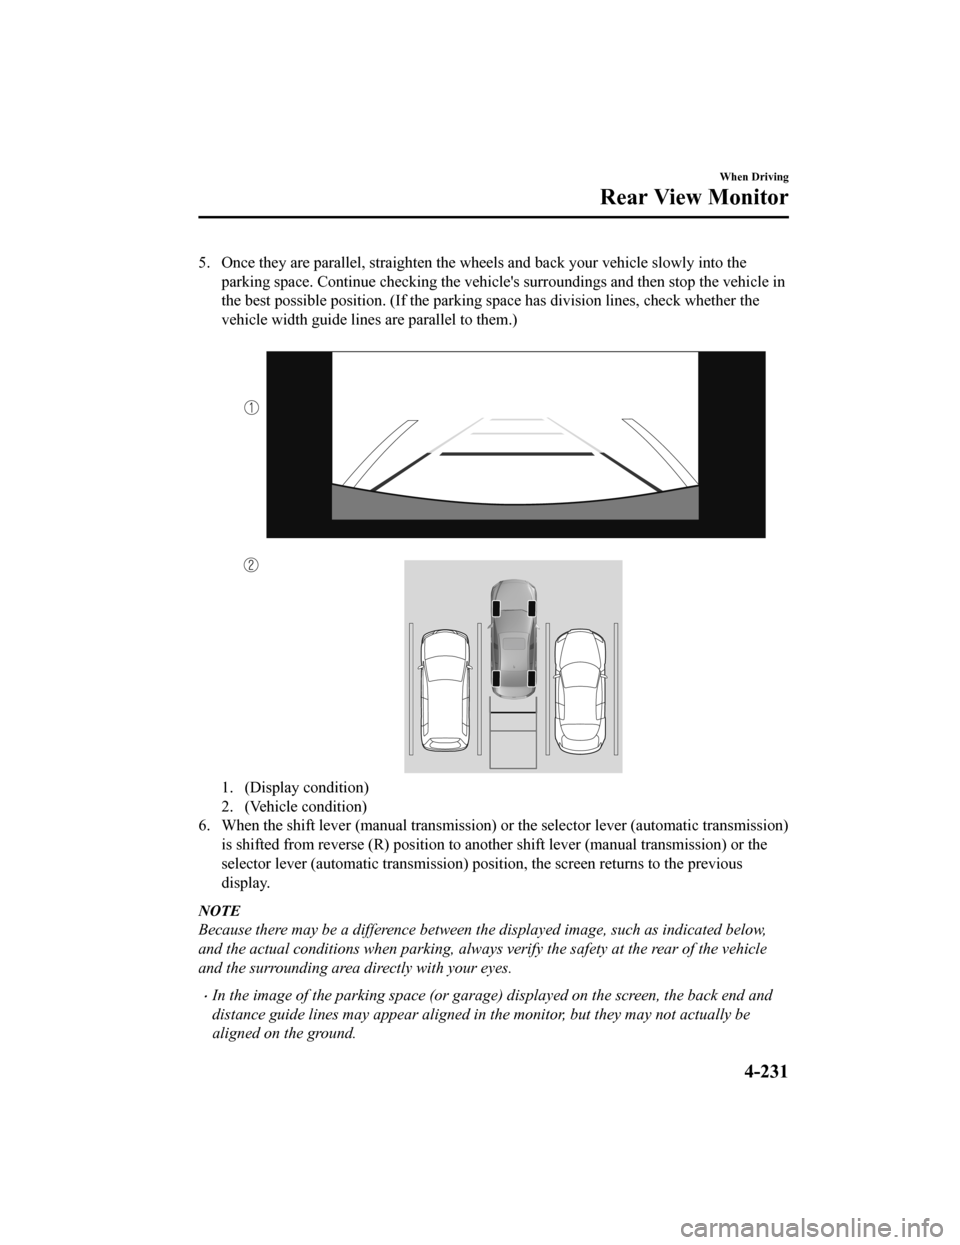
5. Once they are parallel, straighten the wheels and back your vehicle slowly into the
parking space. Continue checkin g the vehicle's surroundings and then stop the vehicle in
the best possible position. (If the parking space has division lines, check whether the
vehicle width guide lines are parallel to them.)
1. (Display condition)
2. (Vehicle condition)
6. When the shift lever (manual transmission) or the selector lever (automatic transmission)
is shifted from reverse (R) pos ition to another shift lever (manual transmission) or the
selector lever (automatic transmission) position, the screen re turns to the previous
display.
NOTE
Because there may be a difference between the displayed image, such as indicated below,
and the actual conditions when parking, always verify the safety at the rear of the vehicle
and the surrounding area directly with your eyes.
In the image of the parking space (or garage) displayed on the screen, the back end and
distance guide lines may appear aligned in the monitor, but they may not actually be
aligned on the ground.
When Driving
Rear View Monitor
4-231
Mazda3_8HZ1-EA-19G_Edition1_old 2019-5-17 13:49:03
Page 376 of 598

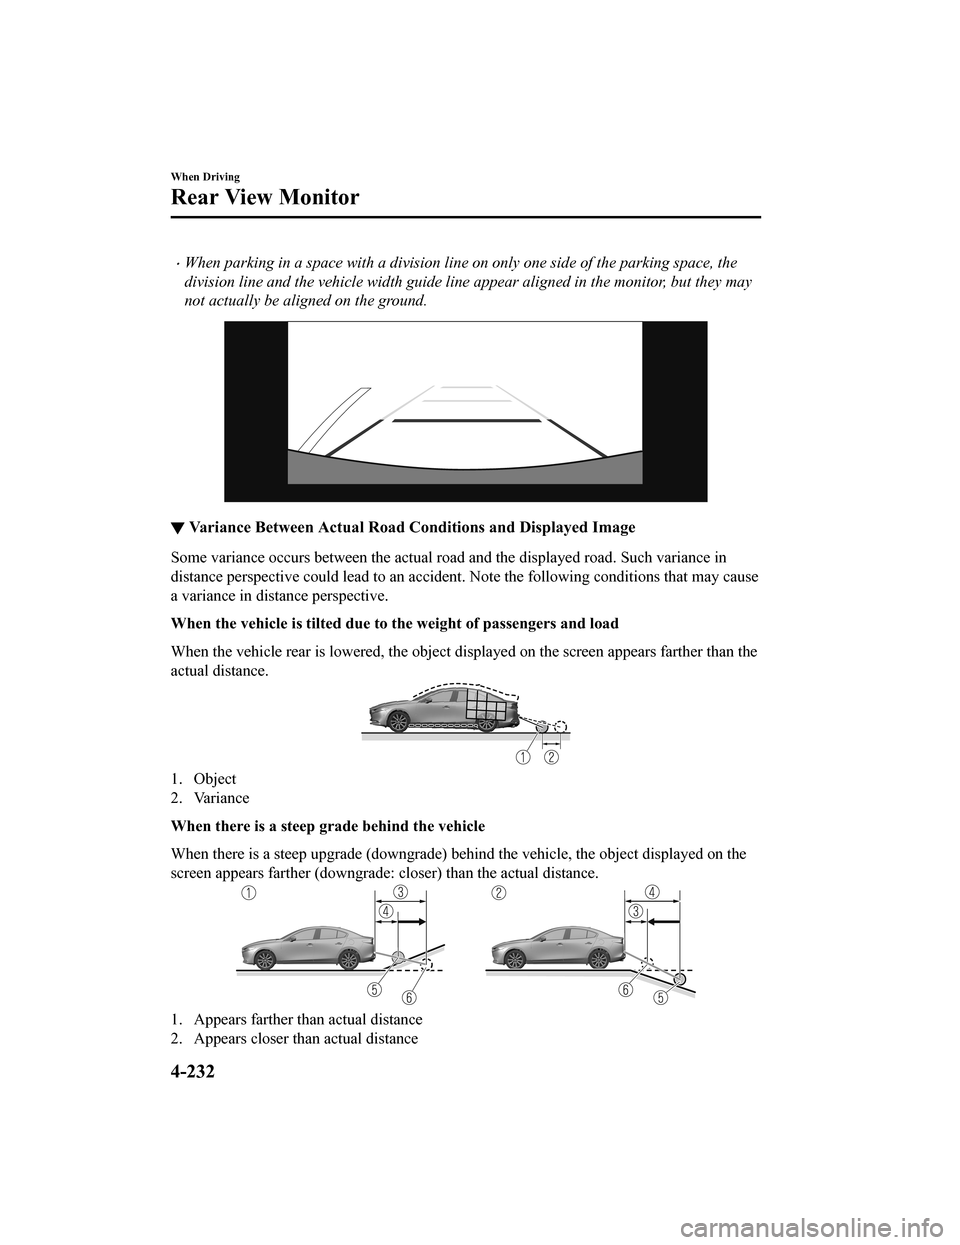
When parking in a space with a division line on only one side of the parking space, the
division line and the vehicle width guide line appear aligned in the monitor, but they may
not actually be aligned on the ground.
▼ Variance Between Actual Road C
onditions and Displayed Image
Some variance occurs between the actual road and the displayed road. Such variance in
distance perspective could lead to an accident. Note the follow ing conditions that may cause
a variance in distance perspective.
When the vehicle is tilted due to the weight of passengers and load
When the vehicle rear is lowered, the object displayed on the screen appears farther than the
actual distance.
1. Object
2. Variance
When there is a steep grade behind the vehicle
When there is a steep upgrade (downgrade) behind the vehicle, t he object displayed on the
screen appears farther (downgrade: closer) than the actual dist ance.
1. Appears farther than actual distance
2. Appears closer than actual distance
When Driving
Rear View Monitor
4-232
Mazda3_8HZ1-EA-19G_Edition1_old 2019-5-17 13:49:03
Page 377 of 598
3. Distance between the vehicle and object displayed on the screen.
4. Actual distance between the vehicle and object.
5. Object at actual position
6. Object on screen
Three-dimensional ob ject on vehicle rear
Because the distance guide lines are displayed based on a flat surface, the distance to the
three-dimensional object displayed on the screen is different f rom the actual distance.
1. (Screen display)
2. (Actual condition)
3. Sensed distance on screen A>B>C
4. Actual distance B>C=A
(Predicted vehicle path assist lines display type)
When Driving
Rear View Monitor
4-233
Mazda3_8HZ1-EA-19G_Edition1_old 2019-5-17 13:49:03
Page 378 of 598
When reversing near a three-dimensional object
When reversing near an overhanging object, the vehicle may hit the object even if the
anticipated course line does not c ontact the object on the screen. The position of the object
displayed on the screen is different from the actual position b ecause the anticipated course
lines on the screen are displayed based on a horizontal road surface. When backing up near
an overhanging object, confirm the rear and surrounding conditi ons directly with your eyes.
1. (Screen display)
2. (Actual view)
When Driving
Rear View Monitor
4-234
Mazda3_8HZ1-EA-19G_Edition1_old 2019-5-17 13:49:03
Page 381 of 598
The system may have a malfunction if the indicator light does not turn on even when the
parking sensor switch is turned on. Have your vehicle inspected by an Authorized Mazda
Dealer.
The system may have a malfunction if a me ssage indicating a system malfunction is
displayed. Have your vehicle inspected by an Authorized Mazda Dealer.
A message may be displayed even when the ambient temperature is extremely cold, or
mud, ice, or snow adheres to the sensor area. Remove any foreign matter from the sensor
area.
▼ Sensor Detection Range
The sensors detect obstructions within the following range.
1. Front ultrasonic sensor detection range
2. Rear corner/Rear side ultrasonic sensor detection range
3. Rear ultrasonic sensor detection range
4. Front corner ultrasonic sensor detection range
A: About 55.0 cm (About 21.6 in)
B: About 150 cm (About 59.0 in)
C: About 100 cm (About 39.3 in)
When Driving
Parking Sensor System
4-237
Mazda3_8HZ1-EA-19G_Edition1_old
2019-5-17 13:49:03
Page 382 of 598

Viewing distance display
DisplayDistance between vehicle and obstruction
Without 360° view monitor
With 360° viewmonitor Front ultrasonic sen‐
sor
*/Front corner
ultrasonic sensor*
Rear ultrasonic sen‐ sor/Rear corner ul‐
trasonic sensor/Rear
side ultrasonic sen‐
sor
*
Without front ul‐
trasonic sensor and front corner ultra‐ sonic sensor With front ultra‐
sonic sensor and
front corner ultra‐ sonic sensor
Green
Front ultrasonic sen‐ sor:
Approx. 100―60.0 cm (39.3―23.6 in) Rear ultrasonic sen‐
sor:
Approx. 150―60.0 cm (59.0―23.6 in)
Yellow
Front ultrasonic sen‐
sor:
Approx. 60.0―45.0
cm (23.6―17.7 in)
Front corner ultrason‐ ic sensor:
Approx. 55.0―38.0 cm (21.6―14.9 in) Rear ultrasonic sen‐
sor:
Approx. 60.0―45.0 cm (23.6―17.7 in)
Rear corner ultrasonic
sensor/Rear side ul‐ trasonic sensor:
Approx. 55.0―38.0
cm (21.6―14.9 in)
Amber
Front ultrasonic sen‐ sor:
Approx. 45.0―35.0 cm (17.7―13.7 in)
Front corner ultrason‐ ic sensor:
Approx. 38.0―25 cm (14.9―9.8 in) Rear ultrasonic sen‐
sor:
Approx. 45.0―35.0 cm (17.7―13.7 in)
Rear corner ultrasonic sensor/Rear side ul‐ trasonic sensor:
Approx. 38.0―25 cm (14.9―9.8 in)
When Driving
Parking Sensor System
4-238*Some models.
Mazda3_8HZ1-EA-19G_Edition1_old 2019-5-17 13:49:03
Page 383 of 598

DisplayDistance between vehicle and obstruction
Without 360° view monitor
With 360° viewmonitor Front ultrasonic sen‐
sor
*/Front corner
ultrasonic sensor*
Rear ultrasonic sen‐ sor/Rear corner ul‐
trasonic sensor/Rear side ultrasonic sen‐
sor
*
Without front ul‐
trasonic sensor and front corner ultra‐ sonic sensor With front ultra‐
sonic sensor and
front corner ultra‐ sonic sensor
Red
Front ultrasonic sen‐ sor:
Within approx. 35.0 cm (13.7 in)
Front corner ultrason‐ ic sensor:
Within approx. 25 cm (9.8 in) Rear ultrasonic sen‐
sor:
Within approx. 35.0 cm (13.7 in)
Rear corner ultrasonic sensor/Rear side ul‐ trasonic sensor:
Within approx. 25 cm (9.8 in)
▼Park Assist Sensor System
Operation
When the parking sensor switch is pressed
with the ignition switched ON, the
indicator light turns on.
When the ignition is switched ON with the
parking sensor activated, the indicator
light turns on.
Press the switch again to stop the
operation.
1. Indicator light
NOTE
When the ignition is
switched OFF, the
system status before it was turned off is
maintained. For exampl e, if the ignition is
switched OFF while the parking sensor is
activated, the system will be activated
when the ignition is switched ON the next
time.
Operation conditions
The parking sensor system can be used
when all of the foll owing conditions are
met:
The ignition is switched ON.
The parking sensor switch is turned on.
NOTE
(Automatic vehicle)
The detection indicator and buzzer of
the front sensors/front corner sensors do
not operate when the selector lever is in
the P position.
The detection indicator and buzzer
sound do not activate when the parking
brake is applied.
When Driving
Parking Sensor System
*Some models.4-239
Mazda3_8HZ1-EA-19G_Edition1_old 2019-5-17 13:49:03