2020 MASERATI GRANTURISMO inflation pressure
[x] Cancel search: inflation pressurePage 191 of 286
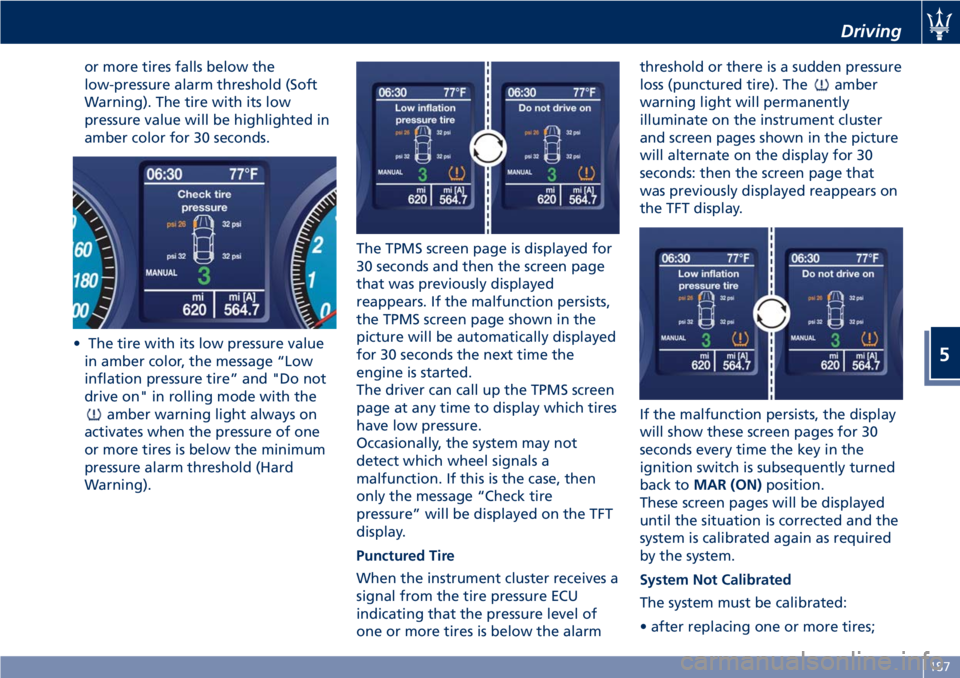
or more tires falls below the
low-pressure alarm threshold (Soft
Warning). The tire with its low
pressure value will be highlighted in
amber color for 30 seconds.
• The tire with its low pressure value
in amber color, the message “Low
inflation pressure tire” and "Do not
drive on" in rolling mode with the
amber warning light always on
activates when the pressure of one
or more tires is below the minimum
pressure alarm threshold (Hard
Warning).The TPMS screen page is displayed for
30 seconds and then the screen page
that was previously displayed
reappears. If the malfunction persists,
the TPMS screen page shown in the
picture will be automatically displayed
for 30 seconds the next time the
engine is started.
The driver can call up the TPMS screen
page at any time to display which tires
have low pressure.
Occasionally, the system may not
detect which wheel signals a
malfunction. If this is the case, then
only the message “Check tire
pressure” will be displayed on the TFT
display.
Punctured Tire
When the instrument cluster receives a
signal from the tire pressure ECU
indicating that the pressure level of
one or more tires is below the alarmthreshold or there is a sudden pressure
loss (punctured tire). The
amber
warning light will permanently
illuminate on the instrument cluster
and screen pages shown in the picture
will alternate on the display for 30
seconds: then the screen page that
was previously displayed reappears on
the TFT display.
If the malfunction persists, the display
will show these screen pages for 30
seconds every time the key in the
ignition switch is subsequently turned
back toMAR (ON)position.
These screen pages will be displayed
until the situation is corrected and the
system is calibrated again as required
by the system.
System Not Calibrated
The system must be calibrated:
• after replacing one or more tires;
Driving
5
187
Page 192 of 286
• after inverting the wheels;
• if you are not sure whether at least
one of the operations above was
performed.
If you simply corrected the tire
inflation pressure, you do not need to
recalibrate the system.
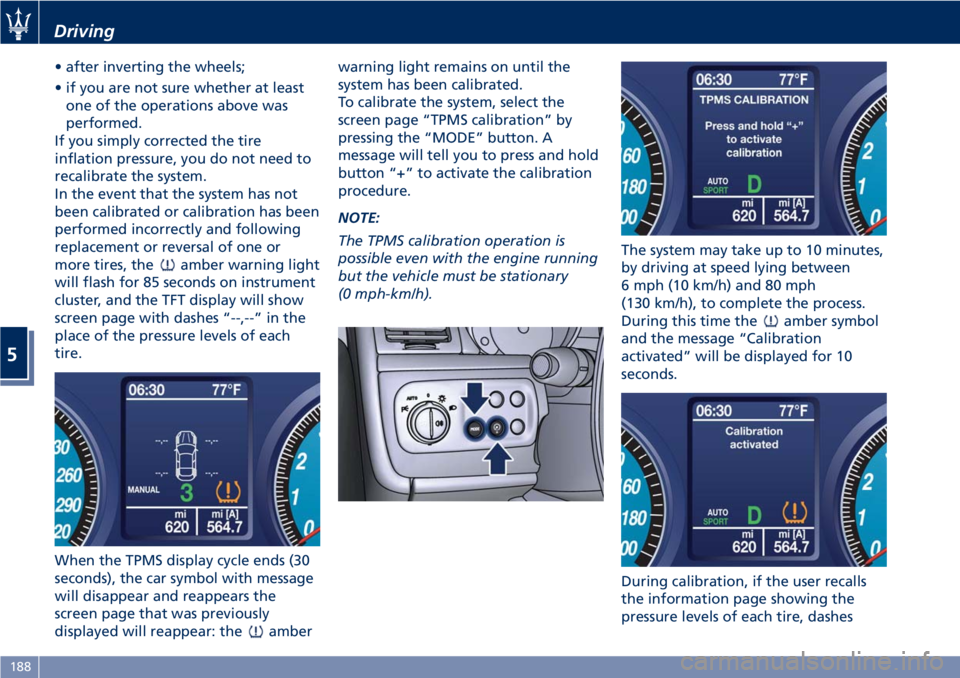
In the event that the system has not
been calibrated or calibration has been
performed incorrectly and following
replacement or reversal of one or
more tires, the
amber warning light
will flash for 85 seconds on instrument
cluster, and the TFT display will show
screen page with dashes “--,--” in the
place of the pressure levels of each
tire.
When the TPMS display cycle ends (30
seconds), the car symbol with message
will disappear and reappears the
screen page that was previously
displayed will reappear: the
amberwarning light remains on until the
system has been calibrated.
To calibrate the system, select the
screen page “TPMS calibration” by
pressing the “MODE” button. A
message will tell you to press and hold
button “+” to activate the calibration
procedure.
NOTE:
The TPMS calibration operation is
possible even with the engine running
but the vehicle must be stationary
(0 mph-km/h).The system may take up to 10 minutes,
by driving at speed lying between
6 mph (10 km/h) and 80 mph
(130 km/h), to complete the process.
During this time the
amber symbol
and the message “Calibration
activated” will be displayed for 10
seconds.
During calibration, if the user recalls
the information page showing the
pressure levels of each tire, dashes
Driving
5
188
Page 210 of 286
(Continued)
slope or an uneven surface, place
chocks or other suitable items in
front of or behind the wheels to
stop the vehicle from moving.
•Never start or run the engine with
the vehicle on a jack.
•No person should place any portion
of their body under a vehicle that is
supported by a jack.
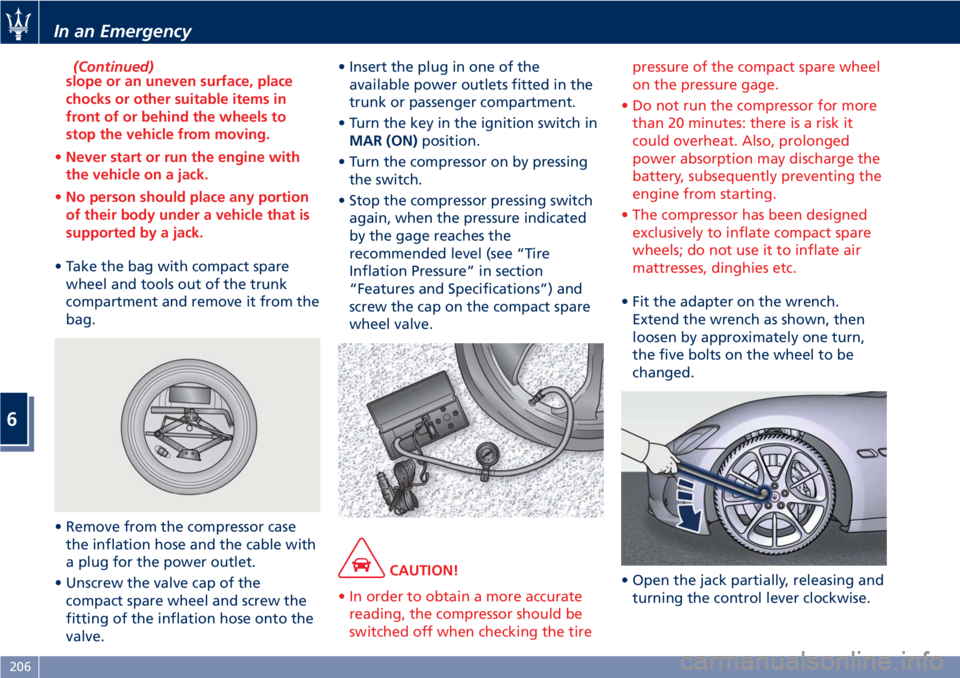
• Take the bag with compact spare
wheel and tools out of the trunk
compartment and remove it from the
bag.
• Remove from the compressor case
the inflation hose and the cable with
a plug for the power outlet.
• Unscrew the valve cap of the
compact spare wheel and screw the
fitting of the inflation hose onto the
valve.• Insert the plug in one of the
available power outlets fitted in the
trunk or passenger compartment.
• Turn the key in the ignition switch in
MAR (ON)position.
• Turn the compressor on by pressing
the switch.
• Stop the compressor pressing switch
again, when the pressure indicated
by the gage reaches the
recommended level (see “Tire
Inflation Pressure” in section
“Features and Specifications”) and
screw the cap on the compact spare
wheel valve.
CAUTION!
• In order to obtain a more accurate
reading, the compressor should be
switched off when checking the tirepressure of the compact spare wheel
on the pressure gage.
• Do not run the compressor for more
than 20 minutes: there is a risk it
could overheat. Also, prolonged
power absorption may discharge the
battery, subsequently preventing the
engine from starting.
• The compressor has been designed
exclusively to inflate compact spare
wheels; do not use it to inflate air
mattresses, dinghies etc.
• Fit the adapter on the wrench.
Extend the wrench as shown, then
loosen by approximately one turn,
the five bolts on the wheel to be
changed.
• Open the jack partially, releasing and
turning the control lever clockwise.
In an Emergency
6
206
Page 212 of 286

following the sequence shown in the
picture.
WARNING!
•Observe the tightening torque for
the bolts securing the wheels (72 ±
7 lbf·ft / 98 ± 10 Nm). This is
equivalent to a load of
approximately 44 lb (20 kg) being
placed on the handle of the wrench
supplied when extended for use.
•After refitting the standard wheel,
check the tire pressure.
WARNING!
•The spare wheel is narrower than
standard wheels and must only be
used to travel the distance required
to reach a service station, where thepunctured tire can be repaired or
replaced.
•Do not exceed a maximum speed of
50 mph (80 km/h) when using the
compact spare wheel; when this
limit is exceeded, the stability, road
holding and braking of the vehicle
will be compromised. Avoid
accelerating to full speed, heavy
braking and fast cornering.
•The compact spare wheel must be
inflated to the recommended tire
pressure (see “Tire Inflation
Pressure” in section “Features and
Specifications”).
•For safety reasons, it is absolutely
forbidden to drive with more than
one compact spare wheel fitted on
the vehicle.
•Snow chains cannot be fitted on the
compact spare wheel.
•The spare wheel can travel a
maximum of 1,800 mi (3.000 km).
NOTE:
The used wheel may soil the mats if it
is housed in the car: protect them if
possible.To Refit the Standard Wheel with
Repaired or Replaced Tire
• Following the procedure and the
caution described above, raise the
vehicle and remove the compact
spare wheel reusing the supplied
wrench with adapter, suitably
extended.
• Fit the standard wheel with repaired
or replaced tire.
• Tighten the original bolts on the
wheel.
• Lower the vehicle and remove the
jack.
• Fully tighten the bolts, alternately
tightening diametrically opposite.
WARNING!
•Observe the tightening torque for
the bolts securing the wheels (72 ±
In an Emergency
6
208
Page 213 of 286
7 lbf·ft / 98 ± 10 Nm). This is
equivalent to a load of
approximately 44 lb (20 kg) being
placed on the handle of the wrench
supplied when extended for use.
•After refitting the standard wheel,
check the tire pressure.
Once finished:
• completely deflate the compact
spare wheel by pressing on the valve
with the overhang of the valve cap;
• wrap the power cable and the
inflation hose inside the compressor
case;
• place the compressor, the jack, the
wrench and the adapter in the
container inside the compact spare
wheel;
• put the compact spare wheel in its
bag and put it back in the trunk
compartment.
Emergency Release of the
Parking Brake
In the event the electric parking brake
locks due to a total system failure (see
“Parking Brake” in section “Driving”),
it is not possible to move the vehicle,
since the thrust action of the brake
shoes will lock the rear wheels.
For moving the vehicle it is therefore
necessary to manually act on the
electric actuator to release the
pressure of the brake shoes on the
rear wheels by performing the
following operation.
CAUTION!
If the parking brake has been
activated in manual or automatic
mode and it is not possible to release
it by operating on the lever of the
central console, do not move the
vehicle since rear brake calipers might
be damaged. If you are not able to
perform the following operation, to
move the vehicle, load it on a rescue
vehicle, avoiding to move it. For more
information on vehicle towing, see
"Towing a Disabled Vehicle" chapter
in this section.
Manual Release Procedure
To manually release the parking brake,
you need to use the special tool
provided in the tool kit (see "Tool Kit"
in this section).
Proceed as follows:
• remove any luggage and/or the bag
containing the compact spare wheel
(if equipped) from the trunk
compartment;
• remove the floor panel from the
trunk compartment;
• remove the inside covering panel
from the battery compartment;
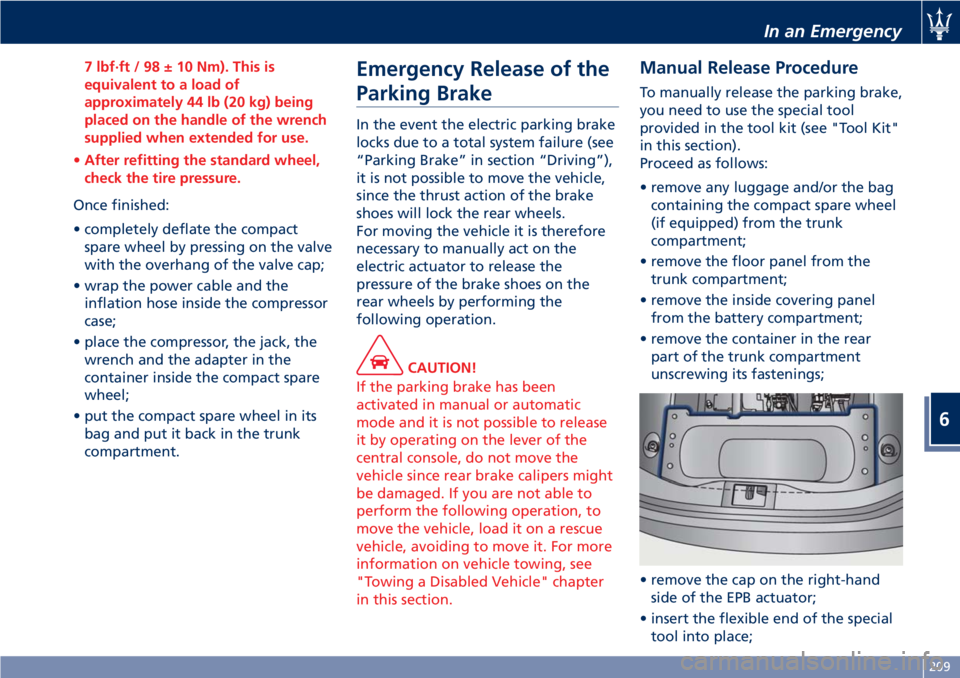
• remove the container in the rear
part of the trunk compartment
unscrewing its fastenings;
• remove the cap on the right-hand
side of the EPB actuator;
• insert the flexible end of the special
tool into place;
In an Emergency
6
209
Page 231 of 286

Service coupons 1° 2° 3° 4° 5° 6° 7° 8° 9° 10° 11° 12°
Main operations Maintenance schedules: every 12500 mi (20000 km) or 2 years
Update navigation maps with the latest
version availableIIIIIIIIIIII
I= Inspect and carry out any other necessary operation
A= Adjust
R= Replace
NOTE:
All the operations marked with an
asterisk(*)in the “Scheduled Service
Plan” are not compulsory but rather
recommended, in the event that the
vehicle is frequently used in
heavy-traffic conditions or on dusty or
sandy roads. The warranty concerning
emissions and the Manufacturer's
responsibility to recall the vehicle in
case of problems shall not be
invalidated if the Customer does not
carry out the operations marked with
the asterisk(*).
Periodic Maintenance
Every 300 mi (500 km) or before long
journeys
Check:
• engine coolant;
• windshield washer fluid level;
• tire inflation pressure and condition;• operation of lighting system
(headlights, turn signals, hazard
warning flashers, etc.);
• operation of windshield
washer/wiper system and wear of
windshield wiper blades.
Every 1900 mi (3000 km)
Check and top up, if required, the
engine oil level.
WARNING!
California Proposition 65
Operating, servicing and maintaining
a passenger vehicle or off-road vehicle
can expose you to chemicals including
such as, engine exhaust, carbon
monoxide, phthalates and lead, that
which are know to the State of
California to cause cancer and birth
defects or other reproductive harm. To
minimize exposure, avoid breathingexhaust, do not idle the engine except
as necessary, service your vehicle in a
well-ventilated area and wear gloves
or wash your hands frequently when
servicing your vehicle. For more
information go to:
www.P65Warnings.ca.gov/passenger-
vehicle
Heavy-Duty Vehicle Use
If the car is mainly used under one of
the following conditions:
• dusty roads;
• short, repeated journeys (less than
4-5 mi/7-8 km) at sub-zero outside
temperatures;
• engine often idling or driving long
distances at low speeds or long
periods of idleness;
you should perform the following
inspections more frequently than
Maintenance and Care
7
227
Page 258 of 286
Wheels Maintenance
Tires Maintenance
CAUTION!
To obtain the best performances and
the longest mileage from the tires,
take the following precautions during
the first 310 mi (500 km):
• do not drive at the vehicle’s
maximum speed;
• drive at low speed on curves;
• avoid sudden steering;
• avoid sudden braking;
• avoid sudden acceleration;
• do not drive at high speeds for too
long.
The tires inflation pressure must
correspond to the prescribed values
(see the chapter “Tire Inflation
Pressure” in section “Features and
Specifications”) and should be checked
only when the tires have cooled down.
In fact, the pressure increases as the
tire temperature progressively
increases.
Never reduce the pressure if tires are
hot (see “Tires – General Information”
chapter in section “Driving”).Insufficient tire inflating pressure can
cause tire overheating and possible
internal damage, which may even lead
to the tire destruction.
CAUTION!
After inspecting or adjusting the tire
pressure, always reinstall the valve
stem cap. This will prevent moisture
and dirt from entering the valve stem,
which could damage it.
Impacts with curbs, holes, and
obstacles in the road, and prolonged
trips on rough roads can cause tire
damage which may not be visible to
the naked eye.
Check your tires regularly for any signs
of damage (e.g. scratches, cuts, cracks,
bulges, etc.). If sharp objects penetrate
the tires, they can cause structural
damage which is only visible when the
tire is removed.
In any case, any possible damage must
be inspected by an experienced tire
fitter, as it may seriously reduce the
tire life.
Remember that tires deteriorate with
time, even if used little or not at all.
Cracks in the tire tread and sides,
alongside possible bulging, are a sign
of deterioration.
WARNING!
•Check the inflating pressure of the
tires when cold, at least every two
weeks and before long trips.
•Have the old tires inspected by an
experienced technician, to make sure
they can still be used safely. If the
same tire has been on your vehicle
for 4 or 5 years, have it inspected
anyway by an experienced
technician.
•Never fit tires of uncertain origin.
•“Directional” tires have an arrow on
their side showing the rolling
direction. To keep the best
performance when replacing a tire,
make sure that the rolling direction
corresponds to the one shown by
the arrow.
•During the tire life, the rolling
direction used for the first fitting
shall always be observed, also in
case of “nondirectional” tires.
•Check the depth of the tire tread at
regular intervals. The minimum
allowed value is 0.06 in (1,6 mm) at
that point the wear indicators on the
tire will be visible (see “Tires –
General Information” in section
Maintenance and Care
7
254
Page 263 of 286
such as, engine exhaust, carbon
monoxide, phthalates and lead, that
which are know to the State of
California to cause cancer and birth
defects or other reproductive harm. To
minimize exposure, avoid breathing
exhaust, do not idle the engine except
as necessary, service your vehicle in a
well-ventilated area and wear gloves
or wash your hands frequently when
servicing your vehicle. For more
information go to:
www.P65Warnings.ca.gov/passenger-
vehicleVehicle Stored for Long
Periods
If the vehicle is going to be stored for
over a month, follow the below
precautions:
• Wash and dry the vehicle
thoroughly.
• Store the vehicle in a covered, dry
and, if possible, ventilated area.
• Select P (Park) and turn off the
engine.
• Turn the key in the ignition switch in
STOP (OFF)position.
• Disconnect the battery (refer
“Maintenance-Free Battery” in this
section) or connect a battery charger
(refer to paragraph “Maintaining
Battery Charge” of chapter “Battery
Statement” in this section).
• Check the battery charge status.
During parking, this check must be
carried out every three weeks.
Recharge the battery if the open
circuit voltage is lower than 12.2 V.
• Check that the parking brake is NOT
engaged.
• Do not empty the engine cooling
system.
• Clean and protect the painted parts
applying protective wax.• Clean and protect polished metal
parts with special products available
on the market.
• Talc the windshield wiper blades and
raise them from the windshield.
• Cover the vehicle with a long cloth
in breathable fabric (available from
theAuthorized Maserati Dealer). Do
not use thick plastic sheets, which do
not allow the humidity on the
vehicle surface to evaporate.
• Inflate the tires up to a pressure
which must be 1 bar (14.5 psi) higher
than the normally prescribed one,
and check it at regular intervals.
NOTE:
TheAuthorized Maserati Dealercan
provide you with any information
about the available “Indoor and
Outdoor Car Covers”, available in the
“Genuine Accessories” range.
WARNING!
The tire pressure must be brought
back to the prescribed value before
reusing the vehicle (see “Tire Inflation
Pressure” in section “Features and
Specifications”).
Maintenance and Care
7
259