2020 MASERATI GRANTURISMO air conditioning
[x] Cancel search: air conditioningPage 144 of 286

compartment it is possible to house a
half-liter bottle or a smartphone.
NOTE:
To prevent to damage the smartphone
put it into its housing shown in figure
below (see also the label applied
under the cover with armrest
function).Analog Clock
To adjust the analog clock located on
the center of the dashboard above the
MTC+ display, use the MTC+ System
(see “MTC+ Settings” in this section).
The time can be visualized also on the
MTC+ status bar and on the
instrument cluster display (see “MTC+
Settings” in this section).
Clock lighting is aligned with the
backlighting status of the MTC+
display (refer to “MTC + Settings” in
section “Dashboard Instruments and
Controls”).
Air Conditioning Controls
The vehicle is equipped with an
automatic dual-zone air conditioning
system that allows to adjust separately
the air temperature and the airflow
distribution in the left and in the right
zone of the passenger compartment,
according to the requests of the driver
and the front passenger.
A humidity sensor, positioned on the
inner surface of the windshield, over
the rearview mirror, allows the A/C
system to prevent/ eliminate fogging
of the windshield and side windows.
The best efficacy in preventing
fogging is obtained by selecting the
AUTO function, described later.
A dual zone solar sensor, positioned on
the center of the dashboard upper
surface, helps to achieve the best
comfort in presence of solar radiation.
CAUTION!
To ensure proper functioning of the solar
sensor, do not apply adhesive parking
stickers, etc. in the checking area
between the sensor and the windshield.
Therefore, keep the windshield and the
sensor clean to prevent accumulation of
dust or other impurities.
Dashboard Instruments and Controls
4
140
Page 145 of 286
Climate Controls
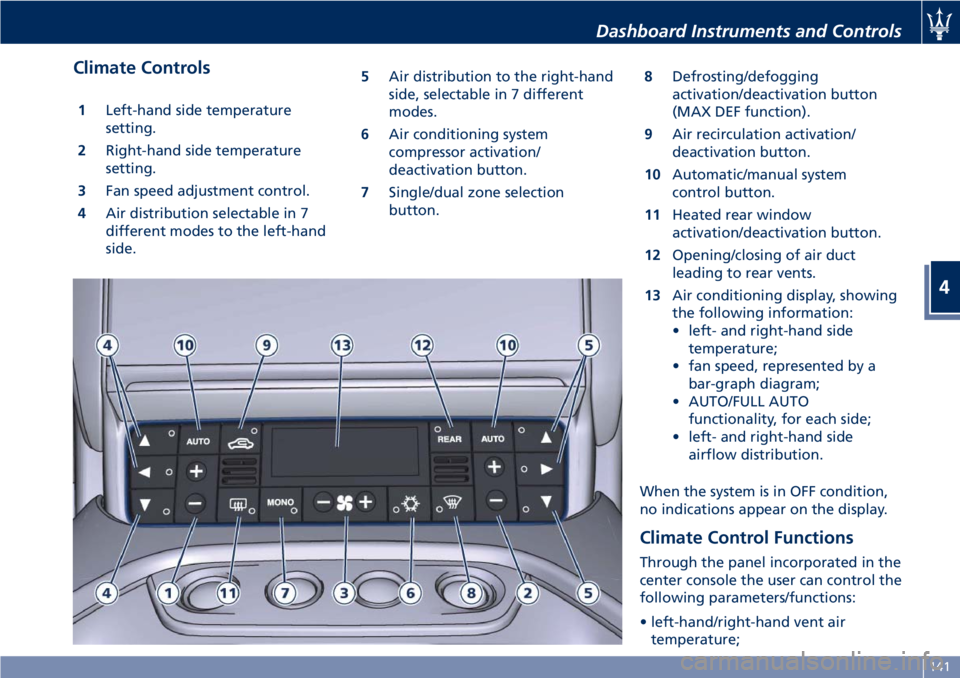
1Left-hand side temperature
setting.
2Right-hand side temperature
setting.
3Fan speed adjustment control.
4Air distribution selectable in 7
different modes to the left-hand
side.5Air distribution to the right-hand
side, selectable in 7 different
modes.
6Air conditioning system
compressor activation/
deactivation button.
7Single/dual zone selection
button.8Defrosting/defogging
activation/deactivation button
(MAX DEF function).
9Air recirculation activation/
deactivation button.
10Automatic/manual system
control button.
11Heated rear window
activation/deactivation button.
12Opening/closing of air duct
leading to rear vents.
13Air conditioning display, showing
the following information:
• left- and right-hand side
temperature;
• fan speed, represented by a
bar-graph diagram;
• AUTO/FULL AUTO
functionality, for each side;
• left- and right-hand side
airflow distribution.
When the system is in OFF condition,
no indications appear on the display.
Climate Control Functions
Through the panel incorporated in the
center console the user can control the
following parameters/functions:
• left-hand/right-hand vent air
temperature;
Dashboard Instruments and Controls
4
141
Page 146 of 286
• left-hand/right-hand vent air
distribution;
• fan speed (stepless change);
• compressor activation;
• air recirculation.
All the functions listed above can be
modified manually, i.e. the user can
select one or more of these functions
as desired, using the control panel.
The manual selections always have
priority over the automatic ones and
are memorized until the user chooses
the automatic control again.
When a function has been set
manually, the other automatic
functions will not be affected.
The following parameters/functions
can be set/modified manually:
• left-hand/right-hand side air
temperature;
• fan speed;
• air distribution on 7 positions
(left-hand/ right-hand);
• compressor activation;
• single/dual-zone distribution priority;
• defrosting/defogging function (MAX
DEF);
• air recirculation;
• automatic/manual control of the
system;
• heated rear window;• system deactivation;
• opening/closing of air duct leading
to rear vents.
Activation
The system can be started up in a
number of ways. It is however
advisable to begin by pressing one of
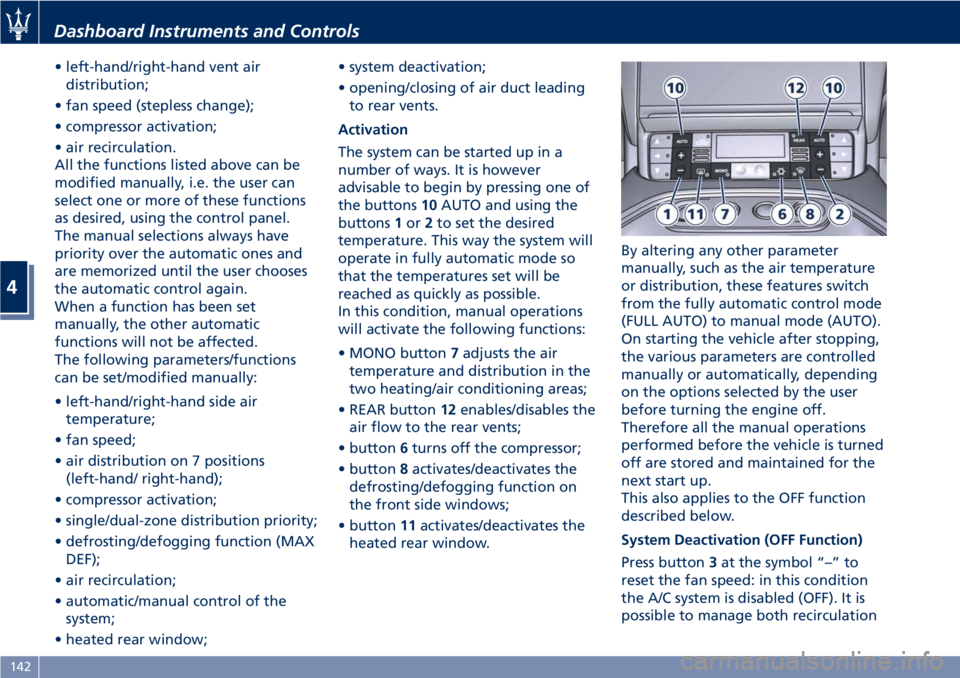
the buttons10AUTO and using the
buttons1or2to set the desired
temperature. This way the system will
operate in fully automatic mode so
that the temperatures set will be
reached as quickly as possible.
In this condition, manual operations
will activate the following functions:
• MONO button7adjusts the air
temperature and distribution in the
two heating/air conditioning areas;
• REAR button12enables/disables the
air flow to the rear vents;
• button6turns off the compressor;
• button8activates/deactivates the
defrosting/defogging function on
the front side windows;
• button11activates/deactivates the
heated rear window.By altering any other parameter
manually, such as the air temperature
or distribution, these features switch
from the fully automatic control mode
(FULL AUTO) to manual mode (AUTO).
On starting the vehicle after stopping,
the various parameters are controlled
manually or automatically, depending
on the options selected by the user
before turning the engine off.
Therefore all the manual operations
performed before the vehicle is turned
off are stored and maintained for the
next start up.
This also applies to the OFF function
described below.
System Deactivation (OFF Function)
Press button3at the symbol “–” to
reset the fan speed: in this condition
the A/C system is disabled (OFF). It is
possible to manage both recirculation
Dashboard Instruments and Controls
4
142
Page 152 of 286
Normal Starting of the
Engine
WARNING!
It is dangerous to run the engine in an
enclosed area. The engine consumes
oxygen and discharges carbon
dioxide, carbon monoxide and other
toxic gases in the atmosphere.
WARNING!
California Proposition 65
Operating, servicing and maintaining
a passenger vehicle or off-road vehicle
can expose you to chemicals including
such as, engine exhaust, carbon
monoxide, phthalates and lead, that
which are know to the State of
California to cause cancer and birth
defects or other reproductive harm. To
minimize exposure, avoid breathing
exhaust, do not idle the engine except
as necessary, service your vehicle in a
well-ventilated area and wear gloves
or wash your hands frequently when
servicing your vehicle. For more
information go to:www.P65Warnings.ca.gov/passenger-
vehicle
When you open a door to get into the
car, the instrument cluster turns on.
The TFT displays the complete
odometer, time, outside temperature
and the
open doors indicator.
Before starting the engine, close the
doors, adjust your seat, the inside and
outside mirrors, fasten your seat belt
and instruct all other occupants to
buckle their seat belts.
Make sure that the Electric Parking
Brake (EPB) is applied.
The shift lever must be in P (Park) or N
(Neutral) position before you can start
the engine. Apply the brakes before
shifting into any driving gear (see
“Automatic Transmission” in this
section).
CAUTION!
• Before starting the engine, switch off
the electrical devices with a high
power consumption (air-conditioning
and heating system, heated rear
window, headlights, etc.).
• Do not start the engine if the fuel
level in the tank is low.
Press the brake pedal and turn the key
in the ignition switch toMAR (ON)
position.
Instrument cluster displays the initial
sequence with warning light and
analog instruments test routine.
Turn the key intoAVVposition and
release it when the engine starts. The
key will return toMAR (ON)position
automatically.
Do not hold the key inAVVposition
for a long time.
If the engine fails to start, the starter
will disengage automatically after 10
seconds. If you wish to stop the
cranking of the engine prior to
starting it, turn the key toSTOP (OFF)
position.
If the engine does not start, turn the
key toSTOP (OFF)position and wait
for the gear display to go off. Then
repeat the entire procedure.
NOTE:
Normal starting of either a cold or a
warm engine is obtained without
pumping or pressing the accelerator
pedal.
Driving
5
148
Page 199 of 286
asphalt is significantly reduced. This
means that braking distances increase
considerably and road grip decreases.
Some advices for driving in the rain
are listed below.
• Reduce your speed and keep a
greater safety distance from the
vehicles in front of you. High speed
may result in a loss of vehicle
control.
• When driving on wet or slushy roads,
it is possible for a wedge of water to
build up between the tire and road
surface. This is known as
aquaplaning and may cause partial
or complete loss of vehicle control
and stopping ability. To reduce this
possibility: slow down if the road has
standing water or puddles.
• Heavy rain substantially reduces
visibility. In these circumstances, even
during the day, turn on the low
beams, to be more visible to other
drivers.
• Set the air conditioning and heating
system controls on the defogging
function, in order to avoid any
visibility problem.
• Periodically check the conditions of
the windshield wiper blades.• In low grip conditions use “ICE”
drive mode (see chapters “Drive
Mode” in this section).
Driving in Fog
If the fog is dense, avoid traveling if
possible.
When driving in mist, blanket fog or
when there is the possibility of banks
of fog, please consider some advices
listed below.
• Keep a moderate speed.
• Even in daytime, turn on the low
beams and rear fog lights. Do not
use the high beams.
• Remember that fog creates
dampness on the asphalt and thus
any type of maneuver is more
difficult and braking distances are
extended.
• Keep a safe distance from the
vehicle in front of you.
• Avoid sudden changes in speed as
much as possible.
• Whenever possible, avoid
overtaking.
• If you are forced to stop the vehicle
(breakdowns, impossibility of
proceeding due to poor visibility,
etc.), first of all, try to stop off of the
travel lane. Then turn on the hazardwarning flashers and, if possible, the
low beams.
• Sound the horn rhythmically if you
hear another vehicle approaching.
• When you get out of the vehicle, put
on the high-visibility vest (if
equipped).
CAUTION!
Be aware that rear fog lights can
bother the drivers following your
vehicle: when visibility is back to
normal, turn off these lights.
Driving in the Mountains
Mountain roads usually have many
narrow turns and curves, tunnels and
steep uphill or downhill slopes: please
consider some advices listed below.
• Drive at a moderate speed, avoid
“cutting” corners.
• When driving inside a tunnel in
daylight turn on the low beams in
advance; avoid high beams and be
aware of the rapid brightness
change. Avoid abrupt maneuvers
that could be dangerous for the
following vehicle.
• Never coast downhill with the
engine off or in neutral, and never
Driving
5
195
Page 228 of 286

Scheduled Service Plan
The Scheduled Maintenance services
listed in this chapter must be done
within the times or mileages specified
to protect your vehicle warranty and
ensure the best vehicle performance
and reliability.
More frequent maintenance may be
needed for vehicles in severeoperating conditions, such as dusty
areas and very short trip driving.
Inspection and service should also be
done anytime a malfunction is
suspected.
Maserati recommends that these
maintenance intervals be performed at
theAuthorized Maserati Dealer. Thetechnicians at your dealership know
your vehicle best, and have access to
factory-approved information,
genuine Maserati parts, and specially
designed electronic and mechanical
tools that can help prevent future
costly repairs.
Main Operations/Service Coupons
Service coupons 1° 2° 3° 4° 5° 6° 7° 8° 9° 10° 11° 12°
Main operations Maintenance schedules: every 12500 mi (20000 km) or 2 years
Belt for alternator, air conditioning
compressor and hydraulic steering controlI I* I I* I I* I I* I I* I I*
Replace at least every 2 years
Poly-V flexible control belt for water
pumpIIIIRIIIIRII
Replace every time the part is removed
Engine oil and filterRRRRRRRRRRRR
Replace at least every 2 years
Cooling system connections and linesI I*I*I*I*I*I* I*I*I*I*I*
Air filterR R* R R* R R* R R* R R* R R*
Fuel injection system’s connections and
linesI I* I I* I I*
Ignition system: cables and connectionsI I* I I* I I*
Spark plugsRR
Active carbon filter and Lambda sensorsR
Replace at least every 4 years
Maintenance and Care
7
224
Page 233 of 286
Maintenance Procedures
The following pages contain the
“required” maintenance standards
determined by Maserati engineers.
Besides those maintenance items
specified in the “Scheduled Service
Plan”, there are other components
which may require service or
replacement in the future.
To perform most of the services, it is
necessary to open the hood (see
“Open and Close the Hood” in section
“Before Starting”).
The following images show the
position of all components involved in
the maintenance service.
CAUTION!
• Failure to properly maintain your
vehicle or perform repairs and
service when necessary could result
in more costly repairs, damage to
other components or negatively
impact vehicle performance.
Immediately have potential
malfunctions examined by an
Authorized Maserati Dealeror a
qualified repair center.
• Your vehicle has been equipped with
improved fluids that protect the
performance and durability of yourvehicle and also allow extended
maintenance intervals. Do not use
chemical flushes for washing as the
chemicals can damage your engine,
transmission, power steering or air
conditioning. Such damages are not
covered by the New Vehicle Limited
Warranty. If a flush is needed
because of component malfunction,
use only a specific product for the
flushing procedure.
Maintenance and Care
7
229
Page 242 of 286
(Continued)
quick coupling from the negative
pole (–) of the battery.
If the battery needs to be removed
from its compartment, you must first
detach the terminal clamp from
negative pole (–) and then the other
terminal clamp from positive pole (+),
after removing the protective cover.
Battery poles are marked positive (+)
and negative (–) and are identified on
the battery case.
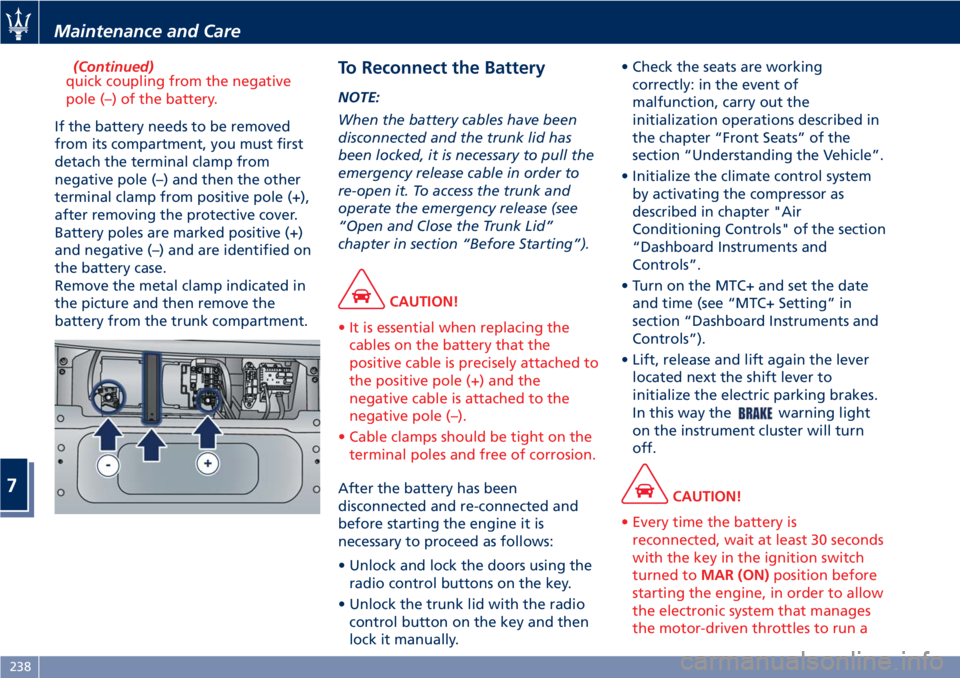
Remove the metal clamp indicated in
the picture and then remove the
battery from the trunk compartment.
To Reconnect the Battery
NOTE:
When the battery cables have been
disconnected and the trunk lid has
been locked, it is necessary to pull the
emergency release cable in order to
re-open it. To access the trunk and
operate the emergency release (see
“Open and Close the Trunk Lid”
chapter in section “Before Starting”).
CAUTION!
• It is essential when replacing the
cables on the battery that the
positive cable is precisely attached to
the positive pole (+) and the
negative cable is attached to the
negative pole (–).
• Cable clamps should be tight on the
terminal poles and free of corrosion.
After the battery has been
disconnected and re-connected and
before starting the engine it is
necessary to proceed as follows:
• Unlock and lock the doors using the
radio control buttons on the key.
• Unlock the trunk lid with the radio
control button on the key and then
lock it manually.• Check the seats are working
correctly: in the event of
malfunction, carry out the
initialization operations described in
the chapter “Front Seats” of the
section “Understanding the Vehicle”.
• Initialize the climate control system
by activating the compressor as
described in chapter "Air
Conditioning Controls" of the section
“Dashboard Instruments and
Controls”.
• Turn on the MTC+ and set the date
and time (see “MTC+ Setting” in
section “Dashboard Instruments and
Controls”).
• Lift, release and lift again the lever
located next the shift lever to
initialize the electric parking brakes.
In this way the
warning light
on the instrument cluster will turn
off.
CAUTION!
• Every time the battery is
reconnected, wait at least 30 seconds
with the key in the ignition switch
turned toMAR (ON)position before
starting the engine, in order to allow
the electronic system that manages
the motor-driven throttles to run a
Maintenance and Care
7
238