2020 MASERATI GRANTURISMO CONVERTIBLE service
[x] Cancel search: servicePage 219 of 296
WARNING!
California Proposition 65
Operating, servicing and maintaining
a passenger vehicle or off-road vehicle
can expose you to chemicals including
such as, engine exhaust, carbon
monoxide, phthalates and lead, that
which are know to the State of
California to cause cancer and birth
defects or other reproductive harm. To
minimize exposure, avoid breathing
exhaust, do not idle the engine except
as necessary, service your vehicle in a
well-ventilated area and wear gloves
or wash your hands frequently when
servicing your vehicle.
NOTE:
For the tire repair procedures with tire
repair kit see instructions included in
the kit.
This kit will provide a temporary tire
seal, allowing you to drive your
vehicle up to 6 miles (10 km) with a
maximum speed of 50 mph (80 km/h).
CAUTION!
• Intruding objects (e.g., screws or
nails) should not be removed fromthe tire, which could compromise
the repair with the tire repair kit.
• Do not use the tire repair kit if the
tire shows lateral damages and/or
the rim is damaged by driving with
flat tire.
• Tire repair kit can be used in outside
temperatures down to
approximately -4°F (-20°C).
• Replace the tire repair kit sealant gas
cylinder prior to the expiration date
(printed on the gas cylinder label) to
assure optimum operation of the
system.
NOTE:
•The compressor power plug can be
inserted either in the 12 V power
outlet housed in the trunk or inside
the passenger compartment (see
“Interior Features” in section
“Understanding the Vehicle”).
•When having the tire serviced,
advise theAuthorized Maserati
Dealeror service center that the tire
has been sealed using the tire repair
kit.
Using the Compact Spare
Wheel (for versions/markets
where provided)
Upon request, the vehicle may come
equipped with a compact spare wheel
(emergency wheel), jack and tools for
replacing a wheel.
The compact spare wheel is stored in
the trunk and housed in a bag: it is
supplied deflated in order to limit the
amount of space occupied. An electric
compressor is also provided for
inflating.
The bag covering the compact spare
wheel has a side pocket containing
the protective bag for the standard
wheel that has been removed along
with a pair of gloves.
In the event of a tire puncture,
proceed as follows.
• Stop the vehicle in a place that does
not constitute a danger to traffic
and where the wheel can be
changed safely. The vehicle must be
level and on firm ground.
• Select the P (Park) mode and then
engage manually the electric
parking brake and turn the key in
the ignition switch toSTOP (OFF)
position.
In an Emergency
6
215
Page 223 of 296

approximately 44 lb (20 kg) being
placed on the handle of the wrench
supplied when extended for use.
•After refitting the standard wheel,
check the tire pressure.
WARNING!
•The spare wheel is narrower than
standard wheels and must only be
used to travel the distance required
to reach a service station, where the
punctured tire can be repaired or
replaced.
•Do not exceed a maximum speed of
50 mph (80 km/h) when using the
compact spare wheel; when this
limit is exceeded, the stability, road
holding and braking of the vehicle
will be compromised. Avoid
accelerating to full speed, heavy
braking and fast cornering.
•The compact spare wheel must be
inflated to the recommended tire
pressure (see “Tire Inflation
Pressure” in section “Features and
Specifications”).
•For safety reasons, it is absolutely
forbidden to drive with more than
one compact spare wheel fitted on
the vehicle.•Snow chains cannot be fitted on the
compact spare wheel.
•The spare wheel can travel a
maximum of 1,800 mi (3.000 km).
NOTE:
The used wheel may soil the mats if it
is housed in the car: insert the used
wheel in the protective bag housed in
the side pocket of the covering bag.
To Refit the Standard Wheel with
Repaired or Replaced Tire
• Following the procedure and the
caution described above, raise the
vehicle and remove the compact
spare wheel reusing the supplied
wrench with adapter, suitably
extended.
• Fit the standard wheel with repaired
or replaced tire.
• Tighten the original bolts on the
wheel.
• Lower the vehicle and remove the
jack.
• Fully tighten the bolts, alternately
tightening diametrically opposite.
WARNING!
•Observe the tightening torque for
the bolts securing the wheels (72 ±
7 lbf·ft / 98 ± 10 Nm). This is
equivalent to a load of
approximately 44 lb (20 kg) being
placed on the handle of the wrench
supplied when extended for use.
•After refitting the standard wheel,
check the tire pressure.
Once finished:
• completely deflate the compact
spare wheel by pressing on the valve
with the overhang of the valve cap;
• wrap the power cable and the
inflation hose inside the compressor
case;
• place the compressor, the jack, the
wrench and the adapter in the
In an Emergency
6
219
Page 228 of 296
Emergency Starting with
Maserati Code
If the Maserati CODE fails to
deactivate the engine immobilizer, the
CODE warning light will illuminate
permanently, while the
MIL
warning light will go off after four
seconds and will turn on again
immediately afterward: the engine will
not start.
To start the engine, follow the
emergency starting procedure.
Emergency Starting Procedure
NOTE:
We recommend that you carefully read
the entire procedure before
performing it. If you make a mistake,
turn the key in the ignition switch to
STOP (OFF)position and repeat the
operations from the first step.
WARNING!
California Proposition 65
Operating, servicing and maintaining
a passenger vehicle or off-road vehicle
can expose you to chemicals including
such as, engine exhaust, carbon
monoxide, phthalates and lead, thatwhich are know to the State of
California to cause cancer and birth
defects or other reproductive harm. To
minimize exposure, avoid breathing
exhaust, do not idle the engine except
as necessary, service your vehicle in a
well-ventilated area and wear gloves
or wash your hands frequently when
servicing your vehicle. For more
information go to:
www.P65Warnings.ca.gov/passenger-
vehicle
• Read the 5-digit electronic code
found on the CODE card.
• Turn the key in the ignition switch to
MAR (ON)position: at this moment
the
CODE andMIL warning
lights are on.
• Push and hold down the accelerator
pedal. Approximately 8 seconds later,
the
MIL warning light will go off.
Release the accelerator and get
ready to count the number of times
the
MIL warning light flashes.
• Wait until the number of flashes is
equal to the first digit of your CODE
card, then push and hold down the
accelerator pedal until the
MIL
warning light goes off, after about 4
seconds, then release the accelerator
pedal.• The
MIL warning light starts
flashing again. As soon as the
displayed number of flashing is equal
to the second digit of your CODE
card, press down the accelerator
pedal and hold it.
• Proceed in the same manner for the
remaining digits in the code on the
CODE card.
• When the last digit has been
entered, hold the accelerator pedal
pushed down. The
MIL warning
light comes on for 4 seconds and
then goes off; you can now release
the accelerator pedal.
• When the
MIL warning light
flashes fast (for about 4 seconds) it
confirms that the procedure has
been performed correctly.
• Start the engine by turning the key
in the ignition switch fromMAR (ON)
position toAVVposition.
If the
MIL warning light remains
on, turn the key toSTOP (OFF)position
and repeat the procedure from the
first step. This procedure can be
repeated an unlimited number of
times.
In an Emergency
6
224
Page 231 of 296

the jumper cables reach and set the
parking brake and make sure the
ignition is off.
• Connect one terminal clamp of the
positive jumper cable to the positive
(+) pole of the discharged battery.
• Connect the opposite terminal clamp
of the positive (+) jumper cable to
the positive (+) pole of the booster
battery.
• Connect one terminal clamp of the
negative jumper cable to the
negative (–) pole of the booster
battery.
• Connect the opposite terminal clamp
of the negative (–) jumper cable to
the negative (–) pole of the
discharged battery.
• Start the engine in the vehicle that
has the booster battery, let the
engine idle a few minutes, and then
start the engine in the vehicle withthe discharged battery. If using a
portable battery booster, wait a few
seconds after connecting the cables,
before starting the booster vehicle.
Once the engine is started, remove the
jumper cables in the reverse sequence.
• Disconnect the terminal clamp of the
negative (–) jumper cable from the
negative (–) pole of the discharged
battery.
• Disconnect the opposite terminal
clamp of the negative jumper cable
from the negative (–) pole of the
booster battery.
• Disconnect the terminal clamp of the
positive (+) jumper cable from the
positive (+) pole of the booster
battery.
• Disconnect the terminal clamp of the
positive jumper cable from the
positive (+) pole of the discharged
battery.
• After starting the engine of the
vehicle with a discharged battery,
avoid turning it off immediately
because the engine running can help
recharge the battery if the latter is
not broken and if the charging
system is not faulty.NOTE:
If frequent jump-starting is required
to start your vehicle you should have
the battery and charging system
inspected at anAuthorized Maserati
Dealer.
WARNING!
California Proposition 65
Operating, servicing and maintaining
a passenger vehicle or off-road vehicle
can expose you to chemicals including
such as, engine exhaust, carbon
monoxide, phthalates and lead, that
which are know to the State of
California to cause cancer and birth
defects or other reproductive harm. To
minimize exposure, avoid breathing
exhaust, do not idle the engine except
as necessary, service your vehicle in a
well-ventilated area and wear gloves
or wash your hands frequently when
servicing your vehicle. For more
information go to:
www.P65Warnings.ca.gov/passenger-
vehicle
In an Emergency
6
227
Page 234 of 296
WARNING!
California Proposition 65
Operating, servicing and maintaining
a passenger vehicle or off-road vehicle
can expose you to chemicals including
such as, engine exhaust, carbon
monoxide, phthalates and lead, that
which are know to the State of
California to cause cancer and birth
defects or other reproductive harm. To
minimize exposure, avoid breathing
exhaust, do not idle the engine except
as necessary, service your vehicle in a
well-ventilated area and wear gloves
or wash your hands frequently when
servicing your vehicle. For more
information go to:
www.P65Warnings.ca.gov/passenger-
vehicle
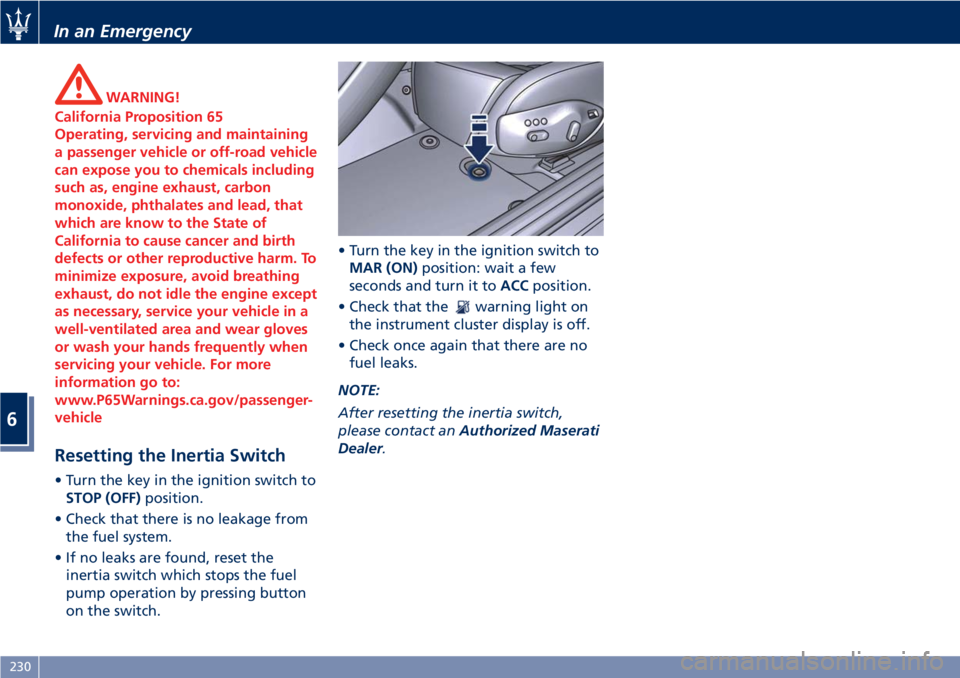
Resetting the Inertia Switch
• Turn the key in the ignition switch to
STOP (OFF)position.
• Check that there is no leakage from
the fuel system.
• If no leaks are found, reset the
inertia switch which stops the fuel
pump operation by pressing button
on the switch.• Turn the key in the ignition switch to
MAR (ON)position: wait a few
seconds and turn it toACCposition.
• Check that the
warning light on
the instrument cluster display is off.
• Check once again that there are no
fuel leaks.
NOTE:
After resetting the inertia switch,
please contact anAuthorized Maserati
Dealer.
In an Emergency
6
230
Page 235 of 296

7 – Maintenance and Care
Scheduled Maintenance Service............................ 232
Scheduled Service Plan................................... 234
Maintenance Procedures................................. 239
Maintenance-Free Battery................................ 247
Fuse Replacement...................................... 251
Bulb Replacement...................................... 257
A/C System Maintenance................................. 262
Wheels Maintenance.................................... 263
Bodywork Maintenance and Care.......................... 265
Interior Maintenance and Care............................ 268
Vehicle Stored for Long Periods............................ 269
Restarting the Vehicle.................................... 269
Battery Statement...................................... 270
231
Page 236 of 296
Scheduled Maintenance
Service
Correct maintenance is clearly the best
way to guarantee vehicle performance
and safety features, ensure respect for
the environment and low operating
costs.
NOTE:
Also remember that the scrupulous
observance of the maintenance
procedures is essential for keeping
your vehicle operating properly. Not
adhering to the “Scheduled Service
Plan” can impact your vehicle’s
warranty.
Interval Running Coupons
Maserati has therefore provided for a
series of checks and maintenance
operations involving the 1
stservice
when the vehicle mileage reaches
12500 mi (20000 km) or after 2 years of
the vehicle's life, and subsequently
every 12500 mi (20000 km) or every 2
years.
After the 12
thservice, maintenance
must be restarted with the operations
scheduled for the 1
st,2ndand 3rd
service.
CAUTION!
The Scheduled Maintenance services
are prescribed by the Manufacturer.
Failure to have the services carried out
can affect your warranty.
The Scheduled Maintenance service is
provided by the wholeAuthorized
Maserati Dealer. In the event that,
when a service is performed, further
replacements or repairs are found to
be necessary in addition to the
scheduled operations, these can be
carried out only with the specific
consent of the Customer.
CAUTION!
You are advised to notify the
Authorized Maserati Dealerof any
minor operating problem, without
waiting for the next scheduled service.
NOTE:
•Change your vehicle's oil if it has
been 2 years since your last oil
change.
•Change your engine oil more often if
you drive your vehicle off-road for an
extended period of time or shorttrips without reaching operation
temperature.
•Under no circumstances should oil
change intervals exceed 12500 mi
(20000 km) or at least after 2 years.
CAUTION!
Failure to perform the required
maintenance items may result in
damage to the vehicle.
Scheduled Maintenance
(Service) Indicator
When the deadlines for maintenance
Scheduled Maintenance services are
approaching, a message on the
instrument cluster display indicates
that service is due. The deadline may
be expressed in miles/Km or days,
whichever comes first.
The message is displayed only once,
upon activating the instrument cluster,
at decreasing intervals expressed in
mi/km (100, 50...... 1800, 1600,) or in
days (27, 24, ....... 6, 3), accompanied
by the
specific symbol.
Maintenance and Care
7
232
Page 237 of 296
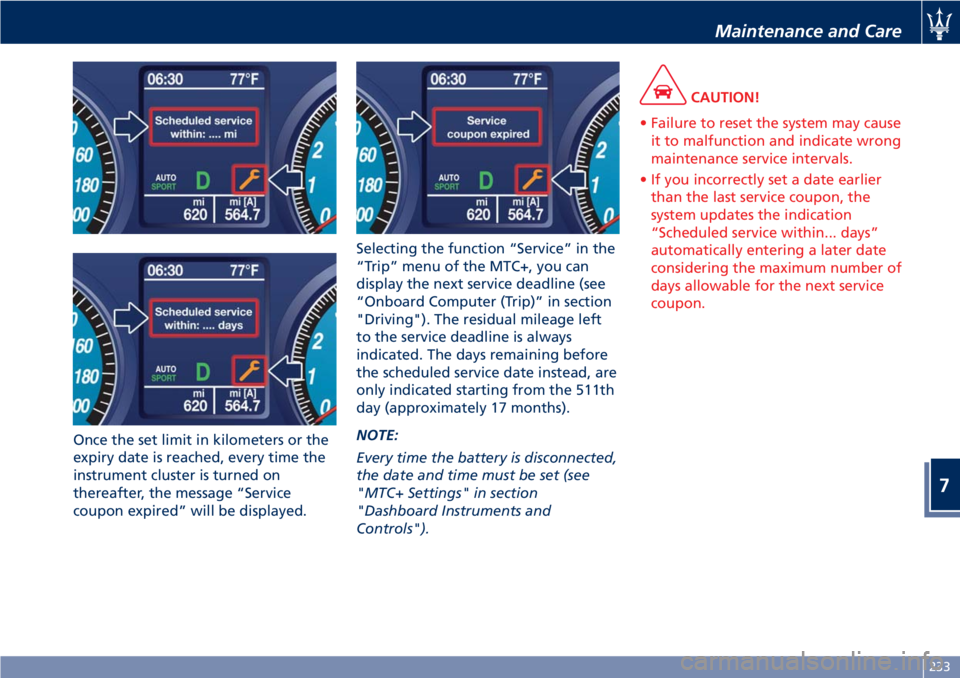
Once the set limit in kilometers or the
expiry date is reached, every time the
instrument cluster is turned on
thereafter, the message “Service
coupon expired” will be displayed.Selecting the function “Service” in the
“Trip” menu of the MTC+, you can
display the next service deadline (see
“Onboard Computer (Trip)” in section
"Driving"). The residual mileage left
to the service deadline is always
indicated. The days remaining before
the scheduled service date instead, are
only indicated starting from the 511th
day (approximately 17 months).
NOTE:
Every time the battery is disconnected,
the date and time must be set (see
"MTC+ Settings" in section
"Dashboard Instruments and
Controls").
CAUTION!
• Failure to reset the system may cause
it to malfunction and indicate wrong
maintenance service intervals.
• If you incorrectly set a date earlier
than the last service coupon, the
system updates the indication
“Scheduled service within... days”
automatically entering a later date
considering the maximum number of
days allowable for the next service
coupon.
Maintenance and Care
7
233