2020 MASERATI GRANTURISMO CONVERTIBLE belt
[x] Cancel search: beltPage 59 of 296
not hold the child, no matter how
strong you are. The child and others
could be badly injured. Any child
riding in your vehicle should always
be in a proper restraint system
suitable for the child’s size.
There are different sizes and types of
restraint systems for children from
newborn size to the child almost large
enough for an adult safety belt.
Always refer to the manual provided
with child seat to ensure it is the
proper type according the travelling
child. Use the restraint system that is
correct for your child.
Infants and Child Restraints
Safety experts recommend that
children ride rearwardfacing in the
vehicle until they are two years old or
until they reach either the height or
weight limit of their rear facing child
seat.
Two types of child restraint systems
can be used rearward-facing: infant
carriers and convertible child seats.
The infant carrier is only used
rearward-facing in the vehicle. It is
recommended for children from birth
until they reach the weight or height
limit of the infant carrier.Convertible child seats can be used
either rearward-facing or
forward-facing in the vehicle.
Convertible child seats often have a
higher weight limit in the
rearward-facing direction than infant
carriers do, so they can be used
rearward-facing by children who have
outgrown their infant carrier but are
still younger than at least two years
old.
Children should remain rearward-
facing until they reach the highest
weight or height allowed by their
child seat. Both types of child restraint
systems are fixed to the car by the
lap/shoulder belt or the LATCH child
restraint anchor system. Refer to
“Lower Anchors and Tether for
CHildren (LATCH)” in this section.
WARNING!
•Never place a rear facing infant seat
in front of an air bag. A deploying of
the passenger front air bag can
cause death or serious injury to a
child 12 years or younger, including
a child in a rearward facing infant
seat.•Only use a rearward-facing child
restraint in a vehicle with a rear
seat.
Older Children and Child
Restraints
Children who are two years old or
who have outgrown their rear-facing
child seat can ride forward-facing in
the vehicle. Forward-facing child seats
and convertible child seats used in the
forward-facing direction are for
children who are over two years old or
who have outgrown the rear-facing
weight or height limit of their
rear-facing child seat.
Children should remain in a
forward-facing child seat with a
harness for as long as possible, up to
the highest weight or height allowed
by the child seat. These child seats are
also fixed to the car by the
lap/shoulder belt or the LATCH child
restraint anchorage system. Refer to
“Lower Anchors and Tether for
CHildren (LATCH)” in this section.
All children whose weight or height is
above the forward-facing limit for the
child seat should use a belt-
positioning booster seat until the
vehicle’s seat belts fit properly. If the
child cannot sit with knees bent over
Before Starting
2
55
Page 60 of 296
the vehicle’s seat cushion while the
back is against the seatback, they
should use a belt-positioning booster
seat.
The child and belt-positioning booster
seat are fixed to the car by the
lap/shoulder belt.
Children Too Large for Booster
Seats
Children who are large enough to
wear the shoulder belt comfortably
and whose legs are long enough to
bend over the front of the seat when
their back is against the seatback
should use the lap/shoulder belt in a
rear seat.
• Make sure that the child is upright in
the seat.
• The lap portion should be low on the
hips and as snug as possible.
• Check belt fit periodically. A child’s
squirming or slouching can move the
belt out of position.
• If the shoulder belt contacts the face
or neck, move the child closer to the
center of the vehicle. Never allow a
child to put the shoulder belt under
an arm or behind their back.NOTE:
For additional information, refer to
www.seatcheck.org or call
1–866–SEATCHECK. Canadian residents
should refer to Transport Canada’s
website for additional information:
http://www.tc.gc.ca/roadsafety/
safedrivers/childsafety/index.htmWARNING!
•Improper installation can lead to
failure of an infant or child restraint.
It could come loose in a collision. The
child could be badly injured or killed.
Follow the restraint manufacturer’s
directions exactly when installing an
infant or child restraint.
•A rearward-facing child restraint
should only be used in a rear seat. A
rearward-facing child restraint in the
front seat may be struck by a
deploying passenger air bag, which
may cause severe or fatal injury to
the infant.
Here are Some Tips on Getting
the Most Out of Your Child
Restraint
• Before buying any restraint system,
make sure that it has a labelcertifying that it meets all applicable
Safety Standards. Maserati also
recommends that you make sure that
you can install the child restraint in
the vehicle where you will use it
before you buy it.
• The restraint system must be
appropriate for your child’s weight
and height.
• Check the label on the restraint
system for weight and height limits.
• Carefully follow the instructions that
come with the restraint system.
• If installed improperly, it may not
work when needed.
• Fit the child into the seat according
to the child restraint manufacturer’s
directions.
WARNING!
When your child restraint system is
not in use, secure it in the vehicle with
the seat belt or remove it from the
vehicle. Do not leave it loose in the
vehicle. In a sudden stop or accident, it
could strike the occupants or
seatbacks and cause serious personal
injury.
Before Starting
2
56
Page 61 of 296
Installing Child Restraint
Systems using the Vehicle Seat
Belt equipped with ALR
All the passenger seat belts are
equipped with an Automatic Locking
Retractor (ALR) to secure child
protection through a Child Restraint
System (CRS). These types of seat belts
are designed to keep the lap portion
of the seat belt tight around the child
restraint seat avoiding to use a locking
clip.
The ALR will make a ratcheting noise
if the entire belt is pulled out of the
retractor in order to enable the belt to
retract subsequently. For additional
information on ALR, see “Using Seat
Belt in Automatic Locking Retractor
(ALR) Mode” in “Occupants Restraint
Systems” in this section.
To install a Child Restraint System with
ALR, pull enough of the belt out of
the retractor leading it through the
belt path of the protection device.
Slide the latch into the buckle until it
clicks, then remove the entire safety
belt from the retractor in order to
rewound. While rewinding a click will
indicate the safety belt is now in
Automatic Locking mode.
Exert then a traction on the exceeded
lap section of the belt in order totighten it around the child restraint
seat. All seat belts will loosen over
time, it is therefore necessary to check
them periodically and set them
properly.
Lower Anchors and Tether for
Children (LATCH)
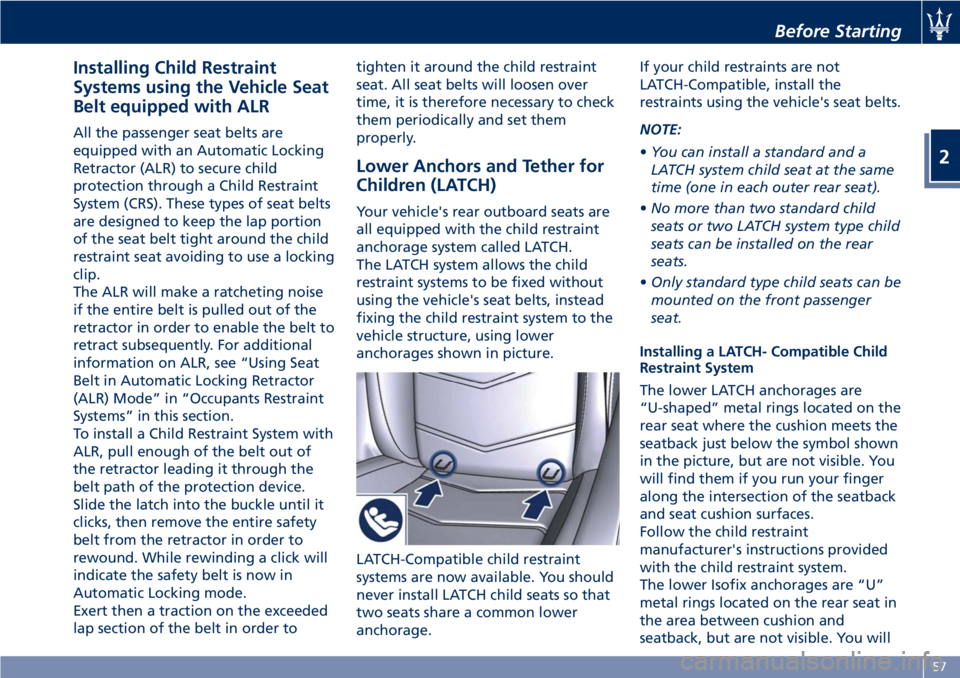
Your vehicle's rear outboard seats are
all equipped with the child restraint
anchorage system called LATCH.
The LATCH system allows the child
restraint systems to be fixed without
using the vehicle's seat belts, instead
fixing the child restraint system to the
vehicle structure, using lower
anchorages shown in picture.
LATCH-Compatible child restraint
systems are now available. You should
never install LATCH child seats so that
two seats share a common lower
anchorage.If your child restraints are not
LATCH-Compatible, install the
restraints using the vehicle's seat belts.
NOTE:
•You can install a standard and a
LATCH system child seat at the same
time (one in each outer rear seat).
•No more than two standard child
seats or two LATCH system type child
seats can be installed on the rear
seats.
•Only standard type child seats can be
mounted on the front passenger
seat.
Installing a LATCH- Compatible Child
Restraint System
The lower LATCH anchorages are
“U-shaped” metal rings located on the
rear seat where the cushion meets the
seatback just below the symbol shown
in the picture, but are not visible. You
will find them if you run your finger
along the intersection of the seatback
and seat cushion surfaces.
Follow the child restraint
manufacturer's instructions provided
with the child restraint system.
The lower Isofix anchorages are “U”
metal rings located on the rear seat in
the area between cushion and
seatback, but are not visible. You will
Before Starting
2
57
Page 62 of 296
easily feel them if you run your finger
along the intersection of the seatback
and seat cushion surfaces.
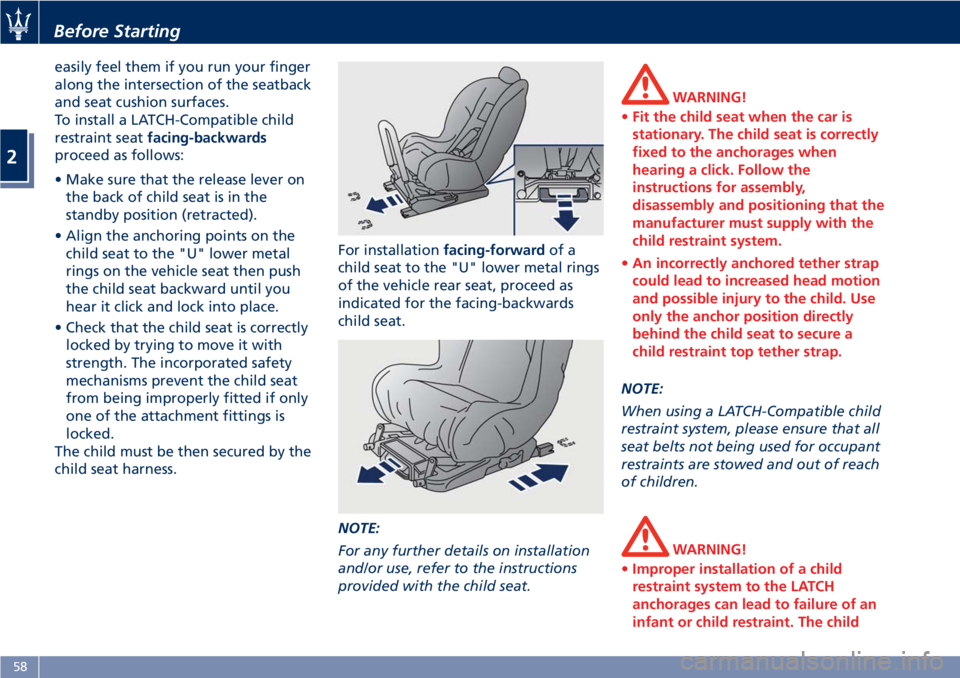
To install a LATCH-Compatible child
restraint seatfacing-backwards
proceed as follows:
• Make sure that the release lever on
the back of child seat is in the
standby position (retracted).
• Align the anchoring points on the
child seat to the "U" lower metal
rings on the vehicle seat then push
the child seat backward until you
hear it click and lock into place.
• Check that the child seat is correctly
locked by trying to move it with
strength. The incorporated safety
mechanisms prevent the child seat
from being improperly fitted if only
one of the attachment fittings is
locked.
The child must be then secured by the
child seat harness.For installationfacing-forwardof a
child seat to the "U" lower metal rings
of the vehicle rear seat, proceed as
indicated for the facing-backwards
child seat.
NOTE:
For any further details on installation
and/or use, refer to the instructions
provided with the child seat.
WARNING!
•Fit the child seat when the car is
stationary. The child seat is correctly
fixed to the anchorages when
hearing a click. Follow the
instructions for assembly,
disassembly and positioning that the
manufacturer must supply with the
child restraint system.
•An incorrectly anchored tether strap
could lead to increased head motion
and possible injury to the child. Use
only the anchor position directly
behind the child seat to secure a
child restraint top tether strap.
NOTE:
When using a LATCH-Compatible child
restraint system, please ensure that all
seat belts not being used for occupant
restraints are stowed and out of reach
of children.
WARNING!
•Improper installation of a child
restraint system to the LATCH
anchorages can lead to failure of an
infant or child restraint. The child
Before Starting
2
58
Page 63 of 296
could be badly injured or killed.
Follow the child restraint
manufacturer's directions exactly
when installing an infant or child
restraint system.
•Child restraint anchorages are
designed to withstand only those
loads imposed by correctly fitted
child restraints. Under no
circumstances are they to be used
for adult seat belts, harnesses, or for
attaching other items or equipment
to the vehicle.
Important Safety Notice for
Transporting Children
• Install the child seat on the rear seat
as this is the safest position in case of
collisions.
• Keep the instructions in the vehicle
together with the documents and
this owner’s manual. Do not use a
child restraint system which does not
contain instructions for use.
• Every child has to use one child
restraint system; never carry two
children using only one child seat.
• If using the vehicle seat belt, always
check that the belt does not restrain
the child's throat.• Firmly pull the seat belt to check
that it is correctly buckled.
• Never allow a child to seat
improperly or to unbuckle the seat
belt while driving.
• Never allow a child to wear the
shoulder portion of the belt under
the arms or behind the back.
• Never carry children on your lap, not
even newborns. No one can restrain
a child in the event of an accident.
• In case of accident, replace the child
seat with a new one.
Transporting Pets
Air bags deploying in the front seat
could harm your pet. An unrestrained
pet will be thrown about and possibly
injured, or injure a passenger during
panic braking or in an accident.
Pets should be restrained in the rear
seat in pet harnesses or pet carriers
that are secured by vehicle seat belts.
Before Starting
2
59
Page 69 of 296
Safety Tips
Transporting Passengers
WARNING!
•Do not leave children or animals
inside parked vehicles in hot
weather. Interior heat build-up may
cause serious injury.
•Never ride in a cargo area, inside of
a vehicle.
•Do not allow people to ride in any
area of your vehicle that is not
equipped with seats and seat belts.
•Be sure everyone in your vehicle is
in a seat and using a seat belt
properly.
Exhaust Gas
WARNING!
Exhaust gases can injure. They contain
carbon monoxide (CO), which is
colorless and odorless. Breathing it
can make you unconscious and can
eventually poison you. To avoid
breathing (CO), follow these safety
tips:
•Do not run the engine in a closed
garage or in confined areas any
longer than needed to move your
vehicle in or out of the area.
•If it is necessary to sit in a parked
vehicle with the engine running,
adjust your heating or cooling
controls to force outside air into the
vehicle. Set the blower at high
speed.
•If you are required to drive with the
trunk lid open, make sure that all
windows are closed and the climate
control blowers switch is set at high
speed. DO NOT use the recirculation
mode.
The best protection against carbon
monoxide entry into the passenger
compartment is a properly maintained
engine exhaust system.Whenever detecting a change in the
sound of the exhaust system or
eventual exhaust fumes inside the
vehicle have theAuthorized Maserati
Dealerinspect the complete exhaust
system and adjacent body areas for
broken, damaged, deteriorated, or
mispositioned parts.
Open seams or loose connections
could permit exhaust fumes to seep
into the passenger compartment.
WARNING!
California Proposition 65
Operating, servicing and maintaining
a passenger vehicle or off-road vehicle
can expose you to chemicals including
such as, engine exhaust, carbon
monoxide, phthalates and lead, that
which are know to the State of
California to cause cancer and birth
defects or other reproductive harm. To
minimize exposure, avoid breathing
exhaust, do not idle the engine except
as necessary, service your vehicle in a
well-ventilated area and wear gloves
or wash your hands frequently when
servicing your vehicle. For more
information go to:
www.P65Warnings.ca.gov/passenger-
vehicle
Before Starting
2
65
Page 70 of 296
Vehicle Safety Checks
Seat Belts
• Inspect the belt system periodically,
checking for cuts, frays, and loose
parts. Damaged parts must be
replaced immediately.
• Do not disassemble or modify the
system.
• If the belt has been sharply pulled,
for example as the result of an
accident, the safety belt, together
with the anchoring devices, the
anchoring device mounting screws
and the pretensioner must be
completely replaced. Even if the belt
does not present any exterior signs
of wear or damage, it may have lost
its restraining properties.
Air bag Warning Light
The
warning light should illuminate
and remain lit for a few seconds bulb
checking when the key in the ignition
switch is turned inMAR (ON)position
(see “Supplemental Restraint System
(SRS) — Air bags” chapter in this
section).
•Ifthe
warning light does not
illuminate while starting, contact an
Authorized Maserati Dealer.•Ifthe
warning light stays on,
flickers, or comes on while driving,
have the system checked by an
Authorized Maserati Dealer.
Defroster
Check operation by selecting the
defrost mode and place the fan system
on high speed (see “Air Conditioning
Controls” chapter in section
“Dashboard Instruments and
Controls”).
You should be able to feel the air
directed against the windshield and
front side windows. Contact an
Authorized Maserati Dealerfor service
if your defroster is inoperable.
Floor Mat
Always use floor mats designed to fit
the footwell of your vehicle. Use only
floor mats that leave the pedal area
unobstructed and that are firmly
secured so that they cannot slip out of
position and interfere with the pedals
or impair safe operation of your
vehicle.
NOTE:
TheAuthorized Maserati Dealercan
provide you with any information
about the available Maserati floor
mats included in the “Genuine
Accessories” range.
WARNING!
Pedals that cannot move freely can
cause loss of vehicle control and
increase the risk of serious personal
injury.
•Always make sure that floor mats
are properly attached to the proper
fasteners.
•Never place or install floor mats or
other floor coverings in the vehicle
that cannot be properly secured to
prevent them from moving and
interfering with the pedals.
•Never put floor mats or other floor
coverings on top of already installed
floor mats. Additional floor mats and
other coverings will reduce the size
of the pedal area and interfere with
the pedals.
•Check mounting of mats on a regular
basis. Always properly reinstall and
secure floor mats that have been
removed for cleaning.
•Always make sure that objects
cannot fall into the driver footwell
while the vehicle is moving. Objects
can become trapped under the brake
pedal and accelerator pedal causing
a loss of vehicle control.
Before Starting
2
66
Page 78 of 296
Front Seats
Seats and seat belts are part of the
Occupant Restraint System of the
vehicle. For further information, see
chapter “Occupant Restraint System”
in Section “Before Starting”.
WARNING!
Be sure everyone in your vehicle is in a
seat and using a seat belt properly.
Seat Adjustments
The seats can only be adjusted with
the key in the ignition switch inMAR
(ON)position.
It is however possible, when the door
is closed, to operate the seat for
approx. 15 seconds after turning the
key toSTOP (OFF)position and then
for other 15 seconds after the last
operation.
The power seats switches are located
on the outboard side of the seat
cushion.
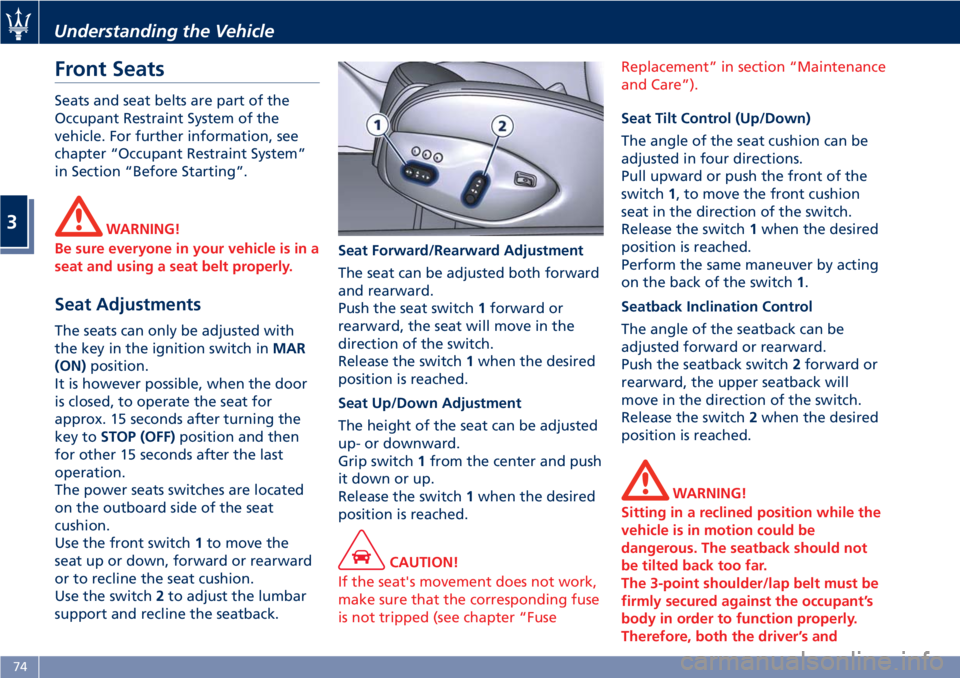
Use the front switch1to move the
seat up or down, forward or rearward
or to recline the seat cushion.
Use the switch2to adjust the lumbar
support and recline the seatback.Seat Forward/Rearward Adjustment
The seat can be adjusted both forward
and rearward.
Push the seat switch1forward or
rearward, the seat will move in the
direction of the switch.
Release the switch1when the desired
position is reached.
Seat Up/Down Adjustment
The height of the seat can be adjusted
up- or downward.
Grip switch1from the center and push
it down or up.
Release the switch1when the desired
position is reached.
CAUTION!
If the seat's movement does not work,
make sure that the corresponding fuse
is not tripped (see chapter “FuseReplacement” in section “Maintenance
and Care”).
Seat Tilt Control (Up/Down)
The angle of the seat cushion can be
adjusted in four directions.
Pull upward or push the front of the
switch1, to move the front cushion
seat in the direction of the switch.
Release the switch1when the desired
position is reached.
Perform the same maneuver by acting
on the back of the switch1.
Seatback Inclination Control
The angle of the seatback can be
adjusted forward or rearward.
Push the seatback switch2forward or
rearward, the upper seatback will
move in the direction of the switch.
Release the switch2when the desired
position is reached.
WARNING!
Sitting in a reclined position while the
vehicle is in motion could be
dangerous. The seatback should not
be tilted back too far.
The 3-point shoulder/lap belt must be
firmly secured against the occupant’s
body in order to function properly.
Therefore, both the driver’s and
Understanding the Vehicle
3
74