2020 MASERATI GRANTURISMO CONVERTIBLE instrument panel
[x] Cancel search: instrument panelPage 157 of 296

• left-hand/right-hand vent air
distribution;
• fan speed (stepless change);
• compressor activation;
• air recirculation.
All the functions listed above can be
modified manually, i.e. the user can
select one or more of these functions
as desired, using the control panel.
The manual selections always have
priority over the automatic ones and
are memorized until the user chooses
the automatic control again.
When a function has been set
manually, the other automatic
functions will not be affected.
The following parameters/functions
can be set/modified manually:
• left-hand/right-hand side air
temperature;
• fan speed;
• air distribution on 7 positions
(left-hand/ right-hand);
• compressor activation;
• single/dual-zone distribution
priority;
• defrosting/defogging function (MAX
DEF);
• air recirculation;
• automatic/manual control of the
system;• heated rear window;
• system deactivation;
• opening/closing of air duct leading
to rear vents.
Activation
The system can be started up in a
number of ways. It is however
advisable to begin by pressing one of
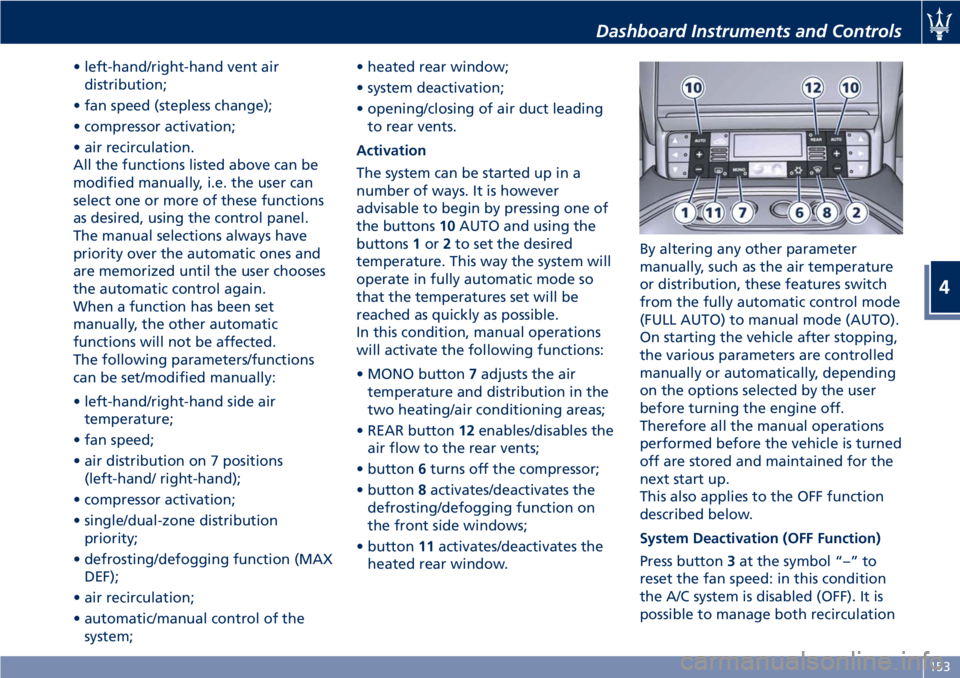
the buttons10AUTO and using the
buttons1or2to set the desired
temperature. This way the system will
operate in fully automatic mode so
that the temperatures set will be
reached as quickly as possible.
In this condition, manual operations
will activate the following functions:
• MONO button7adjusts the air
temperature and distribution in the
two heating/air conditioning areas;
• REAR button12enables/disables the
air flow to the rear vents;
• button6turns off the compressor;
• button8activates/deactivates the
defrosting/defogging function on
the front side windows;
• button11activates/deactivates the
heated rear window.By altering any other parameter
manually, such as the air temperature
or distribution, these features switch
from the fully automatic control mode
(FULL AUTO) to manual mode (AUTO).
On starting the vehicle after stopping,
the various parameters are controlled
manually or automatically, depending
on the options selected by the user
before turning the engine off.
Therefore all the manual operations
performed before the vehicle is turned
off are stored and maintained for the
next start up.
This also applies to the OFF function
described below.
System Deactivation (OFF Function)
Press button3at the symbol “–” to
reset the fan speed: in this condition
the A/C system is disabled (OFF). It is
possible to manage both recirculation
Dashboard Instruments and Controls
4
153
Page 160 of 296

commands can be invalidated when
speaking too quickly or too loudly.
WARNING!
Any voice-controlled system should be
used only in safe driving conditions
following all applicable regulations.
Full attention should be kept on
driving. Failure to do so may result in
a collision causing serious injury or
death.
Phone Mode
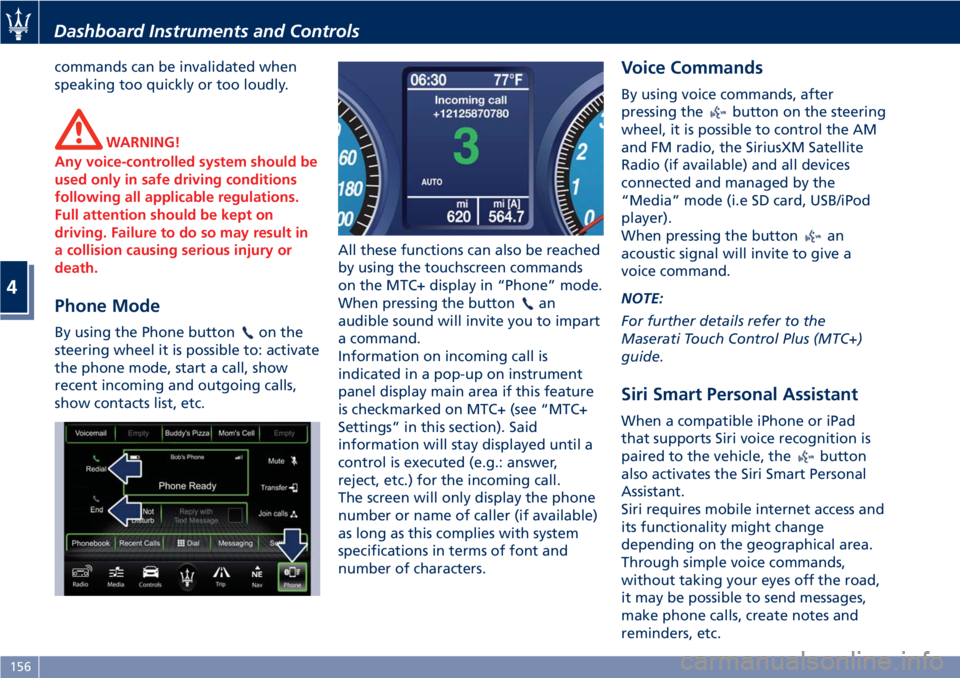
By using the Phone buttonon the
steering wheel it is possible to: activate
the phone mode, start a call, show
recent incoming and outgoing calls,
show contacts list, etc.All these functions can also be reached
by using the touchscreen commands
on the MTC+ display in “Phone” mode.
When pressing the button
an
audible sound will invite you to impart
a command.
Information on incoming call is
indicated in a pop-up on instrument
panel display main area if this feature
is checkmarked on MTC+ (see “MTC+
Settings” in this section). Said
information will stay displayed until a
control is executed (e.g.: answer,
reject, etc.) for the incoming call.
The screen will only display the phone
number or name of caller (if available)
as long as this complies with system
specifications in terms of font and
number of characters.
Voice Commands
By using voice commands, after
pressing the
button on the steering
wheel, it is possible to control the AM
and FM radio, the SiriusXM Satellite
Radio (if available) and all devices
connected and managed by the
“Media” mode (i.e SD card, USB/iPod
player).
When pressing the button
an
acoustic signal will invite to give a
voice command.
NOTE:
For further details refer to the
Maserati Touch Control Plus (MTC+)
guide.
Siri Smart Personal Assistant
When a compatible iPhone or iPad
that supports Siri voice recognition is
paired to the vehicle, the
button
also activates the Siri Smart Personal
Assistant.
Siri requires mobile internet access and
its functionality might change
depending on the geographical area.
Through simple voice commands,
without taking your eyes off the road,
it may be possible to send messages,
make phone calls, create notes and
reminders, etc.
Dashboard Instruments and Controls
4
156
Page 200 of 296

(Continued)
style. Aftermarket wheels can cause
sensor damage. Do not use
aftermarket tire sealants or balance
beads, as damage to the sensors may
result.
• The system can temporarily
experience radio-electric interference
emitted by devices using similar
frequencies.
• After inspecting or adjusting the tire
pressure, always reinstall the valve
stem cap. This will prevent moisture
and dirt from entering the valve
stem and damage the TPMS internal
sensor.
NOTE:
•Driving on a significantly
underinflated tire causes the tire to
overheat and may lead to tire failure.
Under-inflation also reduces fuel
efficiency and tire tread life, and may
affect the vehicle’s handling and
stopping ability.
•The TPMS is not a substitute for
proper tire maintenance, and it is the
driver’s responsibility to maintain
correct tire pressure using an
accurate tire pressure gage, even if
under-inflation has not reached thelevel to trigger illumination of the
TPMS light
.
•Seasonal temperature changes will
affect tire pressure, and the TPMS
will monitor the actual tire pressure
in the tire.
Viewing Messages on the
Display
By pressing repeatedly the “MODE”
button of the control panel on left
side of the steering column, the user
can access the information page that
shows the pressure values of each tire
(“Tire Pressure” screen page: see
paragraph "TFT Display: Screen Pages"
in chapter "Instrument Cluster" of
section "Dashboard Instruments and
Controls").
If system faults or low pressure is
detected on a not indentified tire,"Check Tire Pressure" or "TPMS
Malfunction" pop-up message will be
displayed for 10 seconds. The
amber warning light will
permanently illuminate on the right
side of the instrument cluster display.
With a malfunction detected, the "Tire
Pressure" screen page will not be
available while will be available the
calibration screen page.
The “Tire Pressure” screen page
becomes available again, until the
malfunction is corrected.
Low Tire Pressure Conditions
The signal transmitted by the ECU
activates messages and symbols on the
TFT display with two priority levels
corresponding to the following
thresholds:
• Soft Warning: if the pressure is 10%
lower than the rated pressure;
• Hard Warning: if the pressure is 17%
lower than the rated pressure.
The system refers to the rated pressure
acquired after calibration.
The two alarm thresholds for
monitoring the tire pressure
respectively activate the following
alerts:
• “Check tire pressure” illuminates on
the display when the pressure of one
Driving
5
196
Page 206 of 296

Refueling
Fuel Filler Neck Access
The fuel filler door is found on the
rear, left-hand side of the vehicle.
To open the fuel filler door, press
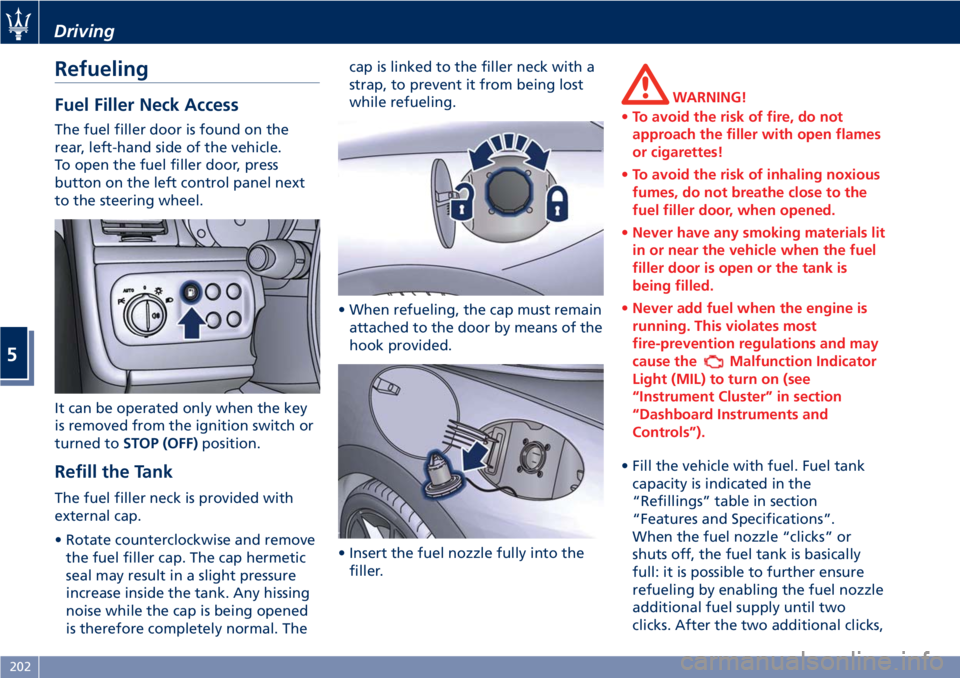
button on the left control panel next
to the steering wheel.
It can be operated only when the key
is removed from the ignition switch or
turned toSTOP (OFF)position.
Refill the Tank
The fuel filler neck is provided with
external cap.
• Rotate counterclockwise and remove
the fuel filler cap. The cap hermetic
seal may result in a slight pressure
increase inside the tank. Any hissing
noise while the cap is being opened
is therefore completely normal. Thecap is linked to the filler neck with a
strap, to prevent it from being lost
while refueling.
• When refueling, the cap must remain
attached to the door by means of the
hook provided.
• Insert the fuel nozzle fully into the
filler.
WARNING!
•To avoid the risk of fire, do not
approach the filler with open flames
or cigarettes!
•To avoid the risk of inhaling noxious
fumes, do not breathe close to the
fuel filler door, when opened.
•Never have any smoking materials lit
in or near the vehicle when the fuel
filler door is open or the tank is
being filled.
•Never add fuel when the engine is
running. This violates most
fire-prevention regulations and may
cause the
Malfunction Indicator
Light (MIL) to turn on (see
“Instrument Cluster” in section
“Dashboard Instruments and
Controls”).
• Fill the vehicle with fuel. Fuel tank
capacity is indicated in the
“Refillings” table in section
“Features and Specifications”.
When the fuel nozzle “clicks” or
shuts off, the fuel tank is basically
full: it is possible to further ensure
refueling by enabling the fuel nozzle
additional fuel supply until two
clicks. After the two additional clicks,
Driving
5
202
Page 216 of 296

Tool Kit
The tool bag and other first aid
equipment are located in the trunk
compartment and are available by
lifting the floor panel.
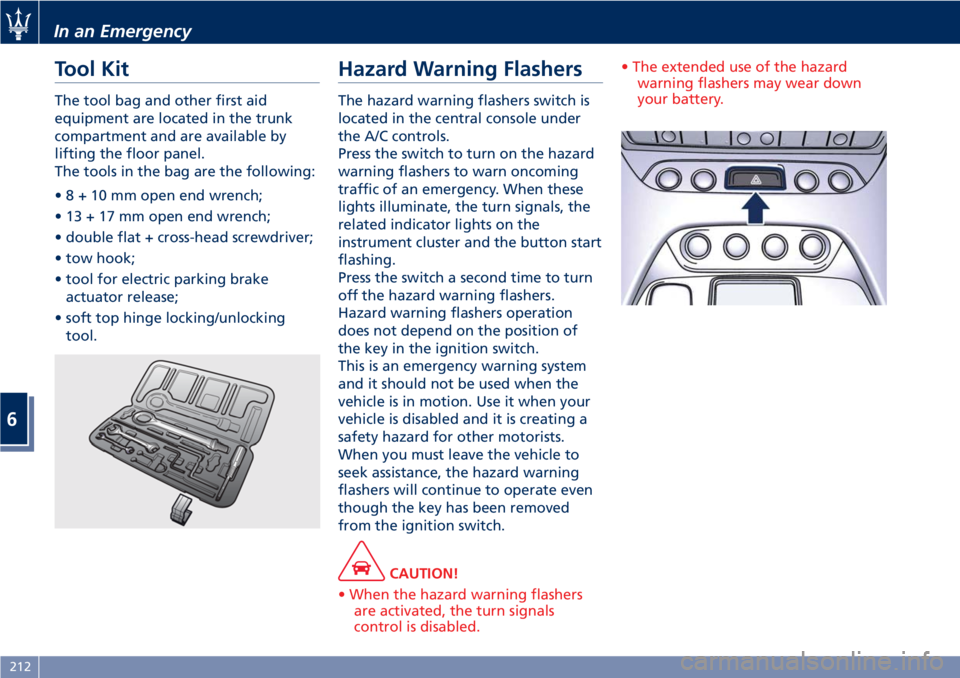
The tools in the bag are the following:
•8+10mmopen end wrench;
• 13 + 17 mm open end wrench;
• double flat + cross-head screwdriver;
• tow hook;
• tool for electric parking brake
actuator release;
• soft top hinge locking/unlocking
tool.
Hazard Warning Flashers
The hazard warning flashers switch is
located in the central console under
the A/C controls.
Press the switch to turn on the hazard
warning flashers to warn oncoming
traffic of an emergency. When these
lights illuminate, the turn signals, the
related indicator lights on the
instrument cluster and the button start
flashing.
Press the switch a second time to turn
off the hazard warning flashers.
Hazard warning flashers operation
does not depend on the position of
the key in the ignition switch.
This is an emergency warning system
and it should not be used when the
vehicle is in motion. Use it when your
vehicle is disabled and it is creating a
safety hazard for other motorists.
When you must leave the vehicle to
seek assistance, the hazard warning
flashers will continue to operate even
though the key has been removed
from the ignition switch.
CAUTION!
• When the hazard warning flashers
are activated, the turn signals
control is disabled.• The extended use of the hazard
warning flashers may wear down
your battery.
In an Emergency
6
212
Page 218 of 296

Engine Overheating
To reduce potentially overheating of
the engine in city traffic, while
stationary, place the transmission in N
(Neutral), but do not increase the
engine idle speed.
NOTE:
There are steps that you can take to
slow down an impending overheat
condition:
•If your air conditioner (A/C) is on,
turn it off. The A/C system adds heat
to the engine cooling system and
turning the A/C off can help remove
this heat.
•You can also turn the temperature
control to maximum heat, the mode
control to floor and the blower
control to high. This allows the
heater core to act as a supplement to
the radiator and aids in removing
heat from the engine cooling system.
CAUTION!
Driving with a hot cooling system
could damage the engine. If the
temperature gauge is positioned on
the red zone (refer to “Instrument
Cluster” in section “DashboardInstruments and Controls”), pull over
and stop the vehicle. Idle the vehicle
with the air conditioner turned off
until the temperature gauge drops
back into the normal range. If the
temperature gauge remains on the red
zone turn the engine off immediately
and contact theAuthorized Maserati
Dealer.
WARNING!
You or others can be badly burned by
hot engine coolant (antifreeze) or
steam from your radiator. If you see or
hear steam coming from under the
hood, do not open it until the radiator
has had time to cool.
Never try to open a coolant bottle
pressure cap (refer to “Maintenance
Procedures” in section “Maintenance
and Care”) when the radiator is
overheated.
In case of a Punctured Tire
The vehicle can be equipped with a
tire repair kit or with a compact spare
wheel.
Using Tire Repair Kit
Small punctures up to 1⁄4” (6 mm) in
the tire tread can be sealed using the
tire repair kit, fitted beneath the floor
panel of the trunk compartment.
The kit comes in a bag and consists of
two parts:
• an electric compressor with pressure
gage, hose to be connected to the
punctured tire and power cable;
• a gas cylinder containing sealant.
In an Emergency
6
214