2020 MASERATI GRANTURISMO CONVERTIBLE heating
[x] Cancel search: heatingPage 149 of 296

•Set Time Hours
With “Sync with GPS Time” feature
unchecked and this mode selected,
you can set the hours manually
from 1 to 24. To select, touch the
“+” or “–” softkeys to adjust the
hours.
•Set Time Minutes
With “Sync with GPS Time” feature
unchecked and this mode selected,
you can set the minutes manually
from 0 to 59. To select, touch the
“+” or “–” softkeys as done for the
hours.
•Time Format
When in this mode, you can select
the time format display. To change
the current setting, touch and
release the “12 Hrs” or “24 Hrs”
softkey.•Show Time In Status Bar
This feature will allow you to turn
on or shut off the digital clock in
the status bar.
•Set Date in Cluster
When in this mode, you can set the
date manually on the instrument
cluster display.
Tick the soft-key to enable the
feature and enter the setting page.
Touch than the “+” or “-” soft-keys
to set the day, the month and the
year”.
Safety & Driving Assistant
Touch this softkey to set the following
modes.
•Stop & Go Parking Sensors
This feature allows you to disablethe parking sensors signal under
special traffic conditions.
See “Park Assist” in section “Before
Starting” for further information.
•ParkView Camera with Dynamic
Guidelines
When this feature is selected, by
moving the transmission lever in R
(Reverse) position, the rearview
image with dynamic guidelines will
appear on MTC+ display.
The feature can be set to “On” or
“Off”.
•ParkView Camera Off Delay
By selecting this feature, when the
transmission lever is moved out of R
(Reverse), the rear view image with
dynamic guidelines will be displayed
for up to 10 seconds after shifting
unless the forward vehicle speed
exceeds 8 mph (12 km/h), or the
transmission is shifted into P (Park)
or the key in the ignition switch is
turned inSTOP (OFF)position.
The feature can be set to “On” or
“Off”.
•Instrument Panel Buzzer Volume
This feature allows adjusting the
volume of the acoustic signal that
accompanies some instrument panel
warnings (EPB overheating, seat
Dashboard Instruments and Controls
4
145
Page 157 of 296

• left-hand/right-hand vent air
distribution;
• fan speed (stepless change);
• compressor activation;
• air recirculation.
All the functions listed above can be
modified manually, i.e. the user can
select one or more of these functions
as desired, using the control panel.
The manual selections always have
priority over the automatic ones and
are memorized until the user chooses
the automatic control again.
When a function has been set
manually, the other automatic
functions will not be affected.
The following parameters/functions
can be set/modified manually:
• left-hand/right-hand side air
temperature;
• fan speed;
• air distribution on 7 positions
(left-hand/ right-hand);
• compressor activation;
• single/dual-zone distribution
priority;
• defrosting/defogging function (MAX
DEF);
• air recirculation;
• automatic/manual control of the
system;• heated rear window;
• system deactivation;
• opening/closing of air duct leading
to rear vents.
Activation
The system can be started up in a
number of ways. It is however
advisable to begin by pressing one of
the buttons10AUTO and using the
buttons1or2to set the desired
temperature. This way the system will
operate in fully automatic mode so
that the temperatures set will be
reached as quickly as possible.
In this condition, manual operations
will activate the following functions:
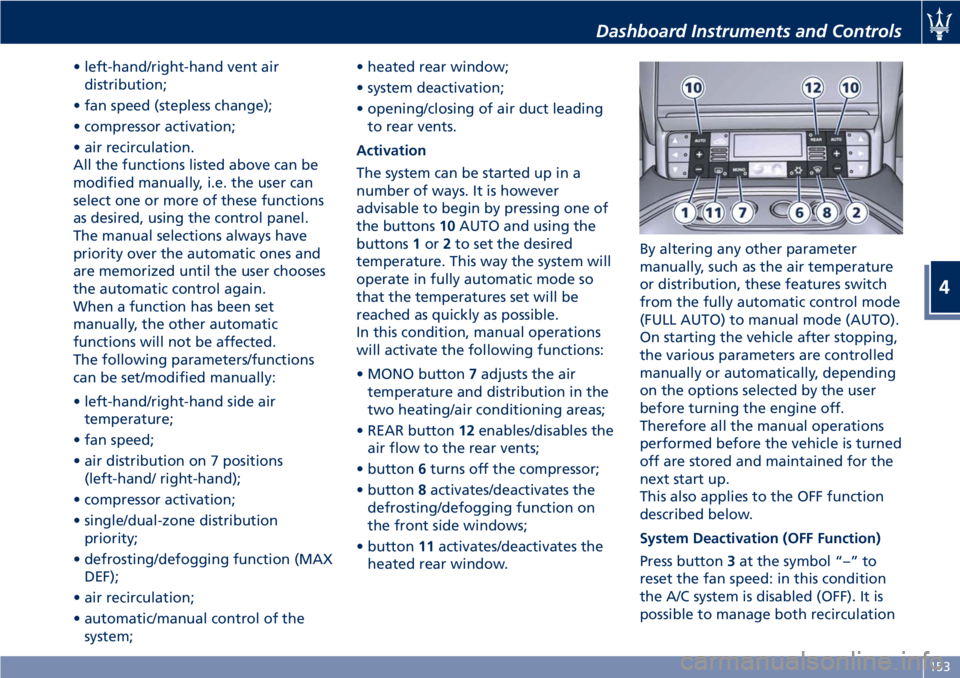
• MONO button7adjusts the air
temperature and distribution in the
two heating/air conditioning areas;
• REAR button12enables/disables the
air flow to the rear vents;
• button6turns off the compressor;
• button8activates/deactivates the
defrosting/defogging function on
the front side windows;
• button11activates/deactivates the
heated rear window.By altering any other parameter
manually, such as the air temperature
or distribution, these features switch
from the fully automatic control mode
(FULL AUTO) to manual mode (AUTO).
On starting the vehicle after stopping,
the various parameters are controlled
manually or automatically, depending
on the options selected by the user
before turning the engine off.
Therefore all the manual operations
performed before the vehicle is turned
off are stored and maintained for the
next start up.
This also applies to the OFF function
described below.
System Deactivation (OFF Function)
Press button3at the symbol “–” to
reset the fan speed: in this condition
the A/C system is disabled (OFF). It is
possible to manage both recirculation
Dashboard Instruments and Controls
4
153
Page 162 of 296

Normal Starting of the
Engine
WARNING!
It is dangerous to run the engine in an
enclosed area. The engine consumes
oxygen and discharges carbon
dioxide, carbon monoxide and other
toxic gases in the atmosphere.
WARNING!
California Proposition 65
Operating, servicing and maintaining
a passenger vehicle or off-road vehicle
can expose you to chemicals including
such as, engine exhaust, carbon
monoxide, phthalates and lead, that
which are know to the State of
California to cause cancer and birth
defects or other reproductive harm. To
minimize exposure, avoid breathing
exhaust, do not idle the engine except
as necessary, service your vehicle in a
well-ventilated area and wear gloves
or wash your hands frequently when
servicing your vehicle. For more
information go to:www.P65Warnings.ca.gov/passenger-
vehicle
When you open a door to get into the
car, the instrument cluster turns on.
The TFT displays the complete
odometer, time, outside temperature
and the
open doors indicator.
Before starting the engine, close the
doors, adjust your seat, the inside and
outside mirrors, fasten your seat belt
and instruct all other occupants to
buckle their seat belts.
Make sure that the Electric Parking
Brake (EPB) is applied.
The shift lever must be in P (Park) or N
(Neutral) position before you can start
the engine. Apply the brakes before
shifting into any driving gear (see
“Automatic Transmission” in this
section).
CAUTION!
• Before starting the engine, switch off
the electrical devices with a high
power consumption (air-conditioning
and heating system, heated rear
window, headlights, etc.).
• Do not start the engine if the fuel
level in the tank is low.
Press the brake pedal and turn the key
in the ignition switch toMAR (ON)
position.
Instrument cluster displays the initial
sequence with warning light and
analog instruments test routine.
Turn the key intoAVVposition and
release it when the engine starts. The
key will return toMAR (ON)position
automatically.
Do not hold the key inAVVposition
for a long time.
If the engine fails to start, the starter
will disengage automatically after 10
seconds. If you wish to stop the
cranking of the engine prior to
starting it, turn the key toSTOP (OFF)
position.
If the engine does not start, turn the
key toSTOP (OFF)position and wait
for the gear display to go off. Then
repeat the entire procedure.
NOTE:
Normal starting of either a cold or a
warm engine is obtained without
pumping or pressing the accelerator
pedal.
Driving
5
158
Page 170 of 296

the efficiency of engine braking
together with the standard braking
system.
ESC System Operations
In order to prevent unstable driving
conditions, the ESC system may request
the transmission system to deactivate
gearshifting. The system handles this
request depending on the gear
engaged and on the rpm, and decides
whether to accept it or not.
Driving with Cruise Control
With the Cruise Control function
activated, the transmission system
selects such settings as to provide
enhanced comfort and fuel-economy.
MC Start Strategy
(for MC version only)
With the aim of optimizing standing
starts for performance driving (only
recommended for use in areas closed
to traffic and in accordance with the
Highway Code), the automatic
transmission system is equipped with
quick start strategy.
This strategy is activated when the
following conditions occur
simultaneously:
• AUTO and SPORT modes active;
•
ESC mode off;
• brake pedal depressed.In these conditions, the driver has the
possibility to accelerate and, keeping
the brake pedal depressed, keep the
vehicle standing until reaching an
engine speed between 2300 an 2500
rpm. Then, upon releasing the brake
pedal, have the best standing start
performance.
WARNING!
This strategy must only be used on
vehicles in areas closed to traffic, in
accordance with the Highway Code
and only by skilled drivers.
Transmission Malfunction and
Overheating Conditions
Transmission Failure
Transmission function is electronically
monitored to detect abnormal
conditions. If a condition that could
result in transmission damage is
detected, Transmission Limp Home
Mode will be activated. In this
situation, the transmission may
operate only in certain gears, or may
not shift at all.
CAUTION!
In these conditions, we recommendedthat you stop the vehicle and turn off
the engine for at least one minute.
When restarting the engine, the
self-diagnosis system may cancel the
malfunction, which will in any case be
recorded by the ECU.
A message and thewarning light
in the instrument cluster will inform
the driver about the transmission
failure.
In failure conditions, the transmission
shift lever can however be shifted to R
(Reverse), N (Neutral) and D (Drive)
position.
When shifting to D (Drive) position,
only a few gears will be available,
depending on the malfunction found.
CAUTION!
If a transmission failure is signaled,
take your vehicle to the nearest
Authorized Maserati Dealeras soon as
possible to have the problem
corrected.
If the failure is signaled when the
engine is started, it means that the
transmission ECU detected a fault
when the vehicle was last used. Also in
this case, take your vehicle to the
nearest Center of theAuthorized
Driving
5
166
Page 186 of 296

(Continued)
brake fluid level immediately (see
"Maintenance Procedure" in section
“Maintenance and Care”). If fluid is
below the minimum level, top up
with the recommended fluid and
contact an Authorized Maserati
Dealer immediately to have the
system checked. Brake fluid leaks
affect the operation of the braking
systems.
•The brake system performance in
terms of active safety is not a reason
for the driver to run unnecessary
risks. The driving style shall always
be suited to weather conditions,
range of visibility and traffic.
•The maximum deceleration that can
be obtained always depends on the
tire grip on the road surface. With
snow or ice on the road the grip is
obviously reduced and the braking
distance is very high, even with the
ABS system.
Brake Pads and Brake Discs
Wear on the brake pads and brake
discs depends to a great extent on the
driving style and the conditions of use
and therefore cannot be expressed in
actual kilometers driven on the road.The high-performance brake system is
designed for optimal braking effect at
all speeds and temperatures.
Certain speeds, braking forces and
ambient conditions (e.g. temperature,
humidity and long outdoor stopping
periods) can therefore cause the
brakes to "squeal". This is normal and
will cease after a few brakings.
New Brake Pads and/or Brake
Discs
New brake pads have to be “broken
in”, and therefore only attain optimal
friction to the brake disc when the
vehicle has covered several
hundreds km.
During this first period, the slightly
reduced braking ability must be
compensated for by pressing the brake
pedal harder. This applies whenever
the brake pads and/or brake discs are
replaced.
Brake Overheating
Driving on mountain roads with steep
slopes or a sports use of the vehicle
could overheat the brake system
components. In these conditions,
parking brake must not be used since
the push on the brake shoes of the
power actuator might not be sufficientto ensure vehicle braking, especially on
a slope.
Drive normally without braking to
allow the brakes to cool down a few
minutes before stopping. In this way,
the automatic or manual activation of
the parking brake will ensure vehicle
braking.
Driving
5
182
Page 195 of 296

WARNING!
•Improperly inflated tires can be
dangerous.
•Under-inflation increases tire flexing
and can result in tire overheating.
•Over-inflation reduces a tire's ability
to cushion shock. Objects on the
road and potholes can cause
damage that results in tire failure.
•Over-inflated or under-inflated tires
can affect vehicle handling and can
fail suddenly, resulting in loss of
vehicle control.
•Unequal tire pressures can cause
steering problems.
•Unequal tire pressures from one side
of the vehicle to the other can cause
the vehicle to drift to the right or
left.
•Always drive with each tire inflated
to the recommended cold tire
inflation pressure.
Economy
Improper inflation pressures may
cause uneven wear patterns to
develop across the tire tread. These
abnormal wear patterns will reduce
tread life resulting in a need for
earlier tire replacement. Under-inflation also increases tire rolling
resistance resulting in higher fuel
consumption.
Ride comfort and vehicle stability
Proper tire inflation contributes to a
comfortable ride. Over-inflation
produces a jarring and uncomfortable
ride.
Tire Pressure Checkup
The proper cold tire inflation pressure
is indicated on the driver's side rear
door pillar and on the table “Tire
Inflation Pressure” in section
“Features and Specifications”.
Inflation pressure specified on the
table always refers to “cold tire
inflation pressure”. Cold tire inflation
pressure is defined as the tire pressure
after the vehicle has not been driven
for at least three hours, or driven less
than 1 mi (1,6 km) after a three hour
period.
Check tire pressures more often in
case of significant outside
temperature changes, as tire pressure
varies according to temperature
changes.
The pressure should be checked and if
necessary adjusted; tire wear and
overall conditions should also be
checked monthly. Tire pressureschange by approximately 1 PSI (0,07
bar) per 12°F (7°C) of air temperature
change. Keep this in mind when
checking tire pressure inside a garage,
especially in winter.
Example: If garage temperature = 68°F
(20°C) and the outside temperature =
32°F (0°C) then the cold tire inflation
pressure should be increased by 3 PSI
(0,21 bar) for every 12°F (7°C) for this
outside temperature condition.
Tire pressure may increase from 2 to 6
PSI (0,13 to 0,4 bar) during operation.
DO NOT reduce this normal pressure
build-up or your tire pressure will be
too low. After inspecting or adjusting
the tire pressure, always reinstall the
valve stem cap. This will prevent
moisture and dirt from entering the
valve stem, which could damage the
valve stem and the TPMS sensor
connected to it.
Tread Wear Indicators
Tread wear indicators are in the
original equipment tires to help you
determine when your tires should be
replaced.
These indicators are molded into the
bottom of the tread grooves.
When the tread is worn to one of the
tread wear indicators, the tire should
be replaced.
Driving
5
191
Page 209 of 296

asphalt is significantly reduced. This
means that braking distances increase
considerably and road grip decreases.
Some advices for driving in the rain
are listed below.
• Reduce your speed and keep a
greater safety distance from the
vehicles in front of you. High speed
may result in a loss of vehicle
control.
• When driving on wet or slushy roads,
it is possible for a wedge of water to
build up between the tire and road
surface. This is known as
aquaplaning and may cause partial
or complete loss of vehicle control
and stopping ability. To reduce this
possibility: slow down if the road has
standing water or puddles.
• Heavy rain substantially reduces
visibility. In these circumstances, even
during the day, turn on the low
beams, to be more visible to other
drivers.
• Set the air conditioning and heating
system controls on the defogging
function, in order to avoid any
visibility problem.
• Periodically check the conditions of
the windshield wiper blades.• In low grip conditions use “ICE”
drive mode (see chapters “Drive
Mode” in this section).
Driving in Fog
If the fog is dense, avoid traveling if
possible.
When driving in mist, blanket fog or
when there is the possibility of banks
of fog, please consider some advices
listed below.
• Keep a moderate speed.
• Even in daytime, turn on the low
beams and rear fog lights. Do not
use the high beams.
• Remember that fog creates
dampness on the asphalt and thus
any type of maneuver is more
difficult and braking distances are
extended.
• Keep a safe distance from the
vehicle in front of you.
• Avoid sudden changes in speed as
much as possible.
• Whenever possible, avoid
overtaking.
• If you are forced to stop the vehicle
(breakdowns, impossibility of
proceeding due to poor visibility,
etc.), first of all, try to stop off of the
travel lane. Then turn on the hazardwarning flashers and, if possible, the
low beams.
• Sound the horn rhythmically if you
hear another vehicle approaching.
• When you get out of the vehicle, put
on the high-visibility vest (if
equipped).
CAUTION!
Be aware that rear fog lights can
bother the drivers following your
vehicle: when visibility is back to
normal, turn off these lights.
Driving in the Mountains
Mountain roads usually have many
narrow turns and curves, tunnels and
steep uphill or downhill slopes: please
consider some advices listed below.
• Drive at a moderate speed, avoid
“cutting” corners.
• When driving inside a tunnel in
daylight turn on the low beams in
advance; avoid high beams and be
aware of the rapid brightness
change. Avoid abrupt maneuvers
that could be dangerous for the
following vehicle.
• Never coast downhill with the
engine off or in neutral, and never
Driving
5
205
Page 215 of 296

6 – In an Emergency
ToolKit .............................................. 212
Hazard Warning Flashers................................. 212
In the Event of an Accident............................... 213
Engine Overheating..................................... 214
In case of a Punctured Tire................................ 214
Emergency Release of the Parking Brake..................... 220
Transmission Manual Release of P (Park) Position............... 221
Freeing the Stuck Vehicle................................. 223
Emergency Starting with Maserati Code...................... 224
Auxiliary Jump-Start Procedure............................ 225
Towing a Disabled Vehicle................................ 228
Fuel Cut-out Inertia Switch............................... 229
211