2020 MASERATI GRANTURISMO CONVERTIBLE dead battery
[x] Cancel search: dead batteryPage 31 of 296

Alarm System Deactivation
Press thelock button on the key to
activate the security alarm system.
• The turn signals flash twice.
• The system emits a double beep.
• The red LEDs on the front door
panels turn off.
• The centralized door locking system
is activated and the doors are
unlocked.
The security alarm system is off and it
is therefore possible to get into the
vehicle and start the engine.
Pressing the
unlock button twice
unlocks the doors and also switches on
the low beams for 30 seconds.
NOTE:
The security alarm system is not
deactivated when the key is turned in
the locks.
Getting into the Vehicle with
Alarm On
When the battery on the radio control
case is dead, to access the vehicle you
must insert the key in the lock on one
of the two front doors and turn it
clockwise to unlock it.
The alarm will sound but you will have
to continue with the normal starting
procedure. The alarm will turn off.
Anti-intrusion and Anti-lift
Protection
The anti-intrusion/anti-lift alarm
device may be deactivated by pressing
the button, on the dome console,
when the key in the ignition switch is
inMAR (ON)position or within 1
minute from turning the engine off
(key in theSTOP (OFF)position).
Deactivation is signaled by the LED on
the button flashing for 3 seconds.
CAUTION!
Anti-intrusion and anti-lift protections
override is memorized until the alarm
is next activated: therefore, if these
protections are overridden but the
alarm is not activated immediately, the
override will remain memorized until
the next time it is activated, regardless
of turning the vehicle on/off.
Security Alarm Memory
If the CODEwarning light appears
on the display when the vehicle is
started, accompanied by the message
“Break-in attempt detected” this
means that an intrusion has been
attempted during your absence.
The security alarm system memory is
reset when you turn the ignition key.
Before Starting
2
27
Page 35 of 296

In the event of an emergency (vehicle
dead battery or electric system failure)
to open the doors, with the locks
released, press the rear button inside
each handle. Otherwise, if the doors
are locked, you must release them by
turning the key in the lock to open
them, then press the rear button.
In this case, being a conventional
mechanism, hold the rear button
pressed down longer.On the door panels, in a position
which is visible from the outside, there
is a dual-color (green/red) LED E which
indicates the status of the locks
(locked/unlocked). The red LEDs
illuminate for 3 seconds after the locks
are engaged and the green LEDs for
the same amount of time when they
are unlocked.
NOTE:
The door LEDs remain illuminated for
approximately 3 seconds and
therefore, in normal conditions, they
are off.
When the security alarm system is
turned on and the doors are locked,
the LEDs on the doors flash.
The radio control device allows you to
operate the centralized opening of all
the doors or of the driver’s door only,
depending on the Maserati TouchControl Plus (MTC+) settings (see
"MTC+ Settings" in section
"Dashboard Instrument and
Controls").
If one or more doors are not properly
closed when locking the doors from
the outside, they will not be locked,
while if the trunk compartment is not
properly closed, the doors will in any
case be locked.
In both cases, the malfunction will be
indicated by the turn signals flashing
for a few seconds.
NOTE:
•The interior door locking/unlocking,
trunk compartment lid opening and
fuel tank door opening buttons are
disabled when the doors are locked
from the outside.
•In the event that the inertia switch
activates, the doors are electrically
unlocked and the vehicle can be
accessed by pressing the rear button
inside each handle.
Before Starting
2
31
Page 82 of 296

To recall one of the stored positions
with the door open, press the relative
button “1”, “2” or “3” briefly.
To recall a stored position with the
door closed, press the corresponding
button until hearing a tone that
confirms the seat has stopped.
NOTE:
•To stop the seat, press one of the
buttons - “1”, “2” or “3” -, or one of
the adjustment controls.
•Malfunctioning of the seat control
unit is indicated by a sequence of 5
tones emitted when the key in the
ignition switch is turned toSTOP
(OFF)position. Contact an
Authorized Maserati Dealerto have
the malfunction corrected.
Each system is independent of the
others and can be operated separately
using specific buttons for each seat.
System Initialization Procedure
Following any power cut-out (e.g.
after using the battery master switch
or dead battery), check the seats to
ensure that they are operating
properly when the power supply is
available.
Perform the following procedures on
both seats in the event of a
malfunction.The key in the ignition switch must be
inSTOP (OFF)position and the door on
the side of the seat concerned closed.
Open the door and begin the
following procedure within 5 seconds,
then complete it within 10 seconds:
• forward - STOP;
• backward - STOP;
• forward - STOP;
• backward - STOP;
• tilt the seatback fully forward and
wait until the seat performs two
complete travels (forward and
backward);
• move the seatback to its normal
upright position.
NOTE:
If you need to disconnect the battery,
wait at least 30 seconds from the last
seat movement. If you disconnect the
battery before, you will have to run
the initialization procedure.
Seatback Facilitated Tilt
This function only active when the
door is open, moves the seat forward
automatically when the seatback is
reclined forward to facilitate access to
the rear seat or exiting the vehicle. The
seat returns to their original position
when the seatback is tilted back again.Rear Seats
Rear seats can fit two passengers.
Seats and seat belts are parts of the
occupant restraint system of the
vehicle.
WARNING!
Be sure everyone in your vehicle is in a
seat and using a seat belt properly.
NOTE:
See chapter “Occupants Restraint
Systems” in section “Before Starting”
for seat belt positioning.
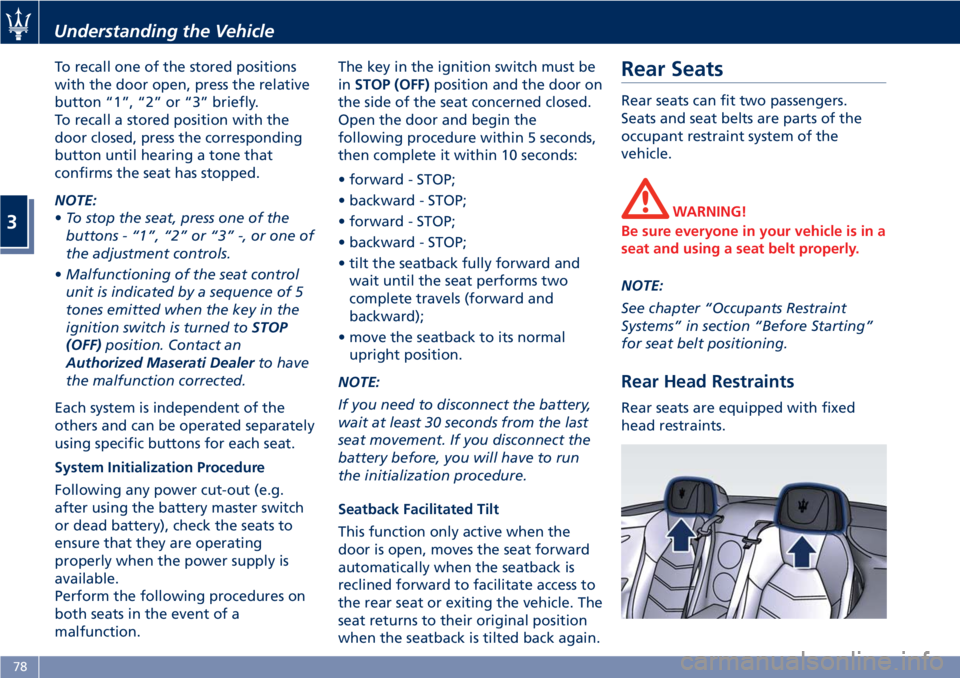
Rear Head Restraints
Rear seats are equipped with fixed
head restraints.
Understanding the Vehicle
3
78
Page 97 of 296

this problem let more air into the
passenger compartment.
• It is advisable to close the soft top
when parking the vehicle. This not
only protects the passenger
compartment against weather
agents, but is also a safeguard
against theft.
• If possible, park in the shade as
prolonged exposure to the sun will
alter the canvas fiber and color.
• Before disconnecting the battery,
lower the side windows by about 1.6
- 2 in (4 - 5 cm) to prevent damaging
the soft top strip when the doors are
opened and closed. When the
battery is connected and fully
charged, this operation is performed
automatically whenever the doors
are opened or closed. The windows
must remain lowered until the
recharged battery is reconnected. If
the battery is dead and the windows
are fully up, only open the doors
when strictly necessary and being
extremely careful: do not close them
again until the windows can be
lowered.
• Cover the soft top with a protective
cloth when it is going to be parked
outdoor for a long period of time.• To avoid damaging the soft top, the
vehicle must not be washed with
high-pressure water jet systems, be it
a manual nozzle or an automatic car
wash with turning rollers.
• Organic residues must be
immediately removed, as they may
damage both the soft top fabric and
its strips.
• Do not use solvents, alcohol, petrol
or other generic detergents to clean
the soft top.
"Summer open" Strategy
Using the key inserted in the external
driver's door lock, you can control the
soft top opening/closing strategy
referred to as “Summer open”.
NOTE:
•The opening and closing cycle can be
interrupted at any time, moving the
key back to its initial position.
•The following operations are
performed with the engine off. This
involves an extremely high power
consumption, which causes the
battery to discharge faster.
With the soft topfully closed:
• insert the key in the external driver’s
door lock;• turn the key clockwise until
unlocking the doors and hold it in
this position. The automatic soft top
opening cycle will begin after
approx. 2 seconds;
• do not move the key for the entire
opening cycle.
With the soft topfully open:
• insert the key in the external driver’s
door lock;
• turn the key counterclockwise until
locking the doors and hold it in this
position. The automatic soft top
closing cycle will begin after approx.
2 seconds;
• do not move the key for the entire
closing cycle.
Understanding the Vehicle
3
93
Page 163 of 296

Engine Start Failure
CAUTION!
• Do not attempt to push or tow your
vehicle to get it started. Vehicles
equipped with an automatic
transmission cannot be started this
way.
• If the vehicle battery is dead, booster
cables may be used to obtain a start
from a booster battery or the
battery in another vehicle. This type
of start can be dangerous if done
improperly. See “Auxiliary Jump
Start Procedure” in section “In an
Emergency” for further information.
Starting by cold engine
Start-off slowly, avoiding sudden
acceleration and rev the engine up at
low medium speeds. High-
performance driving should be
avoided until the engine temperature
reaches 149-158°F (65-70°C).
Engine Turn-Off
• Place the shift lever in P (Park) (see
“Automatic Transmission” in this
section).
• With the engine at idle, turn the key
in the ignition switch toSTOP (OFF)position. A burst on the accelerator
pedal before turning off the engine
has no purpose and increases fuel
consumption.
WARNING!
Never leave a vehicle out of the P
(Park) position, as it could move.
The key can only be removed from the
ignition switch when the transmission
is in P (Park) position and within 30
seconds after turning the key toSTOP
(OFF)position. If you do not remove
the key within 30 seconds, you will
need to turn it back toMAR (ON)and
then toSTOP (OFF)position to have a
further 30 seconds within which to
remove the key from the ignition
switch.
In the event that the key unlocking
system fails or if it is not possible to
shift the transmission to P (Park)
position, to remove the key you must
turn it toSTOP (OFF)position, then
remove the cap shown in picture using
a pen or sufficiently pointed tool.
Then press the button just uncovered
and at the same time extract the key
from the ignition switch. Once the key
has been removed, refit the removed
cap.
Driving
5
159
Page 203 of 296

“--,--” will be displayed in the place of
the values.
NOTE:
•The system will not perform
calibration if the pressure is below 2
bar (29 psi).
•To allow the system to acquire the
sensors’s data, after the startup of
the car, if possible avoid to stop.
During this interval the TFT display
can show screen page with dashes
“--,--” in the place of the pressure
levels of each tire.
•If calibration is not completed within
10 minutes of driving the car, the
instrument cluster shows “TPMS
Malfunction” pop-up message and
“Tire Pressure” screen disappear. The
warning light remains light on.
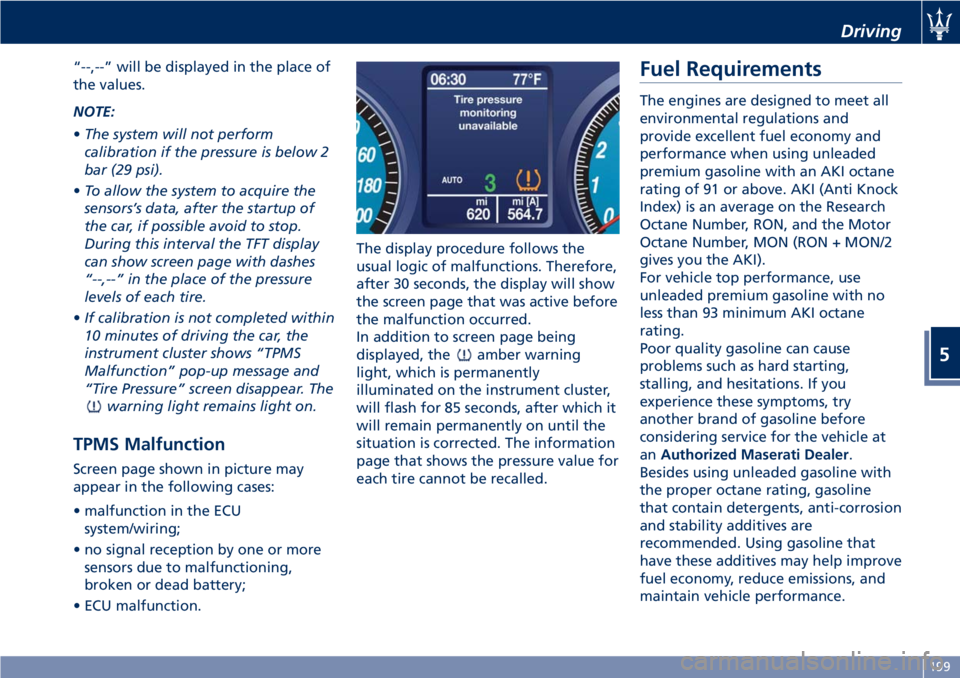
TPMS Malfunction
Screen page shown in picture may
appear in the following cases:
• malfunction in the ECU
system/wiring;
• no signal reception by one or more
sensors due to malfunctioning,
broken or dead battery;
• ECU malfunction.The display procedure follows the
usual logic of malfunctions. Therefore,
after 30 seconds, the display will show
the screen page that was active before
the malfunction occurred.
In addition to screen page being
displayed, the
amber warning
light, which is permanently
illuminated on the instrument cluster,
will flash for 85 seconds, after which it
will remain permanently on until the
situation is corrected. The information
page that shows the pressure value for
each tire cannot be recalled.
Fuel Requirements
The engines are designed to meet all
environmental regulations and
provide excellent fuel economy and
performance when using unleaded
premium gasoline with an AKI octane
rating of 91 or above. AKI (Anti Knock
Index) is an average on the Research
Octane Number, RON, and the Motor
Octane Number, MON (RON + MON/2
gives you the AKI).
For vehicle top performance, use
unleaded premium gasoline with no
less than 93 minimum AKI octane
rating.
Poor quality gasoline can cause
problems such as hard starting,
stalling, and hesitations. If you
experience these symptoms, try
another brand of gasoline before
considering service for the vehicle at
anAuthorized Maserati Dealer.
Besides using unleaded gasoline with
the proper octane rating, gasoline
that contain detergents, anti-corrosion
and stability additives are
recommended. Using gasoline that
have these additives may help improve
fuel economy, reduce emissions, and
maintain vehicle performance.
Driving
5
199
Page 237 of 296

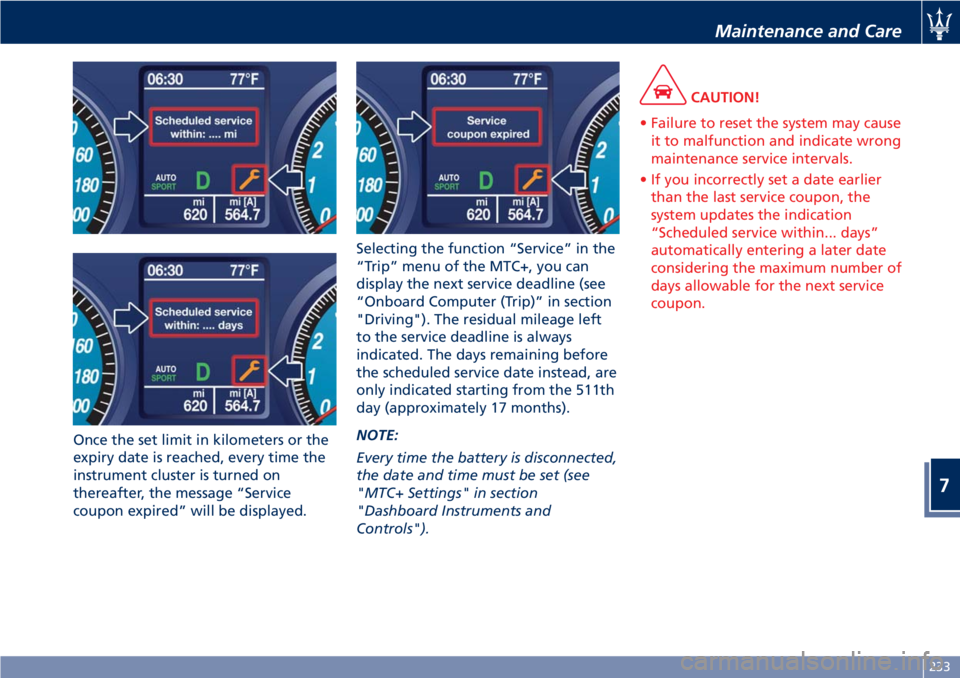
Once the set limit in kilometers or the
expiry date is reached, every time the
instrument cluster is turned on
thereafter, the message “Service
coupon expired” will be displayed.Selecting the function “Service” in the
“Trip” menu of the MTC+, you can
display the next service deadline (see
“Onboard Computer (Trip)” in section
"Driving"). The residual mileage left
to the service deadline is always
indicated. The days remaining before
the scheduled service date instead, are
only indicated starting from the 511th
day (approximately 17 months).
NOTE:
Every time the battery is disconnected,
the date and time must be set (see
"MTC+ Settings" in section
"Dashboard Instruments and
Controls").
CAUTION!
• Failure to reset the system may cause
it to malfunction and indicate wrong
maintenance service intervals.
• If you incorrectly set a date earlier
than the last service coupon, the
system updates the indication
“Scheduled service within... days”
automatically entering a later date
considering the maximum number of
days allowable for the next service
coupon.
Maintenance and Care
7
233
Page 274 of 296

WARNING!
The engine idle must be performed
outdoors. Exhaust gases contain
carbon monoxide which is strongly
toxic and potentially lethal.
WARNING!
California Proposition 65
Operating, servicing and maintaining
a passenger vehicle or off-road vehicle
can expose you to chemicals including
such as, engine exhaust, carbon
monoxide, phthalates and lead, that
which are know to the State of
California to cause cancer and birth
defects or other reproductive harm. To
minimize exposure, avoid breathing
exhaust, do not idle the engine except
as necessary, service your vehicle in a
well-ventilated area and wear gloves
or wash your hands frequently when
servicing your vehicle. For more
information go to:
www.P65Warnings.ca.gov/passenger-
vehicle
Battery Statement
Battery Statement Status of
Charge
To avoid problems with ignition and/or
the electrical system in general when
you are driving, the battery charge
status is constantly maintained and
guaranteed by the vehicle's recharge
circuit; the main component of which
is the alternator. This circuit is only
able to supply voltage to the battery
when the vehicle is traveling.
The
warning light on the
instrument cluster (see “Instrument
Cluster” in section “Dashboard
Instruments and Controls”), will
indicate any malfunctions in the
recharge circuit or an insufficient
battery charge status (flashing).
The vehicle is fitted with advanced
electronic systems, such as, for
example, the alarm system and various
electronic control modules, which
consume power even when the key in
the ignition switch is in theSTOP (OFF)
position and the vehicle is not being
used.
Therefore, it is fundamental that the
battery is properly charged to ensure
that the engine starts properly andthat all the electrical/electronic systems
in the vehicle work efficiently.
Maintaining Battery Charge
If you perform short daily trips
(approximately 10 miles/16 km), which
correspond to an annual total of 4000
miles/6000 km, or when the vehicle is
not going to be used for one week or
more, Maserati recommends
connecting the vehicle to a battery
charger, to save you the trouble of
having to recharge the battery (see
“Battery Charge Maintainer
Operation” in this chapter).
The battery charge maintainer will
keep the battery charged properly and
at the correct voltage levels required
by the systems and devices in the
vehicle.
Before using the battery charge
maintainer, carefully follow the
instructions provided.
If you do not use a battery charge
maintainer to prevent the battery
from going dead when you are not
going to use the vehicle for long
periods of time, you need to check and
recharge the battery at least once
every three weeks. Make this check if
you perform short daily trips
(approximately 10 mi/16 km) which
correspond to an annual total of 4000
Maintenance and Care
7
270