Page 492 of 622

SiriusXM Satellite Radio Reception Factors and Troubleshooting
Potential Reception Issues
For optimal reception performance, keep the antenna clear of snow and ice build-up and keep
luggage and other materials as far away from the antenna as possible.
Antenna obstructions
Hills, mountains, tall buildings, bridges, tunnels, freeway overpasses, \
parking garages, dense tree
foliage and thunderstorms can interfere with your reception.
Terrain
When you pass a ground-based broadcast-repeating tower, a stronger signal may overtake a
weaker one and the audio system may mute.
Station overload
Your display may show ACQUIRING... to indicate the interference and the a\
udio system may mute.
Satellite radio signal interference Troubleshooting Tips
Action
Cause
Message
No action required. This message should disap-
pear shortly.
Radio requires more than two seconds to produce
audio for the selected channel.
Acquiring Signal
If this message does not clear shortly, or with an
ignition key cycle, your receiver may have a fault.
See an authorized dealer for service.
There is an internal module or system failure
present.
Satellite antenna fault
SIRIUS system failure
Tune to another channel or choose another preset.
The channel is no longer available.
Invalid Channel
489
Navigator (TB9) Canada/United States of America, enUSA, Edition date: 201907, Second-Printing SYNC™ 3
Page 497 of 622

Website
http://hdradio.com/stations/feedback
HD Radio Technology manufactured under
license from iBiquity Digital Corporation and
foreign patents. HD Radio and the HD and
HD Radio logos are proprietary trademarks
of DTS. The vehicle manufacturer and DTS
are not responsible for the content sent using
HD Radio technology. Content may be
changed, added or deleted at any time at
the station owner's discretion. CD (If equipped)
Once you select this option, the system
returns you to the main audio screen.
The current audio information appears on
the screen.
The following buttons are also available: Function
Button
You can use the browse button to select a track.
Browse
Select this button and a small number one displays to indicate the track\
is set to repeat.
Repeat
For MP3 CDs, this button allows you to toggle through repeat off, repeat one track (a small number
one displays), and repeat current folder (a small folder displays).
Select the shuffle symbol to have the audio on the disk play in random o\
rder.
Shuffle
494
Navigator (TB9) Canada/United States of America, enUSA, Edition date: 201907, Second-Printing SYNC™ 3
Page 499 of 622
Function
Button
If available, displays the list of tracks in the Now Playing playlist.
Browse
This option, which is available under browse, allows you to play all
tracks or to filter the available media into one of the below categories\
.
New Search
Play All
Playlists
Artist
Albums
Songs
Genres
Podcasts
Audio books
Composers
This button allows you to choose a specific letter to view within the
category you are browsing.
A-Z Jump
If available, this allows you to browse the folders and files on your
USB device.
Explore Device
496
Navigator (TB9) Canada/United States of America, enUSA, Edition date: 201907, Second-Printing SYNC™ 3
Page 501 of 622

Touch the button to direct airflow
to the instrument panel air vents.
Touch the button to direct airflow
to the footwell air vents.
You can direct air through any combination
of these air vents.
Setting the Blower Motor Speed Touch up or down to increase or
decrease the volume of air that
circulates in your vehicle.
Setting the Temperature
Touch up or down on the left-hand
temperature control to set the left-hand
temperature.
Note: This control also adjusts the right-hand
side temperature when you switch off dual
zone mode.
Touch up or down on the right-hand
temperature control to set the right-hand
temperature. Switching Auto Mode On and Off Touch the button to switch on
automatic operation, then set the
temperature.
The system adjusts the blower motor speed,
air distribution, air conditioning operation,
and outside or recirculated air to reach and
maintain the temperature you have set.
Switching the Air Conditioning On and
Off A pop-up appears on the screen
to display the air conditioning
options.
MAX A/C: Touch the button to activate and
maximize cooling. The driver and passenger
temperatures are set to LO, recirculated air
flows through the instrument panel vents, air
conditioning automatically turns on and the
fan automatically adjusts to the highest
speed.
A/C: Touch to switch the air conditioning on
or off. Use A/C with recirculated air to
improve cooling performance and efficiency. Note:
In certain conditions, such as
maximum defrost, the air conditioning
compressor may continue to operate even
though you switch off the air conditioning.
Switching the Climate Control On and
Off Touch the button.
Switching the Climate Controlled Seats
On and Off Touch the button to cycle through
the various climate controlled seat
settings.
Switching Dual Zone Mode On and Off Touch the button to switch on
temperature control for the
right-hand side of the vehicle.
498
Navigator (TB9) Canada/United States of America, enUSA, Edition date: 201907, Second-Printing SYNC™ 3 E265282 E265280
Page 504 of 622

1. Select Add Phone.
Note: A prompt alerts you to search for your
vehicle on your cell phone.
2. Select your vehicle on your cell phone.
Note: A number appears on your cell phone
and on the touchscreen.
3. Confirm that the number on your cell phone matches the number on the
touchscreen.
Note: The touchscreen indicates that you
have successfully paired your cell phone.
4. Download the phonebook from your cell
phone when you are prompted.
Note: If you pair more than one cell phone,
use the phone settings to specify the primary
phone. You can change this setting at any
time.
Using Your Cell Phone
Recent Call List
Display and select an entry from a list of
previous calls. Contacts
Display a smart search form to look up your
contacts. Use the List button to alphabetically
sort your contacts.
Change Phone
Display the list of paired or connected
devices that you can select.
Phone Settings
Change ring tones, alerts or pair another
phone.
Do Not Disturb
Reject incoming calls and switch ring tones
and alerts off.
Phone Keypad
Directly dial a number.
Mute
Mute the microphone.
Text Messaging
Setting Text Message Notification
iOS
1. Go to the settings menu on your cell
phone.
2. Select Bluetooth.
3. Select the information icon to the right of
your vehicle.
4. Switch text message notification on.
Android
1. Go to the settings menu on your cell phone.
2. Select Bluetooth.
3. Select the profiles option.
4. Select the phone profile.
5. Switch text message notification on.
501
Navigator (TB9) Canada/United States of America, enUSA, Edition date: 201907, Second-Printing SYNC™ 3
Page 507 of 622
Setting a Destination
Destination Entry Menu
Description
Item
Enter a destination address.
Search
Display and select from a list of previous destinations.
Previous Destinations
Set your saved home address as your destination
Home
Set your saved place of work as your destination.
Work
Display and select from a list of favorite destinations.
Favorites
504
Navigator (TB9) Canada/United States of America, enUSA, Edition date: 201907, Second-Printing SYNC™ 3
Page 508 of 622

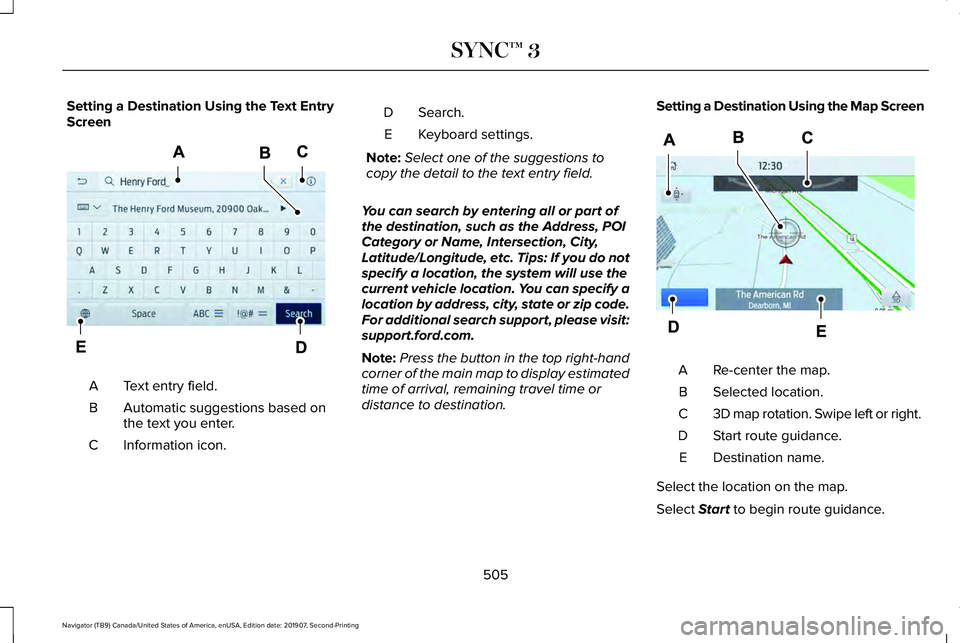
Setting a Destination Using the Text Entry
Screen
Text entry field.
A
Automatic suggestions based on
the text you enter.
B
Information icon.
C Search.
D
Keyboard settings.
E
Note: Select one of the suggestions to
copy the detail to the text entry field.
You can search by entering all or part of
the destination, such as the Address, POI
Category or Name, Intersection, City,
Latitude/Longitude, etc. Tips: If you do not
specify a location, the system will use the
current vehicle location. You can specify a
location by address, city, state or zip code.
For additional search support, please visit:
support.ford.com.
Note: Press the button in the top right-hand
corner of the main map to display estimated
time of arrival, remaining travel time or
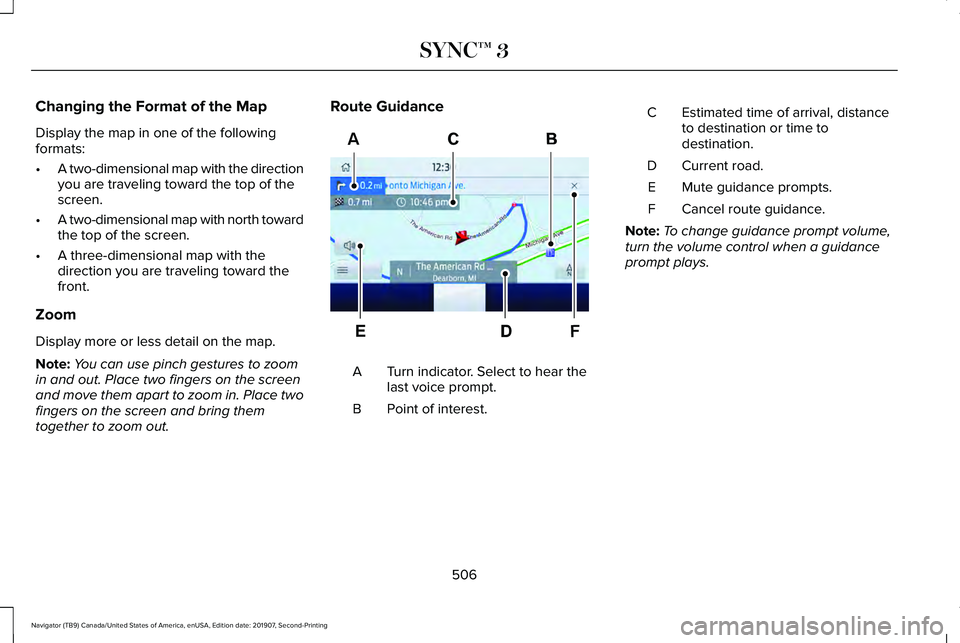
distance to destination. Setting a Destination Using the Map Screen
Re-center the map.
A
Selected location.
B
3D map rotation. Swipe left or right.
C
Start route guidance.
D
Destination name.
E
Select the location on the map.
Select Start to begin route guidance.
505
Navigator (TB9) Canada/United States of America, enUSA, Edition date: 201907, Second-Printing SYNC™ 3E297558 E297559
Page 509 of 622

Changing the Format of the Map
Display the map in one of the following
formats:
•
A two-dimensional map with the direction
you are traveling toward the top of the
screen.
• A two-dimensional map with north toward
the top of the screen.
• A three-dimensional map with the
direction you are traveling toward the
front.
Zoom
Display more or less detail on the map.
Note: You can use pinch gestures to zoom
in and out. Place two fingers on the screen
and move them apart to zoom in. Place two
fingers on the screen and bring them
together to zoom out. Route Guidance
Turn indicator. Select to hear the
last voice prompt.
A
Point of interest.
B Estimated time of arrival, distance
to destination or time to
destination.
C
Current road.
D
Mute guidance prompts.
E
Cancel route guidance.
F
Note: To change guidance prompt volume,
turn the volume control when a guidance
prompt plays.
506
Navigator (TB9) Canada/United States of America, enUSA, Edition date: 201907, Second-Printing SYNC™ 3F
AE297560