2020 LINCOLN MKZ HYBRID change wheel
[x] Cancel search: change wheelPage 229 of 544

WHAT IS CRUISE CONTROL
Cruise control lets you maintain a set speed
without keeping your foot on the accelerator
pedal. You can use cruise control when your
vehicle speed is greater than 20 mph
(30 km/h).
SWITCHING CRUISE CONTROL ON
AND OFF WARNING:
Do not use cruise control
on winding roads, in heavy traffic or when
the road surface is slippery. This could
result in loss of vehicle control, serious
injury or death.
The cruise controls are on the steering
wheel.
See Cruise Control (page 82).
Switching Cruise Control On Press the button. Switching Cruise Control Off Press the button when the system
is in standby mode.
The system also turns off when you switch
the ignition off.
Note: The set speed erases when you switch
the system off.
SETTING THE CRUISE CONTROL
SPEED WARNING:
When you are going
downhill, your vehicle speed could
increase above the set speed. The system
does not apply the brakes.
Drive to the speed you prefer. Press either button to set the
current speed.Take your foot off the accelerator pedal.
Note:
The indicator changes color in the
information display.
Changing the Set Speed Press and release the button to
increase the set speed in small
increments.
Press and hold the button to accelerate.
Release the button when you reach your
preferred speed. Press and release the button to
decrease the set speed in small
increments.
Press and hold the button to decelerate.
Release the button when you reach your
preferred speed.
Note: If you accelerate by pressing the
accelerator pedal, the set speed does not
change. When you release the accelerator
pedal, your vehicle returns to the speed that
you previously set.
226
MKZ (CC9) Hybrid Electric Vehicle (HEV), Canada/United States of America, enUSA, Edition date: 201905, Second-Printing Cruise ControlE265296 E265297
Page 241 of 544

Note:
When aid mode is on and the system
detects no steering activity for a short period,
the system alerts you to put your hands on
the steering wheel. The system may detect
a light grip or touch on the steering wheel
as hands off driving.
Note: The system may not function if the
camera is blocked, or if the windshield is
damaged or dirty. When you switch the system on and it
detects an unintentional drift out of your lane
is likely to occur, the system notifies or
assists you to stay in your lane through the
steering system and information display. In
Alert mode, the system provides a warning
by vibrating the steering wheel. In Aid mode,
the system provides steering assistance by
gently counter steering your vehicle back
into the lane.
When the system is functioning in the
combined Alert and Aid mode, the system
first provides steering assistance by gently
counter steering your vehicle back into the
lane, followed by a warning that vibrates the
steering wheel if the vehicle is still out of the
lane markings.
Switching the System On and Off
Note:
The system on or off setting is stored
until it is manually changed, unless a MyKey™
is detected. If the system detects a MyKey™,
it defaults to on and the mode is set to alert. Press the button on the direction indicator
stalk to switch the system on or off.
System Settings
The system has optional setting menus
available. The system stores the last-known
selection for each of these settings. You do
not need to readjust your settings each time
you switch on the system.
Mode: This setting allows you to select which
of the system features you can enable.
238
MKZ (CC9) Hybrid Electric Vehicle (HEV), Canada/United States of America, enUSA, Edition date: 201905, Second-Printing Driving AidsE249505 E132099
Page 308 of 544

Only use oils certified for gasoline engines
by the American Petroleum Institute (API).
An oil with this trademark symbol conforms
to the current engine and emission system
protection standards and fuel economy
requirements of the International Lubricants
Specification Advisory Committee (ILSAC).
1. Remove the filler cap.
2. Add engine oil that meets our
specifications. See Capacities and
Specifications (page 359).
3. Replace the filler cap. Turn it until you feel a strong resistance.
OIL CHANGE INDICATOR RESET
Use the information display controls on the
steering wheel to reset the oil change
indicator. From the main menu scroll to: Action and description
Message
Press the right arrow button,
then from this menu scroll to
the following message.
Settings
Press the right arrow button,
then from this menu scroll to
the following message.
Vehicle
Press the right arrow button,
then from this menu scroll to
the following message.
Oil Life
Press and hold the OK button
until the instrument cluster
displays the following
message.
Hold OK to
Reset
Reset Successful
When the oil change indicator
resets the instrument cluster
displays 100%.
Remaining Life
{00}% Action and description
Message
If the instrument cluster
displays one of the following
messages, repeat the
process.
Not Reset
Reset Cancelled
ENGINE COOLANT CHECK WARNING:
Do not remove the
coolant reservoir cap when the engine is
on or the cooling system is hot. Wait 10
minutes for the cooling system to cool
down. Cover the coolant reservoir cap with
a thick cloth to prevent the possibility of
scalding and slowly remove the cap.
Failure to follow this instruction could result
in personal injury.
305
MKZ (CC9) Hybrid Electric Vehicle (HEV), Canada/United States of America, enUSA, Edition date: 201905, Second-Printing Maintenance
Page 329 of 544

Alloy wheels and wheel covers are coated
with a clear coat paint finish. To maintain
their condition we recommend that you:
•
Clean them weekly with the
recommended wheel and tire cleaner.
• Use a sponge to remove heavy deposits
of dirt and brake dust accumulation.
• Rinse them thoroughly with a pressurized
stream of water when you complete the
cleaning process.
We recommend that you use our surface
wheel cleaner. Make sure that you read and
follow the manufacturer’ s instructions.
Using other non-recommended cleaning
products can result in severe and permanent
damage.
VEHICLE STORAGE
If you plan on storing your vehicle for 30
days or more, read the following
maintenance recommendations to make sure
your vehicle stays in good operating
condition. We engineer and test all motor vehicles and
their components for reliable, regular driving.
Under various conditions, long-term storage
may lead to degraded engine performance
or failure unless you use specific precautions
to preserve engine components.
General
•
Store all vehicles in a dry, ventilated
place.
• Protect from sunlight, if possible.
• If vehicles are stored outside, they
require regular maintenance to protect
against rust and damage.
Body
• Wash your vehicle thoroughly to remove
dirt, grease, oil, tar or mud from exterior
surfaces, rear-wheel housing and the
underside of front fenders.
• Periodically wash your vehicle if it is
stored in exposed locations.
• Touch-up exposed or primed metal to
prevent rust. •
Cover chrome and stainless steel parts
with a thick coat of auto wax to prevent
discoloration. Re-wax as necessary when
you wash your vehicle.
• Lubricate all hood, door and luggage
compartment hinges and latches with a
light grade oil.
• Cover interior trim to prevent fading.
• Keep all rubber parts free from oil and
solvents.
Engine
• Change the engine oil and filter prior to
storage because used engine oil contains
contaminates which may cause engine
damage.
• Start the engine every 15 days for a
minimum of 15 minutes. Run at fast idle
with the climate controls set to defrost
until the engine reaches normal
operating temperature.
• With your foot on the brake, shift through
all the gears while the engine is running.
• We recommend that you change the
engine oil before you use your vehicle
again.
326
MKZ (CC9) Hybrid Electric Vehicle (HEV), Canada/United States of America, enUSA, Edition date: 201905, Second-Printing Vehicle Care
Page 342 of 544

Information on P Type Tires
P215/65R15 95H is an example of a tire
size, load index and speed rating. The
definitions of these items are listed
below. Note that the tire size, load index
and speed rating for your vehicle may
be different from this example. A. P: Indicates a tire, designated by the
Tire and Rim Association, that may be
used for service on cars, sport utility
vehicles, minivans and light trucks.
Note:
If your tire size does not begin with a
letter this may mean it is designated by
either the European Tire and Rim
Technical Organization or the Japan Tire
Manufacturing Association.
B.
215: Indicates the nominal width of
the tire in millimeters from sidewall edge
to sidewall edge. In general, the larger
the number, the wider the tire.
C.
65: Indicates the aspect ratio which
gives the tire's ratio of height to width.
D.
R: Indicates a radial type tire.
E.
15: Indicates the wheel or rim
diameter in inches. If you change your
wheel size, you will have to purchase
new tires to match the new wheel
diameter. F.
95: Indicates the tire's load index. It
is an index that relates to how much
weight a tire can carry. You may find this
information in your owner’ s manual. If
not, contact a local tire dealer.
Note: You may not find this information
on all tires because it is not required by
federal law.
G.
H: Indicates the tire's speed rating.
The speed rating denotes the speed at
which a tire is designed to be driven for
extended periods of time under a
standard condition of load and inflation
pressure. The tires on your vehicle may
operate at different conditions for load
and inflation pressure. These speed
ratings may need to be adjusted for the
difference in conditions. The ratings
range from
81–186 mph (130–299 km/h).
These ratings are listed in the following
chart.
Note: You may not find this information
on all tires because it is not required by
federal law.
339
MKZ (CC9) Hybrid Electric Vehicle (HEV), Canada/United States of America, enUSA, Edition date: 201905, Second-Printing Wheels and TiresH
I
J
KL
M
A
B
CDEFG
E142543
Page 346 of 544
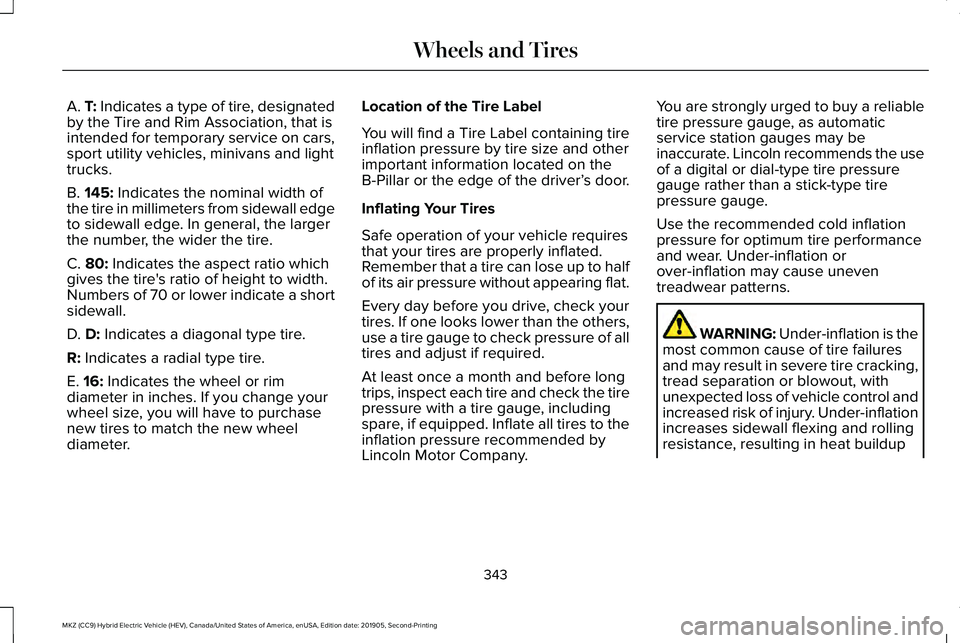
A. T: Indicates a type of tire, designated
by the Tire and Rim Association, that is
intended for temporary service on cars,
sport utility vehicles, minivans and light
trucks.
B.
145: Indicates the nominal width of
the tire in millimeters from sidewall edge
to sidewall edge. In general, the larger
the number, the wider the tire.
C.
80: Indicates the aspect ratio which
gives the tire's ratio of height to width.
Numbers of 70 or lower indicate a short
sidewall.
D.
D: Indicates a diagonal type tire.
R:
Indicates a radial type tire.
E.
16: Indicates the wheel or rim
diameter in inches. If you change your
wheel size, you will have to purchase
new tires to match the new wheel
diameter. Location of the Tire Label
You will find a Tire Label containing tire
inflation pressure by tire size and other
important information located on the
B-Pillar or the edge of the driver’
s door.
Inflating Your Tires
Safe operation of your vehicle requires
that your tires are properly inflated.
Remember that a tire can lose up to half
of its air pressure without appearing flat.
Every day before you drive, check your
tires. If one looks lower than the others,
use a tire gauge to check pressure of all
tires and adjust if required.
At least once a month and before long
trips, inspect each tire and check the tire
pressure with a tire gauge, including
spare, if equipped. Inflate all tires to the
inflation pressure recommended by
Lincoln Motor Company. You are strongly urged to buy a reliable
tire pressure gauge, as automatic
service station gauges may be
inaccurate. Lincoln recommends the use
of a digital or dial-type tire pressure
gauge rather than a stick-type tire
pressure gauge.
Use the recommended cold inflation
pressure for optimum tire performance
and wear. Under-inflation or
over-inflation may cause uneven
treadwear patterns.
WARNING: Under-inflation is the
most common cause of tire failures
and may result in severe tire cracking,
tread separation or blowout, with
unexpected loss of vehicle control and
increased risk of injury. Under-inflation
increases sidewall flexing and rolling
resistance, resulting in heat buildup
343
MKZ (CC9) Hybrid Electric Vehicle (HEV), Canada/United States of America, enUSA, Edition date: 201905, Second-Printing Wheels and Tires
Page 347 of 544

and internal damage to the tire. It also
may result in unnecessary tire stress,
irregular wear, loss of vehicle control
and accidents. A tire can lose up to
half of its air pressure and not appear
to be flat!
Always inflate your tires to the Lincoln
recommended inflation pressure even
if it is less than the maximum inflation
pressure information found on the tire.
The Lincoln recommended tire inflation
pressure is found on the Safety
Compliance Certification Label, affixed
to either the door hinge pillar, door-latch
post, or the door edge that meets the
door-latch post, next to the driver's
seating position, or Tire Label which is
located on the B-Pillar or the edge of the
driver’ s door. Failure to follow the tire
pressure recommendations can cause
uneven treadwear patterns and
adversely affect the way your vehicle
handles. Maximum Permissible Inflation
Pressure is the tire manufacturer's
maximum permissible pressure and the
pressure at which the maximum load
can be carried by the tire. This pressure
is normally higher than the
manufacturer’ s recommended cold
inflation pressure which can be found
on the Safety Compliance Certification
Label, affixed to either the door hinge
pillar, door-latch post, or the door edge
that meets the door-latch post, next to
the driver's seating position, or Tire
Label which is located on the B-Pillar or
the edge of the driver’ s door. The cold
inflation pressure should never be set
lower than the recommended pressure
on the Safety Compliance Certification
Label or Tire Label. When weather temperature changes
occur, tire inflation pressures also
change. A 10°F (6°C) temperature drop
can cause a corresponding drop of 1 psi
(7 kPa)
in inflation pressure. Check your
tire pressures frequently and adjust
them to the proper pressure which can
be found on the Safety Compliance
Certification Label or Tire Label.
To check the pressure in your tires:
1. Make sure the tires are cool, meaning they are not hot from
driving even a mile.
Note: If you are checking tire pressure
when the tire is hot, for example driven
more than
1.0 mi (1.6 km), never bleed
or reduce air pressure. The tires are hot
from driving and it is normal for
pressures to increase above
recommended cold pressures. A hot tire
at or below recommended cold inflation
pressure could be significantly
under-inflated.
344
MKZ (CC9) Hybrid Electric Vehicle (HEV), Canada/United States of America, enUSA, Edition date: 201905, Second-Printing Wheels and Tires
Page 356 of 544

Note:
Changes or modifications not
expressively approved by the party
responsible for compliance could void the
user's authority to operate the equipment.
The term "IC:" before the radio certification
number only signifies that Industry Canada
technical specifications were met.
Changing Tires With a Tire Pressure
Monitoring System Note:
Each road tire is equipped with a tire
pressure sensor located inside the wheel
and tire assembly cavity. The pressure
sensor is attached to the valve stem. The
pressure sensor is covered by the tire and
is not visible unless the tire is removed. Take
care when changing the tire to avoid
damaging the sensor.
You should always have your tires serviced
by an authorized dealer.
Check the tire pressure periodically (at least
monthly) using an accurate tire gauge. See
When Inflating Your Tires in this chapter. Understanding Your Tire Pressure
Monitoring System The tire pressure monitoring system
measures pressure in your road tires and
sends the tire pressure readings to your
vehicle. You can view the tire pressure
readings through the information display.
See
Information Messages (page 121). The
low tire pressure warning light will turn on if
the tire pressure is significantly low. Once
353
MKZ (CC9) Hybrid Electric Vehicle (HEV), Canada/United States of America, enUSA, Edition date: 201905, Second-Printing Wheels and TiresE142549 E250820