2020 LINCOLN CORSAIR remote control
[x] Cancel search: remote controlPage 175 of 591

WARNING: Do not poke sharp
objects into the seat cushion or seat
backrest. This could damage the heated
seat element and cause it to overheat.
Failure to follow this instruction could result
in personal injury. WARNING:
Do not place anything on
the seat that blocks the heat, for example
a seat cover or a cushion. This could cause
the seat to overheat. Failure to follow this
instruction could result in personal injury.
Note: The heated seats switch on during a
remote start if they are enabled.
See
Remote Start (page 156).
Note: The heated seats may also switch on
when you start your vehicle if they were on
when you previously switched your vehicle
off.
Note: Do not do the following:
• Place heavy objects on the seat.
• Operate the seat heater if water or any
other liquid spills on the seat. Allow the
seat to dry thoroughly. Press this symbol to cycle through the
various heat settings and off. More indicator
lights indicate warmer settings.
Automatic Climate Controlled Seats
(If
Equipped)
When you switch the auto setting on, the
climate controlled seats switch between the
heated seats and ventilated seats to match
your climate control setting.
Ventilated Seats
Note: The ventilated seats switch on during
a remote start if they are enabled.
See
Remote Start (page 156). Note:
The ventilated seats may also switch
on when you start your vehicle if they were
on when you previously switched your
vehicle off.
Note: Do not do the following:
• Spill liquid on the front seats. This may
cause the air vent holes to become
blocked and not work properly.
• Place cargo or objects under the seats.
They may block the air intake causing
the air vents to not work properly.
The ventilated seats only function when the
engine is running. Press this symbol to cycle through the
various ventilation settings and off. More
indicator lights indicate higher fan speeds.
If the engine falls below 350 RPM while the
ventilated seats are on, the feature turns
itself off. You need to reactivate it.
172
Corsair (CTF) Canada/United States of America, enUSA, Edition date: 201906, Second-Printing SeatsE146322 E224689
Page 177 of 591
UNIVERSAL GARAGE DOOR
OPENER (IF EQUIPPED)
HomeLink Wireless Control System WARNING:
Do not use the system
with any garage door opener that does not
have the safety stop and reverse feature
as required by U.S. Federal Safety
Standards (this includes any garage door
opener manufactured before April 1, 1982).
A garage door opener which cannot detect
an object, signaling the door to stop and
reverse, does not meet current federal
safety standards. Using a garage door
opener without these features increases
the risk of serious injury or death.
Note: Make sure that the garage door and
security device are free from obstruction
when you are programming. Do not program
the system with the vehicle in the garage.
Note: Make sure you keep the original
remote control transmitter for use in other
vehicles as well as for future system
programming. Note:
We recommend that upon the sale or
lease termination of your vehicle, you erase
the programmed function buttons for security
reasons. See
Erasing the Function Button
Codes later in this section.
Note: You can program a maximum of three
devices. To change or replace any of the
three devices after it has been initially
programmed, you must first erase the current
settings. See
Erasing the Function Button
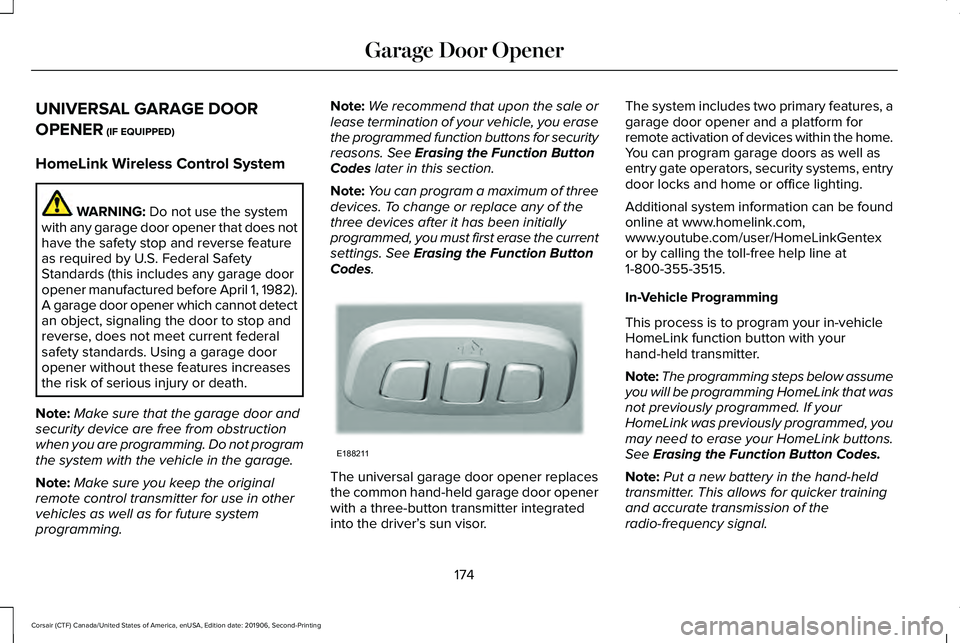
Codes. The universal garage door opener replaces
the common hand-held garage door opener
with a three-button transmitter integrated
into the driver’
s sun visor. The system includes two primary features, a
garage door opener and a platform for
remote activation of devices within the home.
You can program garage doors as well as
entry gate operators, security systems, entry
door locks and home or office lighting.
Additional system information can be found
online at www.homelink.com,
www.youtube.com/user/HomeLinkGentex
or by calling the toll-free help line at
1-800-355-3515.
In-Vehicle Programming
This process is to program your in-vehicle
HomeLink function button with your
hand-held transmitter.
Note:
The programming steps below assume
you will be programming HomeLink that was
not previously programmed. If your
HomeLink was previously programmed, you
may need to erase your HomeLink buttons.
See
Erasing the Function Button Codes.
Note: Put a new battery in the hand-held
transmitter. This allows for quicker training
and accurate transmission of the
radio-frequency signal.
174
Corsair (CTF) Canada/United States of America, enUSA, Edition date: 201906, Second-Printing Garage Door OpenerE188211
Page 183 of 591
Do not place items with a magnetic strip, for
example passports, parking tickets or credit
cards, near the charging area when charging
a device. Damage may occur to the magnetic
strip.
Do not place metal objects, for example
remote controls, coins and candy wrappers,
on or near the charging area when charging
a device. Metal objects may heat up and
degrade the charging performance.
Note:
The rate of charge, or charging power,
is controlled by the device. During charging,
the device and the charger may heat up, this
is normal. If the battery gets hotter than
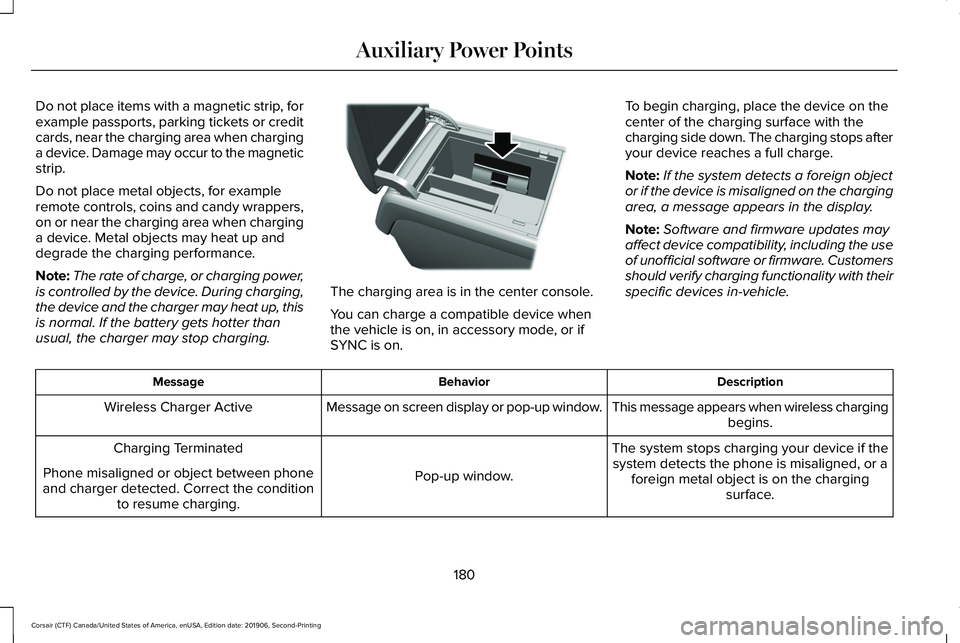
usual, the charger may stop charging. The charging area is in the center console.
You can charge a compatible device when
the vehicle is on, in accessory mode, or if
SYNC is on.
To begin charging, place the device on the
center of the charging surface with the
charging side down. The charging stops after
your device reaches a full charge.
Note:
If the system detects a foreign object
or if the device is misaligned on the charging
area, a message appears in the display.
Note: Software and firmware updates may
affect device compatibility, including the use
of unofficial software or firmware. Customers
should verify charging functionality with their
specific devices in-vehicle. Description
Behavior
Message
This message appears when wireless chargingbegins.
Message on screen display or pop-up window.
Wireless Charger Active
The system stops charging your device if thesystem detects the phone is misaligned, or a foreign metal object is on the charging surface.
Pop-up window.
Charging Terminated
Phone misaligned or object between phone
and charger detected. Correct the condition to resume charging.
180
Corsair (CTF) Canada/United States of America, enUSA, Edition date: 201906, Second-Printing Auxiliary Power PointsE317944
Page 306 of 591
2. Remove the jumper cable on the
negative (-) terminal of the booster
vehicle battery.
3. Remove the jumper cable from the positive (+) terminal of the booster vehicle
battery.
4. Remove the jumper cable from the positive (+) terminal of the disabled
vehicle battery.
5. Allow the engine to idle for at least one minute.
POST-CRASH ALERT SYSTEM
The system flashes the direction indicators
and sounds the horn (intermittently) in the
event of a serious impact that deploys an
airbag (front, side, side curtain or Safety
Canopy) or the seatbelt pretensioners.
The horn and indicators turn off when:
• You press the hazard control button.
• You press the panic button on the remote
entry transmitter (if equipped). •
Your vehicle runs out of power.
• Sounding of the horn is only enabled in
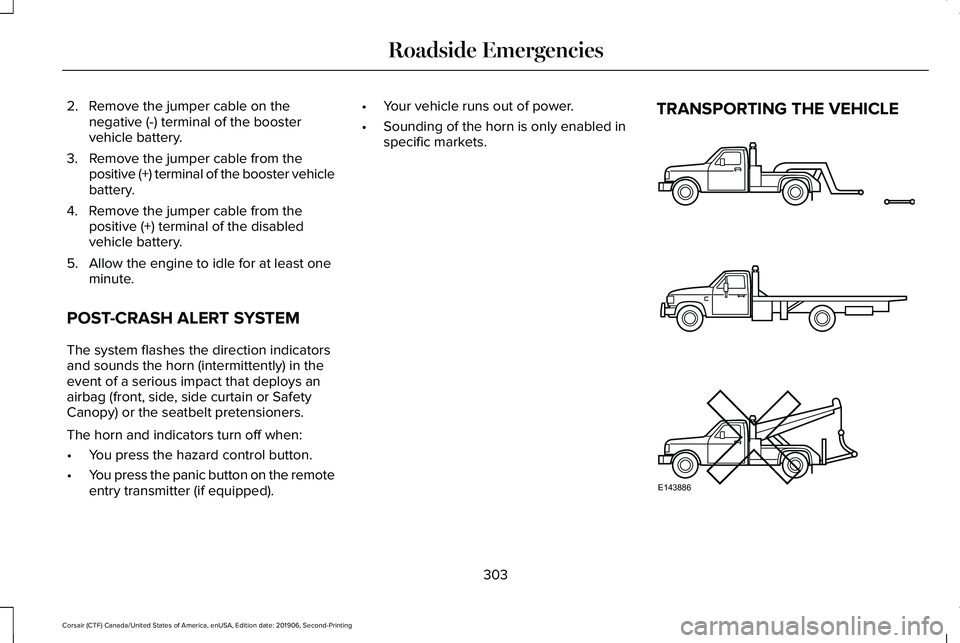
specific markets. TRANSPORTING THE VEHICLE
303
Corsair (CTF) Canada/United States of America, enUSA, Edition date: 201906, Second-Printing Roadside EmergenciesE143886
Page 371 of 591

in insufficient running clearances, tire
rubbing and eventual puncture. Failure
to follow tire replacement
recommendations can lead to tire
failure, loss of vehicle control, serious
injury or death.
WARNING: The use of
non-recommended tires and wheels
could cause steering, suspension, axle,
transfer case or power transfer unit
failure. If you have questions regarding
tire replacement, contact your
authorized dealer as soon as possible. WARNING: To reduce the risk of
serious injury, when mounting
replacement tires and wheels, you
should not exceed the maximum
pressure indicated on the sidewall of
the tire to set the beads without
additional precautions listed below. If
the beads do not seat at the maximum
pressure indicated, re-lubricate and
try again. WARNING:
When inflating the
tire for mounting pressures up to
20 psi (1.38 bar)
greater than the
maximum pressure on the tire sidewall,
the following precautions must be
taken to protect the person mounting
the tire:
• Make sure that you have the correct
tire and wheel size.
• Lubricate the tire bead and wheel
bead seat area again.
• Stand at a minimum of 12 feet (3.66
meters) away from the wheel and tire
assembly.
• Use both eye and ear protection. WARNING:
Always inflate steel
carcass tires with a remote air fill with
the person inflating standing at a
minimum of
12 ft (3.66 m) away from
the wheel and tire assembly. Important:
Remember to replace the
wheel valve stems when the road tires
are replaced on your vehicle.
It is recommended that the two front
tires or two rear tires generally be
replaced as a pair.
The tire pressure sensors mounted in
the wheels (originally installed on your
vehicle) are not designed to be used in
aftermarket wheels.
The use of wheels or tires not
recommended by us, may affect the
operation of your tire pressure
monitoring system.
If the tire pressure monitoring system
indicator is flashing, your system is
malfunctioning. Your replacement tire
might be incompatible with your tire
pressure monitoring system, or some
component of the system may be
damaged.
368
Corsair (CTF) Canada/United States of America, enUSA, Edition date: 201906, Second-Printing Wheels and Tires
Page 497 of 591
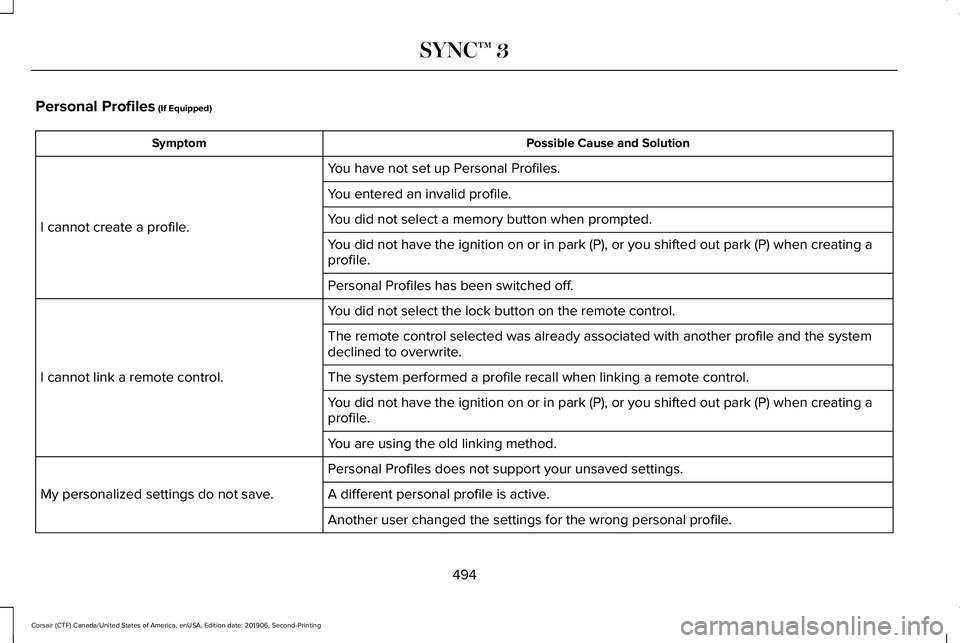
Personal Profiles (If Equipped)
Possible Cause and Solution
Symptom
You have not set up Personal Profiles.
I cannot create a profile. You entered an invalid profile.
You did not select a memory button when prompted.
You did not have the ignition on or in park (P), or you shifted out par\
k (P) when creating a
profile.
Personal Profiles has been switched off.
You did not select the lock button on the remote control.
I cannot link a remote control. The remote control selected was already associated with another profile \
and the system
declined to overwrite.
The system performed a profile recall when linking a remote control.
You did not have the ignition on or in park (P), or you shifted out par\
k (P) when creating a
profile.
You are using the old linking method.
Personal Profiles does not support your unsaved settings.
My personalized settings do not save. A different personal profile is active. Another user changed the settings for the wrong personal profile.
494
Corsair (CTF) Canada/United States of America, enUSA, Edition date: 201906, Second-Printing SYNC™ 3
Page 498 of 591
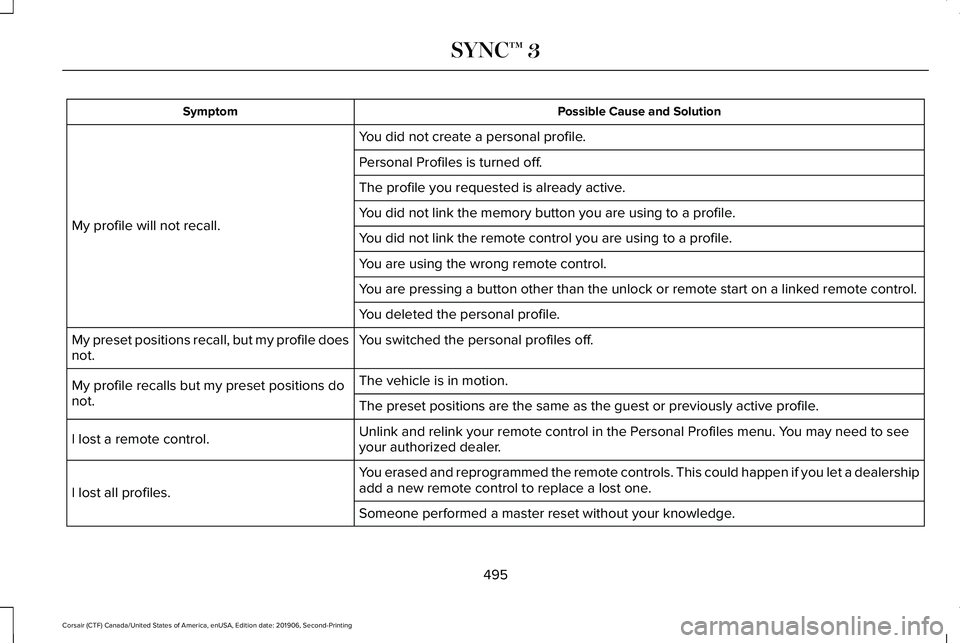
Possible Cause and Solution
Symptom
You did not create a personal profile.
My profile will not recall. Personal Profiles is turned off.
The profile you requested is already active.
You did not link the memory button you are using to a profile.
You did not link the remote control you are using to a profile.
You are using the wrong remote control.
You are pressing a button other than the unlock or remote start on a link\
ed remote control.
You deleted the personal profile.
You switched the personal profiles off.
My preset positions recall, but my profile does
not.
The vehicle is in motion.
My profile recalls but my preset positions do
not. The preset positions are the same as the guest or previously active prof\
ile.
Unlink and relink your remote control in the Personal Profiles menu. You may need to see
your authorized dealer.
I lost a remote control.
You erased and reprogrammed the remote controls. This could happen if you\
let a dealership
add a new remote control to replace a lost one.
I lost all profiles.
Someone performed a master reset without your knowledge.
495
Corsair (CTF) Canada/United States of America, enUSA, Edition date: 201906, Second-Printing SYNC™ 3
Page 583 of 591
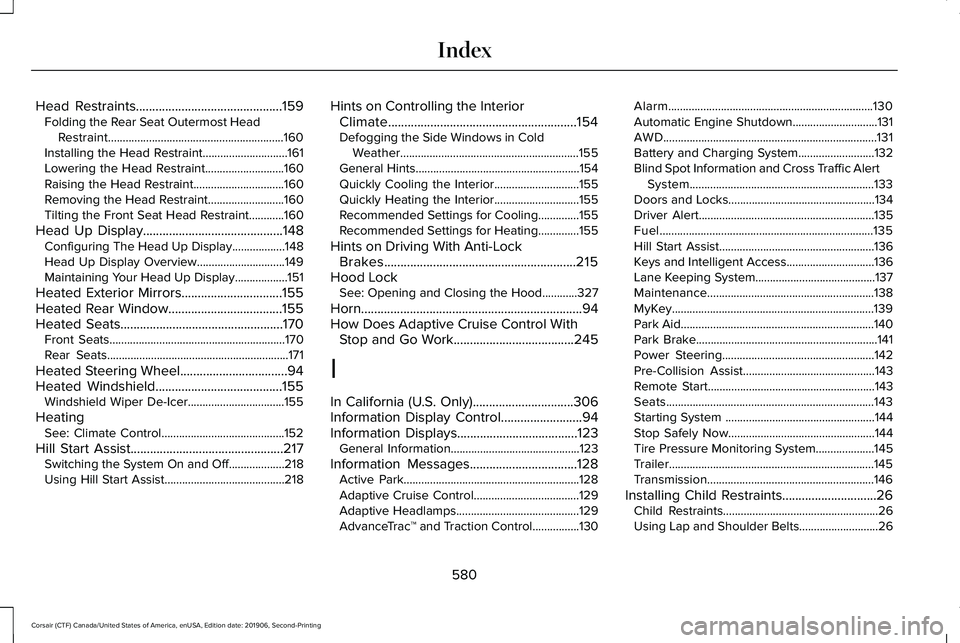
Head Restraints.............................................159
Folding the Rear Seat Outermost Head
Restraint............................................................160
Installing the Head Restraint.............................161
Lowering the Head Restraint...........................160
Raising the Head Restraint...............................
160
Removing the Head Restraint..........................160
Tilting the Front Seat Head Restraint............160
Head Up Display...........................................148 Configuring The Head Up Display..................148
Head Up Display Overview..............................149
Maintaining Your Head Up Display..................151
Heated Exterior Mirrors...............................155
Heated Rear Window
...................................155
Heated Seats..................................................170
Front Seats............................................................170
Rear Seats..............................................................171
Heated Steering Wheel.................................94
Heated Windshield
.......................................155
Windshield Wiper De-Icer.................................155
Heating See: Climate Control..........................................152
Hill Start Assist...............................................217 Switching the System On and Off...................218
Using Hill Start Assist.........................................218 Hints on Controlling the Interior
Climate..........................................................154
Defogging the Side Windows in Cold Weather.............................................................155
General Hints........................................................154
Quickly Cooling the Interior.............................155
Quickly Heating the Interior.............................155
Recommended Settings for Cooling..............
155
Recommended Settings for Heating..............155
Hints on Driving With Anti-Lock Brakes...........................................................215
Hood Lock See: Opening and Closing the Hood............327
Horn
....................................................................94
How Does Adaptive Cruise Control With Stop and Go Work
.....................................245
I
In California (U.S. Only)...............................306
Information Display Control
.........................94
Information Displays.....................................123
General Information............................................123
Information Messages.................................128 Active Park............................................................128
Adaptive Cruise Control....................................129
Adaptive Headlamps..........................................129
AdvanceTrac ™ and Traction Control................
130Alarm......................................................................130
Automatic Engine Shutdown.............................
131
AWD........................................................................\
.131
Battery and Charging System..........................132
Blind Spot Information and Cross Traffic Alert System...............................................................133
Doors and Locks..................................................134
Driver Alert............................................................135
Fuel........................................................................\
.135
Hill Start Assist.....................................................136
Keys and Intelligent Access..............................136
Lane Keeping System.........................................137
Maintenance.........................................................138
MyKey.....................................................................139
Park Aid..................................................................140
Park Brake..............................................................141
Power Steering....................................................142
Pre-Collision Assist.............................................143
Remote Start.........................................................143
Seats.......................................................................143
Starting System ...................................................144
Stop Safely Now..................................................144
Tire Pressure Monitoring System....................145
Trailer......................................................................145
Transmission.........................................................146
Installing Child Restraints.............................26 Child Restraints.....................................................26
Using Lap and Shoulder Belts...........................26
580
Corsair (CTF) Canada/United States of America, enUSA, Edition date: 201906, Second-Printing Index