2020 LINCOLN CONTINENTAL torque
[x] Cancel search: torquePage 206 of 609

USING ALL-WHEEL DRIVE
All-Wheel Drive (AWD) uses all four wheels
to power the vehicle. This increases traction,
enabling you to drive over terrain and road
conditions that a conventional two-wheel
drive vehicle cannot. The AWD system is
active all the time and requires no input from
the operator.
Note:
Your vehicle may be equipped with
Dynamic Torque Vectoring. This feature uses
all four wheels to power the vehicle and
independently controls the torque to each
rear wheel. In addition, the system has the
ability to over speed the outside rear wheel
in a turn. This increases traction and
handling performance, allowing the vehicle
to travel through road conditions and have
path following capability superior to
conventional two-wheel drive and AWD
vehicles. The Dynamic Torque Vectoring
system is active all the time and requires no
input from the operator. Note:
Your AWD vehicle is not intended for
off-road use. The AWD feature gives your
vehicle some limited off-road capabilities in
which driving surfaces are relatively level,
obstruction-free and otherwise similar to
normal on-road driving conditions. Operating
your vehicle under other than those
conditions could subject the vehicle to
excessive stress which might result in
damage which is not covered under your
warranty.
Note: When an AWD system fault is present,
the warning AWD Malfunction Service
Required displays in the information display.
The AWD system is not functioning correctly
and defaulted to front-wheel drive. When
this warning displays, have your vehicle
serviced at an authorized dealer. Note:
The
AWD OFF message may also
appear in the information display if the AWD
system overheats and defaults to front-wheel
drive. This may occur if the vehicle is
operated in extreme conditions with
excessive wheel slip, such as deep sand.
To resume normal AWD function as soon as
possible, stop the vehicle in a safe location
and stop the engine for at least 10 minutes.
After the engine has been restarted and the
AWD system has adequately cooled, the
AWD OFF
message will turn off and normal
AWD function returns. If the engine is not
stopped, the
AWD OFF message turns off
when the system cools and normal AWD
function returns.
203
Continental (CPL) Canada/United States of America, enUSA, Edition date: 201907, Second-Printing All-Wheel Drive
(If Equipped)
Page 217 of 609

Note:
The electric parking brake could
automatically apply when you shift into park
(P). See Transmission (page 197).
Applying the Electric Parking Brake in an
Emergency
Note: Do not apply the electric parking brake
when your vehicle is moving, except in an
emergency. If you repeatedly use the electric
parking brake to slow or stop your vehicle,
you could cause damage to the brake
system.
You can use the electric parking brake to
slow or stop your vehicle in an emergency. Pull the switch upward and hold it.
The red warning lamp illuminates,
a tone sounds and the stoplamps
turn on.
The electric parking brake continues to slow
your vehicle down unless you release the
switch. Manually Releasing the Electric Parking
Brake
Switch the ignition on.
Press and hold the brake pedal.
Push the switch downward.
The red warning lamp turns off.
If it remains illuminated or flashes, the system
has malfunctioned. Have your vehicle
checked as soon as possible.
Pulling Away on a Hill When Towing a
Trailer
Press and hold the brake pedal.
Pull the switch upward and hold it.
Shift into gear. Press the accelerator pedal until engine has
developed sufficient torque to prevent your
vehicle from rolling down the hill. Release the switch and pull away
in a normal manner.
Automatically Releasing the Electric
Parking Brake
Close the driver door.
Shift into gear.
Press the accelerator pedal and pull away in
a normal manner. The red warning lamp turns off.
If it remains illuminated or flashes, the electric
parking brake has not released. Manually
release the parking brake.
214
Continental (CPL) Canada/United States of America, enUSA, Edition date: 201907, Second-Printing BrakesE267156 E270480 E267156 E270480 E267156 E267156 E270480
Page 218 of 609

Releasing the Electric Parking Brake if
the Vehicle Battery is Running Out of
Charge
Connect a booster battery to the vehicle
battery to release the electric parking brake
if the vehicle battery is running out of charge.
See Jump Starting the Vehicle (page 286).
HILL START ASSIST WARNING:
The system does not
replace the parking brake. When you leave
your vehicle, always apply the parking
brake and shift the transmission into park
(P) for automatic transmission or first gear
for manual transmission. WARNING: You must remain in your
vehicle when the system turns on. At all
times, you are responsible for controlling
your vehicle, supervising the system and
intervening, if required. Failure to take care
may result in the loss of control of your
vehicle, serious personal injury or death. WARNING:
The system turns off if
there is a malfunction or if you excessively
rev the engine.
The system makes it easier to pull away
when your vehicle is on a slope without the
need to use the parking brake.
When the system activates, your vehicle
remains stationary on a slope for a few
seconds after you release the brake pedal.
This allows you time to move your foot from
the brake to the accelerator pedal. The
brakes release when the engine has
developed sufficient torque to prevent your
vehicle from rolling down the slope. This is
an advantage when pulling away on a slope,
for example from a car park ramp, traffic
lights or when reversing uphill into a parking
space.
The system activates on any slope that
causes your vehicle to roll.
Note: There is no warning lamp to indicate
the system is either on or off. Using Hill Start Assist
1. Press the brake pedal to bring your
vehicle to a complete standstill. Keep
the brake pedal pressed and shift into
first gear when facing uphill or reverse
(R) when facing downhill.
2. The system activates if the sensors detect that your vehicle is on a slope.
3. When you remove your foot from the brake pedal, your vehicle remains on the
slope without rolling away for a few
seconds. When you remove your foot
from the brake pedal, your vehicle
remains on the slope without rolling away
for a few seconds. This hold time
increases if you are in the process of
driving off.
4. Pull away in the normal manner.
Switching the System On and Off
Vehicles with Automatic Transmission
The system turns on when you switch the
ignition on and you cannot switch the system
off.
215
Continental (CPL) Canada/United States of America, enUSA, Edition date: 201907, Second-Printing Brakes
Page 305 of 609

Protected Component
Fuse Rating
Fuse or Relay Number
Powertrain control module power.
20A 1
01
Engine emissions (malfunction indicator lamp).
20A 1
02
A/C clutch control relay coil.
20A 1
03
Ventilation and climate control (VACC).
Active grille shutters.
Cooling fan relays.
All-wheel drive module (2.7L and 3.7L
engines).
Ignition coils.
20A 1
04
Not used.
—
05
Fuel injectors (3.7L engine).
15A 1
06
Rear recline relay box.
5A 1
07
Not used.
—
08
Not used.
—
09
Not used (spare).
10A 1
10
Torque vectoring relay (3.0L engine).
—
11
302
Continental (CPL) Canada/United States of America, enUSA, Edition date: 201907, Second-Printing Fuses
Page 308 of 609

Protected Component
Fuse Rating
Fuse or Relay Number
Rear seat recline relay.
—
37
A/C compressor clutch relay.
—
38
Horn relay.
—
39
Not used.
—
40
Not used.
—
41
Blower motor.
40A 2
42
Not used.
—
43
Body control module/voltage quality module
bus.
50A 3
44
Not used.
—
45
Electric cooling fan.
50A 3
46
Electric cooling fan.
50A 3
47
Body control module RP1 bus.
50A 3
48
Torque vectoring (3.0L engine).
40A 3
49
Body control module RP2 bus.
50A 3
50
305
Continental (CPL) Canada/United States of America, enUSA, Edition date: 201907, Second-Printing Fuses
Page 382 of 609

TECHNICAL SPECIFICATIONS
Wheel Lug Nut Torque Specifications
WARNING: When installing a wheel, always remove any corrosion, dirt or foreign ma\
terials present on the mounting surfaces of the
wheel or the surface of the wheel hub, brake drum or brake disc that contacts the wheel. Make sure that any fasteners that attach the rotor
to the hub are secured so they do not interfere with the mounting surfac\
es of the wheel. Installing wheels without correct metal-to-metal
contact at the wheel mounting surfaces can cause the wheel nuts to loose\
n and the wheel to come off while your vehicle is in motion,
resulting in loss of control. Ib-ft (Nm)
*
Bolt size
162 lb.ft (220 Nm)
M14 x 1.5
* Torque specifications are for nut and bolt threads free of dirt and rust.\
Use only Ford recommended replacement fasteners.
Retighten the lug nuts to the specified torque within 100 miles (160 kil\
ometers) after any wheel disturbance (such as tire rotation, changing \
a
flat tire, wheel removal).
379
Continental (CPL) Canada/United States of America, enUSA, Edition date: 201907, Second-Printing Wheels and Tires
Page 414 of 609

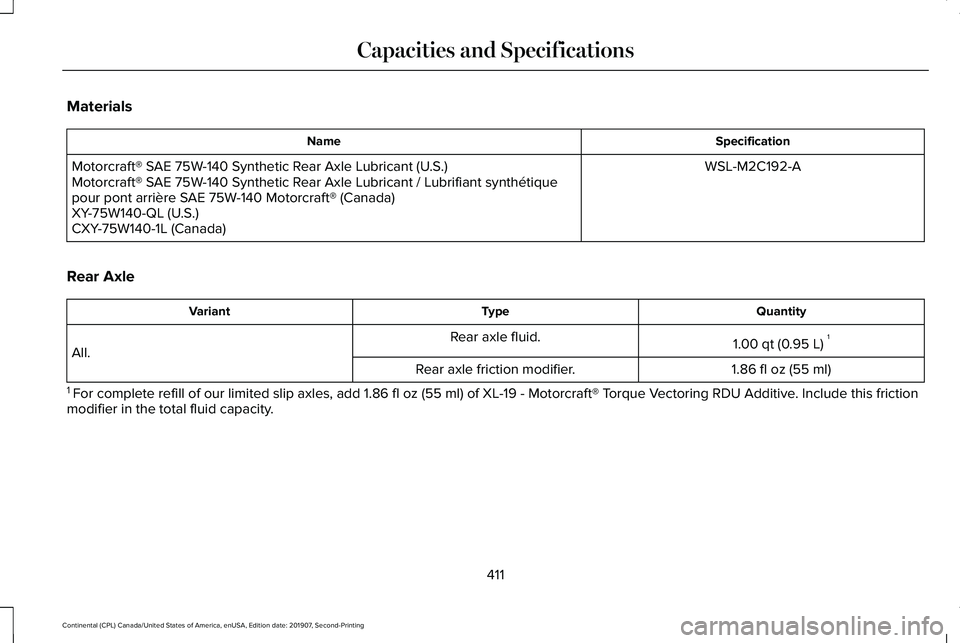
Materials
Specification
Name
WSL-M2C192-A
Motorcraft® SAE 75W-140 Synthetic Rear Axle Lubricant (U.S.)
Motorcraft® SAE 75W-140 Synthetic Rear Axle Lubricant / Lubrifiant synthétique
pour pont arrière SAE 75W-140 Motorcraft® (Canada)
XY-75W140-QL (U.S.)
CXY-75W140-1L (Canada)
Rear Axle Quantity
Type
Variant
1.00 qt (0.95 L)1
Rear axle fluid.
All.
1.86 fl oz (55 ml)
Rear axle friction modifier.
1 For complete refill of our limited slip axles, add 1.86 fl oz (55 ml) \
of XL-19 - Motorcraft® Torque Vectoring RDU Additive. Include this friction
modifier in the total fluid capacity.
411
Continental (CPL) Canada/United States of America, enUSA, Edition date: 201907, Second-Printing Capacities and Specifications
Page 415 of 609

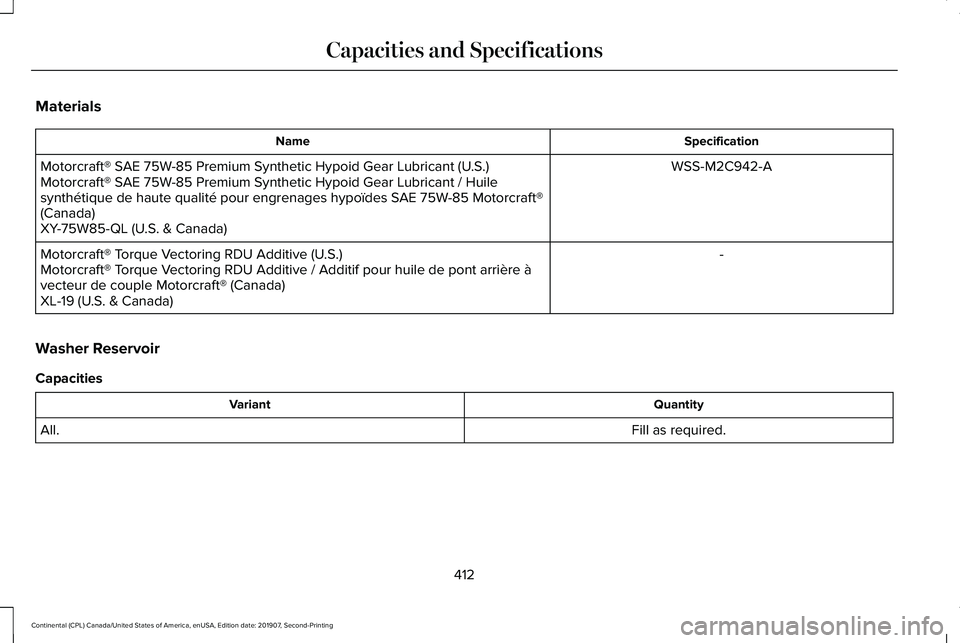
Materials
Specification
Name
WSS-M2C942-A
Motorcraft® SAE 75W-85 Premium Synthetic Hypoid Gear Lubricant (U.S.)
Motorcraft® SAE 75W-85 Premium Synthetic Hypoid Gear Lubricant / Huile
synthétique de haute qualité pour engrenages hypoïdes SAE 75W-85 Motorcraft®
(Canada)
XY-75W85-QL (U.S. & Canada)
-
Motorcraft® Torque Vectoring RDU Additive (U.S.)
Motorcraft® Torque Vectoring RDU Additive / Additif pour huile de pont arrière à
vecteur de couple Motorcraft® (Canada)
XL-19 (U.S. & Canada)
Washer Reservoir
Capacities Quantity
Variant
Fill as required.
All.
412
Continental (CPL) Canada/United States of America, enUSA, Edition date: 201907, Second-Printing Capacities and Specifications