Page 135 of 609

Action
Message
Indicates that the rear seat interior door release switches and power wi\
ndows are switched off,preventing rear seat occupants from opening the doors or windows.
Child Lock ON
Indicates that the rear seat interior door release switches and power wi\
ndows are switched on.
Child Lock OFF
Displays when the door lock turns off.
Door Unlocked
Displays when the door lock is turned on and you attempt to open the doo\
r.
Doors Locked Unlock Before Opening
Indicates a driver door fault that requires manually opening the door by\
the override lever.Contact an authorized dealer.
Driver Door Fault Use Inside Override
Lever In Map Pocket
Indicates a fault with the electronic door system. Contact an authorized\
dealer.
Door Fault Service Required
Displays the factory keypad code after the keypad has been reset. See Keyless Entry (page
83).
Factory Keypad Code {X X X X X}
Driver Alert Action
Message
Stop and rest as soon as it is safe to do so.
Driver Alert Warning Rest Now
Take a rest soon.
Driver Alert Warning Rest Suggested
132
Continental (CPL) Canada/United States of America, enUSA, Edition date: 201907, Second-Printing Information Displays
Page 143 of 609
Pre-Collision Assist
Action
Message
You have a blocked sensor due to bad weather, ice, mud or water in front of the radar sensor.
You can typically clean the sensor to resolve.
Pre-Collision Assist Not Available Sensor
Blocked
A fault with the system has occurred. Contact an authorized dealer as so\
on as possible.
Pre-Collision Assist Not Available
Remote Start Action
Message
Displays as a reminder to apply the brake and push the gear shift button to drive the vehicle after a remote start.
To Drive: Press Brake and Gear Shift
Button
Seats Action
Message
Displays as a reminder that memory seats are not available while driving\
.
Memory Recall Not Permitted While Driving
Displays to show where your memory setting has been saved.
Memory {0} Saved
140
Continental (CPL) Canada/United States of America, enUSA, Edition date: 201907, Second-Printing Information Displays
Page 150 of 609

Maintaining Your Head Up Display
•
Do not place objects onto the transparent
cover, as they may block you from seeing
portions of the image. These objects
could also damage the cover and affect
the quality of the projected image.
• The system uses a special windshield
designed to provide the optimum image
quality. You must replace the windshield
in a vehicle with this system with a
certified original equipment
manufactured (OEM) head up display
windshield. Replacing this system's
windshield with a non-head up display
windshield causes a double image or
distorted image. Have an authorized
dealer or authorized repair facility replace
the windshield.
• Light conditions such as oncoming
headlamps, sunrise, sunset or reflections
off of wet road surfaces can affect the
driver's ability to see the HUD image.
• Clean the windshield often for optimal
HUD performance. See Cleaning the
Windows and Wiper Blades (page 344).
147
Continental (CPL) Canada/United States of America, enUSA, Edition date: 201907, Second-Printing Information Displays
Page 155 of 609
Directing Air to the Rear Footwell Air
Vents
Press and release the button to
direct airflow to rear footwell air
vents.
Note: Air can be directed through any
combination of air vents.
Rear Climate Control Lock Indicator Illuminates when the rear climate
controls are locked through the
front climate controls.
Note: If the rear climate controls are locked
and the rear climate system is turned off, the
indicator illuminates for a few seconds when
you try to use any of the rear climate
controls. Setting the Rear Blower Motor Speed
Turn the control to adjust the volume of air
circulated in the rear passenger
compartment.Setting the Rear Temperature
Turn the control to set the temperature in
the rear passenger compartment.
Switching Rear Auto Mode On
Press and release the button to
switch rear automatic operation on,
then set the temperature.
152
Continental (CPL) Canada/United States of America, enUSA, Edition date: 201907, Second-Printing Climate Control E265389 E265862
Page 159 of 609

HEAD RESTRAINTS
WARNING: Fully adjust the head
restraint before you sit in or operate your
vehicle. This will help minimize the risk of
neck injury in the event of a crash. Do not
adjust the head restraint when your vehicle
is moving. WARNING:
The head restraint is a
safety device. Whenever possible it should
be installed and properly adjusted when
the seat is occupied. Failure to adjust the
head restraint properly could reduce its
effectiveness during certain impacts.
Note: Adjust the seat backrest to an upright
driving position before adjusting the head
restraint. Adjust the head restraint so that
the top of it is level with the top of your head
and as far forward as possible. Make sure
that you remain comfortable. If you are
extremely tall, adjust the head restraint to
its highest position. Front Seat Manual Head Restraints
(If
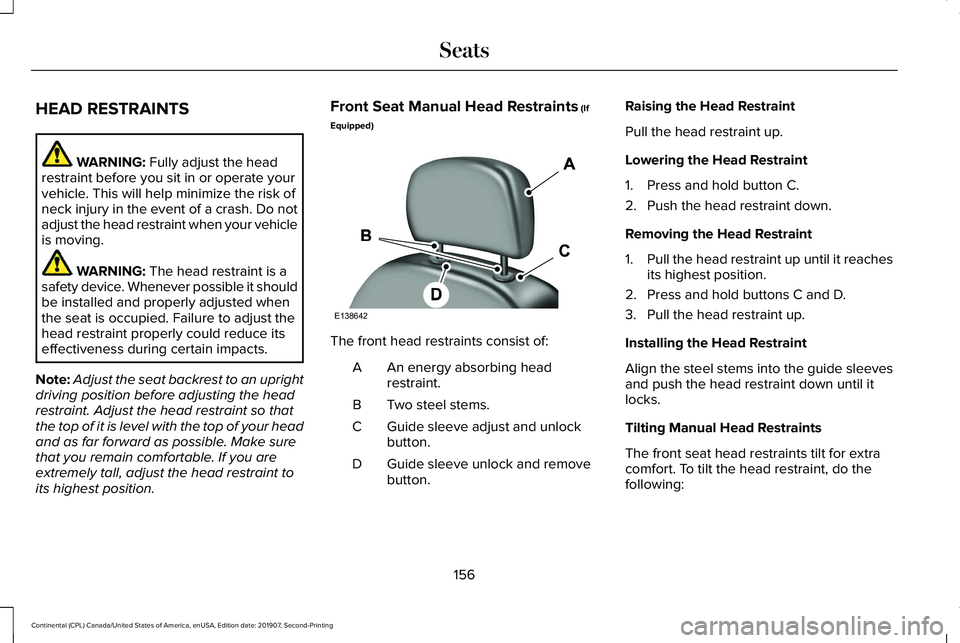
Equipped) The front head restraints consist of:
An energy absorbing head
restraint.
A
Two steel stems.
B
Guide sleeve adjust and unlock
button.
C
Guide sleeve unlock and remove
button.
D Raising the Head Restraint
Pull the head restraint up.
Lowering the Head Restraint
1. Press and hold button C.
2. Push the head restraint down.
Removing the Head Restraint
1.
Pull the head restraint up until it reaches
its highest position.
2. Press and hold buttons C and D.
3. Pull the head restraint up.
Installing the Head Restraint
Align the steel stems into the guide sleeves
and push the head restraint down until it
locks.
Tilting Manual Head Restraints
The front seat head restraints tilt for extra
comfort. To tilt the head restraint, do the
following:
156
Continental (CPL) Canada/United States of America, enUSA, Edition date: 201907, Second-Printing SeatsE138642
Page 160 of 609
1. Adjust the seat backrest to an upright
driving or riding position.
2. Pivot the head restraint forward toward your head to the desired position.
After the head restraint reaches the
forward-most tilt position, pivot it forward
again to release it to the rearward, un-tilted
position. Rear Seat Outermost Head Restraints
The rear outermost head restraints consist
of:
An energy absorbing head
restraint.
A
Two steel stems.
B
Guide sleeve unlock and remove
button.
C
Fold button (If Equipped).
D Removing the Head Restraint
1. Press and hold both C buttons.
2. Pull the head restraint up.
Installing the Head Restraint
Align the steel stems into the guide sleeves
and push the head restraint down until it
locks.
Folding the Head Restraint
1. Press and hold button D.
2. Pull it back up to reset.
157
Continental (CPL) Canada/United States of America, enUSA, Edition date: 201907, Second-Printing SeatsE144727 E293091
Page 161 of 609

Rear Seat Center Head Restraint
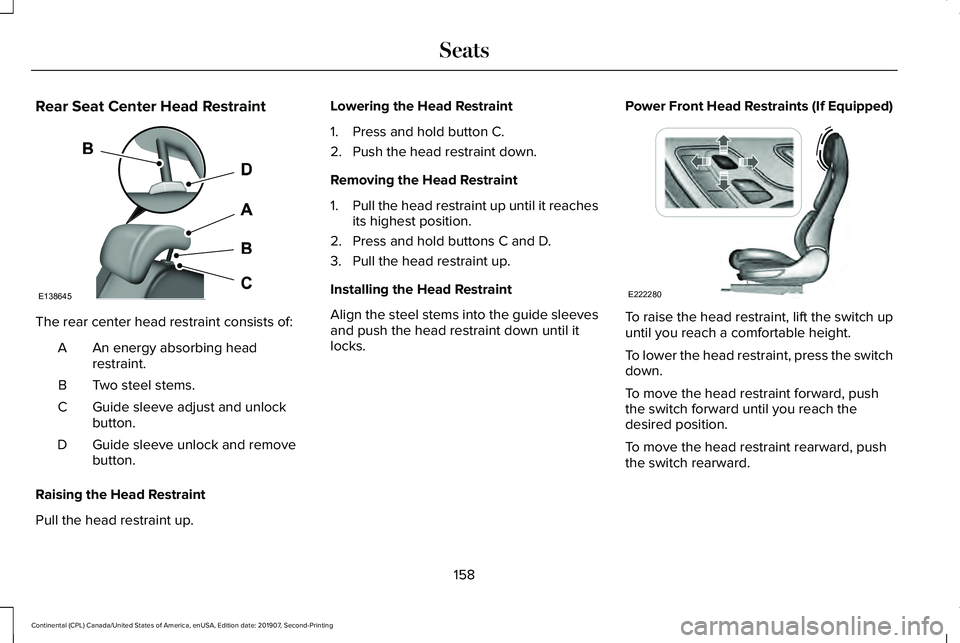
The rear center head restraint consists of:
An energy absorbing head
restraint.
A
Two steel stems.
B
Guide sleeve adjust and unlock
button.
C
Guide sleeve unlock and remove
button.
D
Raising the Head Restraint
Pull the head restraint up. Lowering the Head Restraint
1. Press and hold button C.
2. Push the head restraint down.
Removing the Head Restraint
1.
Pull the head restraint up until it reaches
its highest position.
2. Press and hold buttons C and D.
3. Pull the head restraint up.
Installing the Head Restraint
Align the steel stems into the guide sleeves
and push the head restraint down until it
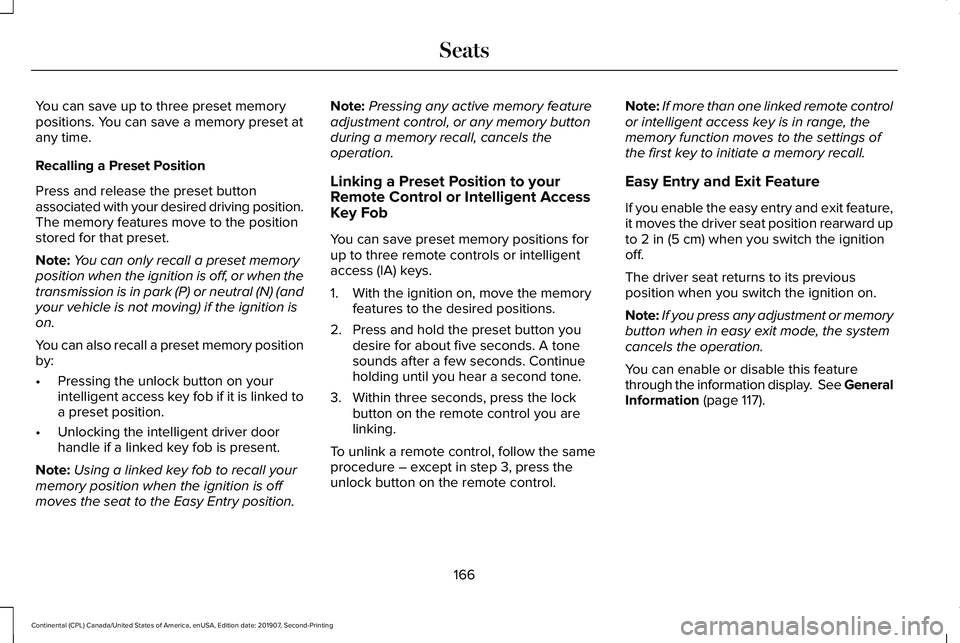
locks. Power Front Head Restraints (If Equipped) To raise the head restraint, lift the switch up
until you reach a comfortable height.
To lower the head restraint, press the switch
down.
To move the head restraint forward, push
the switch forward until you reach the
desired position.
To move the head restraint rearward, push
the switch rearward.
158
Continental (CPL) Canada/United States of America, enUSA, Edition date: 201907, Second-Printing SeatsE138645 E222280
Page 169 of 609

You can save up to three preset memory
positions. You can save a memory preset at
any time.
Recalling a Preset Position
Press and release the preset button
associated with your desired driving position.
The memory features move to the position
stored for that preset.
Note:
You can only recall a preset memory
position when the ignition is off, or when the
transmission is in park (P) or neutral (N) (and
your vehicle is not moving) if the ignition is
on.
You can also recall a preset memory position
by:
• Pressing the unlock button on your
intelligent access key fob if it is linked to
a preset position.
• Unlocking the intelligent driver door
handle if a linked key fob is present.
Note: Using a linked key fob to recall your
memory position when the ignition is off
moves the seat to the Easy Entry position. Note:
Pressing any active memory feature
adjustment control, or any memory button
during a memory recall, cancels the
operation.
Linking a Preset Position to your
Remote Control or Intelligent Access
Key Fob
You can save preset memory positions for
up to three remote controls or intelligent
access (IA) keys.
1. With the ignition on, move the memory features to the desired positions.
2. Press and hold the preset button you desire for about five seconds. A tone
sounds after a few seconds. Continue
holding until you hear a second tone.
3. Within three seconds, press the lock button on the remote control you are
linking.
To unlink a remote control, follow the same
procedure – except in step 3, press the
unlock button on the remote control. Note:
If more than one linked remote control
or intelligent access key is in range, the
memory function moves to the settings of
the first key to initiate a memory recall.
Easy Entry and Exit Feature
If you enable the easy entry and exit feature,
it moves the driver seat position rearward up
to 2 in (5 cm) when you switch the ignition
off.
The driver seat returns to its previous
position when you switch the ignition on.
Note: If you press any adjustment or memory
button when in easy exit mode, the system
cancels the operation.
You can enable or disable this feature
through the information display. See General
Information
(page 117).
166
Continental (CPL) Canada/United States of America, enUSA, Edition date: 201907, Second-Printing Seats