2020 LINCOLN CONTINENTAL battery
[x] Cancel search: batteryPage 185 of 609

2. Open the floor console storage
compartment lid.
3. Insert the passive key into the backup slot. 4. Press the push button ignition switch.
If the engine does not start after three
attempts, wait ten seconds and follow the
flooded engine procedure.
1. Apply the parking brake.
2. Press the brake pedal.
3. Shift into park (P).
4. Fully press the accelerator pedal.
5. Briefly press the push button ignition
switch.
Fast Restart
The fast restart feature allows you to restart
your vehicle within 20 seconds of switching
it off, even if it does not detect a valid
passive key.
Within 20 seconds of switching the engine
off, press the brake pedal and press the push
button ignition switch. After 20 seconds, you
can no longer start your vehicle if it does not
detect a valid passive key. Once your vehicle starts, it remains running
until you press the push button ignition
switch, even if your vehicle does not detect
a valid passive key. If you open and close a
door while your vehicle is running, the
system searches for a valid passive key.
After 20 seconds, you can no longer start
your vehicle if it does not detect a valid
passive key.
Automatic Engine Shutdown
For vehicles with a keyless ignition, this
automatically shuts down your vehicle if it
has been idling for an extended period. The
ignition also turns off to save battery power.
Before your vehicle shuts down, a message
appears in the information display showing
a timer counting down. If you do not
intervene within 30 seconds, your vehicle
shuts down. Another message appears in
the information display to inform you that
your vehicle has shut down to save fuel.
Start your vehicle as normal.
182
Continental (CPL) Canada/United States of America, enUSA, Edition date: 201907, Second-Printing Starting and Stopping the EngineE222430
2
3
Page 199 of 609

If the service engine soon indicator remains
on, have your vehicle serviced at the first
available opportunity. Although some
malfunctions detected by the OBD-II may not
have symptoms that are apparent, continued
driving with the service engine soon indicator
on can result in increased emissions, lower
fuel economy, reduced engine and
transmission smoothness and lead to more
costly repairs.
Readiness for Inspection and
Maintenance (I/M) Testing
Some state and provincial and local
governments may have
Inspection/Maintenance (I/M) programs to
inspect the emission control equipment on
your vehicle. Failure to pass this inspection
could prevent you from getting a vehicle
registration.
If the service engine soon indicator
is on or the bulb does not work,
your vehicle may need service.
See On-Board Diagnostics. Your vehicle may not pass the I/M test if the
service engine soon indicator is on or not
working properly (bulb is burned out), or if
the OBD-II system has determined that some
of the emission control systems have not
been properly checked. In this case, the
vehicle is not ready for I/M testing.
If the vehicle
’s engine or transmission has
just been serviced, or the battery has
recently run down or been replaced, the
OBD-II system may indicate that the vehicle
is not ready for I/M testing. To determine if
the vehicle is ready for I/M testing, turn the
ignition key to the on position for 15 seconds
without cranking the engine. If the service
engine soon indicator blinks eight times, it
means that the vehicle is not ready for I/M
testing; if the service engine soon indicator
stays on solid, it means that your vehicle is
ready for I/M testing.
The OBD-II system checks the emission
control system during normal driving. A
complete check may take several days.
If the vehicle is not ready for I/M testing, you
can perform the following driving cycle
consisting of mixed city and highway driving: 1. 15 minutes of steady driving on an
expressway or highway followed by 20
minutes of stop-and-go driving with at
least four 30-second idle periods.
2. Allow your vehicle to sit for at least eight
hours with the ignition off. Then, start the
vehicle and complete the above driving
cycle. The vehicle must warm up to its
normal operating temperature. Once
started, do not turn off the vehicle until
the above driving cycle is complete.
If the vehicle is still not ready for I/M testing,
you need to repeat the above driving cycle.
196
Continental (CPL) Canada/United States of America, enUSA, Edition date: 201907, Second-Printing Engine Emission Control
Page 204 of 609

The instrument cluster displays your currently
selected gear. If a gear is requested but not
available due to vehicle conditions (low
speed, too high engine speed for requested
gear selection), the current gear will flash
three times.
Note:
At full accelerator pedal travel the
transmission will auto downshift to ensure
maximum performance.
Brake-Shift Interlock Override WARNING: When doing this
procedure, you need to take the
transmission out of park (P) which means
your vehicle can roll freely. To avoid
unwanted vehicle movement, always fully
apply the parking brake prior to doing this
procedure. Use wheels chocks if
appropriate. WARNING: Do not drive your vehicle
until you verify that the stoplamps are
working. WARNING:
If the parking brake is
fully released, but the brake warning lamp
remains illuminated, the brakes may not
be working properly. Have your vehicle
checked as soon as possible.
Note: See your authorized dealer as soon
as possible if this procedure is used.
Note: For some markets this feature is not
available.
Note: This feature only operates if your
12-volt battery has power. If the vehicle
battery voltage is not sufficient, use an
external 12 volt power source (for example,
jumper cables, a battery charger or jump
pack) to operate interlock override switch.
Use the brake-shift interlock override to
move your transmission from the park
position in the event of an electrical
malfunction. If your vehicle has a dead
battery, you need to use an external power
source.
1. Apply the parking brake and turn your ignition off before performing this
procedure. 2. Locate your brake-shift interlock access
slot. The slot is located in your center
console storage bin. The access slot
does not have a label.
Note: Make sure that you correctly identify
the access hole as to not cause damage to
the center console.
201
Continental (CPL) Canada/United States of America, enUSA, Edition date: 201907, Second-Printing TransmissionE222739
Page 205 of 609

3. Using a tool, press and hold the brake
shift interlock switch. The shift buttons
on the instrument panel will flash when
your vehicle is in override mode.
4. With the override switch still held, press the neutral (N) button to shift from park.
5. Release the override button.
6. Your vehicle will remain in neutral for wrecker towing purposes or can be
shifted to the desired gear and driven (if
possible).
7. Release the parking brake.
Automatic Transmission Adaptive
Learning
This feature increases durability and provides
consistent shift feel over the life of your
vehicle. A new vehicle or transmission may
have firm or soft shifts. This operation will
not affect function or durability of your
transmission and is normal. Over time, the
adaptive learning process will fully update
transmission operation. Additionally, the
strategy must be relearned whenever the
battery is disconnected or a new battery is
installed. If Your Vehicle Gets Stuck In Mud or
Snow
Note:
Do not rock your vehicle if your engine
is not at normal operating temperature or
damage to your transmission may occur.
Note: Do not rock your vehicle for more than
a minute or damage to your transmission
and tires may occur, or your engine may
overheat.
If your vehicle gets stuck in mud or snow,
you can help rock your vehicle out by shifting
between forward and reverse gears,
stopping between shifts in a steady pattern.
Press lightly on the accelerator in each gear.
202
Continental (CPL) Canada/United States of America, enUSA, Edition date: 201907, Second-Printing Transmission
Page 216 of 609

This lamp also illuminates
momentarily when you switch the
ignition on to confirm the lamp is
functional. If it does not illuminate
when you switch the ignition on,
or begins to flash at any time, have
the system checked by an authorized dealer.
If the brake warning lamp illuminates with
the parking brake released, have the system
checked immediately.
HINTS ON DRIVING WITH ANTI-
LOCK BRAKES
The anti-lock braking system does not
eliminate the risks when:
• You drive too closely to the vehicle in
front of you.
• Your vehicle is hydroplaning.
• You take corners too fast.
• The road surface is poor. Note:
If the system activates, the brake
pedal may pulse and may travel further.
Maintain pressure on the brake pedal. You
may also hear a noise from the system. This
is normal.
ELECTRIC PARKING BRAKE WARNING: Always fully apply the
parking brake and make sure you shift into
park (P). Failure to follow this instruction
could result in personal injury or death. WARNING:
If you drive extended
distances with the parking brake applied,
you could cause damage to the brake
system. WARNING:
The electric parking
brake does not operate if the vehicle
battery is running out of charge. Your vehicle has an electric parking brake.
You operate it with a switch instead of a
lever. The switch is on the center console or
to the left-hand side of the steering wheel,
on the lower part of the instrument panel.
Note:
The electric parking brake makes
noises during operation. This is normal.
Applying the Electric Parking Brake Pull the switch upward.
The red warning lamp flashes
during operation and illuminates
when the parking brake is applied.
Note:
It remains illuminated for a short
period of time after you switch the ignition
off.
If it continues to flash or does not illuminate,
the system has malfunctioned. Have your
vehicle checked as soon as possible.
Note: You can apply the electric parking
brake when the ignition is off.
213
Continental (CPL) Canada/United States of America, enUSA, Edition date: 201907, Second-Printing BrakesE270480 E267156 E270480
Page 218 of 609

Releasing the Electric Parking Brake if
the Vehicle Battery is Running Out of
Charge
Connect a booster battery to the vehicle
battery to release the electric parking brake
if the vehicle battery is running out of charge.
See Jump Starting the Vehicle (page 286).
HILL START ASSIST WARNING:
The system does not
replace the parking brake. When you leave
your vehicle, always apply the parking
brake and shift the transmission into park
(P) for automatic transmission or first gear
for manual transmission. WARNING: You must remain in your
vehicle when the system turns on. At all
times, you are responsible for controlling
your vehicle, supervising the system and
intervening, if required. Failure to take care
may result in the loss of control of your
vehicle, serious personal injury or death. WARNING:
The system turns off if
there is a malfunction or if you excessively
rev the engine.
The system makes it easier to pull away
when your vehicle is on a slope without the
need to use the parking brake.
When the system activates, your vehicle
remains stationary on a slope for a few
seconds after you release the brake pedal.
This allows you time to move your foot from
the brake to the accelerator pedal. The
brakes release when the engine has
developed sufficient torque to prevent your
vehicle from rolling down the slope. This is
an advantage when pulling away on a slope,
for example from a car park ramp, traffic
lights or when reversing uphill into a parking
space.
The system activates on any slope that
causes your vehicle to roll.
Note: There is no warning lamp to indicate
the system is either on or off. Using Hill Start Assist
1. Press the brake pedal to bring your
vehicle to a complete standstill. Keep
the brake pedal pressed and shift into
first gear when facing uphill or reverse
(R) when facing downhill.
2. The system activates if the sensors detect that your vehicle is on a slope.
3. When you remove your foot from the brake pedal, your vehicle remains on the
slope without rolling away for a few
seconds. When you remove your foot
from the brake pedal, your vehicle
remains on the slope without rolling away
for a few seconds. This hold time
increases if you are in the process of
driving off.
4. Pull away in the normal manner.
Switching the System On and Off
Vehicles with Automatic Transmission
The system turns on when you switch the
ignition on and you cannot switch the system
off.
215
Continental (CPL) Canada/United States of America, enUSA, Edition date: 201907, Second-Printing Brakes
Page 237 of 609

Possible Cause
Symptom
The parking space is more than 5 ft (1.5 m) or less than 2 ft (0.5 m) away.
The vehicle speed is greater than 22 mph (35 km/h) for parallel parkin\
g or greater than
19 mph (30 km/h)
for perpendicular parking.
You recently disconnected or replaced the battery. After you reconnect the battery you
must drive your vehicle on a straight road for a short period of time.
Your vehicle is rolling in the opposite direction of the current transmis\
sion position. For
example, rolling forward when in reverse (R).
The system does not correctly position your vehicle
in a parking space.
An irregular curb along the parking space prevents the system from corre\
ctly aligning
your vehicle.
Vehicles or objects bordering the space may not be correctly parked.
Your vehicle stopped too far past the parking space.
The tires may not be correctly installed or maintained. For example, not inflated correctly,
improper size, or of different sizes.
A repair or alteration changes the detection capabilities.
234
Continental (CPL) Canada/United States of America, enUSA, Edition date: 201907, Second-Printing Parking Aids
Page 239 of 609

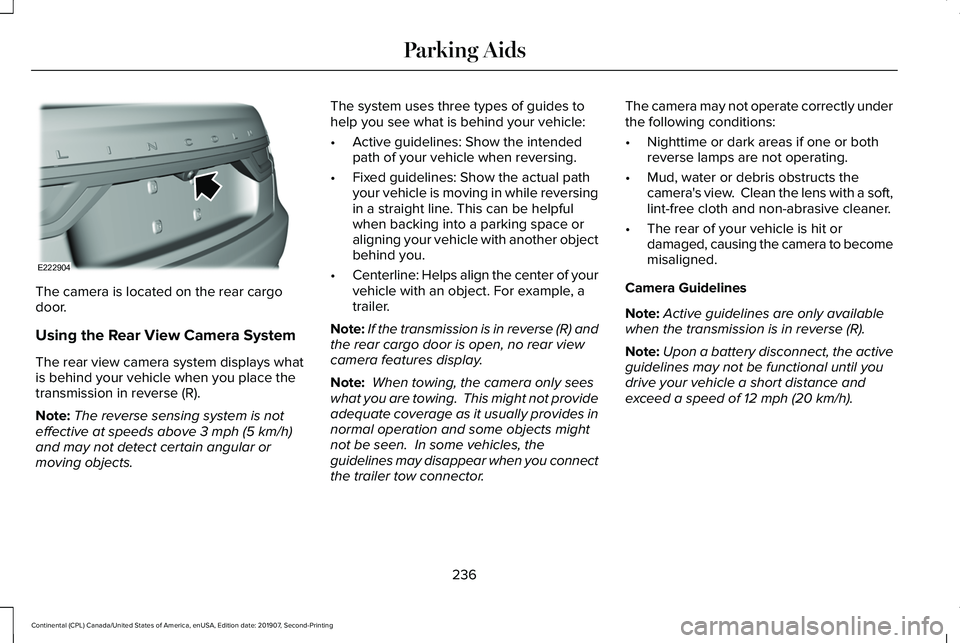
The camera is located on the rear cargo
door.
Using the Rear View Camera System
The rear view camera system displays what
is behind your vehicle when you place the
transmission in reverse (R).
Note:
The reverse sensing system is not
effective at speeds above 3 mph (5 km/h)
and may not detect certain angular or
moving objects. The system uses three types of guides to
help you see what is behind your vehicle:
•
Active guidelines: Show the intended
path of your vehicle when reversing.
• Fixed guidelines: Show the actual path
your vehicle is moving in while reversing
in a straight line. This can be helpful
when backing into a parking space or
aligning your vehicle with another object
behind you.
• Centerline: Helps align the center of your
vehicle with an object. For example, a
trailer.
Note: If the transmission is in reverse (R) and
the rear cargo door is open, no rear view
camera features display.
Note: When towing, the camera only sees
what you are towing. This might not provide
adequate coverage as it usually provides in
normal operation and some objects might
not be seen. In some vehicles, the
guidelines may disappear when you connect
the trailer tow connector. The camera may not operate correctly under
the following conditions:
•
Nighttime or dark areas if one or both
reverse lamps are not operating.
• Mud, water or debris obstructs the
camera's view. Clean the lens with a soft,
lint-free cloth and non-abrasive cleaner.
• The rear of your vehicle is hit or
damaged, causing the camera to become
misaligned.
Camera Guidelines
Note: Active guidelines are only available
when the transmission is in reverse (R).
Note: Upon a battery disconnect, the active
guidelines may not be functional until you
drive your vehicle a short distance and
exceed a speed of
12 mph (20 km/h).
236
Continental (CPL) Canada/United States of America, enUSA, Edition date: 201907, Second-Printing Parking AidsE222904