Page 588 of 777

5877-2. Maintenance
7
Maintenance and care
RX350/RX350L_U
*: Vehicles with single-beam headlights
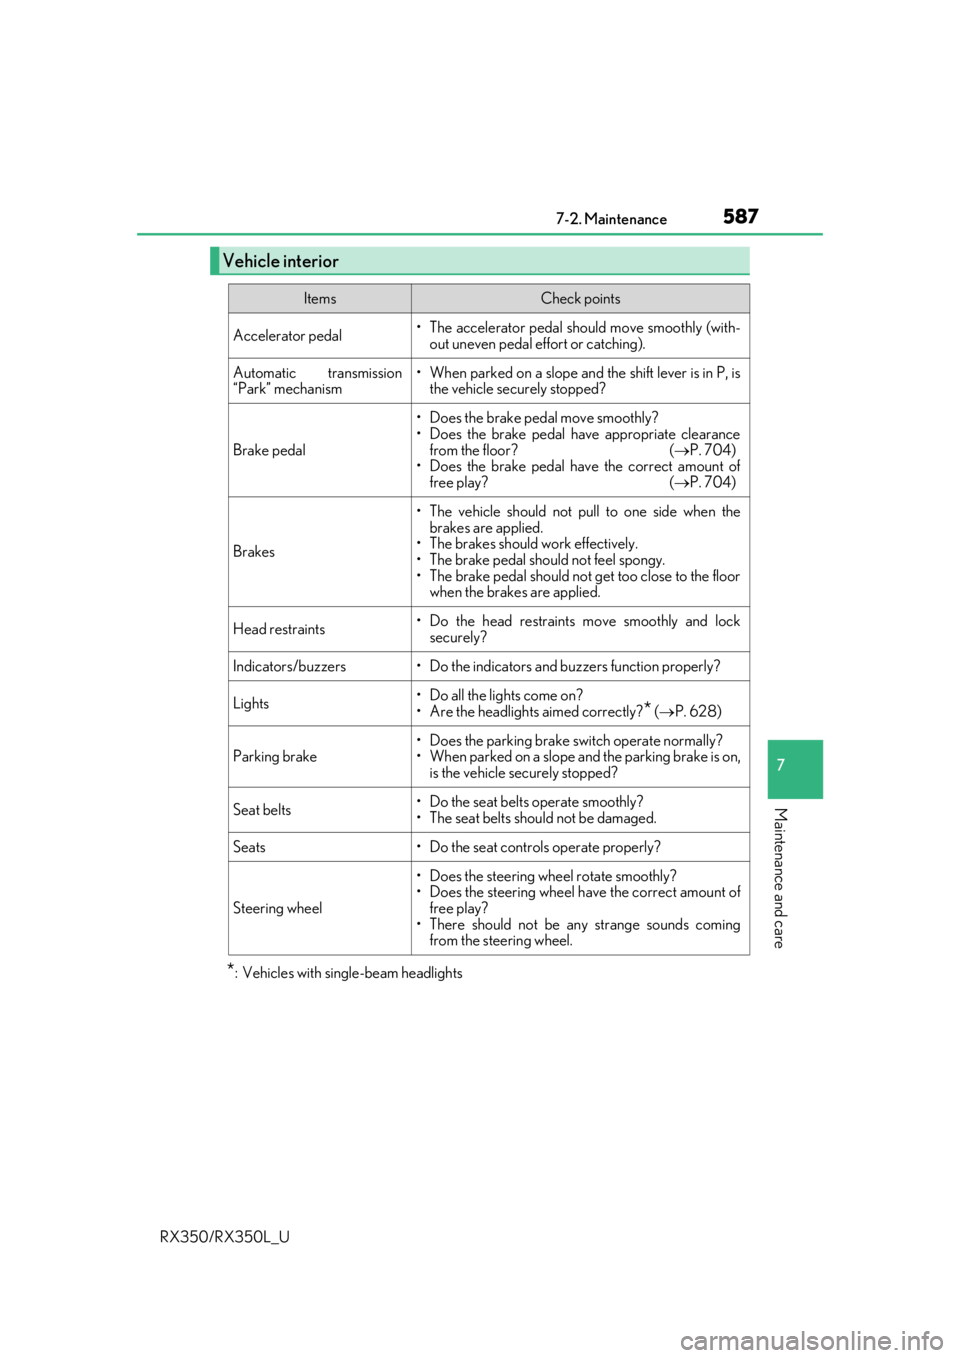
Vehicle interior
ItemsCheck points
Accelerator pedal• The accelerator pedal should move smoothly (with-
out uneven pedal effort or catching).
Automatic transmission
“Park” mechanism• When parked on a slope and the shift lever is in P, is the vehicle securely stopped?
Brake pedal
• Does the brake pedal move smoothly?
• Does the brake pedal have appropriate clearance
from the floor? ( P. 704)
• Does the brake pedal have the correct amount of
free play? ( P. 704)
Brakes
• The vehicle should not pull to one side when the
brakes are applied.
• The brakes should work effectively.
• The brake pedal should not feel spongy.
• The brake pedal should no t get too close to the floor
when the brakes are applied.
Head restraints• Do the head restraints move smoothly and lock
securely?
Indicators/buzzers• Do the indicators and buzzers function properly?
Lights• Do all the lights come on?
• Are the headlights aimed correctly?
* ( P. 628)
Parking brake• Does the parking brake switch operate normally?
• When parked on a slope and the parking brake is on,
is the vehicle securely stopped?
Seat belts• Do the seat belts operate smoothly?
• The seat belts should not be damaged.
Seats• Do the seat controls operate properly?
Steering wheel
• Does the steering wheel rotate smoothly?
• Does the steering wheel have the correct amount offree play?
• There should not be any strange sounds coming from the steering wheel.
Page 592 of 777

5917-3. Do-it-yourself maintenance
7
Maintenance and care
RX350/RX350L_U
*: Vehicles with single-beam headlights
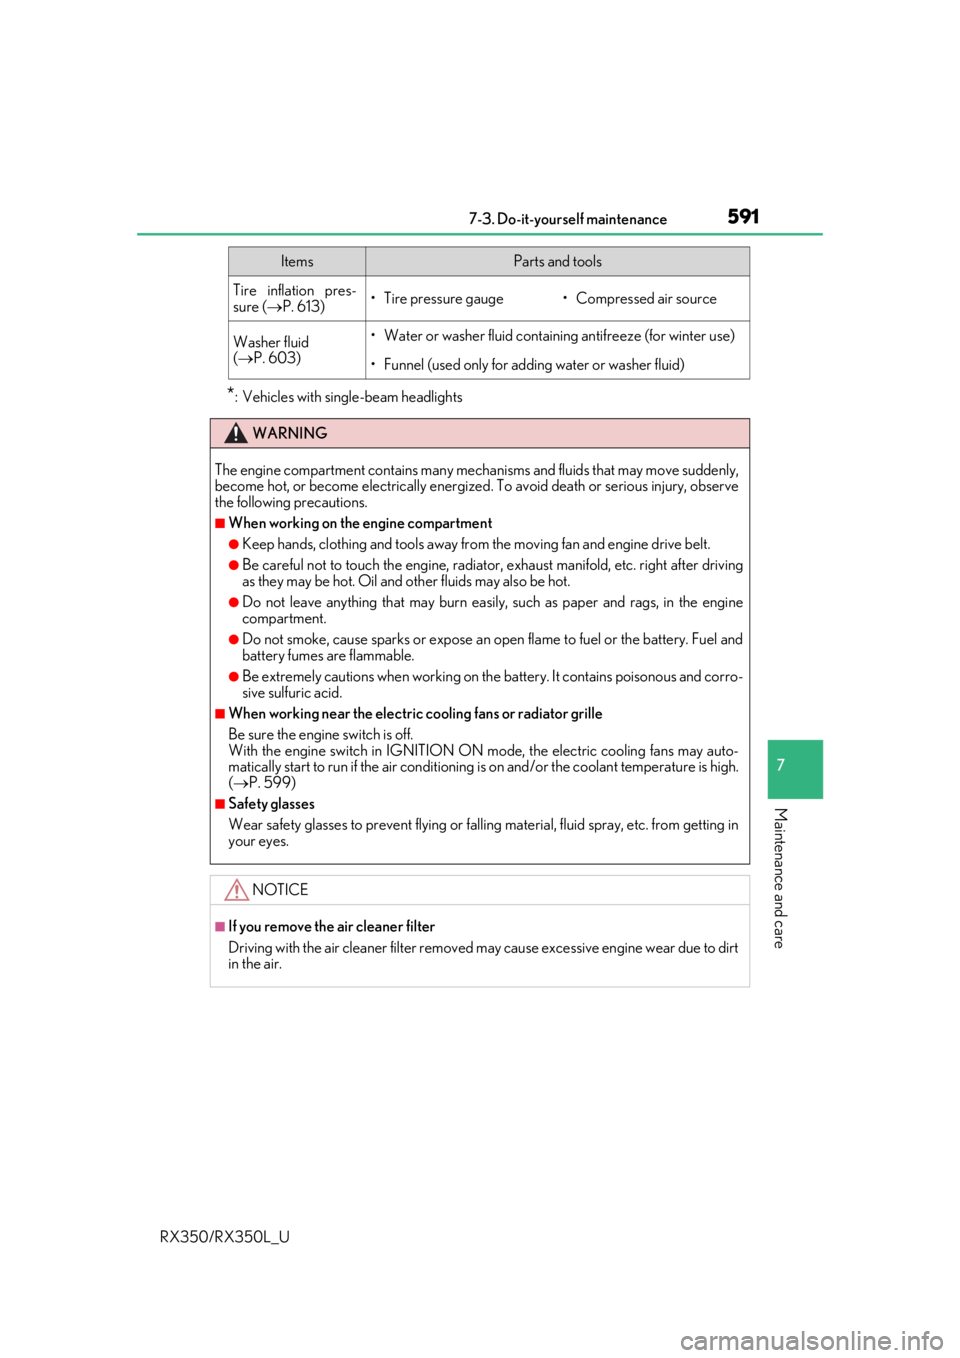
Tire inflation pres-
sure (P. 613)• Tire pressure gauge• Compressed air source
Washer fluid
( P. 603)• Water or washer fluid containing antifreeze (for winter use)
• Funnel (used only for adding water or washer fluid)
WARNING
The engine compartment contains many mechan isms and fluids that may move suddenly,
become hot, or become electrically energize d. To avoid death or serious injury, observe
the following precautions.
■When working on the engine compartment
●Keep hands, clothing and tools away from the moving fan and engine drive belt.
●Be careful not to touch the engine, radiator, exhaust manifold, etc. right after driving
as they may be hot. Oil and other fluids may also be hot.
●Do not leave anything that may burn easily, such as paper and rags, in the engine
compartment.
●Do not smoke, cause sparks or expose an open flame to fuel or the battery. Fuel and
battery fumes are flammable.
●Be extremely cautions when working on the battery. It contains poisonous and corro-
sive sulfuric acid.
■When working near the electric cooling fans or radiator grille
Be sure the engine switch is off.
With the engine switch in IGNITION ON mode, the electric cooling fans may auto-
matically start to run if the air conditioning is on and/or the coolant temperature is high.
( P. 599)
■Safety glasses
Wear safety glasses to prevent flying or falling material, fluid spray, etc. from getting in
your eyes.
NOTICE
■If you remove the air cleaner filter
Driving with the air cleaner f ilter removed may cause excessive engine wear due to dirt
in the air.
ItemsParts and tools
Page 627 of 777

6267-3. Do-it-yourself maintenance
RX350/RX350L_U
Remove the fuse with the pullout
tool.
Only some fuses can be removed
using the pullout tool.
Check if the fuse is blown. Normal fuse
Blown fuse
Replace the blown fuse with a new
fuse of an appropriate amperage rat-
ing. The amperage rating can be
found on the fuse box lid.
Many types of fuse are used on this
vehicle. This illustration shows a com-
mon type of fuse used on this vehicle.
■After a fuse is replaced
●If the lights do not turn on even after the fuse has been replaced, a bulb may need
replacement. ( P. 630)
●If the replaced fuse blows again, have th e vehicle inspected by your Lexus dealer.
■If there is an overload in a circuit
The fuses are designed to blow, protecting the wiring harness from damage.
■When replacing light bulbs
Lexus recommends that you use genuine Lexus products designed for this vehicle.
Because certain bulbs are conne cted to circuits designed to prevent overload, nongenu-
ine parts or parts not designed for this vehicle may be unusable.
3
4
1
2
WARNING
■To prevent system breakdowns and vehicle fire
Observe the following precautions.
Failure to do so may cause damage to th e vehicle, and possibly a fire or injury.
●Never use a fuse of a higher amperage rating than that indicated, or use any other
object in place of a fuse.
●Always use a genuine Lexus fuse or equivalent.
Never replace a fuse with a wire, even as a temporary fix.
●Do not modify the fuses or fuse boxes.
Page 629 of 777
6287-3. Do-it-yourself maintenance
RX350/RX350L_U
Adjustment bolt A
Adjustment bolt B
Make sure the vehicle has a full tank of gasoline and the area around the
headlight is not deformed.
Park the vehicle on level ground.
Sit in the driver’s seat.
Bounce the vehicle several times.
Headlight aim (vehicles with single-beam head-
lights)
Vertical movement adjusting bolts
1
2
Before checking the headlight aim
1
2
3
4
Page 632 of 777
6317-3. Do-it-yourself maintenance
7
Maintenance and care
RX350/RX350L_U
■Front
Bulb locations
Front turn signal light (vehicles with single-beam headlights)
Front side marker light (vehic les with single-beam headlights)1
2
Page 633 of 777
6327-3. Do-it-yourself maintenance
RX350/RX350L_U
■Rear
Back-up light
Rear turn signal light (vehicles with single-beam headlights)1
2
Page 634 of 777
6337-3. Do-it-yourself maintenance
7
Maintenance and care
RX350/RX350L_U
■Front side marker lights (vehicles with single-beam headlights)
To ensure enough space to per-
form work, turn the steering
wheel to rotate the front wheel
away from the bulb to be
replaced.
Remove the 3 fender liner clips.
Turn the steering wheel to the left
when replacing the right side light
bulb, and turn the steering wheel to
the right when replacing the left side
light bulb.
When removing a fender liner clip,
use a flathead screwdriver to pry the
center portion out and then remove
the whole clip.
Pull back the fender liner until the
connector is visible.
Partially remove the fender liner
and turn the bulb base counter-
clockwise and remove it.
Replacing light bulbs
1
82
3
Page 635 of 777
6347-3. Do-it-yourself maintenance
RX350/RX350L_U
Remove the light bulb.
Install a new light bulb and then
install the bulb base to the light
unit by inserting it and turning it
clockwise.
After installing th e bulb base, wiggle
it lightly to make sure it is securely
installed and turn the lights on to
visually check that there is no light
leaking from betw een the bulb base
and light unit.
Reinstall the fender liner and
install the 3 fender liner clips.
4
5
6