2020 LEXUS RX350 maintenance
[x] Cancel search: maintenancePage 398 of 516
3986-3. Do-it-yourself maintenance
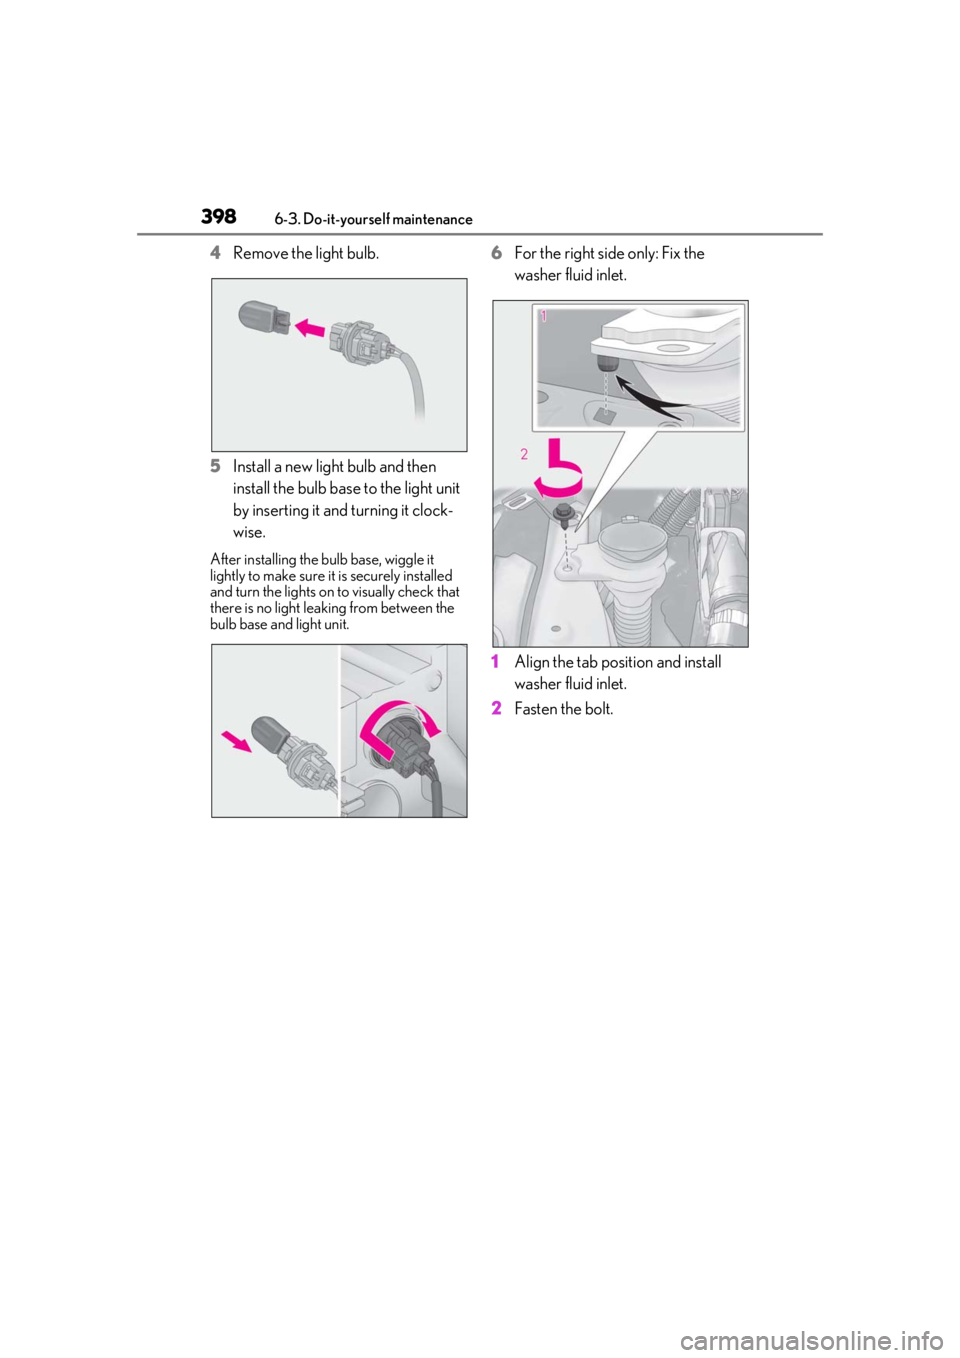
4Remove the light bulb.
5 Install a new light bulb and then
install the bulb base to the light unit
by inserting it and turning it clock-
wise.
After installing the bulb base, wiggle it
lightly to make sure it is securely installed
and turn the lights on to visually check that
there is no light lea king from between the
bulb base and light unit.
6 For the right side only: Fix the
washer fluid inlet.
1 Align the tab position and install
washer fluid inlet.
2 Fasten the bolt.
Page 399 of 516
3996-3. Do-it-yourself maintenance
6
Maintenance and care
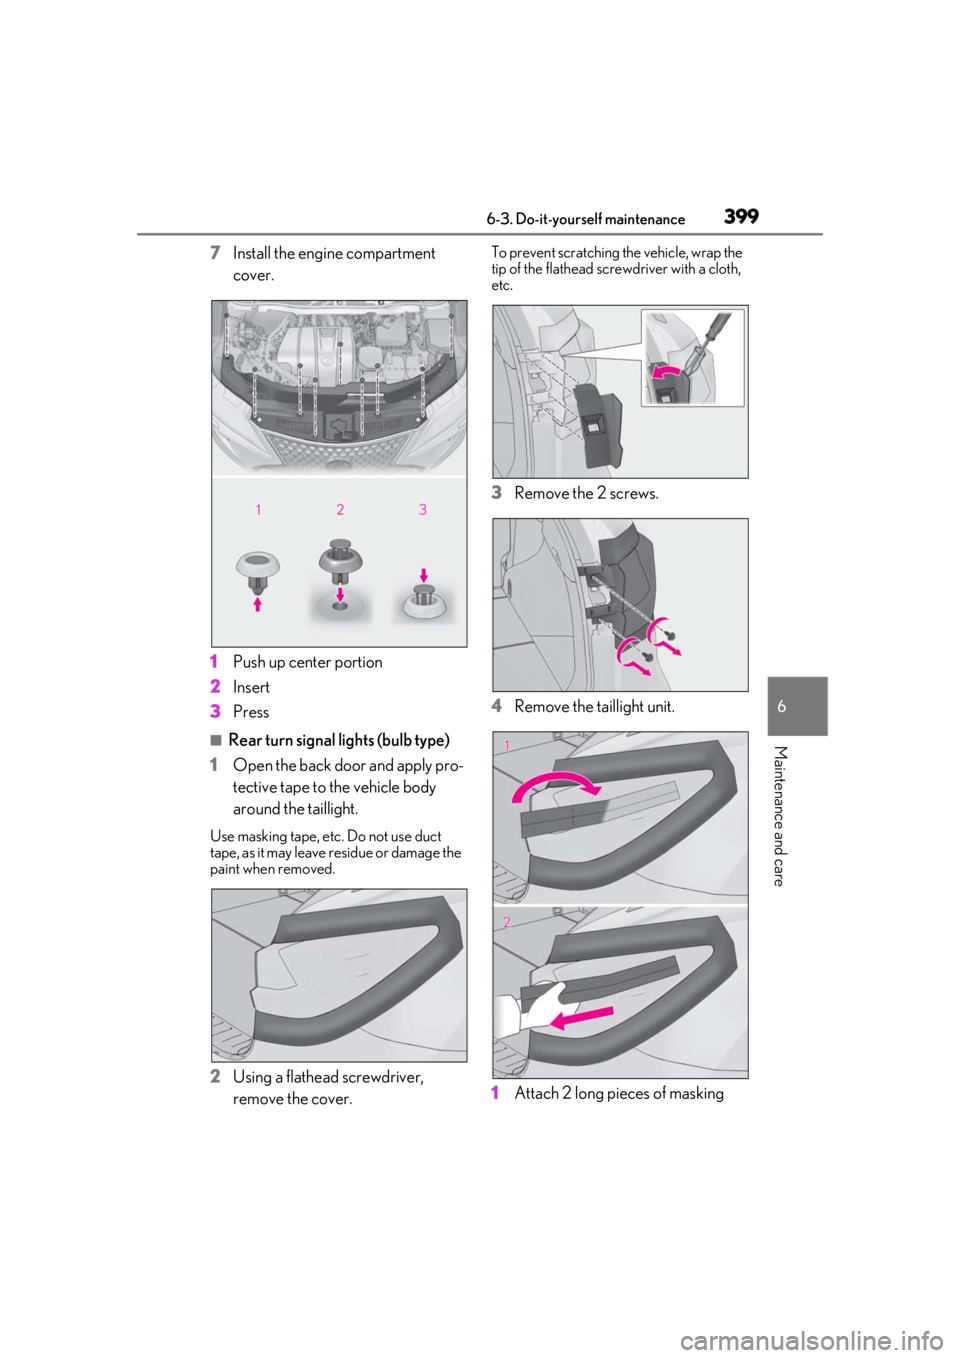
7Install the engine compartment
cover.
1 Push up center portion
2 Insert
3 Press
■Rear turn signal lights (bulb type)
1 Open the back door and apply pro-
tective tape to the vehicle body
around the taillight.
Use masking tape, etc. Do not use duct
tape, as it may leave residue or damage the
paint when removed.
2Using a flathead screwdriver,
remove the cover.
To prevent scratching the vehicle, wrap the
tip of the flathead scre wdriver with a cloth,
etc.
3 Remove the 2 screws.
4 Remove the taillight unit.
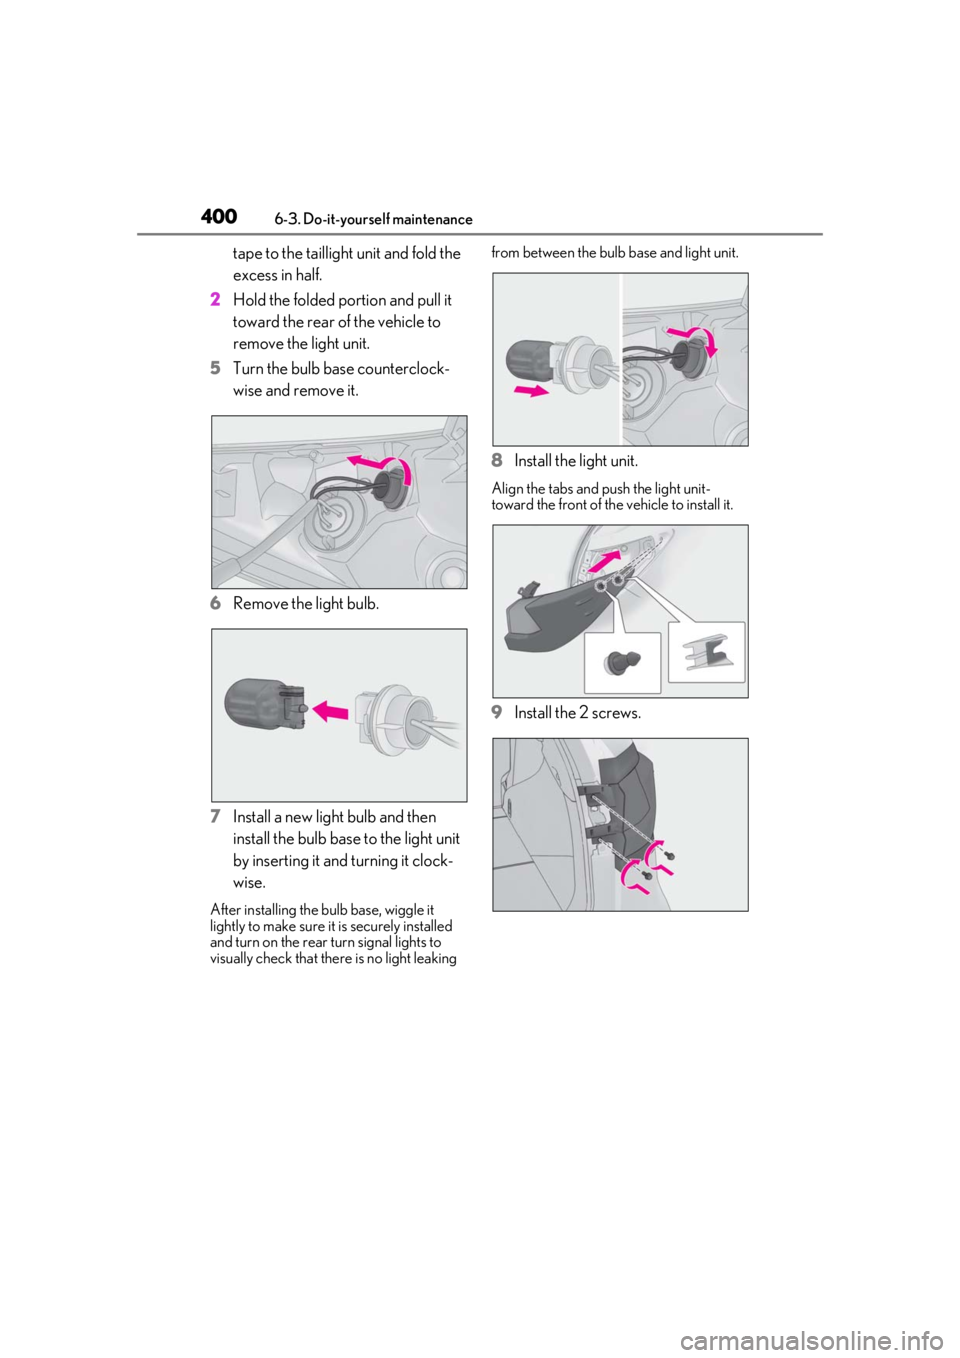
1 Attach 2 long pieces of masking
Page 400 of 516
4006-3. Do-it-yourself maintenance
tape to the taillight unit and fold the
excess in half.
2 Hold the folded portion and pull it
toward the rear of the vehicle to
remove the light unit.
5 Turn the bulb base counterclock-
wise and remove it.
6 Remove the light bulb.
7 Install a new light bulb and then
install the bulb base to the light unit
by inserting it and turning it clock-
wise.
After installing the bulb base, wiggle it
lightly to make sure it is securely installed
and turn on the rear turn signal lights to
visually check that ther e is no light leaking from between the bulb
base and light unit.
8Install the light unit.
Align the tabs and push the light unit-
toward the front of the vehicle to install it.
9Install the 2 screws.
Page 401 of 516
4016-3. Do-it-yourself maintenance
6
Maintenance and care
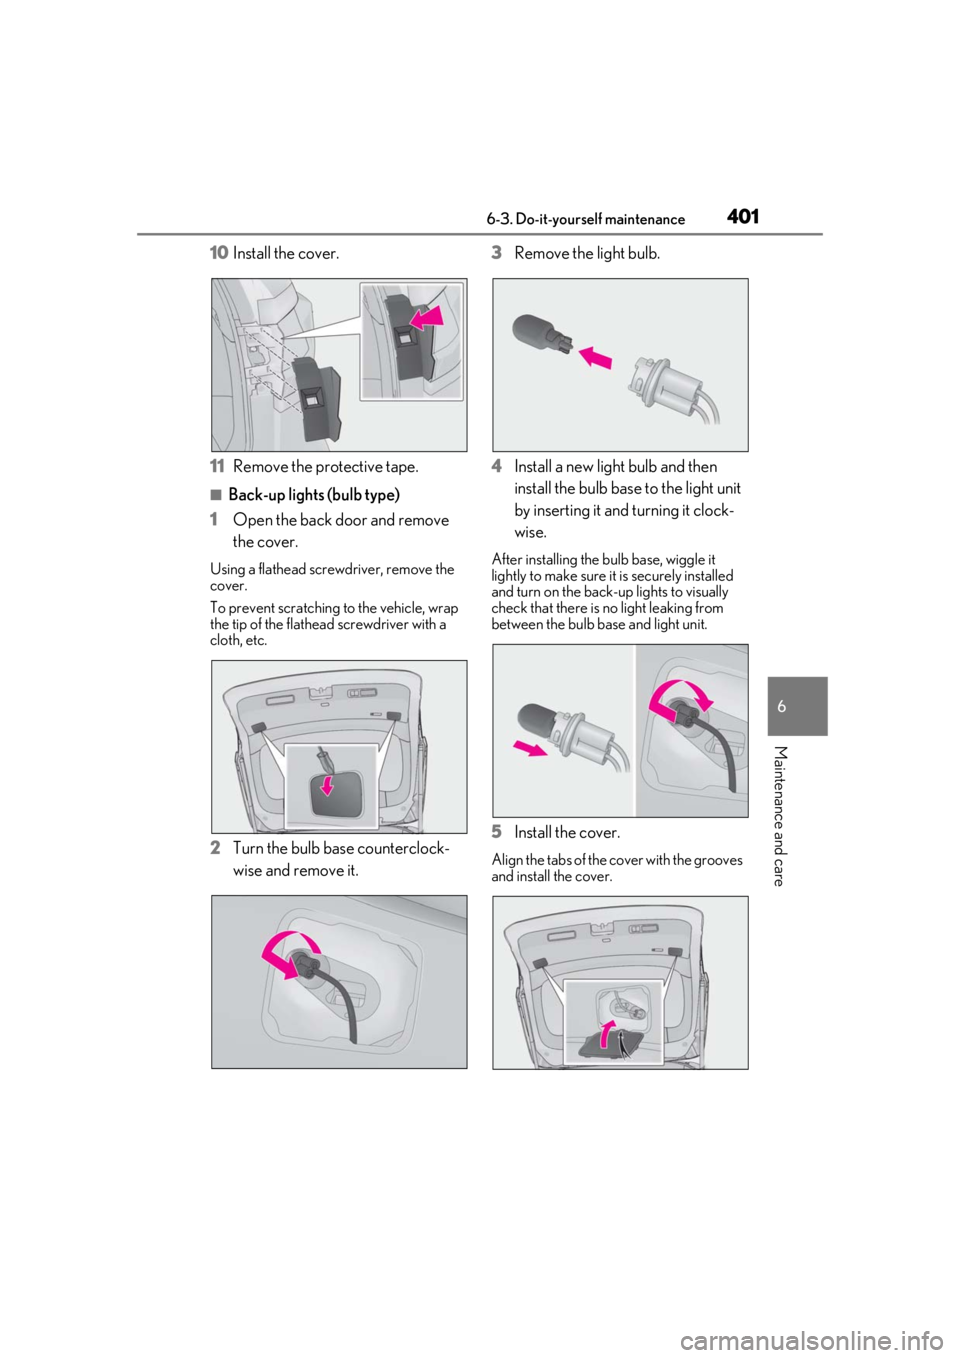
10Install the cover.
11 Remove the protective tape.
■Back-up lights (bulb type)
1 Open the back door and remove
the cover.
Using a flathead screwdriver, remove the
cover.
To prevent scratching to the vehicle, wrap
the tip of the flathead screwdriver with a
cloth, etc.
2 Turn the bulb base counterclock-
wise and remove it. 3
Remove the light bulb.
4 Install a new light bulb and then
install the bulb base to the light unit
by inserting it and turning it clock-
wise.
After installing the bulb base, wiggle it
lightly to make sure it is securely installed
and turn on the back-up lights to visually
check that there is no light leaking from
between the bulb ba se and light unit.
5Install the cover.
Align the tabs of the cover with the grooves
and install the cover.
Page 402 of 516
4026-3. Do-it-yourself maintenance
WARNING
■To prevent injury
Before performing any light bulb
replacement procedure, be sure to turn
the engine switch off. Failure to do so
may result in burns from hot components
or a part of your bo dy may get caught on
an operating component, possibly caus-
ing serious injury.
■Replacing light bulbs
●Turn off the lights. Do not attempt to
replace the bulb immediately after
turning off the lights.
The bulbs become very hot and may
cause burns.
●Do not touch the glass portion of the
light bulb with bare hands. When it is
unavoidable to hold the glass portion,
use and hold with a clean dry cloth to
avoid getting moisture and oils on the
bulb.
Also, if the bulb is scratched or
dropped, it may blow out or crack.
●Fully install light bulbs and any parts
used to secure them. Failure to do so
may result in heat damage, fire, or
water entering the headlight unit. This
may damage the headlights or cause
condensation to build up on the lens.
●Do not attempt to repair or disassem-
ble the light bulbs, connectors, electric
circuits or component parts.
Doing so may result in death or serious
injury due to electric shock.
■To prevent damage or fire
●Make sure bulbs are fully seated and
locked.
●Check the wattage of the bulb before
installing to prev ent heat damage.
Page 421 of 516

4217-2. Steps to take in an emergency
7
When trouble arises
WARNING
■If the tire pressure warning light
comes on
Be sure to observe the following precau-
tions.
Failure to do so could cause a loss of
vehicle control and result in death or
serious injury.
●Stop your vehicle in a safe place as
soon as possible. Adjust the tire infla-
tion pressure immediately.
●If the tire pressure warning light comes
on even after tire inflation pressure
adjustment, it is probable that you have
a flat tire. Check the tires. If a tire is flat,
change it with the spare tire and have
the flat tire repaired by the nearest
Lexus dealer.
●Avoid abrupt maneuvering and brak-
ing.
If the vehicle tires deteriorate, you
could lose control of the steering
wheel or the brakes.
■If a blowout or sudden air leakage
should occur
The tire pressure warning system may
not activate immediately.
■Maintenance of the tires
Each tire, including the spare (if pro-
vided), should be checked monthly when
cold and inflated to the inflation pressure
recommended by the vehicle manufac-
turer on the vehicle placard or tire infla-
tion pressure label (tire and load
information label). (I f your vehicle has
tires of a different size than the size indi-
cated on the vehicle placard or tire infla-
tion pressure label [tire and load
information label], yo u should determine
the proper tire infl ation pressure for
those tires.)
As an added safety fe ature, your vehicle
has been equipped with a tire pressure
monitoring system (TPMS-tire pressure
warning system) that illuminates a low
tire pressure telltale (tire pressure warn-
ing light) when one or more of your tires
is significantly under-inflated. Accord-
ingly, when the low ti re pressure telltale
(tire pressure warning light) illuminates,
you should stop and check your tires as
soon as possible, and inflate them to the
proper pressure. Driving on a signifi-
cantly under-inflated tire causes the tire
to overheat and can lead to tire failure.
Under-inflation also reduces fuel effi-
ciency and tire tread life, and may affect
the vehicle’s handling and stopping abil-
ity.
Please note that the TPMS (tire pressure
warning system) is not a substitute for
proper tire maintenance, and it is the
driver’s responsibility to maintain correct
tire pressure, even if under-inflation has
not reached the level to trigger illumina-
tion of the TPMS low tire pressure telltale
(tire pressure warning light).
Your vehicle has also been equipped with
a TPMS (tire pressure warning system)
malfunction indicator to indicate when
the system is not operating properly. The
TPMS (tire pressure warning system)
malfunction indicator is combined with
the low tire pressure telltale (tire pres-
sure warning light) . When the system
detects a malfunction, the telltale will
flash for approximately one minute and
then remain continuously illuminated.
This sequence will continue upon subse-
quent vehicle start-ups as long as the
malfunction exists. When the malfunction
indicator is illuminated, the system may
not be able to detect or signal low tire
pressure as intended.
Page 422 of 516

4227-2. Steps to take in an emergency
WARNING
TPMS (tire pressure warning system)
malfunctions may occur for a variety of
reasons, including the installation of
replacement or alternate tires or wheels
on the vehicle that prevent the TPMS
(tire pressure warning system) from func-
tioning properly. Always check the
TPMS (tire pressure warning system)
malfunction telltale after replacing one
or more tires or wheels on your vehicle to
ensure that the replacement or alternate
tires and wheels allow the TPMS (tire
pressure warning system) to continue to
function properly.
NOTICE
■To ensure the tire pressure warning
system operates properly
Do not install tires wi th different specifi-
cations or makers, as the tire pressure
warning system may not operate prop-
erly.
If a warning message is dis-
played
The multi-information display
shows warnings of system malfunc-
tions, incorrectly performed opera-
tions, and messages that indicate a
need for maintenance. When a
message is shown, perform the cor-
rection procedure appropriate to
the message.
Except F SPORT models:
Master warning light
The master warning light also comes on
or flashes in order to indicate that a mes-
sage is currently be ing displayed on the
multi-information display.
Multi-information display
Follow the instructions of the message
on the multi-information display.
If any of the warning messages are
shown again after the appropriate
actions have been performed, contact
your Lexus dealer.
F SPORT models:
A
B
Page 424 of 516

4247-2. Steps to take in an emergency
In some situations, the master warning light and warning buzzer may not oper-
ate as specified. In this case, follow the instructions displayed in the warning
message.
If a warning light comes on or flashes at the same time that a warning message is
displayed, take corrective actio n according to the warning light. ( P.413)
*: A buzzer sounds the first time a message is shown on the multi-information display.
■Warning messages
The warning messages explained below
may differ from the actual messages
according to operation conditions and vehi-
cle specifications.
■Warning buzzer
In some cases, the bu zzer may not be heard
due to being in a noisy location or audio
sound.
■If “Shift to P Before Exiting Vehicle” is
displayed
Message is displayed when the driver’s
door is opened withou t turning the engine
switch off with the shift lever in any position
other than P.
Shift the shift lever to P.
■If “Power Turned Off to Save Battery” is
displayed
This message is displayed when the power
was cut off due to the automatic power off
function. The next time the engine is started,
increase the engine speed slightly and
maintain it at that speed for approximately
5 minutes to recharge the battery.
■If “AWD System Overheated Switching
to 2WD Mode” or “AWD System Over-
heated 2WD Mode Engaged” is dis-
played (AWD models)
This message may be displayed when driv-
ing under extremely high load conditions.
Drive the vehicle at low speeds or stop the
vehicle in a safe place with the engine run-
ning until the me ssage is cleared.
If the message is not cleared, have the vehi-
cle inspected by your Lexus dealer.
■If “Headlight System Malfunction Visit
Your Dealer” is displayed
The following systems may be malfunction-
ing. Have the vehicle inspected by your
Lexus dealer immediately.
●The LED headlight system
●AFS (Adaptive Front-lighting System) (if
equipped)
●The automatic headlight leveling system
●Automatic High Beam
■If “Radar Cruise Control Unavailable
See Owner's Manual” is displayed
The dynamic radar cruise control with
full-speed range system is suspended tem-
porarily or until the problem shown in the
message is re solved. (causes and coping
methods: P.209)
Comes onDoes not sound
Indicates a condition, such as malfunction of electri-
cal components, their cond ition, or indicates the
need for maintenance
FlashesDoes not sound
Indicates a situation, such as when an operation has
been performed incorrectly, or indicates how to
perform an operation correctly
Warning buzzer*Warning