2020 LEXUS RX350 door lock
[x] Cancel search: door lockPage 350 of 516
3506-1. Maintenance and care
6-1.Maintenance and care
Working from top to bottom, liber-
ally apply water to the vehicle body,
wheel wells and underside of the
vehicle to remove any dirt and dust.
Wash the vehicle body using a
sponge or soft cloth, such as a
chamois.
For hard-to-remove marks, use car
wash soap and rinse thoroughly with
water.
Wipe away any water.
Wax the vehicle when the water-
proof coating deteriorates.
If water does not bead on a clean surface,
apply wax when the vehicle body is cool.
■Self-restoring coat
The vehicle body has a self-restoring coat-
ing that is resistant to small surface
scratches caused in a car wash etc.
●The coating lasts for 5 to 8 years from
when the vehicle is delivered from the
plant.
●The restoration time differs depending on
the depth of the scratch and outside tem-
perature.
The restoration time may become
shorter when the coating is warmed by
applying warm water.
●Deep scratches caused by keys, coins,
etc. cannot be restored.
●Do not use wax that contains abrasives.
■Automatic car washes
●Before washing the vehicle:
• Fold the mirrors
• Turn off the power back door
Start washing from the front of the vehicle.
Extend the mirrors before driving.
●Brushes used in automatic car washes
may scratch the vehicl e surface and harm
your vehicle’s paint.
●Rear spoiler may not be washable in
some automatic car washes. There may
also be an increased risk of damage to
vehicle.
■High pressure car washes
As water may enter the cabin, do not bring
the nozzle tip near the gaps around the
doors or perimeter of the windows, or spray
these areas continuously.
■When using a car wash
If the door handle becomes wet while the
electronic key is within the effective range,
the door may lock and unlock repeatedly. In
that case, follow the following correction
procedures to wash the vehicle:
●Place the key in a position 6 ft. (2 m) or
more separate from the vehicle while the
vehicle is being wash ed. (Take care to
ensure that the key is not stolen.)
●Set the electronic key to battery-saving
mode to disable the smart access system
with push-button start. ( P.114)
■Aluminum wheels
●Remove any dirt immediately by using a
neutral detergent.
●Wash detergent off with water immedi-
ately after use.
●To protect the paint from damage, make
sure to observe the following precau-
tions.
• Do not use acidic, alkaline or abrasive detergent
• Do not use hard brushes
• Do not use detergent on the wheels when they are hot, such as after driving or park-
ing in hot weather
■Bumpers
Do not scrub with abrasive cleaners.
Cleaning and protecting the
vehicle exterior
Perform cleaning in a manner
appropriate to each component
and its material.
Cleaning instructions
Page 359 of 516
3596-2. Maintenance
6
Maintenance and care
Seats• Do the seat controls operate properly?
Steering wheel
• Does the steering wheel rotate
smoothly?
• Does the steering wheel have the cor-
rect amount of free
play?
•There should not be any strange sounds
coming from the
steering wheel.
Vehicle exterior
ItemsCheck points
Doors• Do the doors oper-ate smoothly?
Engine hood
•Does the engine hood lock system
work properly?
Fluid leaks
•There should not be any signs of fluid
leakage after the
vehicle has been
parked.
ItemsCheck points
Tires
• Is the tire inflation pressure correct?
• The tires should not be damaged or
excessively worn.
• Have the tires been rotated according to
the maintenance
schedule?
•The wheel nuts should not be loose.
Windshield wip-
ers/rear window
wiper
• The wiper blades should not show any
signs of cracking,
splitting, wear, con-
tamination or defor-
mation.
• The wiper blades should clear the
windshield/rear win-
dow without streak-
ing or skipping.
ItemsCheck points
Page 369 of 516

3696-3. Do-it-yourself maintenance
6
Maintenance and care
only newly opened brake fluid.
Check the battery as follows.
■Battery exterior
Make sure that the battery terminals
are not corroded and that there are no
loose connections, cracks, or loose
clamps.
Terminals
Hold-down clamp
■Before recharging
When recharging, the battery produces
hydrogen gas which is flammable and
explosive. Therefore, observe the following
precautions before recharging:
●If recharging with the battery installed on
the vehicle, be sure to disconnect the
ground cable.
●Make sure the power switch on the char-
ger is off when connecting and discon-
necting the charger cables to the battery.
■After recharging/reconnecting the bat-
tery
●The engine may not start. Follow the pro-
cedure below to initialize the system.
1 Shift the shift lever to P.
2 Open and close any of the doors.
3 Restart the engine.
●Unlocking the doors using the smart
access system with pu sh-button start may
not be possible immediately after recon-
necting the battery. If this happens, use
the wireless remote control or the
mechanical key to lo ck/unlock the doors.
●Start the engine with the engine switch in
ACCESSORY mode. The engine may
not start with the engine switch turned off.
However, the engine will operate nor-
mally from the second attempt.
●The engine switch mode is recorded by
the vehicle. If the battery is reconnected,
the vehicle will return the engine switch
mode to the status it was in before the
battery was disconnected. Make sure to
turn off the power before disconnect the
battery. Take extra care when connecting
the battery if the engine switch mode
prior to discharge is unknown.
If the system will not start even after multiple
attempts at all the methods above, contact
your Lexus dealer.
WARNING
■When filling the reservoir
Take care as brake fluid can harm your
hands and eyes and damage painted sur-
faces.
If fluid gets on your hands or in your eyes,
flush the affected area with clean water
immediately.
If you still experience discomfort, see a
doctor.
NOTICE
■If the fluid level is low or high
It is normal for the brake fluid level to go
down slightly as the brake pads wear out
or when the fluid level in the accumulator
is high.
If the reservoir need s frequent refilling,
there may be a serious problem.
Battery
A
B
Page 401 of 516
4016-3. Do-it-yourself maintenance
6
Maintenance and care
10Install the cover.
11 Remove the protective tape.
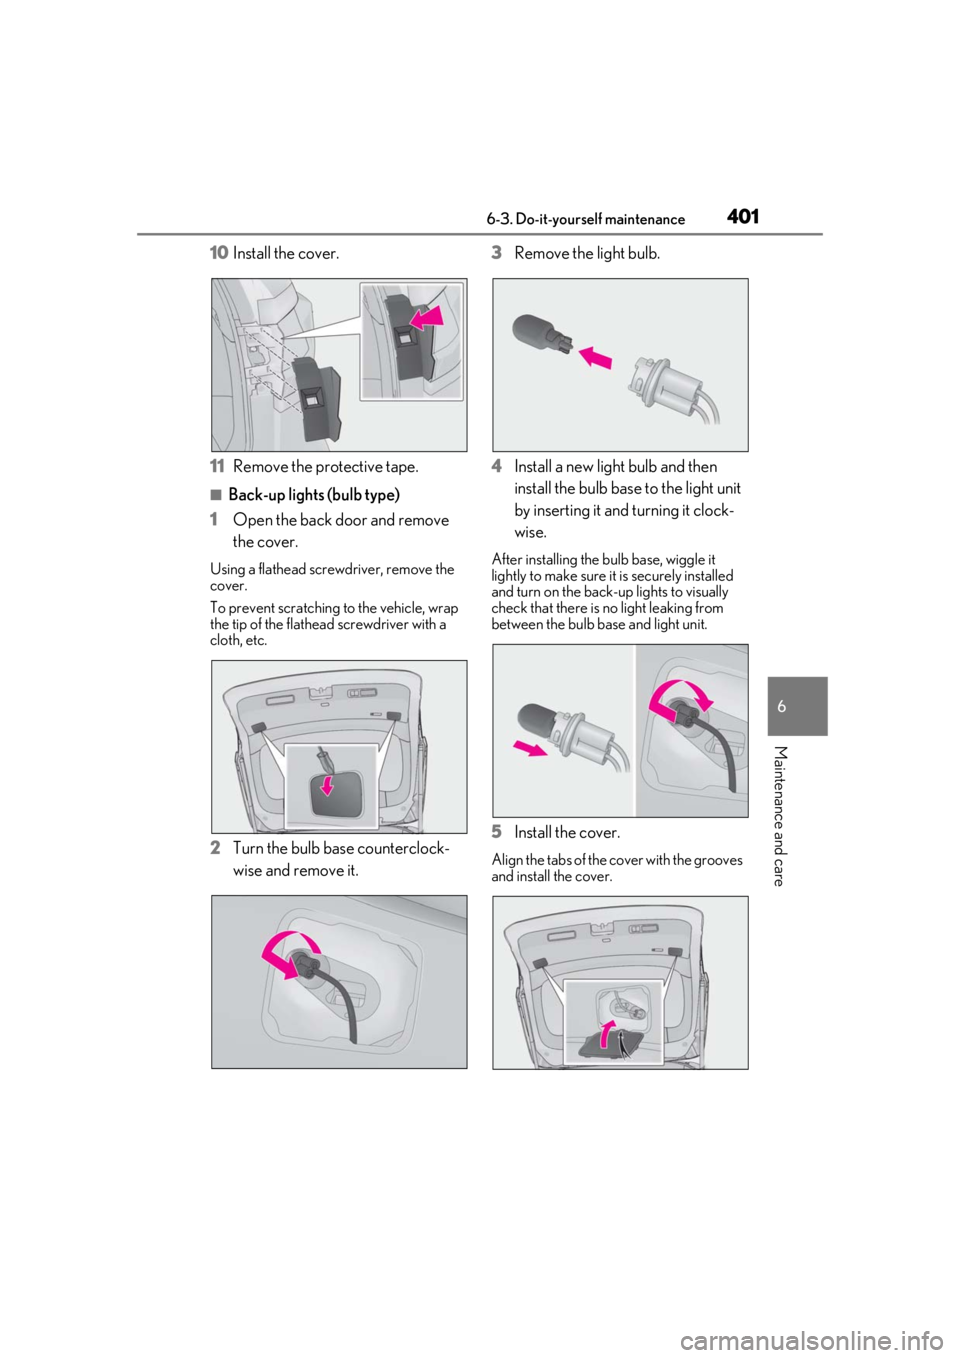
■Back-up lights (bulb type)
1 Open the back door and remove
the cover.
Using a flathead screwdriver, remove the
cover.
To prevent scratching to the vehicle, wrap
the tip of the flathead screwdriver with a
cloth, etc.
2 Turn the bulb base counterclock-
wise and remove it. 3
Remove the light bulb.
4 Install a new light bulb and then
install the bulb base to the light unit
by inserting it and turning it clock-
wise.
After installing the bulb base, wiggle it
lightly to make sure it is securely installed
and turn on the back-up lights to visually
check that there is no light leaking from
between the bulb ba se and light unit.
5Install the cover.
Align the tabs of the cover with the grooves
and install the cover.
Page 433 of 516
4337-2. Steps to take in an emergency
7
When trouble arises
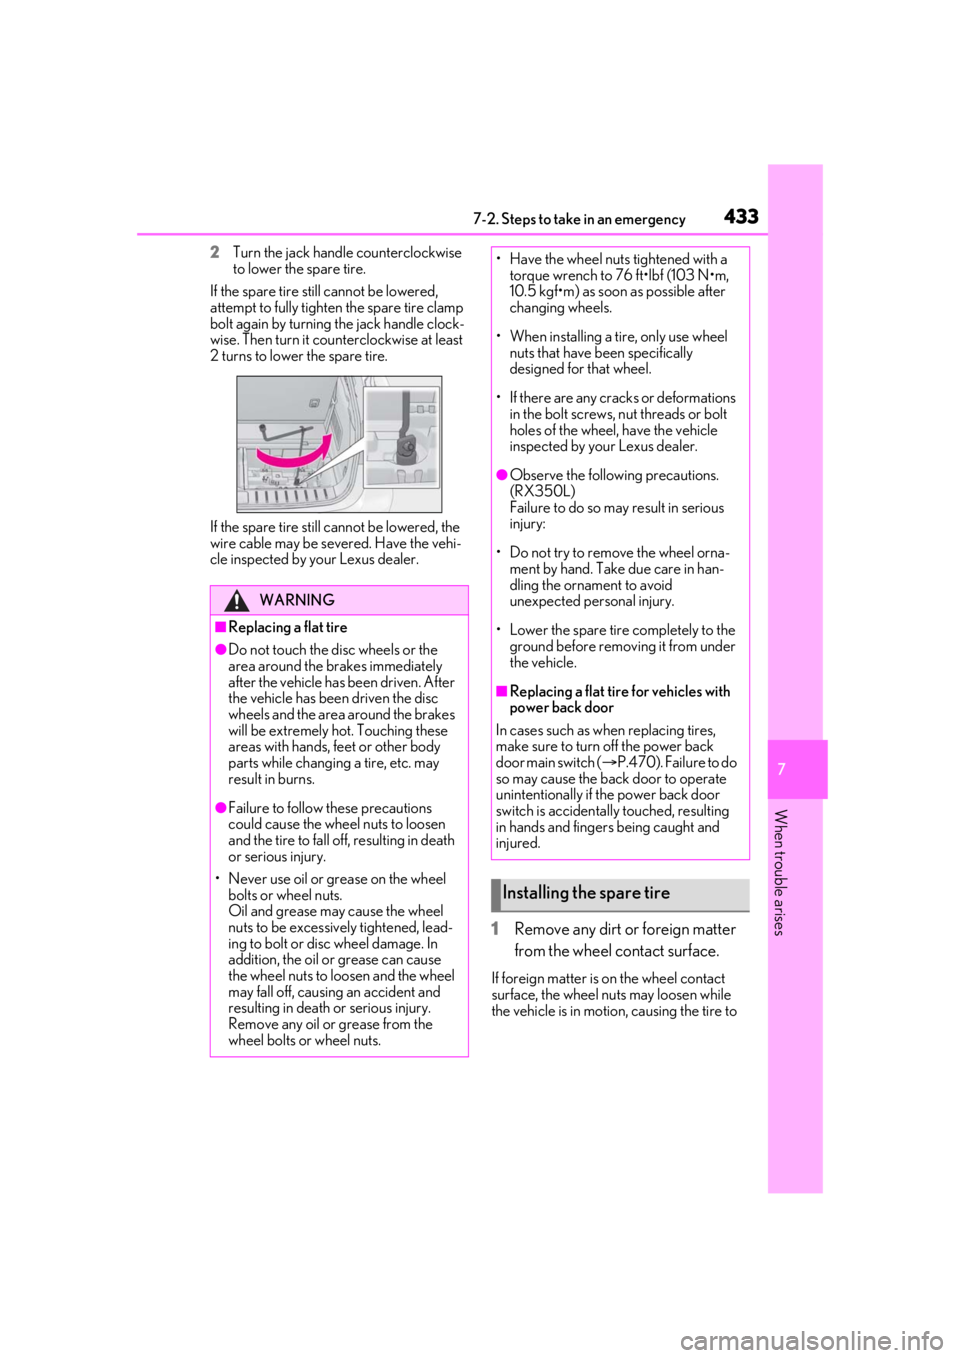
2Turn the jack handle counterclockwise
to lower the spare tire.
If the spare tire still cannot be lowered,
attempt to fully tighten the spare tire clamp
bolt again by turning the jack handle clock-
wise. Then turn it coun terclockwise at least
2 turns to lower the spare tire.
If the spare tire still ca nnot be lowered, the
wire cable may be seve red. Have the vehi-
cle inspected by your Lexus dealer.
1 Remove any dirt or foreign matter
from the wheel contact surface.
If foreign matter is on the wheel contact
surface, the wheel nuts may loosen while
the vehicle is in motion, causing the tire to
WARNING
■Replacing a flat tire
●Do not touch the disc wheels or the
area around the brakes immediately
after the vehicle has been driven. After
the vehicle has been driven the disc
wheels and the area around the brakes
will be extremely hot. Touching these
areas with hands, feet or other body
parts while changing a tire, etc. may
result in burns.
●Failure to follow these precautions
could cause the wheel nuts to loosen
and the tire to fall of f, resulting in death
or serious injury.
• Never use oil or grease on the wheel bolts or wheel nuts.
Oil and grease may cause the wheel
nuts to be excessively tightened, lead-
ing to bolt or disc wheel damage. In
addition, the oil or grease can cause
the wheel nuts to loosen and the wheel
may fall off, causing an accident and
resulting in death or serious injury.
Remove any oil or grease from the
wheel bolts or wheel nuts.
• Have the wheel nuts tightened with a torque wrench to 76 ft•lbf (103 N•m,
10.5 kgf•m) as soon as possible after
changing wheels.
• When installing a tire, only use wheel nuts that have been specifically
designed for that wheel.
• If there are any cracks or deformations in the bolt screws, nut threads or bolt
holes of the wheel, have the vehicle
inspected by your Lexus dealer.
●Observe the following precautions.
(RX350L)
Failure to do so may result in serious
injury:
• Do not try to remove the wheel orna- ment by hand. Take due care in han-
dling the ornament to avoid
unexpected personal injury.
• Lower the spare tire completely to the ground before removing it from under
the vehicle.
■Replacing a flat tire for vehicles with
power back door
In cases such as when replacing tires,
make sure to turn off the power back
door main switch ( P.470). Failure to do
so may cause the back door to operate
unintentionally if th e power back door
switch is accidentally touched, resulting
in hands and fingers being caught and
injured.
Installing the spare tire
Page 440 of 516
4407-2. Steps to take in an emergency
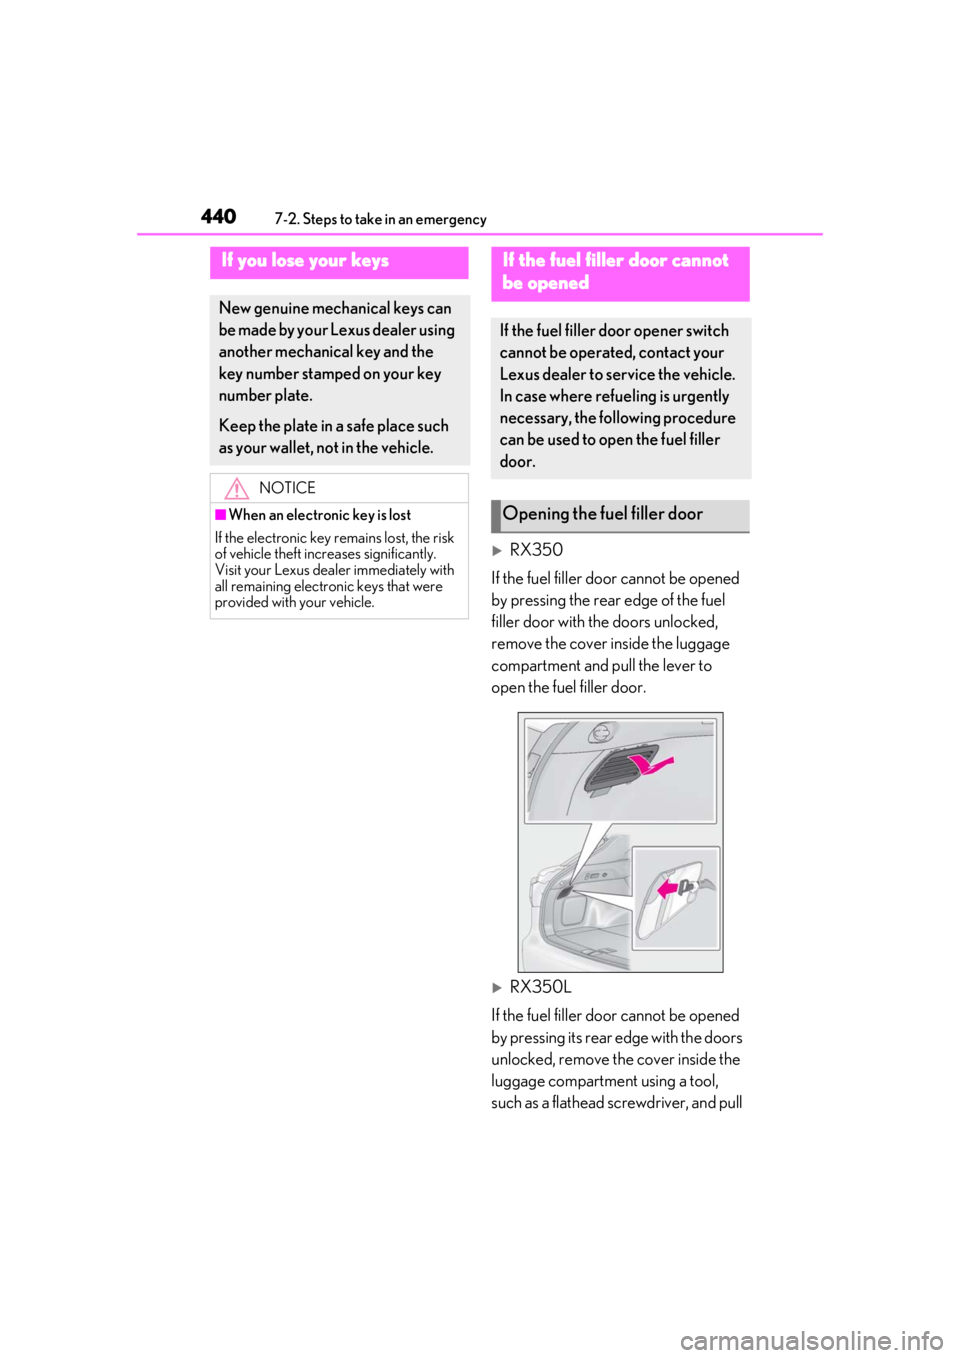
RX350
If the fuel filler door cannot be opened
by pressing the rear edge of the fuel
filler door with the doors unlocked,
remove the cover inside the luggage
compartment and pull the lever to
open the fuel filler door.
RX350L
If the fuel filler door cannot be opened
by pressing its rear edge with the doors
unlocked, remove the cover inside the
luggage compartment using a tool,
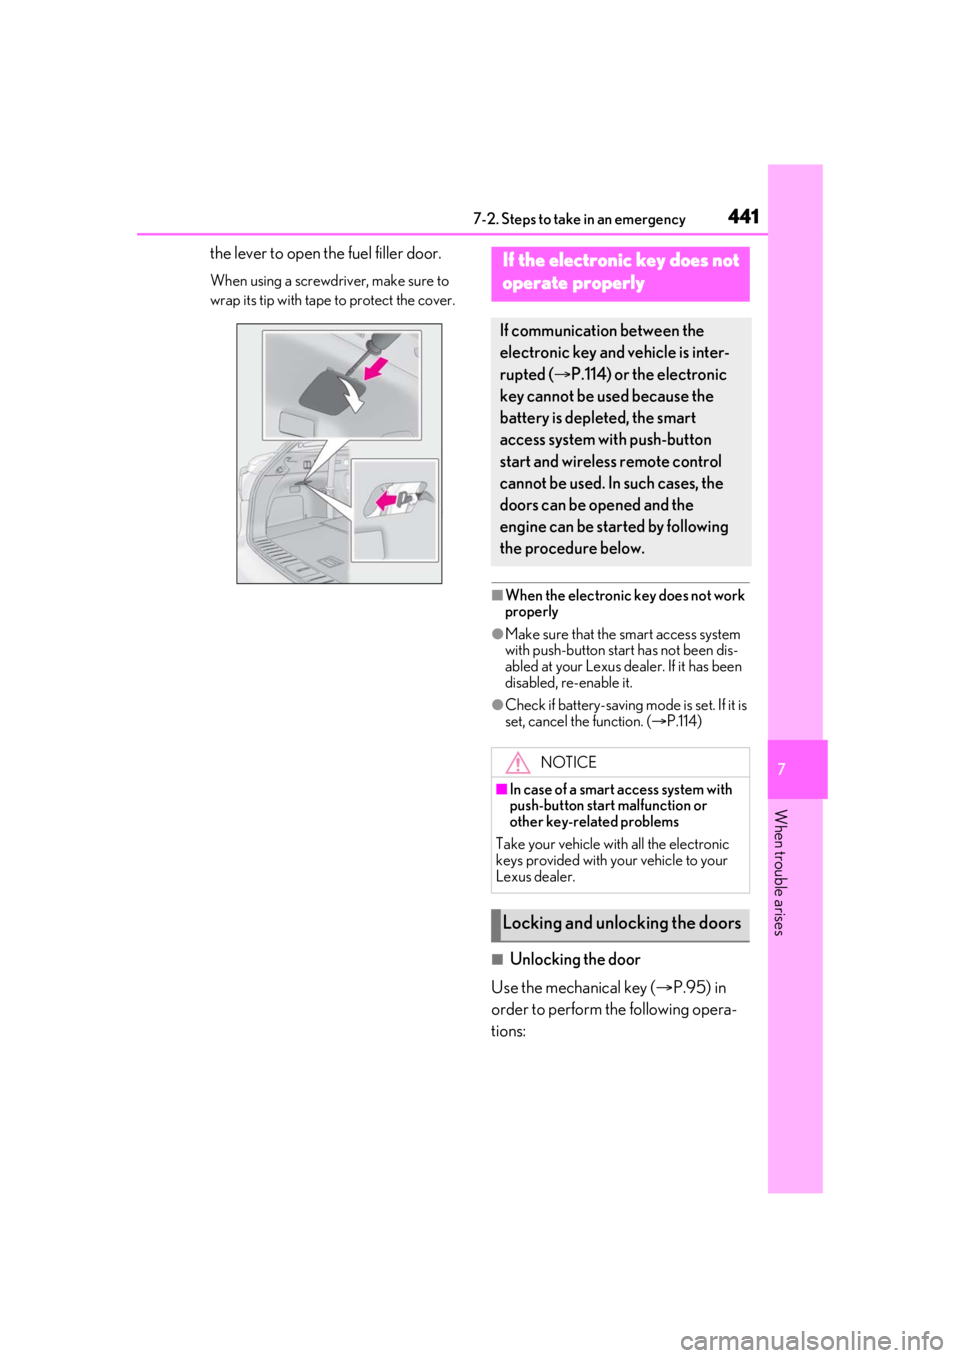
such as a flathead screwdriver, and pull
If you lose your keys
New genuine mechanical keys can
be made by your Lexus dealer using
another mechanical key and the
key number stamped on your key
number plate.
Keep the plate in a safe place such
as your wallet, not in the vehicle.
NOTICE
■When an electronic key is lost
If the electronic key remains lost, the risk
of vehicle theft increases significantly.
Visit your Lexus deal er immediately with
all remaining electronic keys that were
provided with your vehicle.
If the fuel filler door cannot
be opened
If the fuel filler door opener switch
cannot be operated, contact your
Lexus dealer to service the vehicle.
In case where refueling is urgently
necessary, the following procedure
can be used to open the fuel filler
door.
Opening the fuel filler door
Page 441 of 516
4417-2. Steps to take in an emergency
7
When trouble arises
the lever to open the fuel filler door.
When using a screwdriver, make sure to
wrap its tip with tape to protect the cover.
■When the electronic key does not work
properly
●Make sure that the smart access system
with push-button star t has not been dis-
abled at your Lexus dealer. If it has been
disabled, re-enable it.
●Check if battery-saving mo de is set. If it is
set, cancel the function. ( P.114)
■Unlocking the door
Use the mechanical key ( P.95) in
order to perform th e following opera-
tions:
If the electronic key does not
operate properly
If communication between the
electronic key and vehicle is inter-
rupted ( P.114) or the electronic
key cannot be used because the
battery is depleted, the smart
access system with push-button
start and wireless remote control
cannot be used. In such cases, the
doors can be opened and the
engine can be started by following
the procedure below.
NOTICE
■In case of a smart access system with
push-button start malfunction or
other key-rela ted problems
Take your vehicle with all the electronic
keys provided with your vehicle to your
Lexus dealer.
Locking and unlocking the doors
Page 442 of 516
4427-2. Steps to take in an emergency
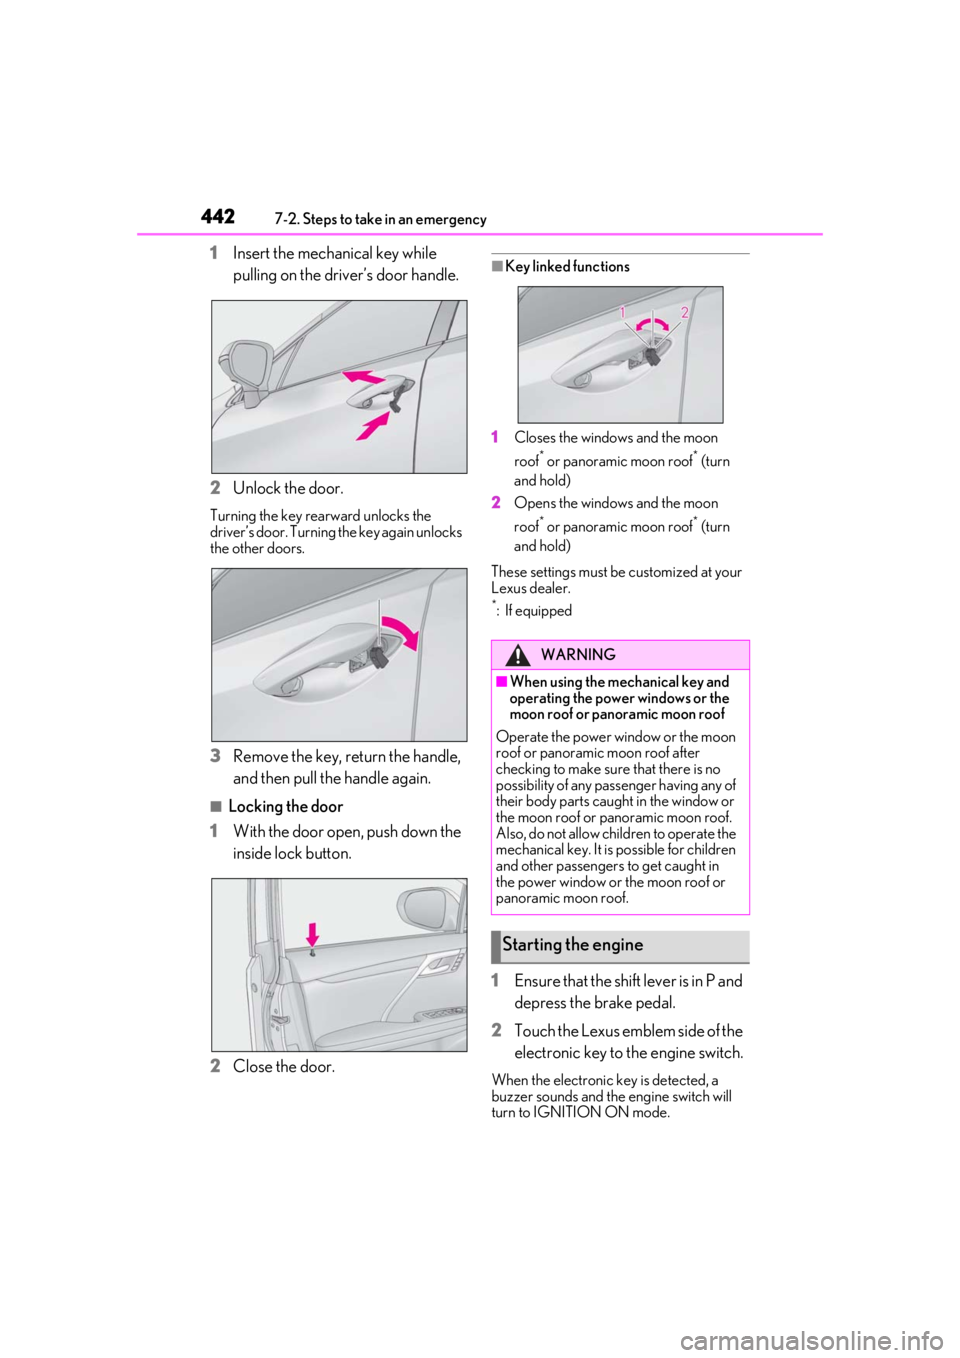
1Insert the mechanical key while
pulling on the driver’s door handle.
2 Unlock the door.
Turning the key rearward unlocks the
driver’s door. Turning the key again unlocks
the other doors.
3Remove the key, return the handle,
and then pull the handle again.
■Locking the door
1 With the door open, push down the
inside lock button.
2 Close the door.
■Key linked functions
1 Closes the windows and the moon
roof
* or panoramic moon roof* (turn
and hold)
2 Opens the windows and the moon
roof
* or panoramic moon roof* (turn
and hold)
These settings must be customized at your
Lexus dealer.
*: If equipped
1 Ensure that the shift lever is in P and
depress the brake pedal.
2 Touch the Lexus emblem side of the
electronic key to the engine switch.
When the electronic key is detected, a
buzzer sounds and the engine switch will
turn to IGNITION ON mode.
WARNING
■When using the mechanical key and
operating the power windows or the
moon roof or panoramic moon roof
Operate the power window or the moon
roof or panoramic moon roof after
checking to make sure that there is no
possibility of any passe nger having any of
their body parts caught in the window or
the moon roof or panoramic moon roof.
Also, do not allow children to operate the
mechanical key. It is possible for children
and other passengers to get caught in
the power window or the moon roof or
panoramic moon roof.
Starting the engine