2020 LEXUS RX350 belt
[x] Cancel search: beltPage 163 of 516

1634-1. Before driving
4
Driving
WARNING
●Do not stack cargo and luggage in the
luggage compartment higher than the
seatbacks.
●When you fold down the rear seats,
long items should not be placed
directly behind the front seats.
●Never allow anyone to ride in the lug-
gage compartment. It is not designed
for passengers. They should ride in
their seats with their seat belts prop-
erly fastened.
●Do not place cargo or luggage in or on
the following locations.
• At the feet of the driver
• On the front passenger or rear seats (when stacking items)
• On the luggage cover
• On the instrument panel
•On the dashboard
●Secure all items in the occupant com-
partment.
■Capacity and distribution
●Do not exceed the maximum axle
weight rating or the total vehicle
weight rating.
●Even if the total load of occupant’s
weight and the cargo load is less than
the total load capacity, do not apply the
load unevenly. Improper loading may
cause deterioration of steering or
braking control which may cause
death or serious injury.
■Roof luggage carrier precautions
Observe the following precautions:
●Place the cargo so that its weight is dis-
tributed evenly between the front and
rear axles.
●If loading long or wide cargo, never
exceed the vehicle overall length or
width. (
P.452)
●Before driving, make sure the cargo is
securely fastened on the roof luggage
carrier.
●Loading cargo on the roof luggage
carrier will make the center of gravity
of the vehicle higher. Avoid high
speeds, sudden starts, sharp turns,
sudden braking or abrupt maneuvers,
otherwise it may result in loss of con-
trol or vehicle rollover due to failure to
operate this vehicle correctly and
result in death or serious injury.
●If driving for a long distance, on rough
roads, or at high sp eeds, stop the vehi-
cle now and then during the trip to
make sure the cargo remains in its
place.
●Do not exceed 165 lb. (75 kg) cargo
weight on the roof luggage carrier.
NOTICE
■When loading cargo (vehicles with a
moon roof or panoramic moon roof)
Be careful not to scratch the surface of
the moon roof or panoramic moon roof.
Page 186 of 516

1864-2. Driving procedures
The parking brake indicator light and park-
ing brake light will turn on.
Pull and hold the parking brake switch if an
emergency occurs and it is necessary to
operate the parking brake while driving.
2Push the parking brake switch to
release the parking brake
Operate the parking brake switch while
depressing the brake pedal.
Make sure that the pa rking brake indicator
light and parking brake light turn off.
Parking brake automatic release function:
Slowly depress the accelerator pedal.
Make sure that the pa rking brake indicator
light and parking brake light turn off.
If the parking brake indicator light and
parking brake light flashes, operate the
switch again. ( P.419)
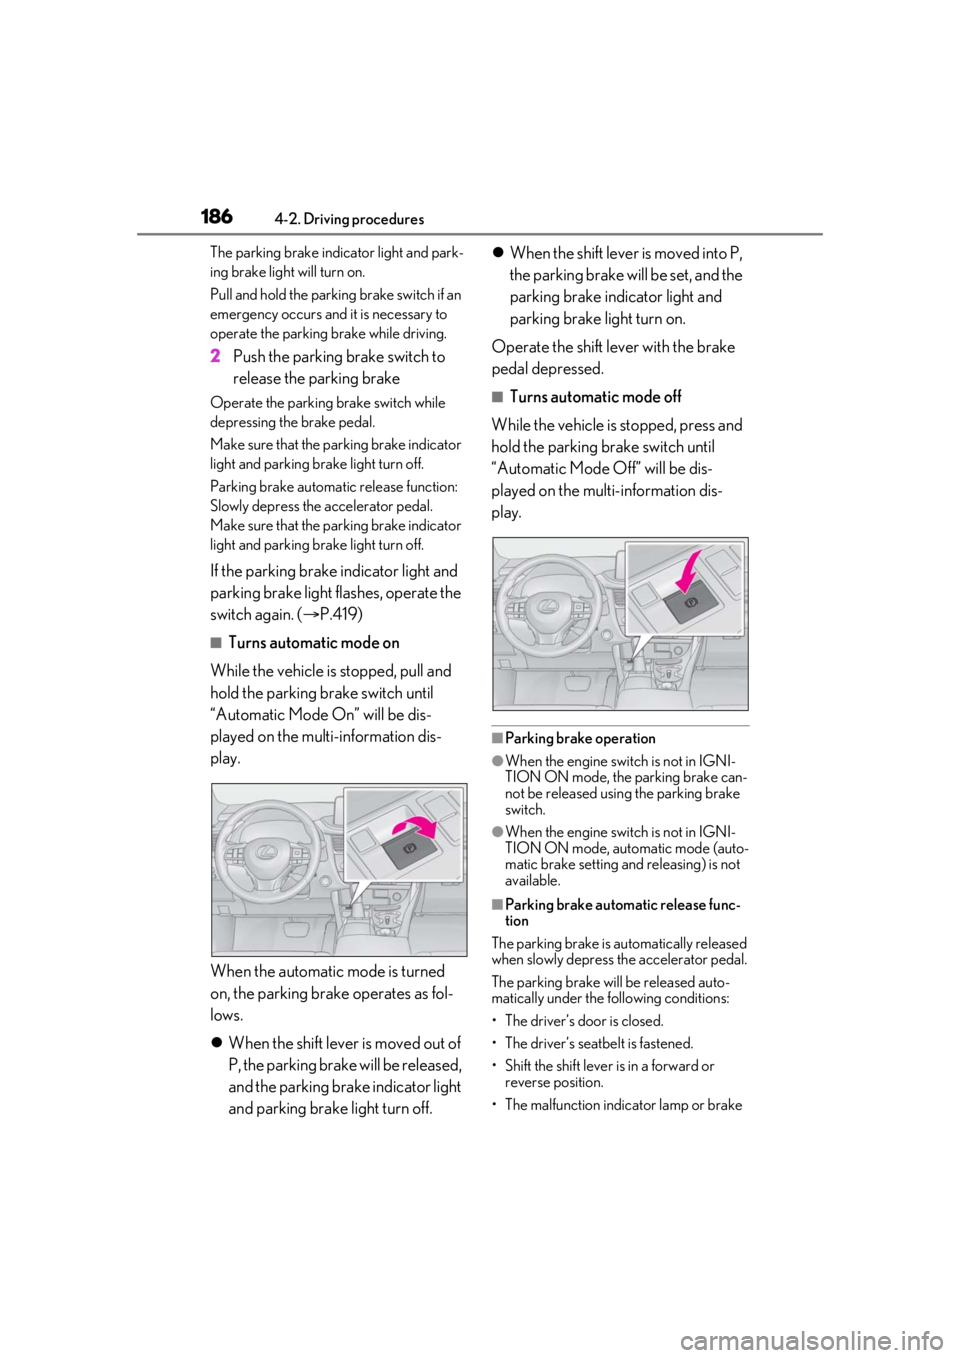
■Turns automatic mode on
While the vehicle is stopped, pull and
hold the parking brake switch until
“Automatic Mode On” will be dis-
played on the multi-information dis-
play.
When the automatic mode is turned
on, the parking brake operates as fol-
lows.
When the shift lever is moved out of
P, the parking brake will be released,
and the parking brake indicator light
and parking brake light turn off.
When the shift lever is moved into P,
the parking brake will be set, and the
parking brake indicator light and
parking brake light turn on.
Operate the shift lever with the brake
pedal depressed.
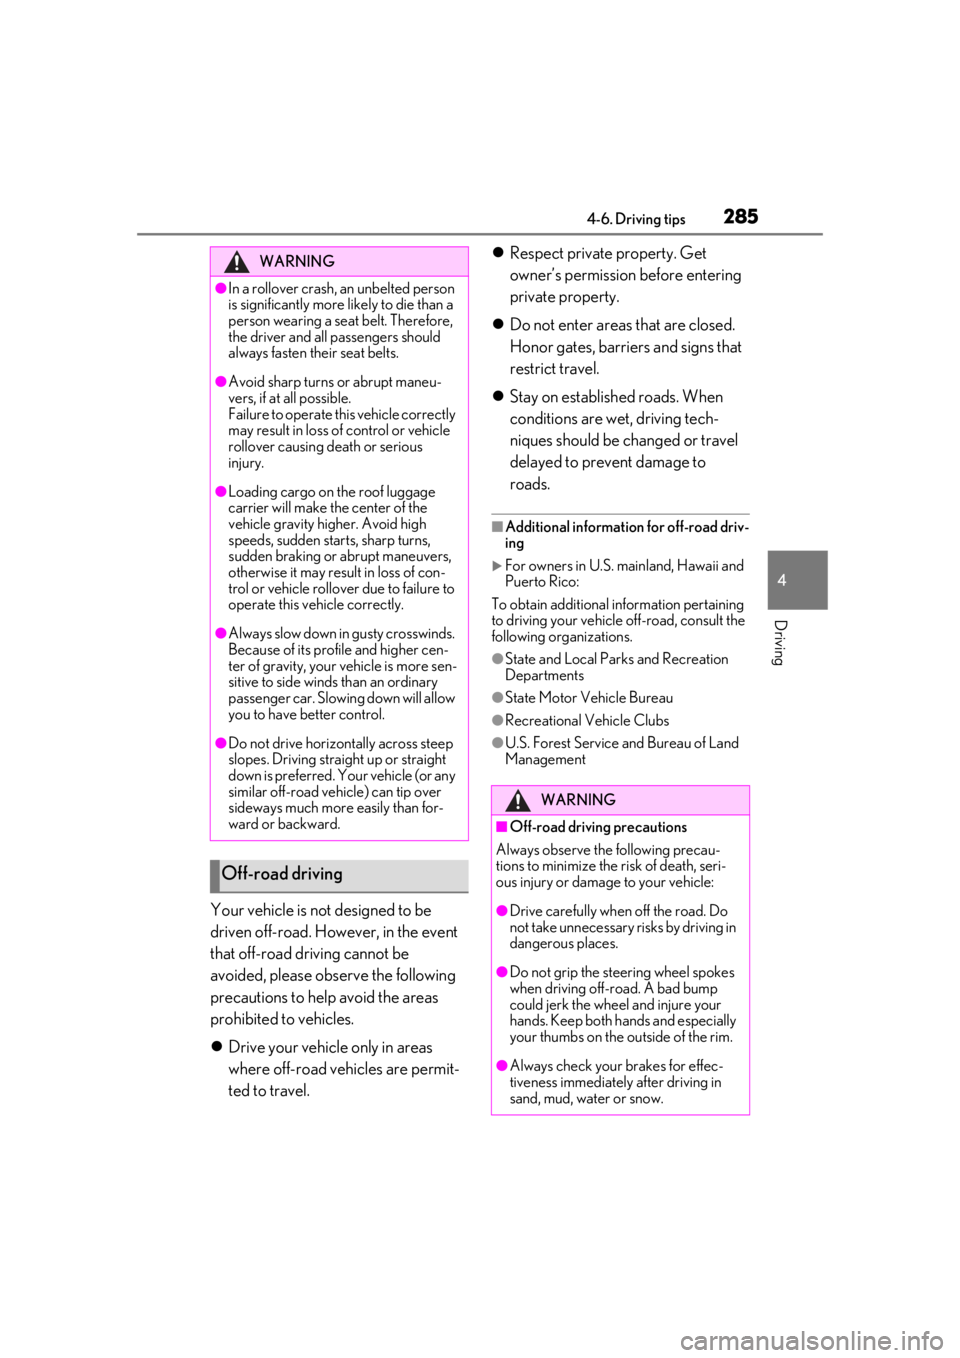
■Turns automatic mode off
While the vehicle is stopped, press and
hold the parking brake switch until
“Automatic Mode Off” will be dis-
played on the multi-information dis-
play.
■Parking brake operation
●When the engine switch is not in IGNI-
TION ON mode, the parking brake can-
not be released using the parking brake
switch.
●When the engine switch is not in IGNI-
TION ON mode, auto matic mode (auto-
matic brake setting an d releasing) is not
available.
■Parking brake automatic release func-
tion
The parking brake is automatically released
when slowly depress the accelerator pedal.
The parking brake will be released auto-
matically under the following conditions:
• The driver’s door is closed.
• The driver’s seatbelt is fastened.
• Shift the shift lever is in a forward or reverse position.
• The malfunction indicator lamp or brake
Page 188 of 516

1884-2. Driving procedures
Turns the brake hold system on
The brake hold standby indicator (green) comes on. While the system is holding
the brake, the brake hold operated indica-
tor (yellow) comes on.
■Brake hold system operating conditions
The brake hold system cannot be turned on
in the following conditions:
●The driver’s door is not closed.
●The driver is not wearing the seat belt.
If any of the conditions above are detected
when the brake hold system is enabled, the
system will turn off and the brake hold
standby indicator light will go off. In addi-
tion, if any of the conditions are detected
while the system is holding the brake, a
warning buzzer will sound and a message
will be shown on the multi-information dis-
NOTICE
■When the parking brake cannot be
released due to a malfunction
Driving the vehicle with the parking
brake set will lead to brake components
overheating, which may affect braking
performance and increase brake wear.
Have the vehicle inspected by your
Lexus dealer immediately if this occurs.
Brake Hold
The brake hold system keeps the
brake applied when the shift lever is
in D, M or N with the system on and
the brake pedal has been
depressed to stop the vehicle. The
system releases the brake when the
accelerator pedal is depressed with
the shift lever in D or M to allow
smooth start off.
Enabling the system
A
B
Page 189 of 516

1894-2. Driving procedures
4
Driving
play. The parking brake will then be set
automatically.
■Brake hold function
●If the brake pedal is left released for a
period of about 3 minutes after the sys-
tem has started holding the brake, the
parking brake will be set automatically. In
this case, a warning buzzer sounds and a
message is shown on the multi-informa-
tion display.
●To turn the system off while the system is
holding the brake, firmly depress the
brake pedal and press the button again.
●The brake hold function may not hold the
vehicle when the vehicle is on a steep
incline. In this situation, it may be neces-
sary for the driver to apply the brakes. A
warning buzzer will sound and the
multi-information display will inform the
driver of this situation. If a warning mes-
sage is shown on the multi-information
display, read the message and follow the
instructions.
■When the parking brake is set automati-
cally while the system is holding the
brakes
Perform any of the follo wing operations to
release the parking brake.
●Depress the accelerator pedal. (The
parking brake will not be released auto-
matically if the seat belt is not fastened.)
●Operate the parking brake switch with
the brake pedal depressed.
Make sure that the pa rking brake indicator
light goes off. ( P.185)
■When an inspection at your Lexus
dealer is necessary
When the brake hold standby indicator
(green) does not illuminate even when the
brake hold switch is pressed with the brake
hold system operating conditions met, the
system may be malfun ctioning. Have the
vehicle inspected at your Lexus dealer.
■If “Brake Hold Fault Depress Brake to
Deactivate Visit Your Dealer” or “Brake
Hold Malfunction Visit Your Dealer” is
displayed on the multi-information dis-
play
The system may be ma lfunctioning. Have
the vehicle inspected by your Lexus dealer.
■Warning messages and buzzers
Warning messages and buzzers are used to
indicate a system malfunction or to inform
the driver of the need for caution. If a warn-
ing message is shown on the multi-informa-
tion display, read the message and follow
the instructions.
■If the brake hold operated indicator
flashes
P.419
WARNING
■When the vehicle is on a steep incline
When using the brake hold system on a
steep incline exercise caution. The brake
hold function may not hold the vehicle in
such a situation.
■When stopped on a slippery road
The system cannot stop the vehicle when
the gripping ability of the tires has been
exceeded. Do not use the system when
stopped on a slippery road.
NOTICE
■When parking the vehicle
The brake hold system is not designed
for use when parking the vehicle for a
long period of time. Turning the engine
switch off while the system is holding the
brake may release the brake, which
would cause the vehicle to move. When
operating the engine switch, depress the
brake pedal, shift the shift lever to P and
set the parking brake.
Page 237 of 516
![LEXUS RX350 2020 Owners Manual 2374-5. Using the driving support systems
4
Driving
while driving at below approximately 20
mph [30 km/h], the set speed will be set
to approximately 20 mph [30 km/h].)
■Accelerating after setting LEXUS RX350 2020 Owners Manual 2374-5. Using the driving support systems
4
Driving
while driving at below approximately 20
mph [30 km/h], the set speed will be set
to approximately 20 mph [30 km/h].)
■Accelerating after setting](/manual-img/36/58031/w960_58031-236.png)
2374-5. Using the driving support systems
4
Driving
while driving at below approximately 20
mph [30 km/h], the set speed will be set
to approximately 20 mph [30 km/h].)
■Accelerating after setting the vehicle
speed
The vehicle can accelerate by operating the
accelerator pedal. After accelerating, the
set speed resumes. However, during vehi-
cle-to-vehicle distance control mode, the
vehicle speed may decrease below the set
speed in order to maintain the distance to
the preceding vehicle.
■When the vehicle stops while follow-up
cruising
●Pushing the lever up while the vehicle
ahead stops will resume follow-up cruis-
ing if the vehicle ahead starts off within
approximately 3 seconds after the lever
is pushed up.
●If the vehicle ahead starts off within 3 sec-
onds after your vehicle stops, follow-up
cruising will be resumed.
■Automatic cancelation of vehi-
cle-to-vehicle distance control mode
Vehicle-to-vehicle dist ance control mode is
automatically canceled in the following situ-
ations.
●VSC is activated.
●TRAC is activated for a period of time.
●When the VSC or TRAC system is
turned off.
●The sensor cannot detect correctly
because it is covered in some way.
●Pre-collision braking is activated.
●The parking brake is operated.
●The vehicle is stopped by system control
on a steep incline.
●The following are detected when the
vehicle has been stopped by system con-
trol:
• The driver is not wearing a seat belt.
• The driver’s door is opened.
• The vehicle has been stopped for about 3 minutes.
If vehicle-to-vehicle distance control mode
is automatically canceled for any reasons
other than the above, there may be a mal- function in the system. Contact your Lexus
dealer.
■Automatic cancelation of constant
speed control mode
Constant speed control mode is automati-
cally canceled in the following situations:
●Actual vehicle speed is more than
approximately 10 mph (16 km/h) below
the set vehicle speed.
●Actual vehicle speed falls below approxi-
mately 20 mph (30 km/h).
●VSC is activated.
●TRAC is activated for a period of time.
●When the VSC or TRAC system is
turned off.
●Pre-collision braking is activated.
If constant speed control mode is automati-
cally canceled for any reasons other than
the above, there may be a malfunction in the
system. Contact your Lexus dealer.
■Brake operation
A brake operation sound may be heard and
the brake pedal response may change, but
these are not malfunctions.
■Warning messages and buzzers for
dynamic radar cruise control with
full-speed range
Warning messages and buzzers are used to
indicate a system malfunction or to inform
the driver of the need for caution while driv-
ing. If a warning messa ge is shown on the
multi-information displa y, read the message
and follow the instructions.( P.209,422)
■When the sensor may not be correctly
detecting the vehicle ahead
In the case of the fo llowing and depending
on the conditions, operate the brake pedal
when deceleration of the system is insuffi-
cient or operate the accelerator pedal
when acceleration is required.
As the sensor may not be able to correctly
detect these types of vehicles, the approach
warning ( P.235) may not be activated.
●Vehicles that cut in suddenly
●Vehicles traveling at low speeds
●Vehicles that are not moving in the same
Page 285 of 516

2854-6. Driving tips
4
Driving
Your vehicle is not designed to be
driven off-road. However, in the event
that off-road driving cannot be
avoided, please observe the following
precautions to help avoid the areas
prohibited to vehicles.
Drive your vehicle only in areas
where off-road vehicles are permit-
ted to travel.
Respect private property. Get
owner’s permission before entering
private property.
Do not enter areas that are closed.
Honor gates, barriers and signs that
restrict travel.
Stay on established roads. When
conditions are wet, driving tech-
niques should be changed or travel
delayed to prevent damage to
roads.
■Additional informatio n for off-road driv-
ing
For owners in U.S. mainland, Hawaii and
Puerto Rico:
To obtain additional information pertaining
to driving your vehicle off-road, consult the
following organizations.
●State and Local Parks and Recreation
Departments
●State Motor Vehicle Bureau
●Recreational Vehicle Clubs
●U.S. Forest Service and Bureau of Land
Management
WARNING
●In a rollover crash, an unbelted person
is significantly more likely to die than a
person wearing a seat belt. Therefore,
the driver and all passengers should
always fasten th eir seat belts.
●Avoid sharp turns or abrupt maneu-
vers, if at all possible.
Failure to operate this vehicle correctly
may result in loss of control or vehicle
rollover causing death or serious
injury.
●Loading cargo on the roof luggage
carrier will make the center of the
vehicle gravity higher. Avoid high
speeds, sudden starts, sharp turns,
sudden braking or abrupt maneuvers,
otherwise it may result in loss of con-
trol or vehicle rollover due to failure to
operate this vehicle correctly.
●Always slow down in gusty crosswinds.
Because of its profile and higher cen-
ter of gravity, your vehicle is more sen-
sitive to side winds than an ordinary
passenger car. Slowing down will allow
you to have better control.
●Do not drive horizontally across steep
slopes. Driving straig ht up or straight
down is preferred. Your vehicle (or any
similar off-road vehicle) can tip over
sideways much more easily than for-
ward or backward.
Off-road driving
WARNING
■Off-road driving precautions
Always observe the following precau-
tions to minimize the risk of death, seri-
ous injury or damage to your vehicle:
●Drive carefully when off the road. Do
not take unnecessary risks by driving in
dangerous places.
●Do not grip the steering wheel spokes
when driving off-road. A bad bump
could jerk the wheel and injure your
hands. Keep both hands and especially
your thumbs on the outside of the rim.
●Always check your brakes for effec-
tiveness immediately after driving in
sand, mud, water or snow.
Page 305 of 516

3055-3. Using the air conditioning system and defogger
5
Interior features
Automatic S-FLOW mode
In this mode, when a passenger is
judged to be in a rear seat, S-FLOW
mode will be automatically disabled.
( P.305)
The indicator will illuminate on the air con-
ditioning control screen when S-FLOW
mode is enabled.
To enable/disable S-FLOW mode and
enter manual S-FLOW mode, select the
S-FLOW mode switch.
How the system judges if a passenger is in
the vehicle: P.305
Manual S-FLOW mode
When the S-FLOW mode switch is
selected, S-FLOW mode will be manu-
ally enabled/ disabled.
The indicator will illuminate on the air con-
ditioning control screen when S-FLOW
mode is enabled.
In manual S-FLOW mode, as the system
does not judge if a pa ssenger is in a rear
seat.
To disable S-FLOW mode automatically by
opening and closing a rear door or operat-
ing the rear air conditioning system
(RX350L), change to automatic S-FLOW
mode. ( P.305)
■How the system judges if a passenger is
in the vehicle when in S-FLOW mode
In S-FLOW mode, the system judges if a
passenger is in the vehicle as follows:
●Front passenger seat: A passenger is
judged to be in the front passenger seat
when the system detects an object on the
front passenger seat, fastening of the
front passenger seat belt, changing of the
set temperature for the front passenger
seat or the opening and closing of the
front passenger door. (However, when
only opening and closing of the front pas- senger door is dete
cted, the system will
judge that a passenger is not in the front
passenger seat after the vehicle speed
reaches approximately 12 mph (20
km/h) or more.)
●Rear seats (automatic S-FLOW mode
only): A passenger is judged to be in a
rear seat when the system detects the
opening and closing of a rear door or the
operation of the rear air conditioning sys-
tem (RX350L).
If a passenger is judged to be in the vehicle,
the system will retain the judgement for a
certain amount of time after the engine
switch is turned off.
■Operation of automatic S-FLOW mode
When the system is operating in automatic
S-FLOW mode, if the system detects the
opening and closing of a rear door or the
operation of the rear air conditioning sys-
tem (RX350L), S-FLOW mode will be dis-
abled. To enable S-FLOW mode, select the
S-FLOW mode switch. (I n this case, the sys-
tem will operate in manual S-FLOW mode.)
■Changing from manual S-FLOW mode
to automatic S-FLOW mode
1 Select the S-FLOW mode switch to dis-
able S-FLOW mode.
2 Turn the engine switch off.
3 After 60 minutes have elapsed, change
the engine switch to ON mode.
Vehicles with DUAL-ZONE climate
control
To turn on the “DUAL” mode, perform
any of the following procedures:
Select “DUAL” on the sub function
menu. ( P.300)
Select “DUAL” on the option con-
trol screen.
Adjust the passenger’s side tem-
Adjusting the temperature for
the driver and passenger seats
separately
Page 326 of 516

3265-5. Using the storage features
WARNING
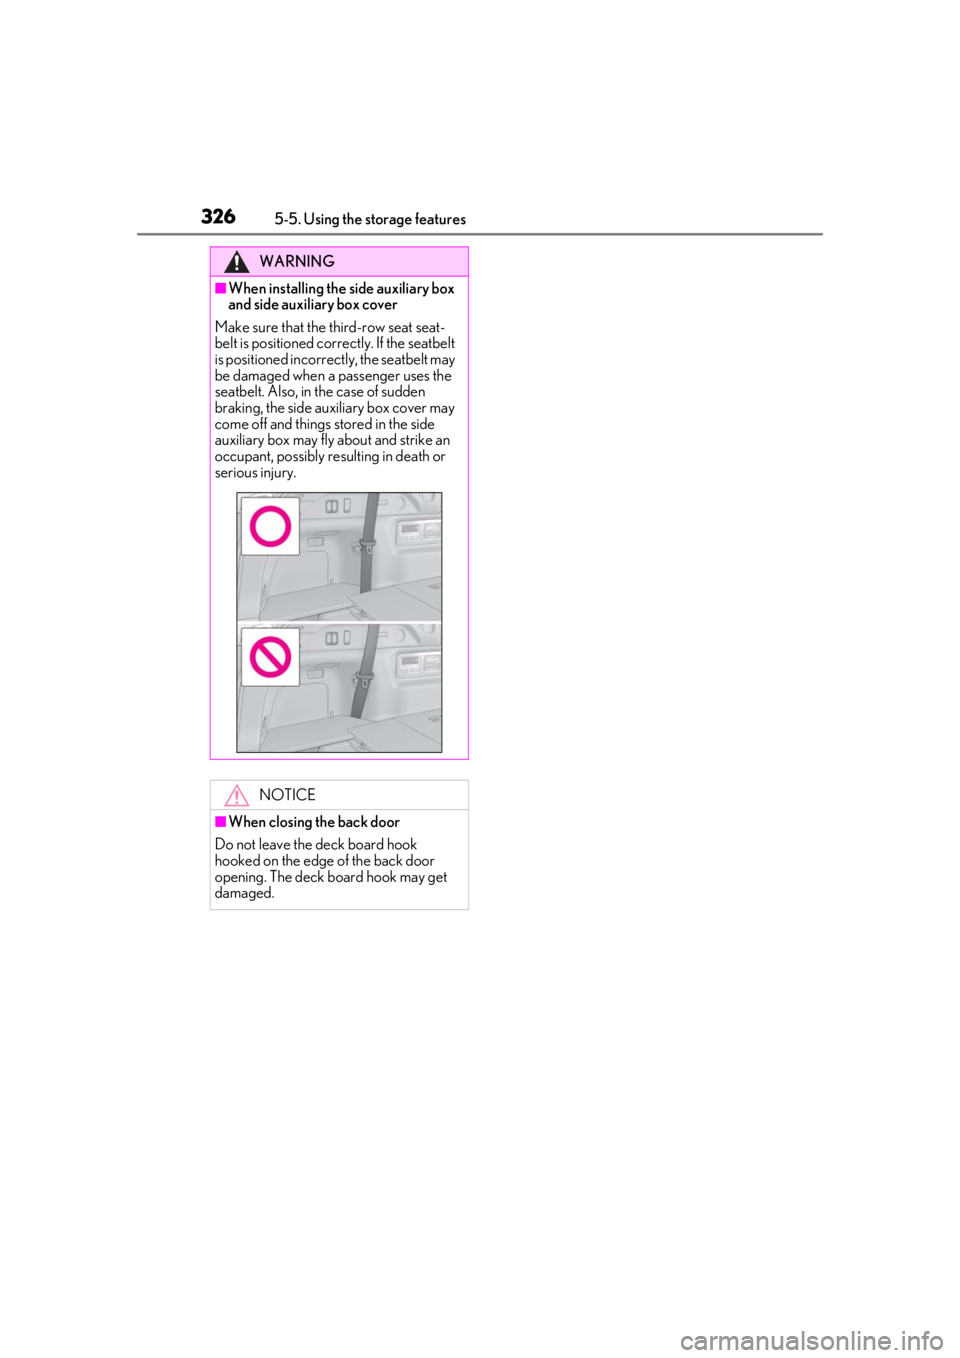
■When installing the side auxiliary box
and side auxiliary box cover
Make sure that the third-row seat seat-
belt is positioned corre ctly. If the seatbelt
is positioned incorrectly, the seatbelt may
be damaged when a passenger uses the
seatbelt. Also, in th e case of sudden
braking, the side auxiliary box cover may
come off and things stored in the side
auxiliary box may fly about and strike an
occupant, possibly resulting in death or
serious injury.
NOTICE
■When closing the back door
Do not leave the deck board hook
hooked on the edge of the back door
opening. The deck board hook may get
damaged.