2020 LEXUS RX350 tire pressure
[x] Cancel search: tire pressurePage 429 of 516

4297-2. Steps to take in an emergency
7
When trouble arises
When replacing tires on a vehicle with
wheel lock nuts, use the following pro-
cedures to remove and install the
wheel lock nuts. The wheel lock key is
stored in the tray inside the luggage
compartment. Always return the wheel
lock key to its original position after
use, so that it does not get lost.
■Removal
For ease of removal, the wheel lock nut
should always be the first one loos-
ened.
1 Place the wheel lock key on top of
the wheel lock nut, turning until the
wheel lock key and wheel lock nut
patterns engage.
2 Place the wheel nut wrench on the
wheel lock key, and while applying
pressure on the wheel lock key,
loosen the wheel lock nut.
■Installation
For ease of installation, the wheel lock nut should always be the last one tight-
ened.
1
By hand, install a wheel lock nut on
each wheel.
2 Place the wheel lock key on top of
the wheel lock nut, turning until the
wheel lock key and wheel lock nut
patterns engage.
3 Place the wheel nut wrench on the
wheel lock key, and while applying
pressure on the wheel lock key,
tighten the wheel lock nut to the
recommended torque.
1 Secure the deck board using the
hook. ( P.324)
2 Disengage the hook and take out
the jack.
RX350: Remove the wheel nut wrench
and then the jack.
RX350L: Remove the jack handle and
then the jack.
WARNING
●Do not raise the vehicle while some-
one is inside.
●When raising the vehicle, do not put an
object on or under the jack.
●Do not raise the vehicle to a height
greater than that required to replace
the tire.
●Use a jack stand if it is necessary to get
under the vehicle.
●When lowering the vehicle, make sure
that there is no-one near the vehicle. If
there are people nearby, warn them
vocally before lowering.
Wheel lock nut (if equipped)
NOTICE
Do not use an impact wrench. Using an
impact wrench may cause permanent
damage to wheel lock nut and wheel lock
key. If in doubt about wheel lock applica-
tion, contact your Lexus dealer.
Taking out the jack
Page 436 of 516

4367-2. Steps to take in an emergency
7Confirm it is not loose after tighten-
ing:
1 Push and pull the tire
2 Try rotating
Visually check to ensure tire is not hung on
surrounding parts.
If looseness or misassembly exists, repeat
steps 2 to 7.
8 Repeat step 7, any time the tire is
lowered or disturbed.
9 Stow the jack and all tools.
■The compact spare tire
●The compact spare tire is identified by the
label “TEMPORARY USE ONLY” on
the tire sidewall. Use the compact spare
tire temporarily, and only in an emer-
gency.
●Make sure to check the tire inflation pres-
sure of the compact spare tire. ( P.457)
■When using the compact spare tire
As the compact spare tire is not equipped
with a tire pressure warning valve and trans-
mitter, low inflation pressure of the spare
tire will not be indicated by the tire pressure
warning system. Also, if you replace the
compact spare tire after the tire pressure
warning light comes on, the light remains
on.
■When the compact spare tire is
equipped
When driving with the compact spare tire
installed, the vehicle he ight will be different
than when driving with standard tires.
■If you have a flat front tire on a road cov-
ered with snow or ice
Install the compact spare tire on one of the
rear wheels of the vehicle. Perform the fol-
lowing steps and fit tire chains to the front
tires:
1 Replace a rear tire with the compact
spare tire.
2 Replace the flat front tire with the tire
removed from the rear of the vehicle.
3 Fit tire chains to the front tires.
WARNING
■When using the compact spare tire
●Remember that the compact spare tire
provided is specific ally designed for
use with your vehicle. Do not use your
compact spare tire on another vehicle.
●Do not use more than one compact
spare tire simultaneously.
●Replace the compact spare tire with a
standard tire as soon as possible.
●Avoid sudden acceleration, abrupt
steering, sudden br aking and shifting
operations that cause sudden engine
braking.
■When the compact spare tire is
attached
The vehicle speed may not be correctly
detected, and the following systems may
not operate correctly:
• ABS & Brake assist
•VSC
•TRAC
• Trailer Sway Control
•EPS
•VDIM (if equipped)
• Adaptive Variable Suspension System (if equipped)
• Dynamic radar cruise control with full-speed range
Page 437 of 516
4377-2. Steps to take in an emergency
7
When trouble arises
WARNING
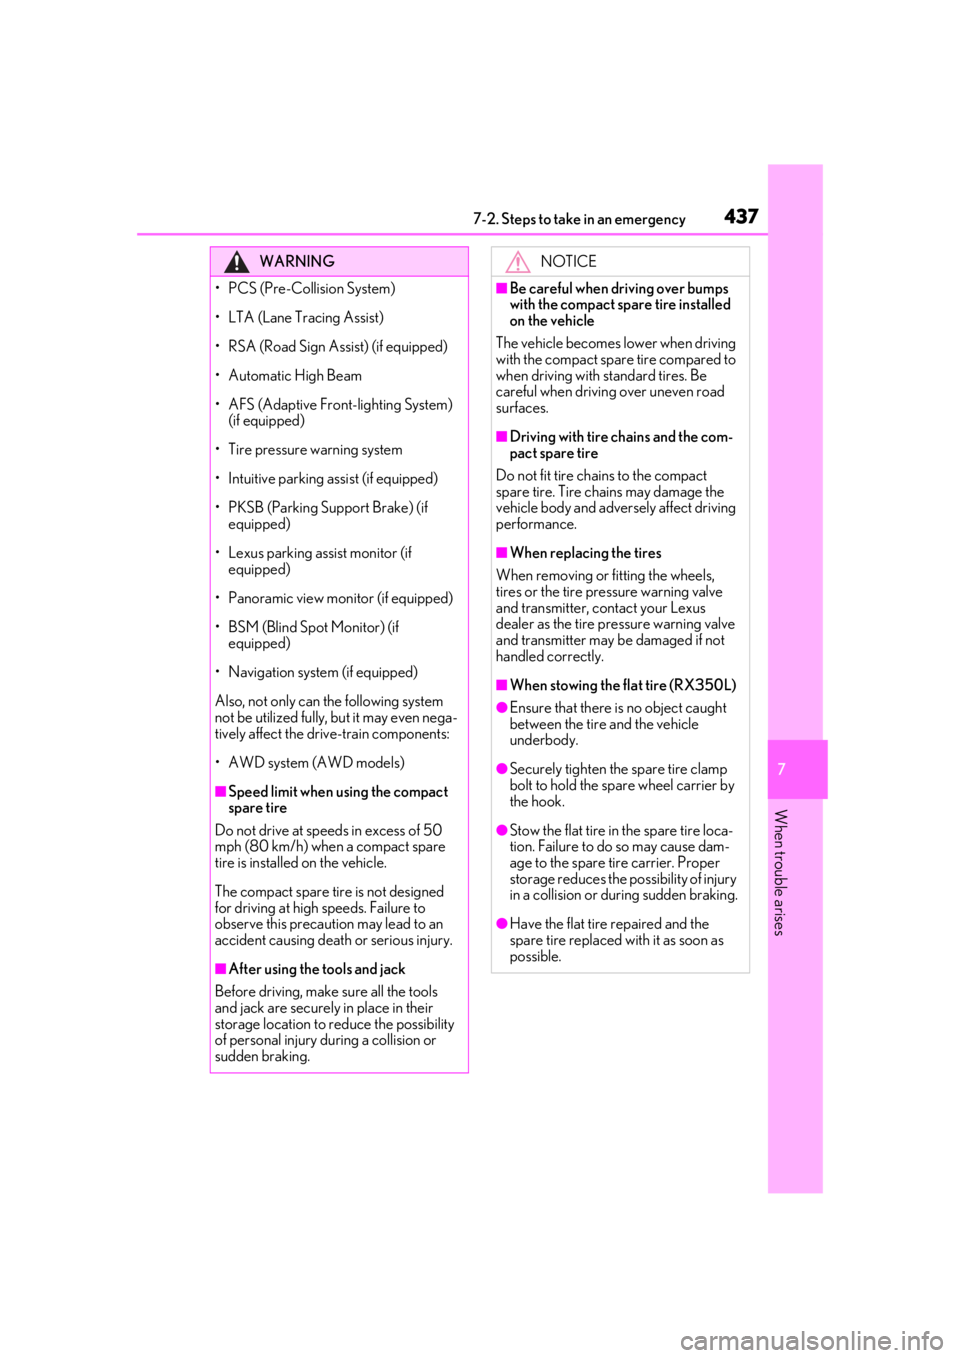
• PCS (Pre-Collision System)
• LTA (Lane Tracing Assist)
• RSA (Road Sign Assist) (if equipped)
•Automatic High Beam
• AFS (Adaptive Front-lighting System) (if equipped)
• Tire pressure warning system
• Intuitive parking assist (if equipped)
• PKSB (Parking Support Brake) (if equipped)
• Lexus parking assist monitor (if equipped)
• Panoramic view monitor (if equipped)
• BSM (Blind Spot Monitor) (if equipped)
• Navigation system (if equipped)
Also, not only can the following system
not be utilized fully, but it may even nega-
tively affect the drive-train components:
• AWD system (AWD models)
■Speed limit when using the compact
spare tire
Do not drive at speeds in excess of 50
mph (80 km/h) when a compact spare
tire is installed on the vehicle.
The compact spare tire is not designed
for driving at high speeds. Failure to
observe this precaution may lead to an
accident causing deat h or serious injury.
■After using the tools and jack
Before driving, make sure all the tools
and jack are securely in place in their
storage location to reduce the possibility
of personal injury during a collision or
sudden braking.
NOTICE
■Be careful when driving over bumps
with the compact spare tire installed
on the vehicle
The vehicle becomes lower when driving
with the compact spar e tire compared to
when driving with standard tires. Be
careful when driving over uneven road
surfaces.
■Driving with tire chains and the com-
pact spare tire
Do not fit tire chains to the compact
spare tire. Tire chains may damage the
vehicle body and adversely affect driving
performance.
■When replacing the tires
When removing or fitting the wheels,
tires or the tire pr essure warning valve
and transmitter, contact your Lexus
dealer as the tire pressure warning valve
and transmitter may be damaged if not
handled correctly.
■When stowing the flat tire (RX350L)
●Ensure that there is no object caught
between the tire and the vehicle
underbody.
●Securely tighten the spare tire clamp
bolt to hold the spare wheel carrier by
the hook.
●Stow the flat tire in the spare tire loca-
tion. Failure to do so may cause dam-
age to the spare tire carrier. Proper
storage reduces the possibility of injury
in a collision or during sudden braking.
●Have the flat tire repaired and the
spare tire replaced with it as soon as
possible.
Page 457 of 516
4578-1. Specifications
8
Vehicle specifications
Your Lexus vehicle is filled with “Toyota Genuine Differential Gear Oil” at the fac-
tory. Use Lexus approved “Toyota Genuine Di fferential Gear Oil” or an equivalent
of matching quality to satisfy the above specification. Please contact your Lexus
dealer for further details.
*: Minimum pedal clearance when depressed with a force of 110 lbf (490 N, 50 kgf) while
the engine is running.
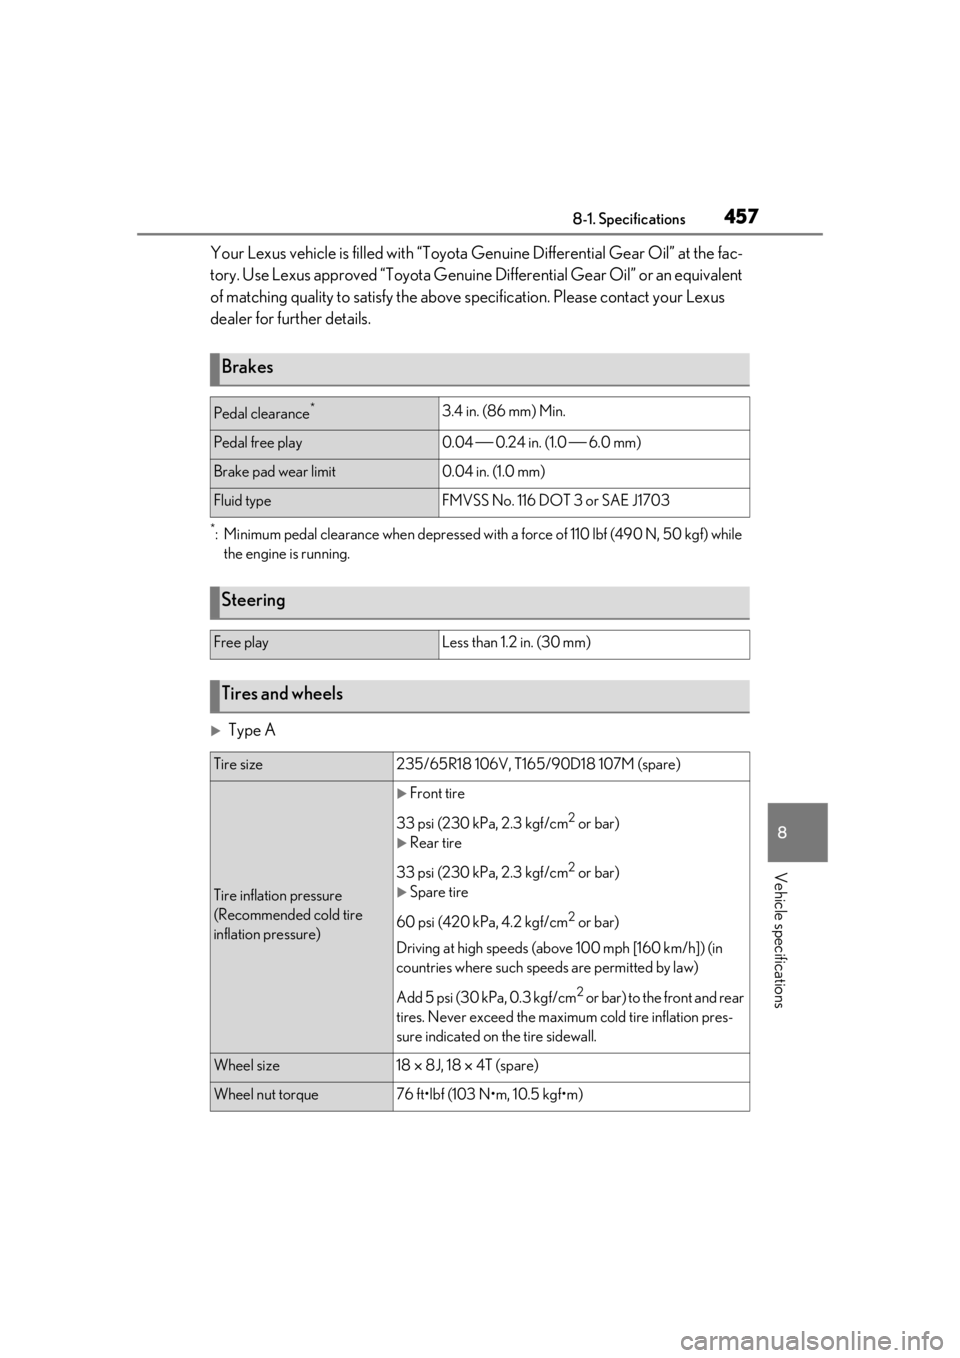
Type A
Brakes
Pedal clearance*3.4 in. (86 mm) Min.
Pedal free play0.04 0.24 in. (1.0 6.0 mm)
Brake pad wear limit0.04 in. (1.0 mm)
Fluid typeFMVSS No. 116 DOT 3 or SAE J1703
Steering
Free playLess than 1.2 in. (30 mm)
Tires and wheels
Tire size235/65R18 106V, T165/90D18 107M (spare)
Tire inflation pressure
(Recommended cold tire
inflation pressure)
Front tire
33 psi (230 kPa, 2.3 kgf/cm
2 or bar)
Rear tire
33 psi (230 kPa, 2.3 kgf/cm
2 or bar)
Spare tire
60 psi (420 kPa, 4.2 kgf/cm
2 or bar)
Driving at high speeds (above 100 mph [160 km/h]) (in
countries where such speeds are permitted by law)
Add 5 psi (30 kPa, 0.3 kgf/cm
2 or bar) to the front and rear
tires. Never exceed the maximum cold tire inflation pres-
sure indicated on the tire sidewall.
Wheel size18 8J, 18 4T (spare)
Wheel nut torque76 ft•lbf (103 N•m, 10.5 kgf•m)
Page 458 of 516
4588-1. Specifications
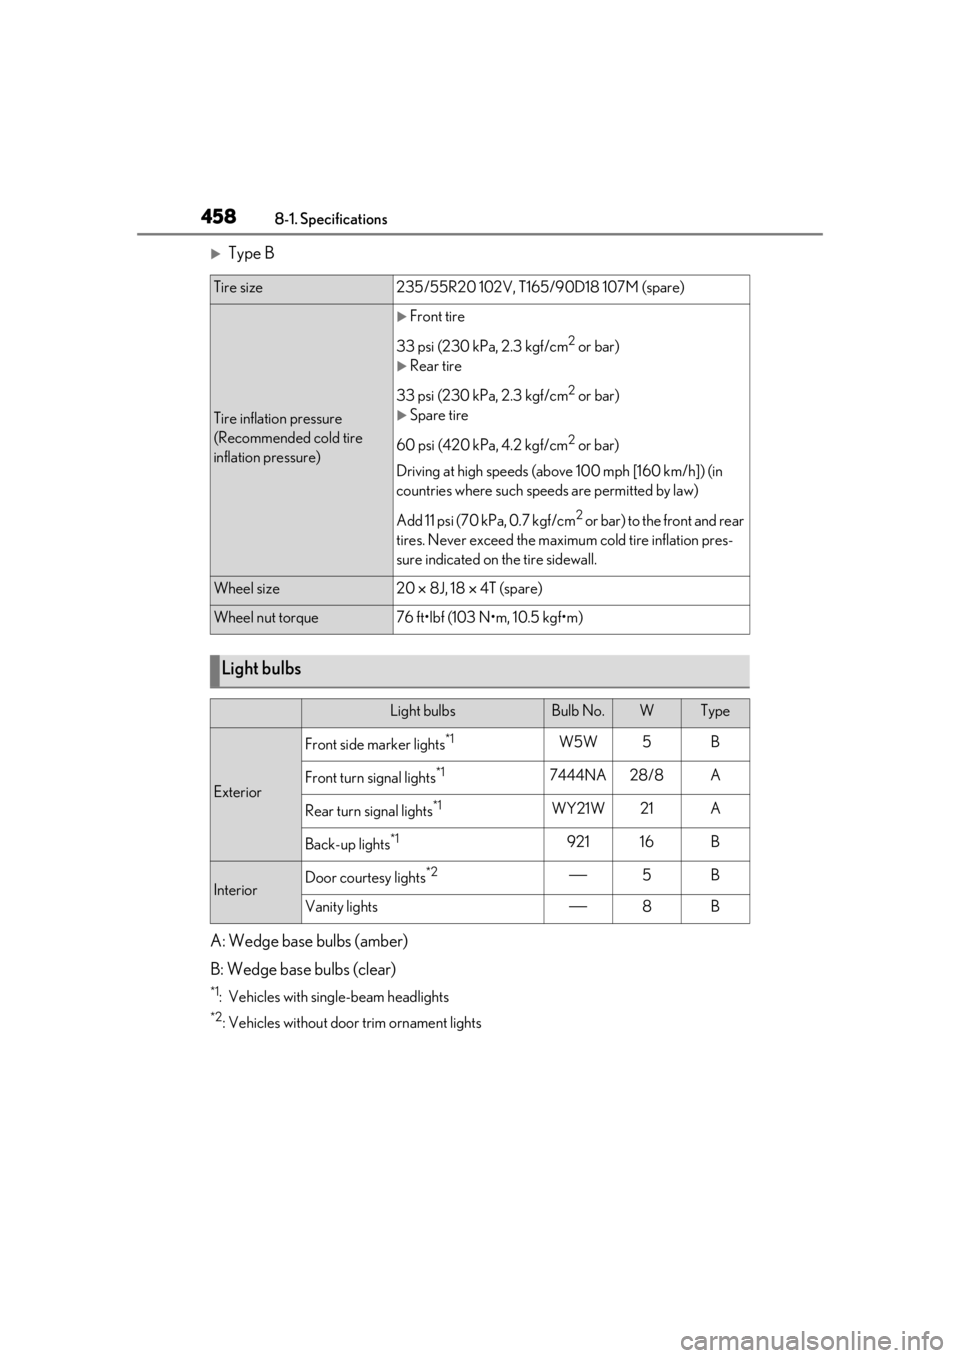
Type B
A: Wedge base bulbs (amber)
B: Wedge base bulbs (clear)
*1: Vehicles with sing le-beam headlights
*2: Vehicles without door trim ornament lights
Tire size235/55R20 102V, T165/90D18 107M (spare)
Tire inflation pressure
(Recommended cold tire
inflation pressure)
Front tire
33 psi (230 kPa, 2.3 kgf/cm
2 or bar)
Rear tire
33 psi (230 kPa, 2.3 kgf/cm
2 or bar)
Spare tire
60 psi (420 kPa, 4.2 kgf/cm
2 or bar)
Driving at high speeds (above 100 mph [160 km/h]) (in
countries where such speeds are permitted by law)
Add 11 psi (70 kPa, 0.7 kgf/cm
2 or bar) to the front and rear
tires. Never exceed the maximum cold tire inflation pres-
sure indicated on the tire sidewall.
Wheel size20 8J, 18 4T (spare)
Wheel nut torque76 ft•lbf (103 N•m, 10.5 kgf•m)
Light bulbs
Light bulbsBulb No.WType
Exterior
Front side marker lights*1W5W5B
Front turn signal lights*17444NA28/8A
Rear turn signal lights*1WY21W21A
Back-up lights*192116B
InteriorDoor courtesy lights*25B
Vanity lights8B
Page 462 of 516
4628-1. Specifications
A radial tire has “RADIAL” on the sidewall. A tire not marked “RADIAL” is a bias-ply tire.
TUBELESS or TUBE TYPE
A tubeless tire does not have a tube and air is directly put into the tire. A tube type tire has a
tube inside the tire and the tube maintains the air pressure.
Load limit at maximum cold tire inflation pressure ( P.372)
Maximum cold tire inflation pressure ( P.457)
This means the pressure to which a tire may be inflated.
Uniform tire quality grading
For details, see “Uniform Tire Quality Grading” that follows.
Summer tires or all season tires ( P.372)
An all season tire has “M+S” on the sidewall. A tire not marked “M+S” is a summer tire.
“TEMPORARY USE ONLY”
A compact spare tire is identified by the phrase “TEMPORARY USE ONLY” molded on its
sidewall. This tire is designed for temporary emergency use only.
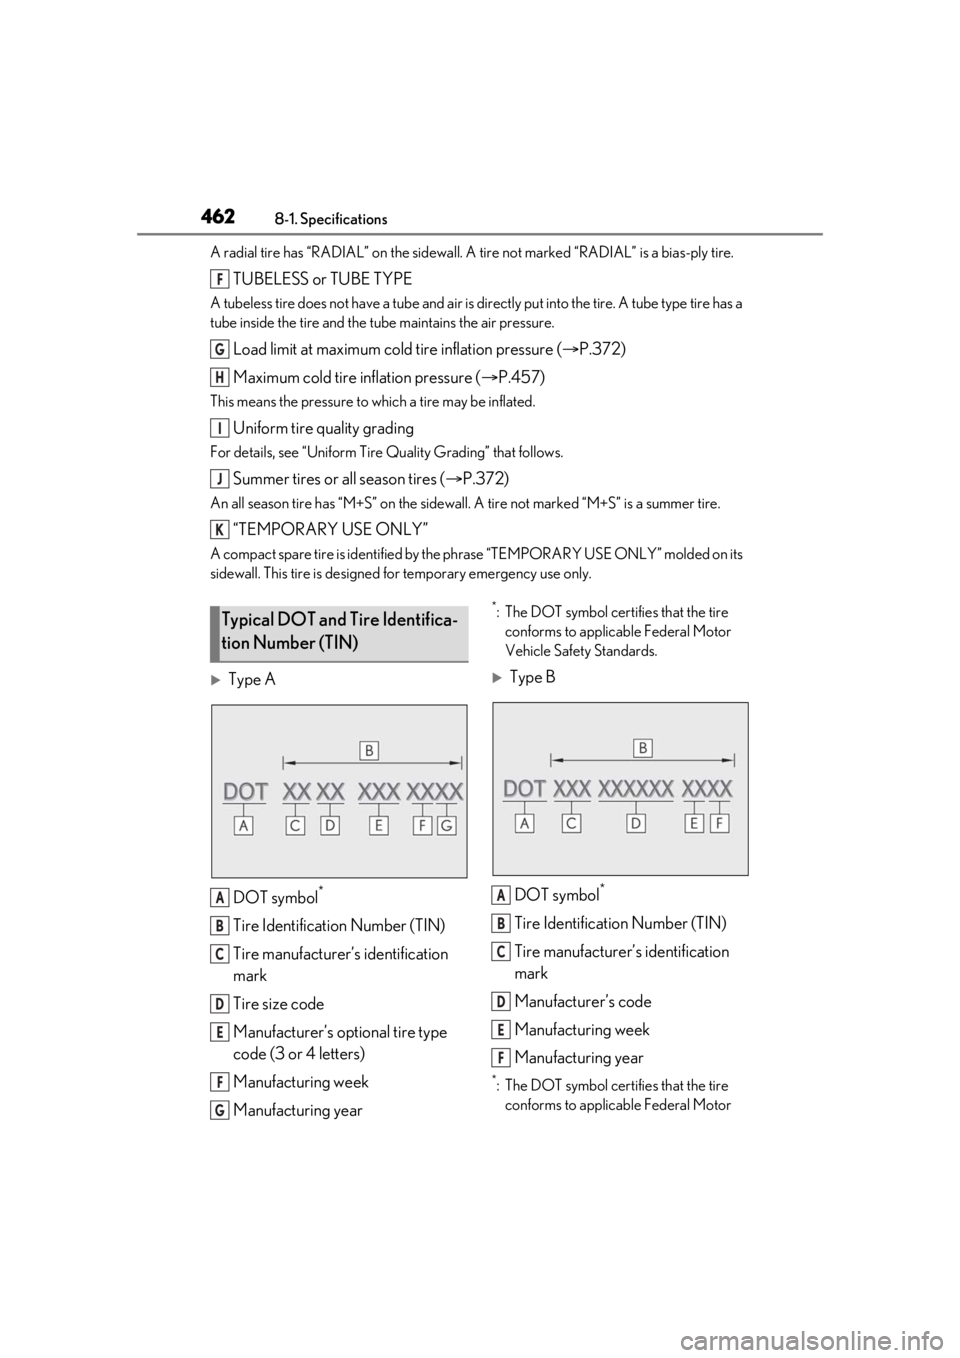
Type A
DOT symbol
*
Tire Identification Number (TIN)
Tire manufacturer’s identification
mark
Tire size code
Manufacturer’s optional tire type
code (3 or 4 letters)
Manufacturing week
Manufacturing year
*: The DOT symbol certifies that the tire conforms to applicable Federal Motor
Vehicle Safety Standards.
Type B
DOT symbol
*
Tire Identification Number (TIN)
Tire manufacturer’s identification
mark
Manufacturer’s code
Manufacturing week
Manufacturing year
*: The DOT symbol certifies that the tire conforms to applicable Federal Motor
F
G
H
I
J
K
Typical DOT and Tire Identifica-
tion Number (TIN)
A
B
C
D
E
F
G
A
B
C
D
E
F
Page 465 of 516

4658-1. Specifications
8
Vehicle specifications
Glossary of tire terminology
Tire related termMeaning
Cold tire inflation pressure
Tire pressure when the vehicle has been parked for
three hours or more, or has not been driven more
than 1 mile or 1.5 km under that condition
Maximum inflation pressureThe maximum cold inflated pressure to which a tire
may be inflated, shown on the sidewall of the tire
Recommended inflation pressureCold tire inflation pressure recommended by a
manufacturer
Accessory weight
The combined weight (in excess of those standard
items which may be replaced) of automatic trans-
mission, power steering, power brakes, power win-
dows, power seats, radio and heater, to the extent
that these items are available as factory-installed
equipment (whether installed or not)
Curb weight
The weight of a motor vehicle with standard equip-
ment, including the maximum capacity of fuel, oil
and coolant, and if so equipped, air conditioning
and additional weight optional engine
Maximum loaded vehicle weight
The sum of:
(a) Curb weight
(b) Accessory weight
(c) Vehicle capacity weight
(d) Production options weight
Normal occupant weight
150 lb. (68 kg) times the number of occupants
specified in the second column of Table 1
* that fol-
lows
Occupant distributionDistribution of occupants in a vehicle as specified in
the third column of Table 1
* below
Production options weight
The combined weight of installed regular produc-
tion options weighing over 5 lb. (2.3 kg) in excess of
the standard items which they replace, not previ-
ously considered in curb weight or accessory
weight, including heavy duty brakes, ride levelers,
roof rack, heavy duty battery, and special trim
Page 467 of 516
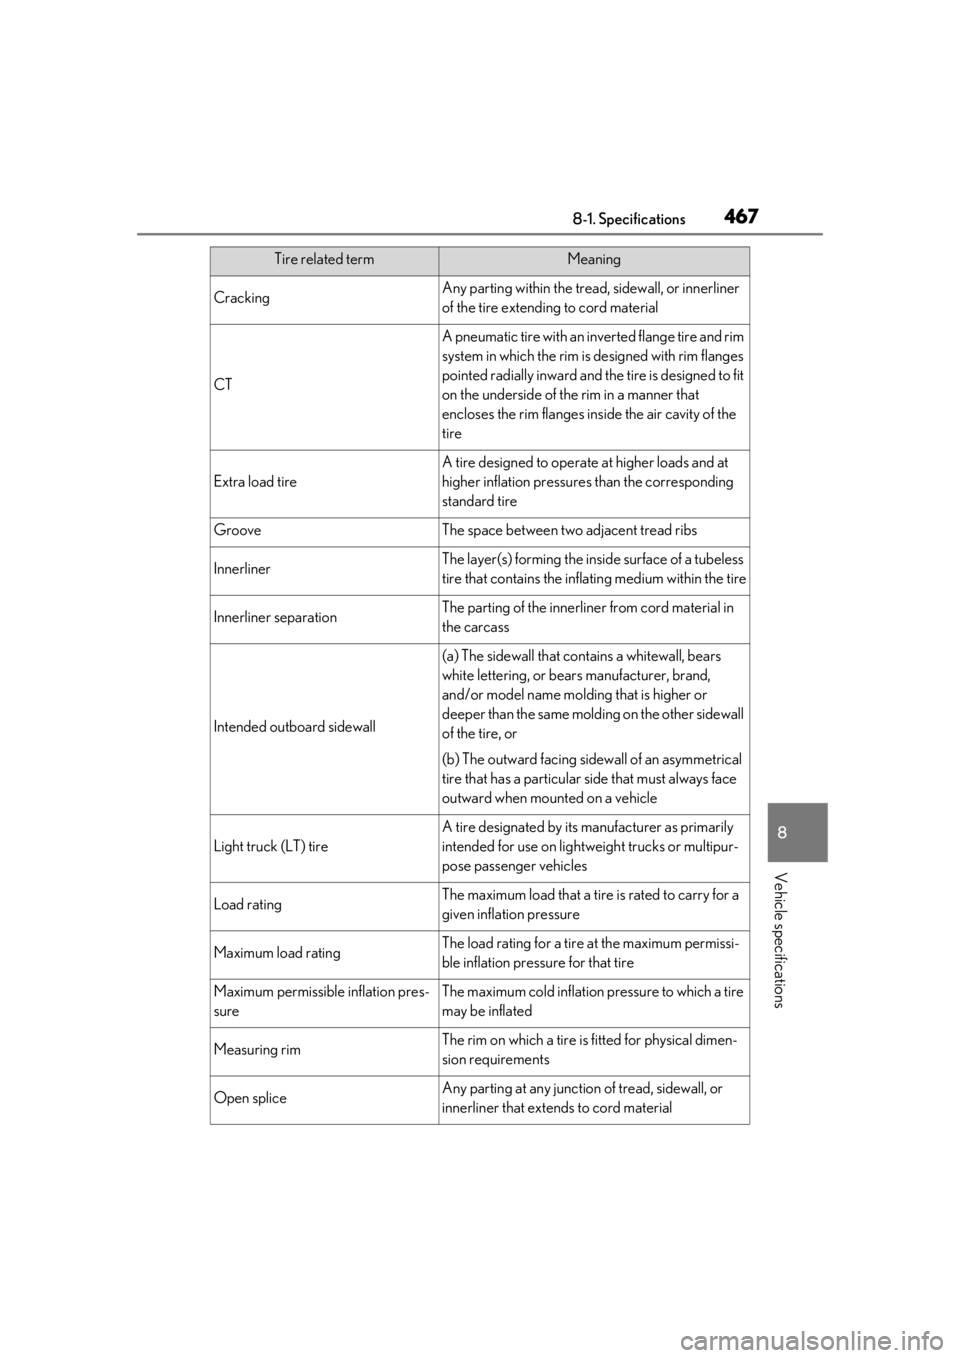
4678-1. Specifications
8
Vehicle specifications
CrackingAny parting within the tread, sidewall, or innerliner
of the tire extending to cord material
CT
A pneumatic tire with an inverted flange tire and rim
system in which the rim is designed with rim flanges
pointed radially inward and the tire is designed to fit
on the underside of the rim in a manner that
encloses the rim flanges inside the air cavity of the
tire
Extra load tire
A tire designed to operate at higher loads and at
higher inflation pressures than the corresponding
standard tire
GrooveThe space between two adjacent tread ribs
InnerlinerThe layer(s) forming the in side surface of a tubeless
tire that contains the inflating medium within the tire
Innerliner separationThe parting of the innerliner from cord material in
the carcass
Intended outboard sidewall
(a) The sidewall that contains a whitewall, bears
white lettering, or bear s manufacturer, brand,
and/or model name molding that is higher or
deeper than the same molding on the other sidewall
of the tire, or
(b) The outward facing sidewall of an asymmetrical
tire that has a particular side that must always face
outward when mounted on a vehicle
Light truck (LT) tire
A tire designated by its manufacturer as primarily
intended for use on lightwe ight trucks or multipur-
pose passenger vehicles
Load ratingThe maximum load that a tire is rated to carry for a
given inflation pressure
Maximum load ratingThe load rating for a tire at the maximum permissi-
ble inflation pressure for that tire
Maximum permissible inflation pres-
sureThe maximum cold inflation pressure to which a tire
may be inflated
Measuring rimThe rim on which a tire is fitted for physical dimen-
sion requirements
Open spliceAny parting at any junction of tread, sidewall, or
innerliner that extends to cord material
Tire related termMeaning