Page 345 of 516

3455-6. Using the other interior features
5
Interior features
Press the appropriate HomeLink®
button. The HomeLink
® indicator light
should turn on.
The status of the opening and closing
of a garage door is shown by the indi-
cators.
Opening
Closing
This function is only available if the garage
door opener motor used is a compatible
device. (To check device compatibility,
refer to www.homelink.com.)
The indicators can operate within
approximately 820 ft. (250 m) of the
garage door. However, if there are
obstructions between the garage door
and the vehicle, such as houses and
trees, feedback signals from the
garage door may not be received. To recall the previous door operation
status, press and release either Home-
Link
® buttons and or
and simultaneously. The
last recorded status will be displayed
for 3 seconds.
Press and hold the 2 outside buttons
for 10 seconds until the HomeLink
®
indicator light changes from continu-
ously lit (orange) to rapidly flashing
(green).
If you sell your vehicle, be sure to erase the
programs stored in the HomeLink
® mem-
ory.
Operating HomeLink®
ColorStatus
Orange (flashing)Currently open- ing/closing
GreenOpening/closing has completed
Red (flashing)Feedback signals
cannot be received
A
B
Erasing the entire HomeLink®
memory (all three codes)
Page 394 of 516
3946-3. Do-it-yourself maintenance
Check the wattage of the light bulb to
be replaced. (P.458)
P.111
■Front
Front side marker light (vehicles
with single-beam headlights)
Front turn signal light (vehicles with
single-beam headlights)
Light bulbs
You may replace the following bulbs
by yourself. The difficulty level of
replacement varies depending on
the bulb. If necessary bulb replace-
ment seems difficult to perform,
contact your Lexus dealer.
For more information about replac-
ing other light bulbs, contact your
Lexus dealer.
Preparing for light bulb replace-
ment
Canceling the power back door
system
Bulb locations
A
B
Page 395 of 516

3956-3. Do-it-yourself maintenance
6
Maintenance and care
■RearBack-up light (bulb type)
Rear turn signal light (bulb type)
■Replacing the following bulbs
If any of the lights listed below has
burnt out, have it replaced by your
Lexus dealer.
Headlight
Parking lights and daytime running
lights
Front turn signal lights (vehicles
without single-beam headlights)
Front side marker lights (vehicles
without single-beam headlights)
Front fog lights (if equipped)
Cornering lights (if equipped)
Side turn signal lights
Stop/tail lights
Back-up lights (LED type)
Rear turn signal light (LED type)
Rear side marker lights
High mounted stoplight
License plate lights
Outer foot lights
■LED Lights
The lights other than the front turn signal
lights (vehicles with single-beam head-
lights), front side marker lights (vehicles
with single-beam headlig hts), rear turn sig-
nal lights (bulb type) and back-up lights
(bulb type) each consist of a number of
LEDs. If any of the LEDs burn out, take your
vehicle to your Lexus dealer to have the
light replaced.
■Condensation build-up on the inside of
the lens
Temporary condensation build-up on the
inside of the headlight lens does not indi-
cate a malfunction. Contact your Lexus
dealer for more information in the following
situations:
●Large drops of water have built up on the
inside of the lens.
●Water has built up inside the headlight.
■When replacing light bulbs
P.392
■Front side marker lights (vehicles
with single-beam headlights)
1 To ensure enough space to per-
form work, turn the steering wheel
to rotate the front wheel away from
the bulb to be replaced.
Remove the 3 fender liner clips.
Turn the steering wheel to the left when
replacing the right side light bulb, and turn
the steering wheel to the right when
replacing the left side light bulb.
When removing a fender liner clip, use a
A
B
Replacing light bulbs
Page 397 of 516
3976-3. Do-it-yourself maintenance
6
Maintenance and care
6Reinstall the fender liner and install
the 3 fender liner clips.
■Front turn signal lights (vehicles
with single-bea m headlights)
1 Removing the engine compartment
cover. 1
Push the center of the clip.
2 Remove the clip.
2 For the right side only: Remove the
bolt, and move the washer fluid
inlet.
3 Turn the bulb base counterclock-
wise and remove it.
Page 399 of 516
3996-3. Do-it-yourself maintenance
6
Maintenance and care
7Install the engine compartment
cover.
1 Push up center portion
2 Insert
3 Press
■Rear turn signal lights (bulb type)
1 Open the back door and apply pro-
tective tape to the vehicle body
around the taillight.
Use masking tape, etc. Do not use duct
tape, as it may leave residue or damage the
paint when removed.
2Using a flathead screwdriver,
remove the cover.
To prevent scratching the vehicle, wrap the
tip of the flathead scre wdriver with a cloth,
etc.
3 Remove the 2 screws.
4 Remove the taillight unit.
1 Attach 2 long pieces of masking
Page 400 of 516
4006-3. Do-it-yourself maintenance
tape to the taillight unit and fold the
excess in half.
2 Hold the folded portion and pull it
toward the rear of the vehicle to
remove the light unit.
5 Turn the bulb base counterclock-
wise and remove it.
6 Remove the light bulb.
7 Install a new light bulb and then
install the bulb base to the light unit
by inserting it and turning it clock-
wise.
After installing the bulb base, wiggle it
lightly to make sure it is securely installed
and turn on the rear turn signal lights to
visually check that ther e is no light leaking from between the bulb
base and light unit.
8Install the light unit.
Align the tabs and push the light unit-
toward the front of the vehicle to install it.
9Install the 2 screws.
Page 404 of 516

4047-1. Essential information
7-1.Essential information
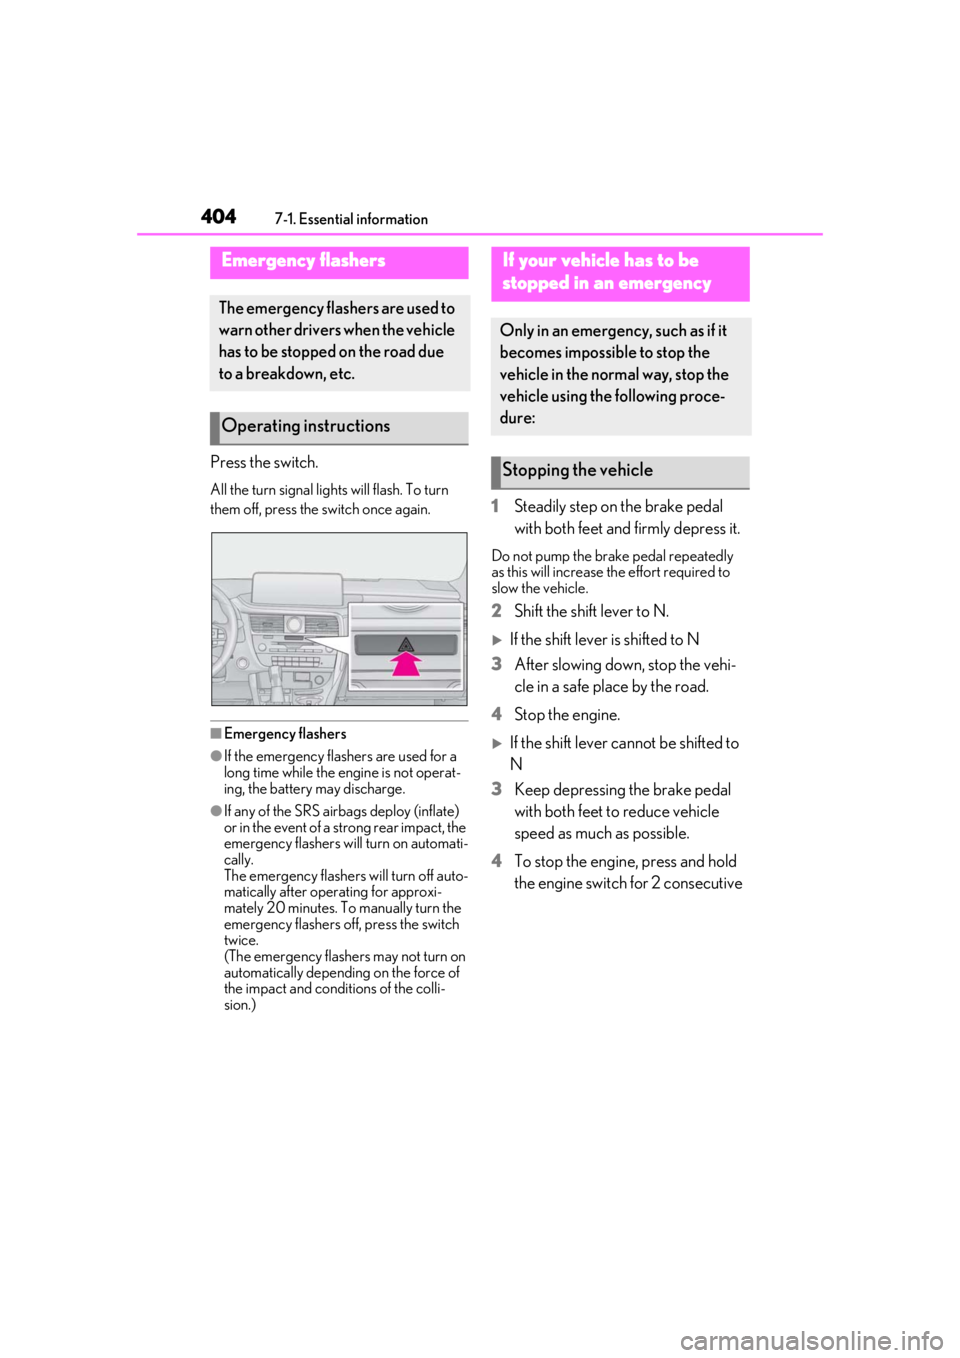
Press the switch.
All the turn signal lights will flash. To turn
them off, press the switch once again.
■Emergency flashers
●If the emergency flashers are used for a
long time while the engine is not operat-
ing, the battery may discharge.
●If any of the SRS airbags deploy (inflate)
or in the event of a strong rear impact, the
emergency flashers will turn on automati-
cally.
The emergency flashers will turn off auto-
matically after operating for approxi-
mately 20 minutes. To manually turn the
emergency flashers off, press the switch
twice.
(The emergency flashers may not turn on
automatically depending on the force of
the impact and conditions of the colli-
sion.)
1 Steadily step on the brake pedal
with both feet and firmly depress it.
Do not pump the brake pedal repeatedly
as this will increase the effort required to
slow the vehicle.
2Shift the shift lever to N.
If the shift lever is shifted to N
3 After slowing down, stop the vehi-
cle in a safe place by the road.
4 Stop the engine.
If the shift lever cannot be shifted to
N
3 Keep depressing the brake pedal
with both feet to reduce vehicle
speed as much as possible.
4 To stop the engine, press and hold
the engine switch for 2 consecutive
Emergency flashers
The emergency flashers are used to
warn other drivers when the vehicle
has to be stopped on the road due
to a breakdown, etc.
Operating instructions
If your vehicle has to be
stopped in an emergency
Only in an emergency, such as if it
becomes impossible to stop the
vehicle in the normal way, stop the
vehicle using the following proce-
dure:
Stopping the vehicle
Page 458 of 516

4588-1. Specifications
Type B
A: Wedge base bulbs (amber)
B: Wedge base bulbs (clear)
*1: Vehicles with sing le-beam headlights
*2: Vehicles without door trim ornament lights
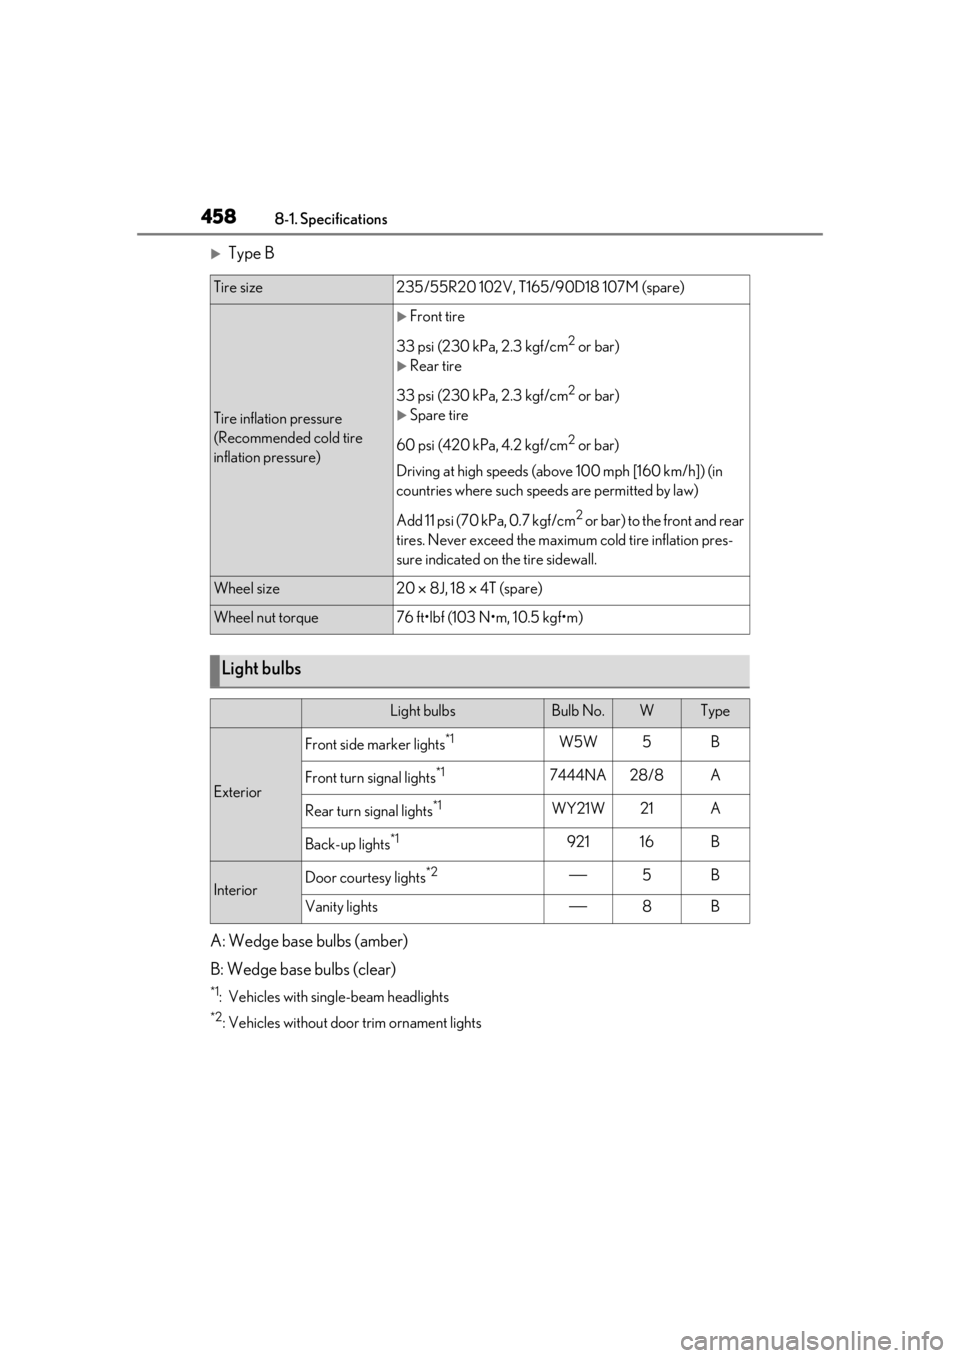
Tire size235/55R20 102V, T165/90D18 107M (spare)
Tire inflation pressure
(Recommended cold tire
inflation pressure)
Front tire
33 psi (230 kPa, 2.3 kgf/cm
2 or bar)
Rear tire
33 psi (230 kPa, 2.3 kgf/cm
2 or bar)
Spare tire
60 psi (420 kPa, 4.2 kgf/cm
2 or bar)
Driving at high speeds (above 100 mph [160 km/h]) (in
countries where such speeds are permitted by law)
Add 11 psi (70 kPa, 0.7 kgf/cm
2 or bar) to the front and rear
tires. Never exceed the maximum cold tire inflation pres-
sure indicated on the tire sidewall.
Wheel size20 8J, 18 4T (spare)
Wheel nut torque76 ft•lbf (103 N•m, 10.5 kgf•m)
Light bulbs
Light bulbsBulb No.WType
Exterior
Front side marker lights*1W5W5B
Front turn signal lights*17444NA28/8A
Rear turn signal lights*1WY21W21A
Back-up lights*192116B
InteriorDoor courtesy lights*25B
Vanity lights8B