2020 LEXUS RX350 brake
[x] Cancel search: brakePage 433 of 516

4337-2. Steps to take in an emergency
7
When trouble arises
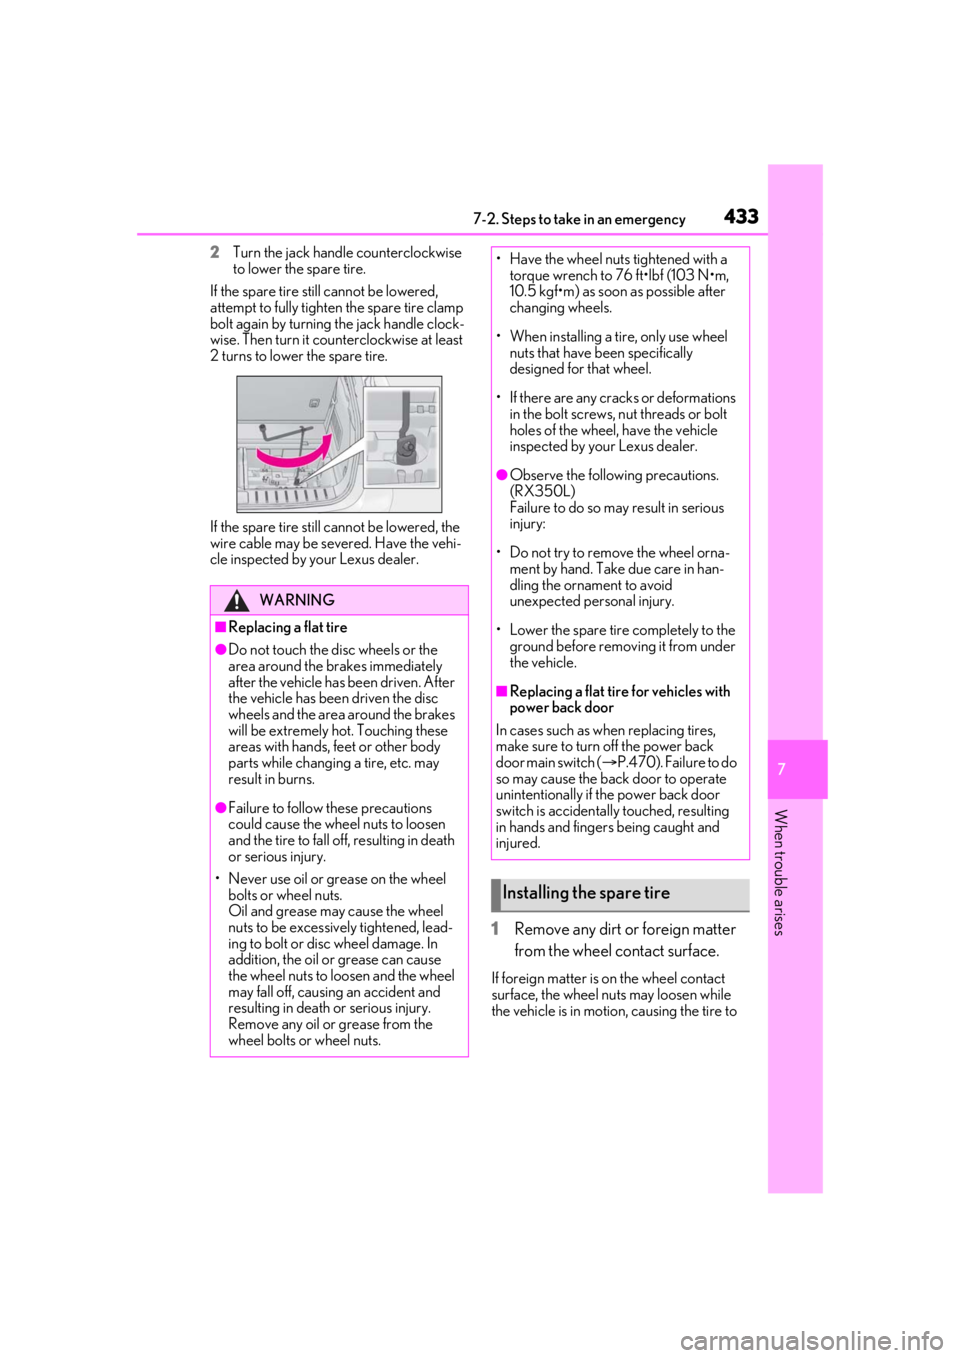
2Turn the jack handle counterclockwise
to lower the spare tire.
If the spare tire still cannot be lowered,
attempt to fully tighten the spare tire clamp
bolt again by turning the jack handle clock-
wise. Then turn it coun terclockwise at least
2 turns to lower the spare tire.
If the spare tire still ca nnot be lowered, the
wire cable may be seve red. Have the vehi-
cle inspected by your Lexus dealer.
1 Remove any dirt or foreign matter
from the wheel contact surface.
If foreign matter is on the wheel contact
surface, the wheel nuts may loosen while
the vehicle is in motion, causing the tire to
WARNING
■Replacing a flat tire
●Do not touch the disc wheels or the
area around the brakes immediately
after the vehicle has been driven. After
the vehicle has been driven the disc
wheels and the area around the brakes
will be extremely hot. Touching these
areas with hands, feet or other body
parts while changing a tire, etc. may
result in burns.
●Failure to follow these precautions
could cause the wheel nuts to loosen
and the tire to fall of f, resulting in death
or serious injury.
• Never use oil or grease on the wheel bolts or wheel nuts.
Oil and grease may cause the wheel
nuts to be excessively tightened, lead-
ing to bolt or disc wheel damage. In
addition, the oil or grease can cause
the wheel nuts to loosen and the wheel
may fall off, causing an accident and
resulting in death or serious injury.
Remove any oil or grease from the
wheel bolts or wheel nuts.
• Have the wheel nuts tightened with a torque wrench to 76 ft•lbf (103 N•m,
10.5 kgf•m) as soon as possible after
changing wheels.
• When installing a tire, only use wheel nuts that have been specifically
designed for that wheel.
• If there are any cracks or deformations in the bolt screws, nut threads or bolt
holes of the wheel, have the vehicle
inspected by your Lexus dealer.
●Observe the following precautions.
(RX350L)
Failure to do so may result in serious
injury:
• Do not try to remove the wheel orna- ment by hand. Take due care in han-
dling the ornament to avoid
unexpected personal injury.
• Lower the spare tire completely to the ground before removing it from under
the vehicle.
■Replacing a flat tire for vehicles with
power back door
In cases such as when replacing tires,
make sure to turn off the power back
door main switch ( P.470). Failure to do
so may cause the back door to operate
unintentionally if th e power back door
switch is accidentally touched, resulting
in hands and fingers being caught and
injured.
Installing the spare tire
Page 436 of 516

4367-2. Steps to take in an emergency
7Confirm it is not loose after tighten-
ing:
1 Push and pull the tire
2 Try rotating
Visually check to ensure tire is not hung on
surrounding parts.
If looseness or misassembly exists, repeat
steps 2 to 7.
8 Repeat step 7, any time the tire is
lowered or disturbed.
9 Stow the jack and all tools.
■The compact spare tire
●The compact spare tire is identified by the
label “TEMPORARY USE ONLY” on
the tire sidewall. Use the compact spare
tire temporarily, and only in an emer-
gency.
●Make sure to check the tire inflation pres-
sure of the compact spare tire. ( P.457)
■When using the compact spare tire
As the compact spare tire is not equipped
with a tire pressure warning valve and trans-
mitter, low inflation pressure of the spare
tire will not be indicated by the tire pressure
warning system. Also, if you replace the
compact spare tire after the tire pressure
warning light comes on, the light remains
on.
■When the compact spare tire is
equipped
When driving with the compact spare tire
installed, the vehicle he ight will be different
than when driving with standard tires.
■If you have a flat front tire on a road cov-
ered with snow or ice
Install the compact spare tire on one of the
rear wheels of the vehicle. Perform the fol-
lowing steps and fit tire chains to the front
tires:
1 Replace a rear tire with the compact
spare tire.
2 Replace the flat front tire with the tire
removed from the rear of the vehicle.
3 Fit tire chains to the front tires.
WARNING
■When using the compact spare tire
●Remember that the compact spare tire
provided is specific ally designed for
use with your vehicle. Do not use your
compact spare tire on another vehicle.
●Do not use more than one compact
spare tire simultaneously.
●Replace the compact spare tire with a
standard tire as soon as possible.
●Avoid sudden acceleration, abrupt
steering, sudden br aking and shifting
operations that cause sudden engine
braking.
■When the compact spare tire is
attached
The vehicle speed may not be correctly
detected, and the following systems may
not operate correctly:
• ABS & Brake assist
•VSC
•TRAC
• Trailer Sway Control
•EPS
•VDIM (if equipped)
• Adaptive Variable Suspension System (if equipped)
• Dynamic radar cruise control with full-speed range
Page 437 of 516

4377-2. Steps to take in an emergency
7
When trouble arises
WARNING
• PCS (Pre-Collision System)
• LTA (Lane Tracing Assist)
• RSA (Road Sign Assist) (if equipped)
•Automatic High Beam
• AFS (Adaptive Front-lighting System) (if equipped)
• Tire pressure warning system
• Intuitive parking assist (if equipped)
• PKSB (Parking Support Brake) (if equipped)
• Lexus parking assist monitor (if equipped)
• Panoramic view monitor (if equipped)
• BSM (Blind Spot Monitor) (if equipped)
• Navigation system (if equipped)
Also, not only can the following system
not be utilized fully, but it may even nega-
tively affect the drive-train components:
• AWD system (AWD models)
■Speed limit when using the compact
spare tire
Do not drive at speeds in excess of 50
mph (80 km/h) when a compact spare
tire is installed on the vehicle.
The compact spare tire is not designed
for driving at high speeds. Failure to
observe this precaution may lead to an
accident causing deat h or serious injury.
■After using the tools and jack
Before driving, make sure all the tools
and jack are securely in place in their
storage location to reduce the possibility
of personal injury during a collision or
sudden braking.
NOTICE
■Be careful when driving over bumps
with the compact spare tire installed
on the vehicle
The vehicle becomes lower when driving
with the compact spar e tire compared to
when driving with standard tires. Be
careful when driving over uneven road
surfaces.
■Driving with tire chains and the com-
pact spare tire
Do not fit tire chains to the compact
spare tire. Tire chains may damage the
vehicle body and adversely affect driving
performance.
■When replacing the tires
When removing or fitting the wheels,
tires or the tire pr essure warning valve
and transmitter, contact your Lexus
dealer as the tire pressure warning valve
and transmitter may be damaged if not
handled correctly.
■When stowing the flat tire (RX350L)
●Ensure that there is no object caught
between the tire and the vehicle
underbody.
●Securely tighten the spare tire clamp
bolt to hold the spare wheel carrier by
the hook.
●Stow the flat tire in the spare tire loca-
tion. Failure to do so may cause dam-
age to the spare tire carrier. Proper
storage reduces the possibility of injury
in a collision or during sudden braking.
●Have the flat tire repaired and the
spare tire replaced with it as soon as
possible.
Page 439 of 516

4397-2. Steps to take in an emergency
7
When trouble arises
The engine starting system may be
malfunctioning due to an electrical
problem such as electronic key battery
depletion or a blown fuse. However, an
interim measure is available to start the
engine. (P.439)
One of the following may be the cause
of the problem:
One or both of the battery terminals
may be disconnected. ( P.369)
The battery may be discharged.
( P.443)
There may be a malfunction in the
steering lock system.
Contact your Lexus dealer if the problem
cannot be repaired, or if repair procedures
are unknown.
When the engine does not start, the
following steps can be used as an
interim measure to start the engine if
the engine switch is functioning nor-
mally.
Do not use this starting procedure
except in cases of emergency.
1 Turn the engine switch to IGNI-
TION ON mode and check that the parking brake is set. (
P.179,
185)
2 Shift the shift lever to P.
3 Turn the engine switch to ACCES-
SORY mode.
4 Press and hold the engine switch
for about 15 seconds while
depressing the brake pedal firmly.
Even if the engine can be started using
the above steps, the system may be
malfunctioning. Have the vehicle
inspected by your Lexus dealer.
The starter motor does not turn
over
The starter motor does not turn
over, the interior lights and head-
lights do not turn on, or the horn
does not sound.
Starting the engine in an emer-
gency
Page 442 of 516

4427-2. Steps to take in an emergency
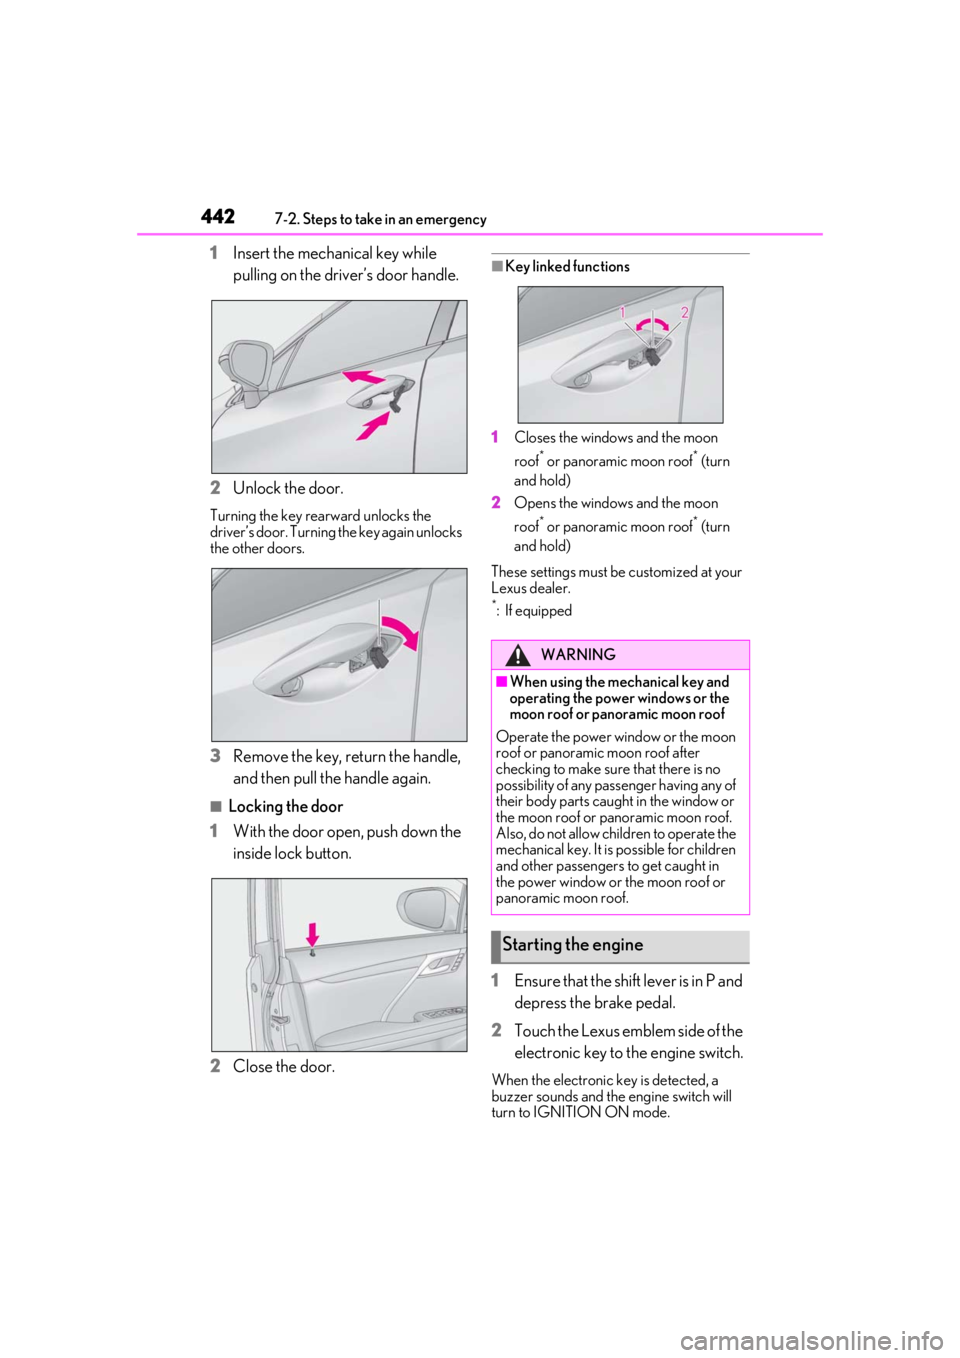
1Insert the mechanical key while
pulling on the driver’s door handle.
2 Unlock the door.
Turning the key rearward unlocks the
driver’s door. Turning the key again unlocks
the other doors.
3Remove the key, return the handle,
and then pull the handle again.
■Locking the door
1 With the door open, push down the
inside lock button.
2 Close the door.
■Key linked functions
1 Closes the windows and the moon
roof
* or panoramic moon roof* (turn
and hold)
2 Opens the windows and the moon
roof
* or panoramic moon roof* (turn
and hold)
These settings must be customized at your
Lexus dealer.
*: If equipped
1 Ensure that the shift lever is in P and
depress the brake pedal.
2 Touch the Lexus emblem side of the
electronic key to the engine switch.
When the electronic key is detected, a
buzzer sounds and the engine switch will
turn to IGNITION ON mode.
WARNING
■When using the mechanical key and
operating the power windows or the
moon roof or panoramic moon roof
Operate the power window or the moon
roof or panoramic moon roof after
checking to make sure that there is no
possibility of any passe nger having any of
their body parts caught in the window or
the moon roof or panoramic moon roof.
Also, do not allow children to operate the
mechanical key. It is possible for children
and other passengers to get caught in
the power window or the moon roof or
panoramic moon roof.
Starting the engine
Page 443 of 516

4437-2. Steps to take in an emergency
7
When trouble arises
When the smart access system with
push-button start is deactivated in custom-
ization setting, the engine switch will turn
to ACCESSORY mode.
3 Firmly depress the brake pedal and
check that is shown on the
multi-information display.
4 Press the engine switch shortly and
firmly.
In the event that the engine still cannot
be started, contact your Lexus dealer.
■Stopping the engine
Shift the shift lever to P, set the parking
brake, and press the engine switch as you
normally do when stopping the engine.
■Replacing the key battery
As the above procedure is a temporary
measure, it is recomme nded that the elec-
tronic key battery be replaced immediately
when the battery is depleted. ( P.389)
■Changing engine switch modes
Release the brake pedal and press the
engine switch in step 3 above. The engine
does not start and modes will be changed
each time the switch is pressed. ( P.179)
If the vehicle battery is dis-
charged
The following procedures may be
used to start the engine if the vehi-
cle’s battery is discharged.
You can also call your Lexus dealer
or a qualified repair shop.
Page 449 of 516

4497-2. Steps to take in an emergency
7
When trouble arises
1Stop the engine. Shift the shift lever
to P and set the parking brake.
2 Remove the mud, snow or sand
from around the front wheels.
3 Place wood, stones or some other
material under the front wheels to
help provide traction.
4 Restart the engine.
5 AWD models: Activate all-wheel
drive lock mode. ( P.276)
6 Shift the shift lever to D or R and
release the parking brake. Then,
while exercising caution, depress
the accelerator pedal.
■When it is difficult to free the vehicle
Press to turn off TRAC.
If the vehicle becomes stuck
Carry out the following proce-
dures if the tires spin or the vehicle
becomes stuck in mud, dirt or snow:
Recovering procedure
WARNING
■When attempting to free a stuck vehi-
cle
If you choose to push the vehicle back
and forth to free it, make sure the sur-
rounding area is clear to avoid striking
other vehicles, obje cts or people. The
vehicle may also lunge forward or lunge
back suddenly as it becomes free. Use
extreme caution.
■When shifting the shift lever
Be careful not to shif t the shift lever with
the accelerator pedal depressed.
This may lead to un expected rapid accel-
eration of the vehicle that may cause an
accident resulting in death or serious
injury.
NOTICE
■To avoid damage to the transmission
and other components
●Avoid spinning the front wheels and
depressing the accelerator pedal
more than necessary.
●If the vehicle remains stuck even after
these procedures are performed, the
vehicle may require towing to be freed.
Page 457 of 516

4578-1. Specifications
8
Vehicle specifications
Your Lexus vehicle is filled with “Toyota Genuine Differential Gear Oil” at the fac-
tory. Use Lexus approved “Toyota Genuine Di fferential Gear Oil” or an equivalent
of matching quality to satisfy the above specification. Please contact your Lexus
dealer for further details.
*: Minimum pedal clearance when depressed with a force of 110 lbf (490 N, 50 kgf) while
the engine is running.
Type A
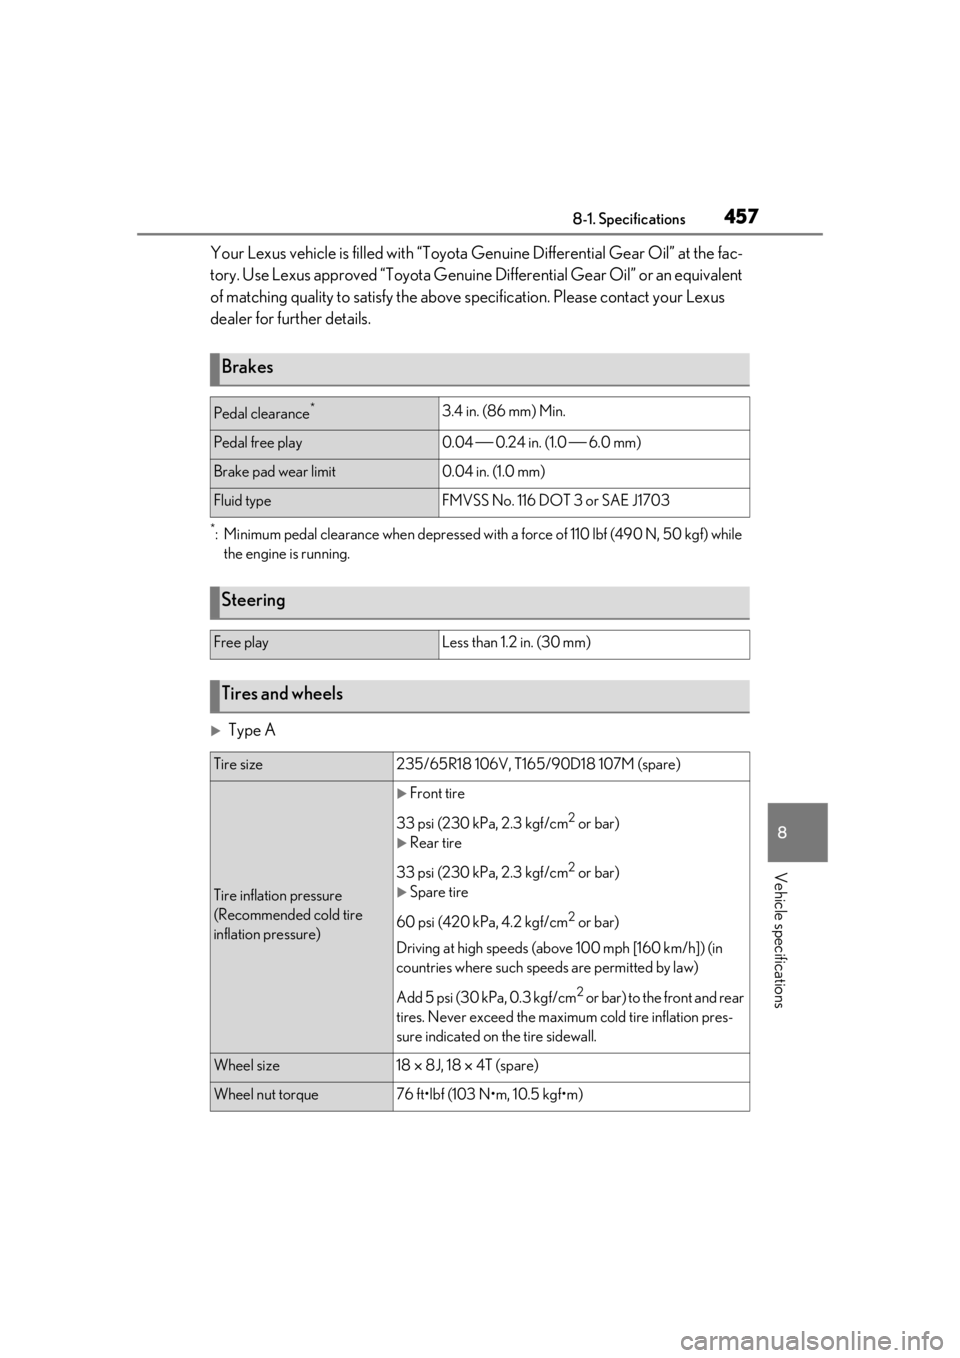
Brakes
Pedal clearance*3.4 in. (86 mm) Min.
Pedal free play0.04 0.24 in. (1.0 6.0 mm)
Brake pad wear limit0.04 in. (1.0 mm)
Fluid typeFMVSS No. 116 DOT 3 or SAE J1703
Steering
Free playLess than 1.2 in. (30 mm)
Tires and wheels
Tire size235/65R18 106V, T165/90D18 107M (spare)
Tire inflation pressure
(Recommended cold tire
inflation pressure)
Front tire
33 psi (230 kPa, 2.3 kgf/cm
2 or bar)
Rear tire
33 psi (230 kPa, 2.3 kgf/cm
2 or bar)
Spare tire
60 psi (420 kPa, 4.2 kgf/cm
2 or bar)
Driving at high speeds (above 100 mph [160 km/h]) (in
countries where such speeds are permitted by law)
Add 5 psi (30 kPa, 0.3 kgf/cm
2 or bar) to the front and rear
tires. Never exceed the maximum cold tire inflation pres-
sure indicated on the tire sidewall.
Wheel size18 8J, 18 4T (spare)
Wheel nut torque76 ft•lbf (103 N•m, 10.5 kgf•m)