2020 LEXUS RX350 torque
[x] Cancel search: torquePage 175 of 516
1754-1. Before driving
4
Driving
Dinghy towing
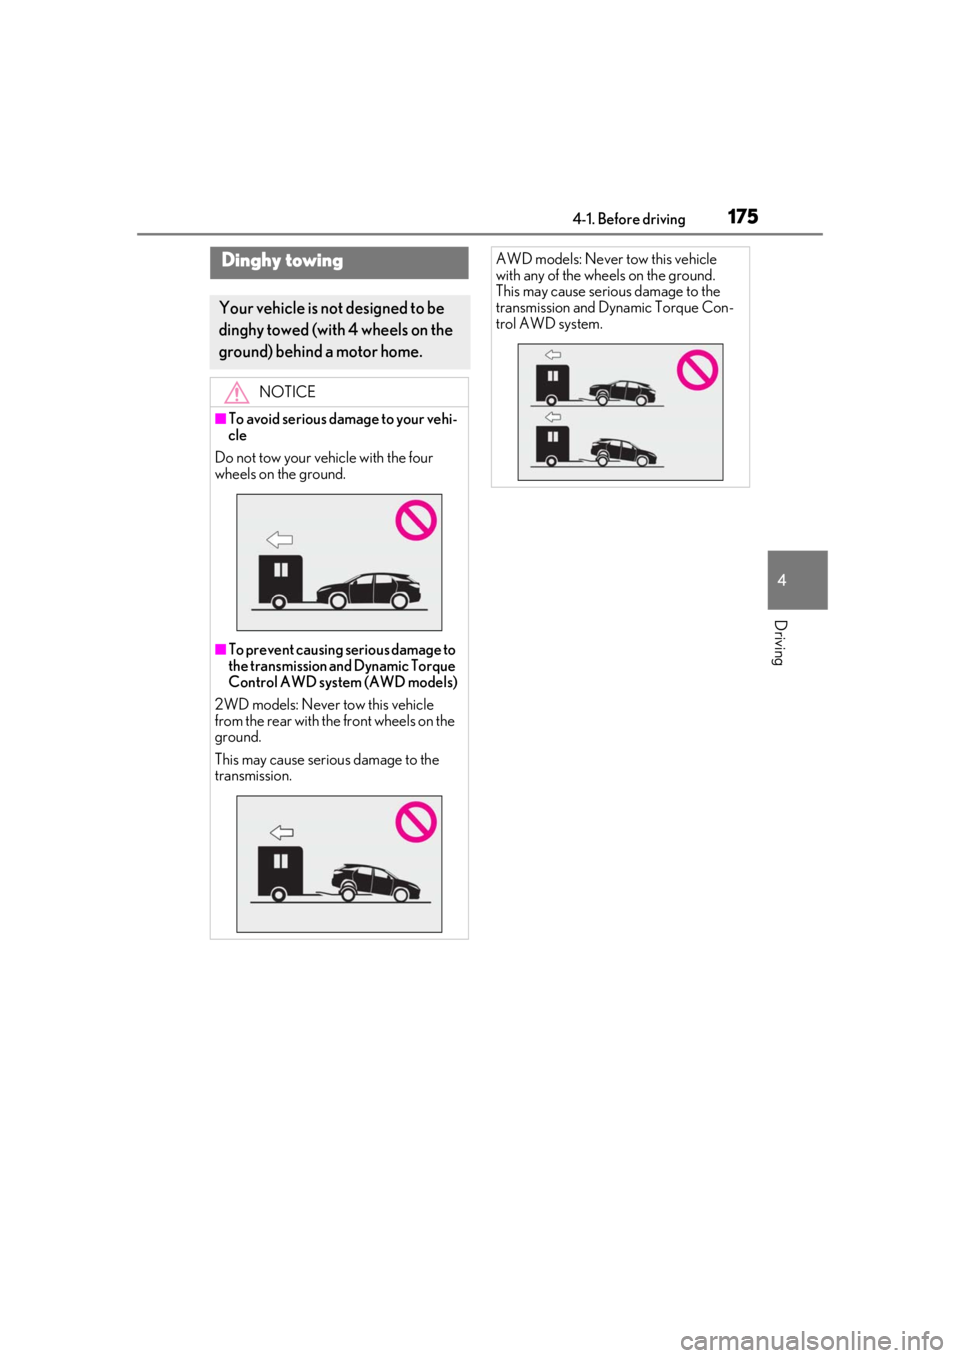
Your vehicle is not designed to be
dinghy towed (with 4 wheels on the
ground) behind a motor home.
NOTICE
■To avoid serious damage to your vehi-
cle
Do not tow your vehicle with the four
wheels on the ground.
■To prevent causing serious damage to
the transmission and Dynamic Torque
Control AWD system (AWD models)
2WD models: Never tow this vehicle
from the rear with the front wheels on the
ground.
This may cause serious damage to the
transmission.
AWD models: Never tow this vehicle
with any of the wheels on the ground.
This may cause serious damage to the
transmission and Dynamic Torque Con-
trol AWD system.
Page 275 of 516
2754-5. Using the driving support systems
4
Driving
economy through moderate throttle char-
acteristics and by controlling the operation
of the air conditioning system (heat-
ing/cooling).
When not in Eco drive mode, if the driving
mode select switch is turned to the left, the
Eco drive mode indicator will come on.
3Sport mode
Controls the transmission and engine to
provide quick, powerful acceleration. This
mode also changes the steering feel, mak-
ing it suitable for when agile driving
response is desired, such as when driving
on roads with many curves.
When not in sport mode, if the driving
mode select switch is turned to the right,
the “Sport” indicator will comes on.
■Operation of the air conditioning sys-
tem in Eco drive mode
Eco drive mode controls the heating/cool-
ing operations and fan speed of the air con-
ditioning system to enhance fuel efficiency.
To improve air condit ioning performance,
adjust the fan speed or turn off Eco drive
mode.
■Automatic deactivation of sport mode
and custom mode
If the engine switch is turned off after driv-
ing in sport mode or custom mode, the
drive mode will be changed to normal
mode.
■Driving mode pop-up display (12.3-inch
display only)
When the driving mode is changed, the
selected driving mode will be temporarily
displayed on the side display. ( P.292)
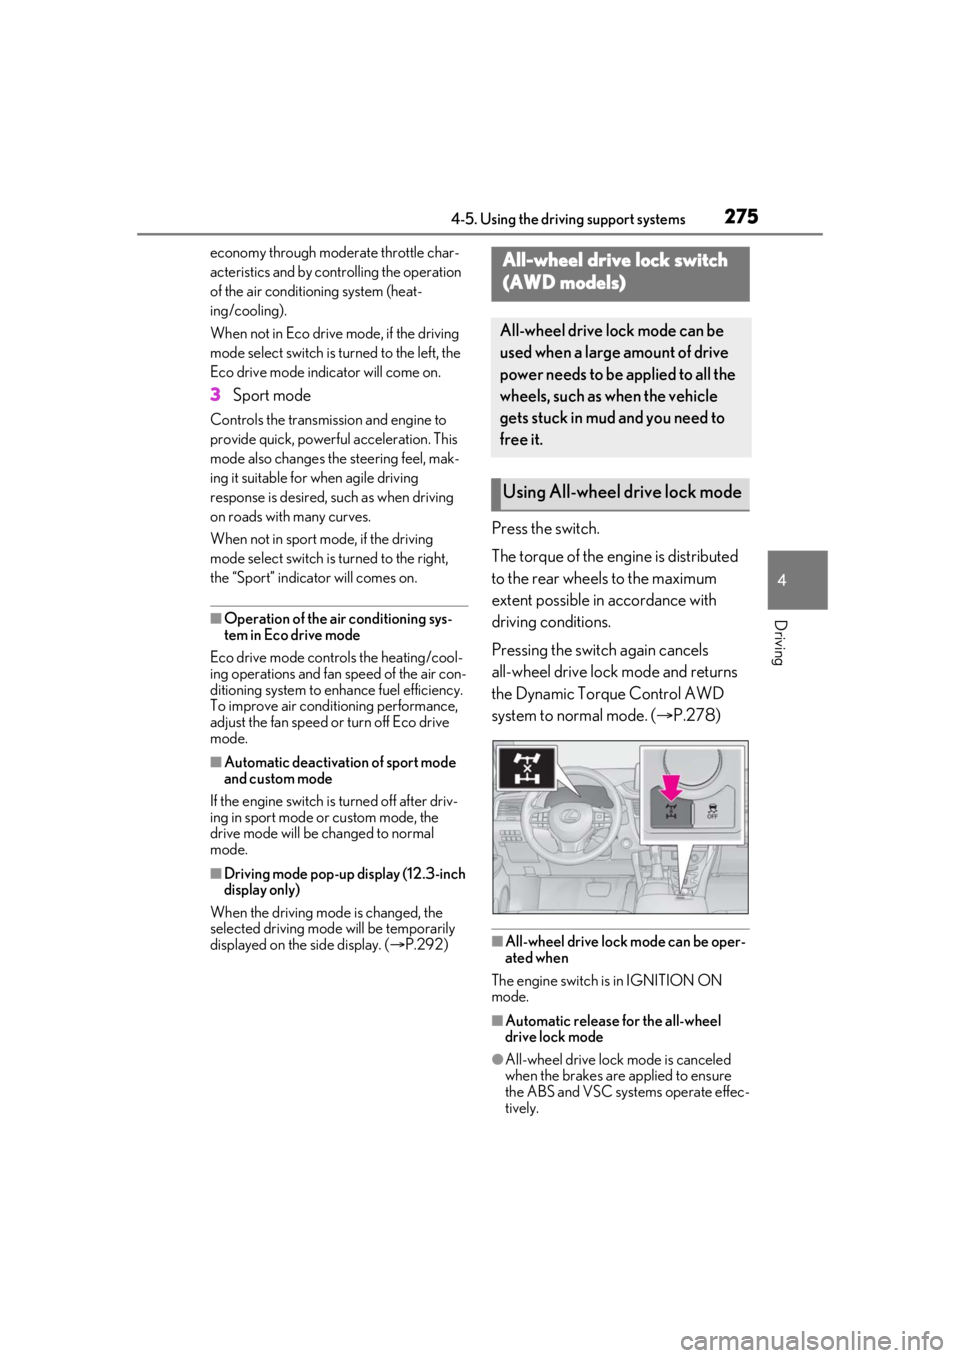
Press the switch.
The torque of the engine is distributed
to the rear wheels to the maximum
extent possible in accordance with
driving conditions.
Pressing the switch again cancels
all-wheel drive lock mode and returns
the Dynamic Torque Control AWD
system to normal mode. ( P.278)
■All-wheel drive lock mode can be oper-
ated when
The engine switch is in IGNITION ON
mode.
■Automatic release for the all-wheel
drive lock mode
●All-wheel drive lock mode is canceled
when the brakes are applied to ensure
the ABS and VSC systems operate effec-
tively.
All-wheel drive lock switch
(AWD models)
All-wheel drive lock mode can be
used when a large amount of drive
power needs to be applied to all the
wheels, such as when the vehicle
gets stuck in mud and you need to
free it.
Using All-wheel drive lock mode
Page 277 of 516

2774-5. Using the driving support systems
4
Driving
■Trailer Sway Control (if equipped)
Helps the driver to control trailer sway
by selectively applying brake pressure
for individual wheels and reducing
driving torque when trailer sway is
detected.
■TRAC (Traction Control)
Helps to maintain drive power and pre-
vent the drive wheels from spinning
when starting the vehicle or accelerat-
ing on slippery roads
■Active Cornering Assist (ACA)
Helps to prevent the vehicle from drift-
ing to the outer side by performing
inner wheel brake control when
attempting to accelerate while turning
■Hill-start assist control
Helps to reduce the backward move-
ment of the vehicle when starting on an
uphill
■EPS (Electric Power Steering)
Employs an electric motor to reduce
the amount of effort needed to turn the
steering wheel
■Dynamic Torque Control AWD
system (AWD models)
Automatically switches from
front-wheel drive to all-wheel drive
(AWD) according to the driving condi-
tions, helping to ensure reliable han-
dling and stability. Examples of
conditions where the system will switch
to AWD are when cornering, going
uphill, starting off or accelerating, and
when the road surface is slippery due
to snow, rain, etc.
■Adaptive Variable Suspension Sys-
tem (if equipped)
Controls the damping force of the
shock absorber of each wheel accord-
ing to the road and driving conditions,
helping achieve a comfortable ride,
excellent driveability and a high level of
stability.
If Sport S+ mode is selected using the
driving mode select switch, the damp-
ing force will become more suitable for
sporty driving. ( P.274)
■VDIM (Vehicle Dynamics Inte-
grated Management) (if equipped)
Provides integrated control of the
ABS, brake assist, TRAC, VSC,
hill-start assist control and EPS systems
Helps to maintain vehicle stability when
swerving on slippery road surfaces by
controlling the brakes, engine output
and steering assist.
■The Secondary Collision Brake
When the SRS airbag sensor detects a
collision and the system operates, the
brakes and brake lights are automati-
cally controlled to reduce the vehicle
speed and help reduce the possibility
of further damage due to a secondary
collision.
■When the TRAC/VSC/Trailer Sway
Control systems are operating
The slip indicator light will flash while the
TRAC/VSC/Trailer Sway Control systems
are operating.
Page 408 of 516
4087-2. Steps to take in an emergency
The following may indicate a problem
with your transmission. Contact your
Lexus dealer or commercial towing
service before towing.
The engine is running but the vehi-
cle does not move.
The vehicle makes an abnormal
sound.
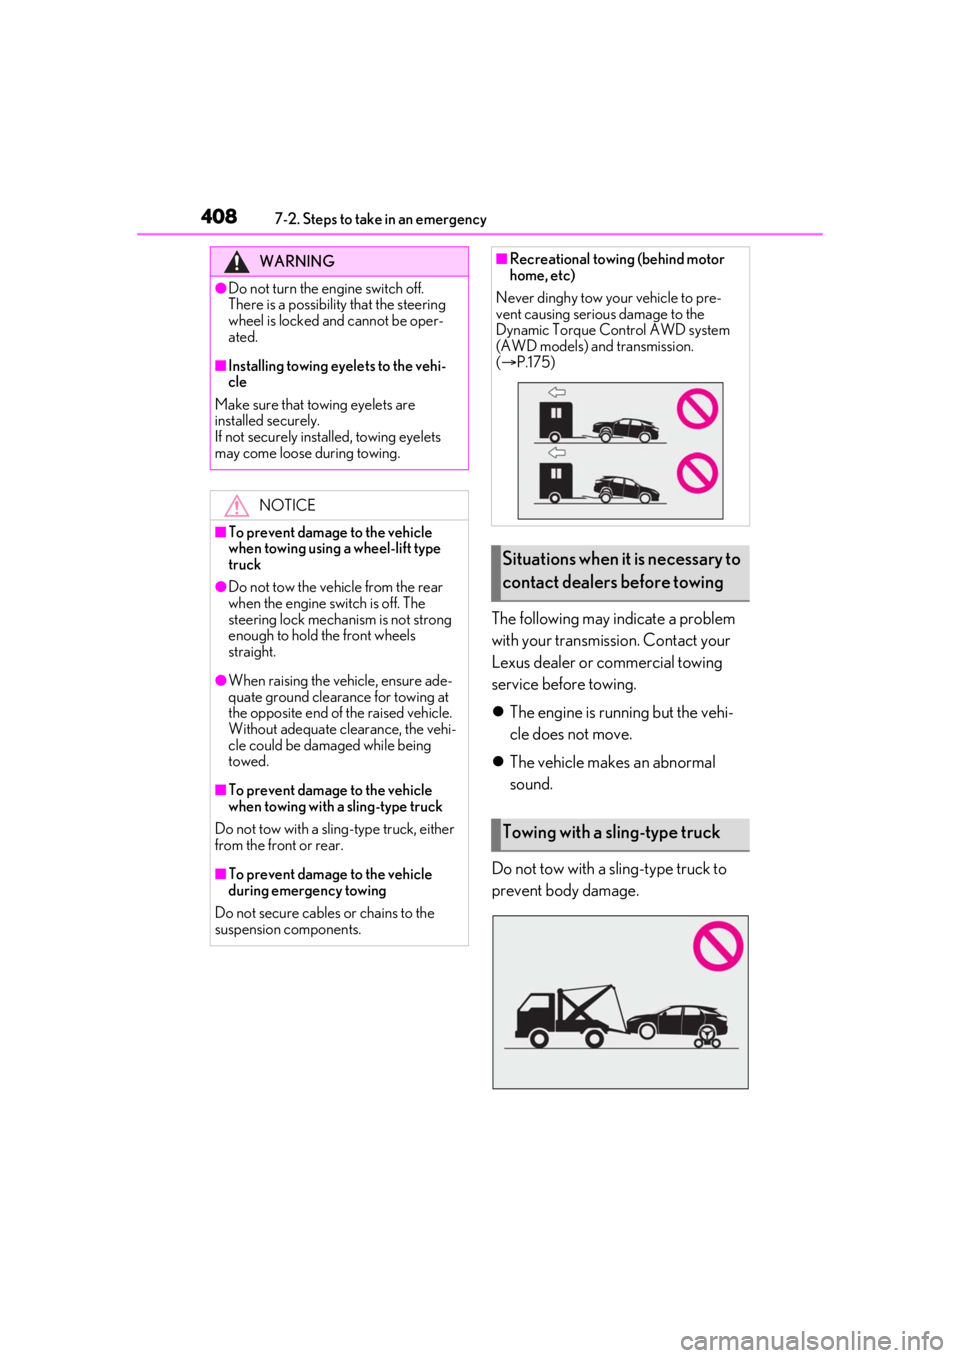
Do not tow with a sling-type truck to
prevent body damage.
WARNING
●Do not turn the engine switch off.
There is a possibility that the steering
wheel is locked and cannot be oper-
ated.
■Installing towing eyelets to the vehi-
cle
Make sure that towing eyelets are
installed securely.
If not securely installed, towing eyelets
may come loose during towing.
NOTICE
■To prevent damage to the vehicle
when towing using a wheel-lift type
truck
●Do not tow the vehicle from the rear
when the engine switch is off. The
steering lock mechanism is not strong
enough to hold the front wheels
straight.
●When raising the vehicle, ensure ade-
quate ground clearance for towing at
the opposite end of the raised vehicle.
Without adequate clearance, the vehi-
cle could be damaged while being
towed.
■To prevent damage to the vehicle
when towing with a sling-type truck
Do not tow with a sling-type truck, either
from the front or rear.
■To prevent damage to the vehicle
during emergency towing
Do not secure cables or chains to the
suspension components.
■Recreational towing (behind motor
home, etc)
Never dinghy tow your vehicle to pre-
vent causing serious damage to the
Dynamic Torque Control AWD system
(AWD models) and transmission.
( P.175)
Situations when it is necessary to
contact dealers before towing
Towing with a sling-type truck
Page 429 of 516

4297-2. Steps to take in an emergency
7
When trouble arises
When replacing tires on a vehicle with
wheel lock nuts, use the following pro-
cedures to remove and install the
wheel lock nuts. The wheel lock key is
stored in the tray inside the luggage
compartment. Always return the wheel
lock key to its original position after
use, so that it does not get lost.
■Removal
For ease of removal, the wheel lock nut
should always be the first one loos-
ened.
1 Place the wheel lock key on top of
the wheel lock nut, turning until the
wheel lock key and wheel lock nut
patterns engage.
2 Place the wheel nut wrench on the
wheel lock key, and while applying
pressure on the wheel lock key,
loosen the wheel lock nut.
■Installation
For ease of installation, the wheel lock nut should always be the last one tight-
ened.
1
By hand, install a wheel lock nut on
each wheel.
2 Place the wheel lock key on top of
the wheel lock nut, turning until the
wheel lock key and wheel lock nut
patterns engage.
3 Place the wheel nut wrench on the
wheel lock key, and while applying
pressure on the wheel lock key,
tighten the wheel lock nut to the
recommended torque.
1 Secure the deck board using the
hook. ( P.324)
2 Disengage the hook and take out
the jack.
RX350: Remove the wheel nut wrench
and then the jack.
RX350L: Remove the jack handle and
then the jack.
WARNING
●Do not raise the vehicle while some-
one is inside.
●When raising the vehicle, do not put an
object on or under the jack.
●Do not raise the vehicle to a height
greater than that required to replace
the tire.
●Use a jack stand if it is necessary to get
under the vehicle.
●When lowering the vehicle, make sure
that there is no-one near the vehicle. If
there are people nearby, warn them
vocally before lowering.
Wheel lock nut (if equipped)
NOTICE
Do not use an impact wrench. Using an
impact wrench may cause permanent
damage to wheel lock nut and wheel lock
key. If in doubt about wheel lock applica-
tion, contact your Lexus dealer.
Taking out the jack
Page 433 of 516
4337-2. Steps to take in an emergency
7
When trouble arises
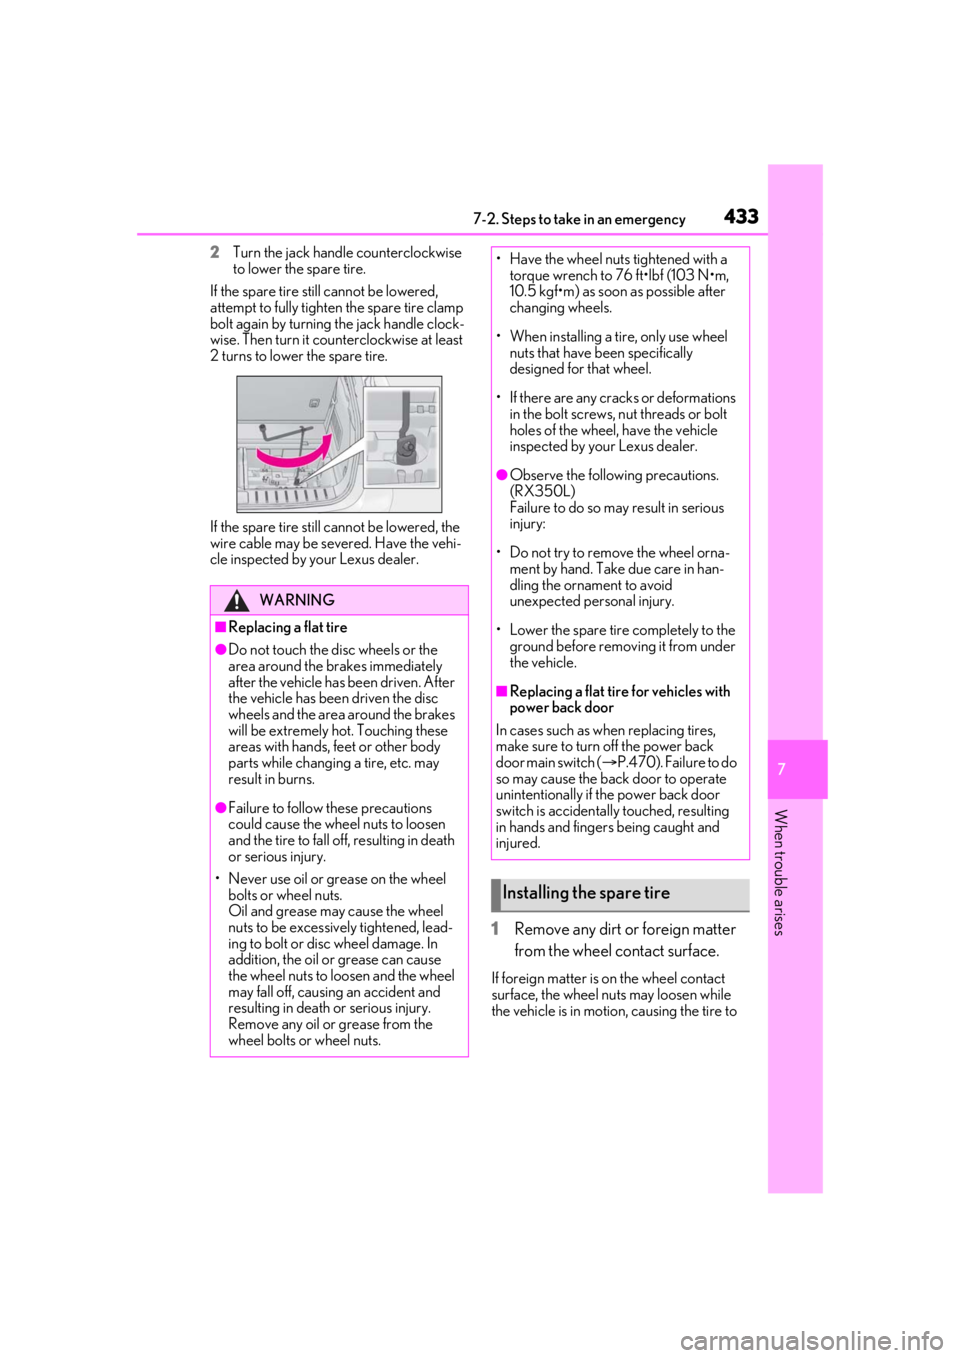
2Turn the jack handle counterclockwise
to lower the spare tire.
If the spare tire still cannot be lowered,
attempt to fully tighten the spare tire clamp
bolt again by turning the jack handle clock-
wise. Then turn it coun terclockwise at least
2 turns to lower the spare tire.
If the spare tire still ca nnot be lowered, the
wire cable may be seve red. Have the vehi-
cle inspected by your Lexus dealer.
1 Remove any dirt or foreign matter
from the wheel contact surface.
If foreign matter is on the wheel contact
surface, the wheel nuts may loosen while
the vehicle is in motion, causing the tire to
WARNING
■Replacing a flat tire
●Do not touch the disc wheels or the
area around the brakes immediately
after the vehicle has been driven. After
the vehicle has been driven the disc
wheels and the area around the brakes
will be extremely hot. Touching these
areas with hands, feet or other body
parts while changing a tire, etc. may
result in burns.
●Failure to follow these precautions
could cause the wheel nuts to loosen
and the tire to fall of f, resulting in death
or serious injury.
• Never use oil or grease on the wheel bolts or wheel nuts.
Oil and grease may cause the wheel
nuts to be excessively tightened, lead-
ing to bolt or disc wheel damage. In
addition, the oil or grease can cause
the wheel nuts to loosen and the wheel
may fall off, causing an accident and
resulting in death or serious injury.
Remove any oil or grease from the
wheel bolts or wheel nuts.
• Have the wheel nuts tightened with a torque wrench to 76 ft•lbf (103 N•m,
10.5 kgf•m) as soon as possible after
changing wheels.
• When installing a tire, only use wheel nuts that have been specifically
designed for that wheel.
• If there are any cracks or deformations in the bolt screws, nut threads or bolt
holes of the wheel, have the vehicle
inspected by your Lexus dealer.
●Observe the following precautions.
(RX350L)
Failure to do so may result in serious
injury:
• Do not try to remove the wheel orna- ment by hand. Take due care in han-
dling the ornament to avoid
unexpected personal injury.
• Lower the spare tire completely to the ground before removing it from under
the vehicle.
■Replacing a flat tire for vehicles with
power back door
In cases such as when replacing tires,
make sure to turn off the power back
door main switch ( P.470). Failure to do
so may cause the back door to operate
unintentionally if th e power back door
switch is accidentally touched, resulting
in hands and fingers being caught and
injured.
Installing the spare tire
Page 434 of 516
4347-2. Steps to take in an emergency
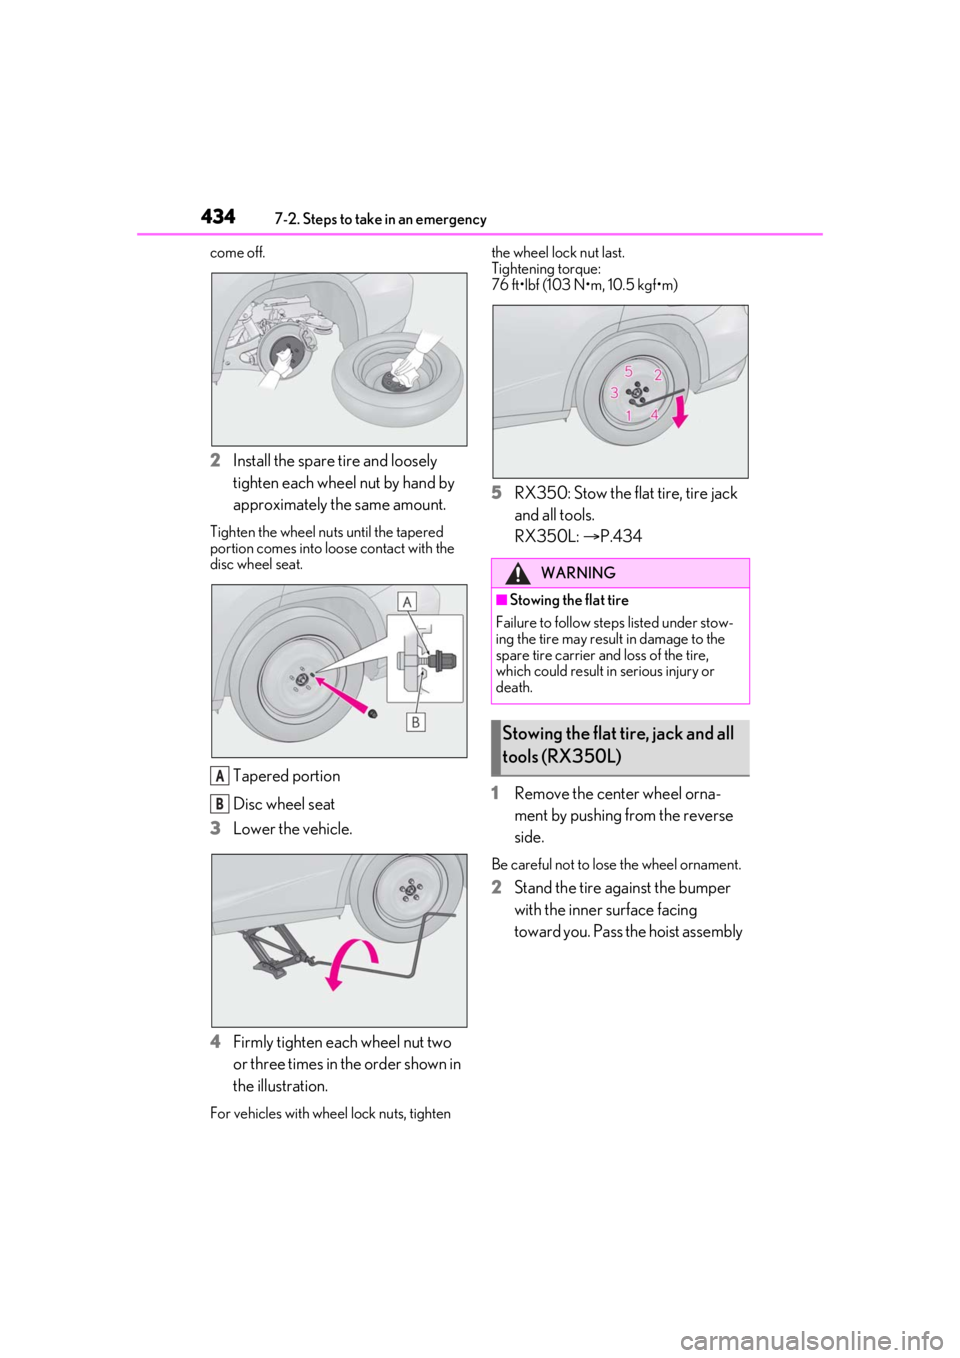
come off.
2Install the spare tire and loosely
tighten each wheel nut by hand by
approximately the same amount.
Tighten the wheel nuts until the tapered
portion comes into loose contact with the
disc wheel seat.
Tapered portion
Disc wheel seat
3 Lower the vehicle.
4 Firmly tighten each wheel nut two
or three times in the order shown in
the illustration.
For vehicles with wheel lock nuts, tighten the wheel lock nut last.
Tightening torque:
76 ft•lbf (103 N•m, 10.5 kgf•m)
5
RX350: Stow the flat tire, tire jack
and all tools.
RX350L: P.434
1 Remove the center wheel orna-
ment by pushing from the reverse
side.
Be careful not to lose the wheel ornament.
2Stand the tire against the bumper
with the inner surface facing
toward you. Pass the hoist assembly
A
B
WARNING
■Stowing the flat tire
Failure to follow st eps listed under stow-
ing the tire may result in damage to the
spare tire carrier and loss of the tire,
which could result in serious injury or
death.
Stowing the flat tire, jack and all
tools (RX350L)
Page 457 of 516
4578-1. Specifications
8
Vehicle specifications
Your Lexus vehicle is filled with “Toyota Genuine Differential Gear Oil” at the fac-
tory. Use Lexus approved “Toyota Genuine Di fferential Gear Oil” or an equivalent
of matching quality to satisfy the above specification. Please contact your Lexus
dealer for further details.
*: Minimum pedal clearance when depressed with a force of 110 lbf (490 N, 50 kgf) while
the engine is running.
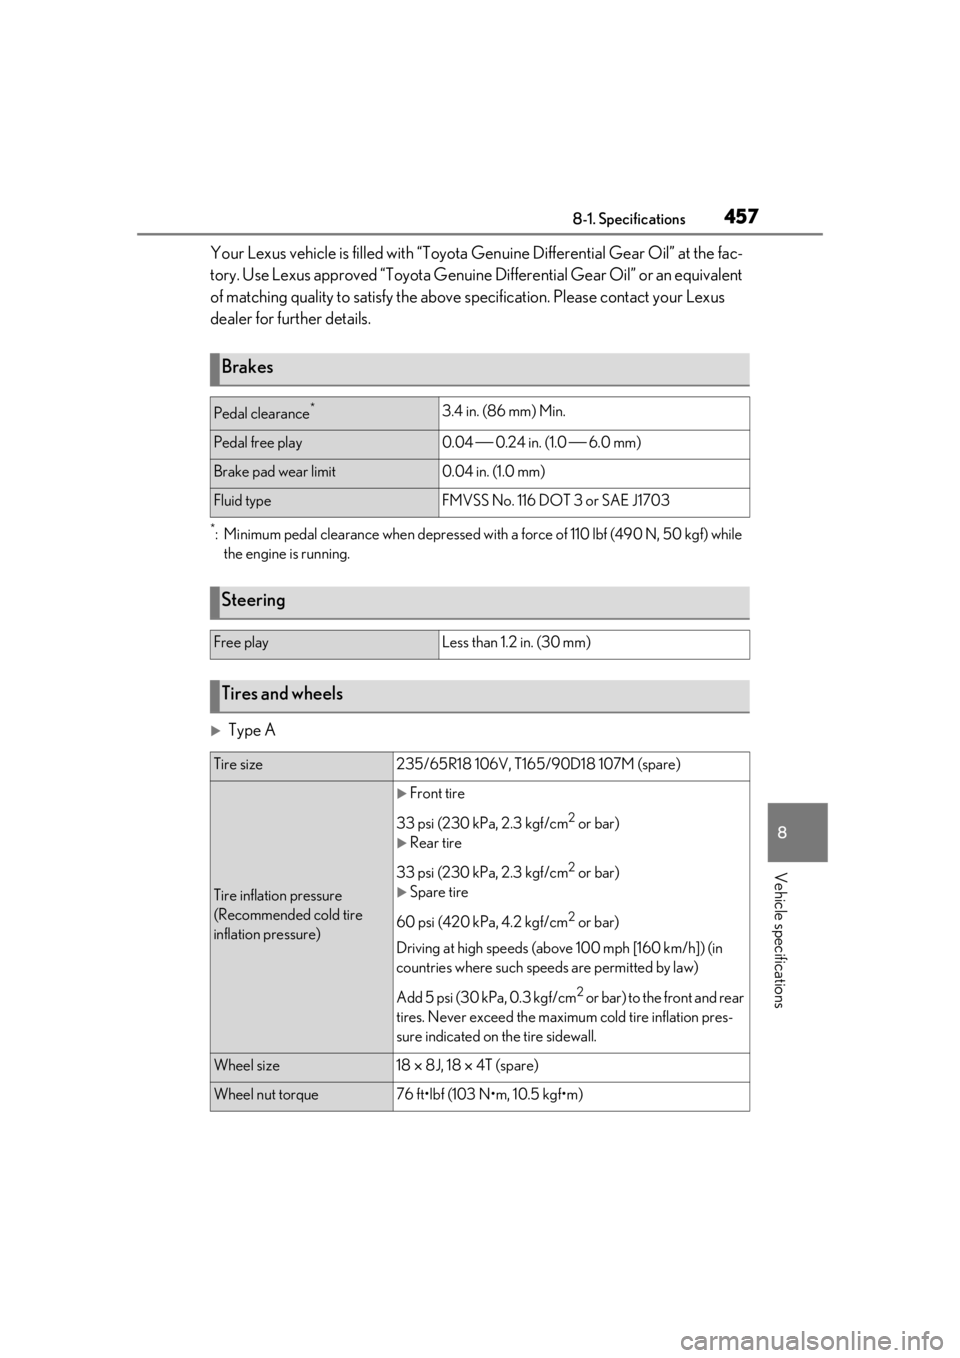
Type A
Brakes
Pedal clearance*3.4 in. (86 mm) Min.
Pedal free play0.04 0.24 in. (1.0 6.0 mm)
Brake pad wear limit0.04 in. (1.0 mm)
Fluid typeFMVSS No. 116 DOT 3 or SAE J1703
Steering
Free playLess than 1.2 in. (30 mm)
Tires and wheels
Tire size235/65R18 106V, T165/90D18 107M (spare)
Tire inflation pressure
(Recommended cold tire
inflation pressure)
Front tire
33 psi (230 kPa, 2.3 kgf/cm
2 or bar)
Rear tire
33 psi (230 kPa, 2.3 kgf/cm
2 or bar)
Spare tire
60 psi (420 kPa, 4.2 kgf/cm
2 or bar)
Driving at high speeds (above 100 mph [160 km/h]) (in
countries where such speeds are permitted by law)
Add 5 psi (30 kPa, 0.3 kgf/cm
2 or bar) to the front and rear
tires. Never exceed the maximum cold tire inflation pres-
sure indicated on the tire sidewall.
Wheel size18 8J, 18 4T (spare)
Wheel nut torque76 ft•lbf (103 N•m, 10.5 kgf•m)