Page 397 of 516

3976-3. Do-it-yourself maintenance
6
Maintenance and care
point positions.
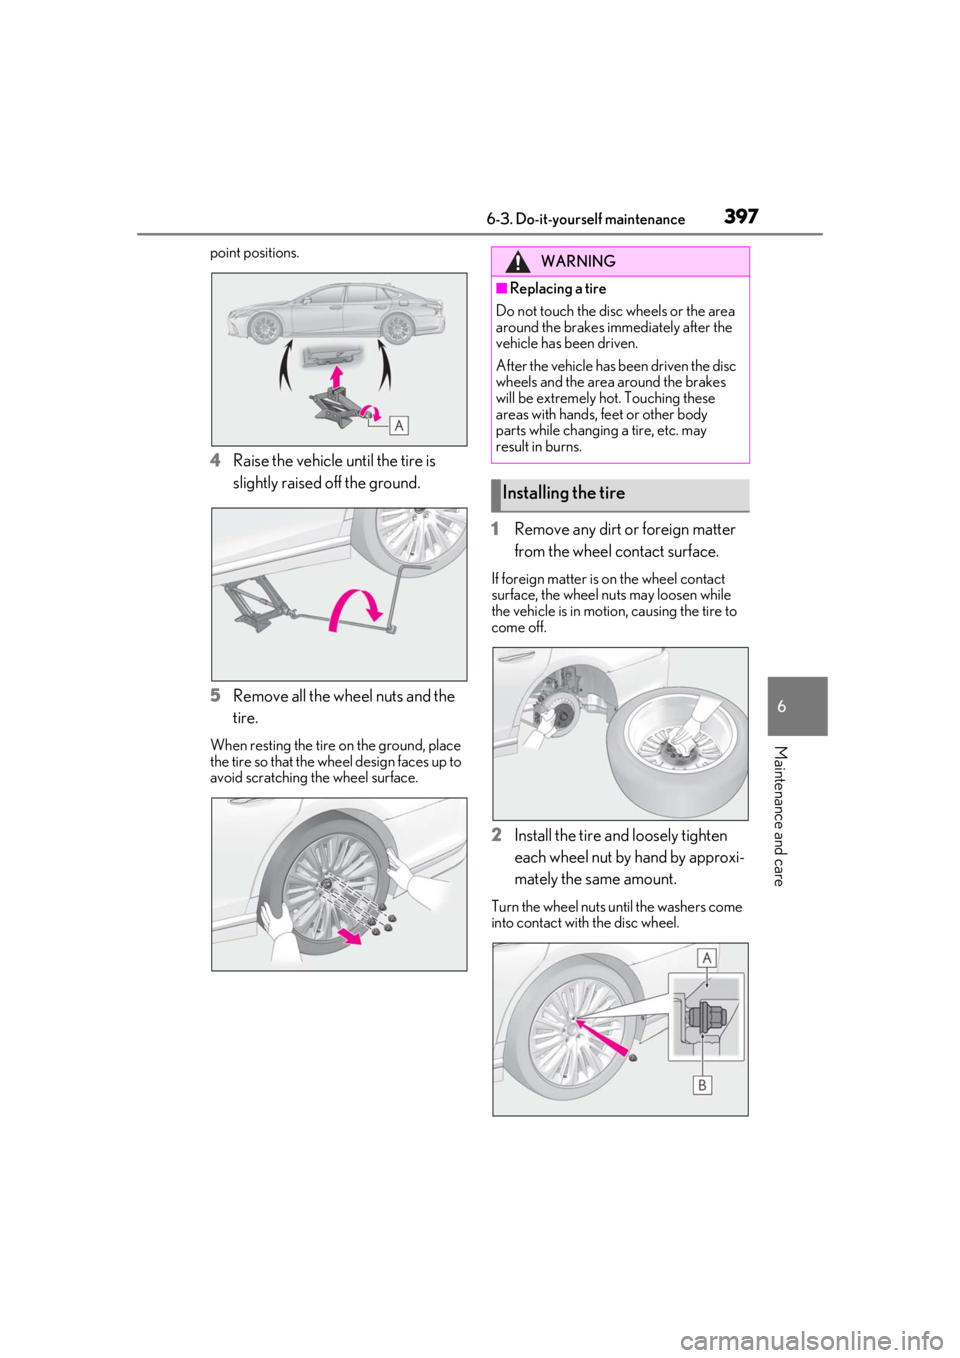
4Raise the vehicle until the tire is
slightly raised off the ground.
5
Remove all the wheel nuts and the
tire.
When resting the tire on the ground, place
the tire so that the wh eel design faces up to
avoid scratching the wheel surface.
1Remove any dirt or foreign matter
from the wheel contact surface.
If foreign matter is on the wheel contact
surface, the wheel nuts may loosen while
the vehicle is in motion, causing the tire to
come off.
2Install the tire and loosely tighten
each wheel nut by hand by approxi-
mately the same amount.
Turn the wheel nuts until the washers come
into contact with the disc wheel.
WARNING
■Replacing a tire
Do not touch the disc wheels or the area
around the brakes immediately after the
vehicle has been driven.
After the vehicle has been driven the disc
wheels and the area around the brakes
will be extremely hot. Touching these
areas with hands, feet or other body
parts while changing a tire, etc. may
result in burns.
Installing the tire
Page 412 of 516

4107-1. Essential information
7-1.Essential information
Press the switch to flash all of the turn
signal lights.
To turn them off, press the switch once
again.
■Emergency flashers
●If the emergency flashers are used for a
long time while the engine is not running,
the battery may discharge.
●If any of the SRS airbags deploy (inflate)
or in the event of a strong rear impact, the
emergency flashers will turn on automati-
cally.
The emergency flashers will turn off auto-
matically after operating for approxi-
mately 20 minutes. To manually turn the
emergency flashers off, press the switch
twice.
(The emergency flashers may not turn on
automatically depending on the force of
the impact and conditions of the colli-
sion.)
1 Steadily step on the brake pedal
with both feet and firmly depress it.
Do not pump the brake pedal repeatedly
as this will increase the effort required to
slow the vehicle.
2Shift the shift position to N.
If the shift position is shifted to N
3 After slowing down, stop the vehi-
cle in a safe place by the road.
4 Stop the engine.
If the shift position cannot be shifted
to N
3 Keep depressing the brake pedal
with both feet to reduce vehicle
speed as much as possible.
4 To stop the engine, press and hold
the engine switch for 2 consecutive
Emergency flashers
The emergency flashers are used to
warn other drivers when the vehicle
has to be stopped on the road due
to a breakdown, etc.
Operating instructions
If your vehicle has to be
stopped in an emergency
Only in an emergency, such as if it
becomes impossible to stop the
vehicle in the normal way, stop the
vehicle using the following proce-
dure:
Stopping the vehicle
Page 417 of 516

4157-2. Steps to take in an emergency
7
When trouble arises
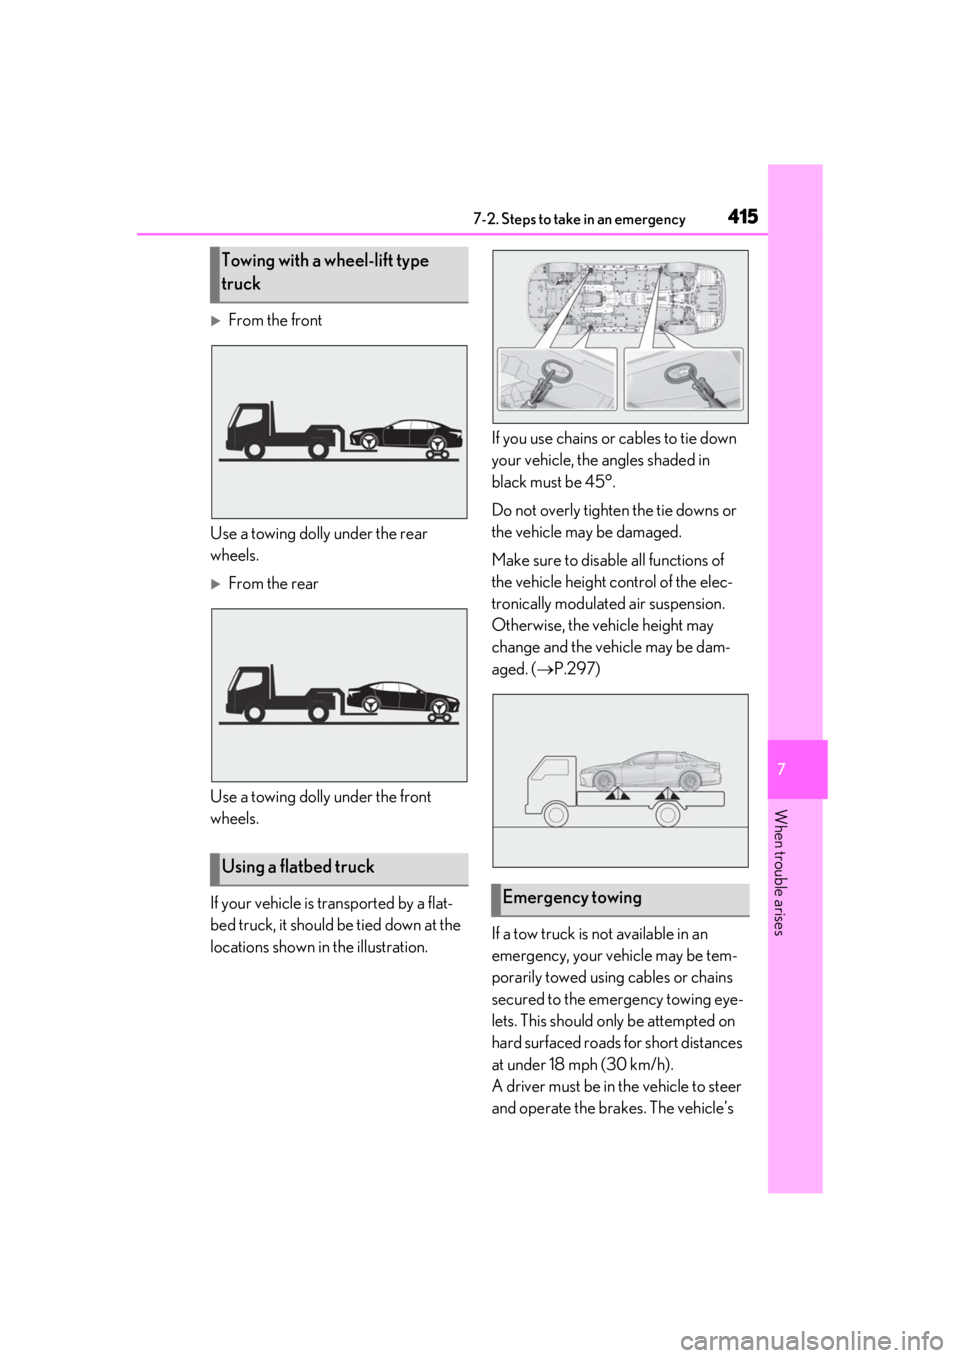
From the front
Use a towing dolly under the rear
wheels.
From the rear
Use a towing dolly under the front
wheels.
If your vehicle is transported by a flat-
bed truck, it should be tied down at the
locations shown in the illustration. If you use chains or cables to tie down
your vehicle, the angles shaded in
black must be 45°.
Do not overly tighten the tie downs or
the vehicle may be damaged.
Make sure to disable all functions of
the vehicle height control of the elec-
tronically modulated air suspension.
Otherwise, the vehicle height may
change and the vehicle may be dam-
aged. (
P.297)
If a tow truck is not available in an
emergency, your vehicle may be tem-
porarily towed using cables or chains
secured to the emergency towing eye-
lets. This should only be attempted on
hard surfaced roads for short distances
at under 18 mph (30 km/h).
A driver must be in the vehicle to steer
and operate the brakes. The vehicle’s
Towing with a wheel-lift type
truck
Using a flatbed truck
Emergency towing
Page 418 of 516

4167-2. Steps to take in an emergency
wheels, drive train, axles, steering and
brakes must be in good condition.
To have your vehicle towed by another
vehicle, the towing eyelet must be
installed to your vehicle. Install the tow-
ing eyelet using the following proce-
dure.
1Take out the phillips-head screw-
driver and towing eyelet.
Phillips-head screwdriver
Towing eyelet
2 Remove the eyelet cover using a
flathead screwdriver.
To protect the bodywork, place a rag
between the screwdriver and the vehicle
body as shown in the illustration.
3Insert the towing eyelet into the
hole and tighten partially by hand.
4 Tighten down the towing eyelet
securely using a phillips-head
screwdriver or hard metal bar.
5 Securely attach cables or chains to
the towing eyelet.
Take care not to damage the vehicle body.
6Enter the vehicle being towed and
start the engine.
If the engine does not start, turn the engine
switch to IGNITION ON mode.
7Shift the shift position to N and
release the parking brake.
■While towing
If the engine is not running, the power assist
for the brakes and steering will not function,
making steering and braking more difficult.
Emergency towing procedure
A
B
Page 419 of 516
4177-2. Steps to take in an emergency
7
When trouble arises
Fluid leaks under the vehicle.
(Water dripping from the air condi-
tioning after use is normal.)
Flat-looking tires or uneven tire
wear
Engine coolant temperature gauge
needle continually points higher
than normal.
Changes in exhaust sound
Excessive tire squeal when corner-
ing
Strange noises related to the sus-
pension system
Pinging or other noises related to
the engine
Engine missing, stumbling or run-
ning roughly
Appreciable loss of power
Vehicle pulls heavily to one side
when braking
Vehicle pulls heavily to one side
when driving on a level road
Loss of brake effectiveness, spongy
feeling, pedal almost touches the
floor
If you think something is
wrong
If you notice any of the following
symptoms, your vehicle probably
needs adjustment or repair. Con-
tact your Lexus dealer as soon as
possible.
Visible symptoms
Audible symptoms
Operational symptoms
Page 421 of 516

4197-2. Steps to take in an emergency
7
When trouble arises
■Brake system warning light (warning buzzer)
■Brake system warning light (warning buzzer)
■High coolant temperature warning light* (warning buzzer)
*: This light illuminates on the multi-information display.
If a warning light turns on or a warning buzzer sounds
Calmly perform the following actions if any of the warning lights comes on or
flashes. If a light comes on or flashes, bu t then goes off, this does not necessar-
ily indicate a malfunction in the system. However, if this continues to occur,
have the vehicle inspected by your Lexus dealer.
Actions to the warning lights or warning buzzers
Warning lightDetails/Actions
(U.S.A.)
or
(red)
(Canada)
Indicates that:
The brake fluid level is low; or
The brake system is malfunctioning
Immediately stop the vehicle in a safe place and contact your Lexus
dealer. Continuing to drive the vehicle may be dangerous.
Indicates that the brake pads are worn out (only the right-side pads can
be detected)
Have the vehicle inspected by your Lexus dealer.
Warning lightDetails/Actions
(yellow)
Indicates a malfunction in:
The electronically controlled brake sy stem (vehicles with Lexus Safety
System + A); or
The parking brake system
Have the vehicle inspected by your Lexus dealer immediately.
Warning lightDetails/Actions
Indicates that the engine coolant temperature is too high
Immediately stop the vehicle in a safe place.
Handling method ( P.444)
Page 423 of 516

4217-2. Steps to take in an emergency
7
When trouble arises
■Pop Up Hood warning light (warning buzzer)
■ABS warning light (warning buzzer)
■Brake Override System warning light/Drive-Start Control warning light*
(warning buzzer)
*: This light illuminates on the multi-information display.
Warning lightDetails/Actions
Indicates that the Pop Up Hood system has operated
The Pop Up Hood system cannot be reused once it has operated.
Have it replaced by your Lexus dealer.
Indicates a malfunction in the Pop Up Hood system
Have the vehicle inspected by your Lexus dealer immediately.
Warning lightDetails/Actions
(U.S.A.)
or
(Canada)
Indicates a malfunction in:
The ABS; or
The brake assist system
Have the vehicle inspected by your Lexus dealer immediately.
Warning lightDetails/Actions
When a buzzer sounds:
Brake Override System is malfunctioning;
Drive-Start Control is operating;
Drive-Start Control is malfunctioning; or
Parking Support Brake function (for static objects) is operating
Follow the instructions displayed on the multi-information display.
When a buzzer does not sound:
Brake Override System is operating
Release the accelerator pedal and depress the brake pedal.
Page 426 of 516

4247-2. Steps to take in an emergency
■RCTA OFF indicator (warning buzzer)
■RCD OFF indicator (warning buzzer)
■PKSB OFF indicator (warning buzzer)
Warning lightDetails/Actions
(flashes)
(if equipped)
Indicates a malfunction in the RCTA (Rear Cross Traffic Alert) function
Have the vehicle inspected by your Lexus dealer immediately.
Indicates that the rear bumper around the radar sensor is covered with
dirt, etc. ( P.253)
Follow the instructions displayed on the multi-information display.
( P.267)
Warning lightDetails/Actions
(flashes)
(if equipped)
When a buzzer sounds:
Indicates a malfunction in the RCD (Rear Camera Detection) function
Have the vehicle inspected by your Lexus dealer immediately.
When a buzzer does not sound:
Indicates that the function temporarily cannot be used due to the cam-
era being dirty, etc.
Follow the instructions displayed on the multi-information display.
( P.271, 429)
Warning lightDetails/Actions
(flashes)
(if equipped)
When a buzzer sounds:
Indicates a malfunction in the PK SB (Parking Support Brake) system
Have the vehicle inspected by your Lexus dealer immediately.
When a buzzer does not sound:
Indicates that the system is temporarily unavailable, possibly due to a
sensor being dirty or covered with ice, etc.
Follow the instructions displayed on the multi-information display.
( P.277, 429)