Page 49 of 66
47
S E AT I N G
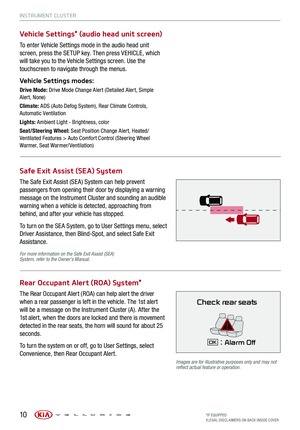
3rd Row Seat – Folding
1. Fully lower headrest A
2. Pull Seat folding strap located in the back of the
Seatback B
3. Fold Seats down C
Quick Tip
For specific information on how to use the 2nd and 3rd Row Center Seat Belts, please refer to the Owner’s Manual.
AA
BBC
B
*IF EQUIPPED ALWAYS CHECK THE OWNER’S MANUAL FOR COMPLE TE OPER ATING INFORMATION AND SAFE T Y WARNINGS.
Page 50 of 66
:
§ Press button once to unlock driver’s door
§ Press again within 4 seconds to unlock all door")
HOLD
HOLD
OTHER KEY FEATURES
*IF EQUIPPED 48
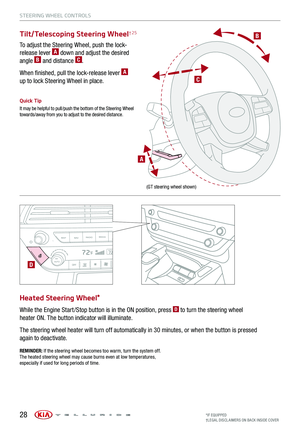
Driver’s Door Lock/Unlock Button G:
To unlock door(s):
§ Press button once to unlock driver’s door
§ Press again within 4 seconds to unlock all doors
To lock all doors:
§ Press again to lock all doors
Mechanical Key:
§ Use to unlock /lock driver’s door:
1. Remove door handle keyhole cover with
mechanical key by pressing up into slot in the
bottom of the handle as shown H
2. Insert mechanical key I and turn left to
unlock driver’s door
3. Insert mechanical key I and turn right to
lock driver’s door
4. Return mechanical key to its original location
§ Use to lock and unlock glove box
ENGINE STOP/START BUTTON & SMART KEY VIDEO
H
G
Smart Key
A Press to lock all doors
B Press to unlock driver’s door. Press twice within 4
seconds to unlock all doors
C Press and hold for more than 1 second to unlock Liftgate
and open manually (or automatically if Smart Power
Liftgate)
REMINDER: The Liftgate unlocks when the Smart Key is within close proximity of the vehicle
D Press and hold more than half a second for panic alarm.
To turn off alarm, press any button
E Press to release mechanical key I
Quick Tips
§ If the Smart Key battery is weak or not working properly, hold the Smart Key fob up to the Engine Start /Stop button (lock button side closest) and press to start engine
§
The Smart Key’s signal can be blocked by the normal operation of a cellular phone or smartphone. To help prevent this, store each device separately
§ When reinserting the mechanical key into the fob, make sure it is pushed all the way in until there is a click sound
REMINDER: Remote button configuration may vary depending on vehicle options.
ABCDE
I
KIA KEY FOB VIDEO
To view videos on your mobile device, snap these QR Codes or visit the listed website. Refer to page 2 for more information.
www.youtube.com/KiaFeatureVideos
These illustrations are for demonstration purposes only.
Unock
Lock
I
Page 51 of 66

49
OTHER KEY FEATURES
SMART POWER LIFTGATE VIDEO
To view a video on your mobile device, snap this QR Code or visit the listed website. Refer to page 2 for more information.
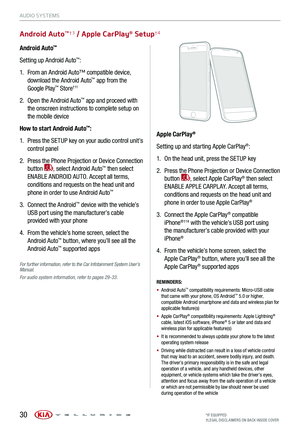
Smart Power Liftgate*† 22
The Smart Power Liftgate can be operated from several
controls to either open, close or lock the Liftgate.
To turn the Smart Power Liftgate features ON, go to User
Setting mode in the LCD Instrument Cluster Modes and
set to ON.
Opening from Inside the Vehicle:
Press and hold the Smart Power Liftgate Open/Close button* A to automatically open/close the Liftgate.
Opening from Outside the Vehicle:
To open Smart Power Liftgate* automatically, press the
Liftgate Release button B on exterior of the Liftgate.
Automatically close by pressing Smart Power Liftgate
Close button* C.
Quick Tip
During the Smart Liftgate alert, the Smart Liftgate can be deactivated with the Smart Key by pressing any button on the key fob.
REMINDERS:
§ All doors are closed and locked after about 15 seconds
§ The Smart Power Liftgate feature will not operate when the following occurs:
§ Doors are recently closed and locked
§ The Smart Key is still detected after 15 seconds near the vehicle or within 60 inches of the door handles
§ A door is not locked or closed
§ The Smart Key is in the vehicle
§ Pulling the Liftgate upward by the handle or pressing the button a second time will interrupt the automatic opening of the Smart Power Liftgate
For more information on the Smart Power Liftgate operation, please refer to the Owner’s Manual.
(Button located on driver’s panel, left of the steering wheel)
B
A
(located inside Liftgate lid)
www.youtube.com/KiaFeatureVideos
C
ALWAYS CHECK THE OWNER’S MANUAL FOR COMPLE TE OPERATING INFORMATION AND SAFETY WARNINGS.*IF EQUIPPED†LEG AL DISCL AIMERS ON BACK INSIDE COVER
Page 52 of 66

Opening with no-touch activation:
When the Smart Key fob is on your person and you are near
the back of the vehicle, within close pr")
OTHER KEY FEATURES
*IF EQUIPPED
Smart Power Liftgate* (Continued)
Opening with no-touch activation:
When the Smart Key fob is on your person and you are near
the back of the vehicle, within close proximity, the hazard
lights will blink and a chime will sound for about 3 seconds as
an alert that the Smart Power Liftgate* is about to open.
Then the alert system will blink and chime two additional
times before opening the Smart Power Liftgate*.
The Smart Power Liftgate* feature is OFF by default. To
enable the Smart Power Liftgate*, go to User Settings in
the LCD Instrument Cluster modes.
Smart Key:
To open the Smart Power
Liftgate*, press and hold the
Smart Key Liftgate button D
until the Liftgate begins opening.
Press again and hold to close.
Power Liftgate Height
Adjustment:
For your convenience, the liftgate
opening height is adjustable.
To program the opening height,
perform the following:
1. Open liftgate and manually position liftgate to your
preferred opening height
2. Depress and hold the close button on the liftgate for
3 seconds or more
3. Once the system sounds the alert that the programming
is complete, manually close the liftgate
Power Liftgate Opening/Closing Speed Setting:
Go to the User Settings in the Instrument Cluster. Select
Door, then Power Liftgate Speed, and select Fast or Normal.
KIA KEY FOB VIDEO
To view a video on your mobile device, snap this QR Code or visit the listed website. Refer to page 2 for more information.
Quick Tips
§ The Liftgate must be unlocked before it can be opened by the Liftgate Release button
§ The Liftgate unlocks automatically and then can be opened manually when the Smart Key is within close proximity to the vehicle
REMINDERS:
§
Smart Power Liftgate may be damaged if attempting to open or close manually
§ When not in use, keep the Liftgate Lid Control button in the OFF position
§ If going through a car wash, remind the attendant to keep the vehicle in Neutral (N) and keep the engine running. Also, disable the Smart Power Liftgate lid control using the button inside the glove compartment, turn off the auto rain-sensing wipers and fold in the mirrors
§ Ensure all obstacles are out of the way of the Liftgate lid when operating the Smart Power Liftgate
HOLDHOLDD
www.youtube.com/KiaFeatureVideos
50
REMINDERS:
§ The default speed is set to fast
§ The speed setting cannot be changed when the Power Liftgate function is turned off or if the Liftgate is not completely closed
Page 53 of 66

51
OTHER KEY FEATURES
UVO
FRONTREAR
ONOFFDOOR
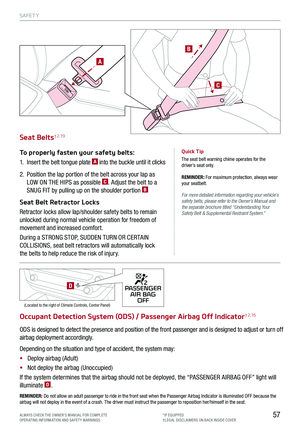
Map/Room Lamps
Automatic Turn Off Function
The interior lights automatically turn off approximately 20
seconds after the Engine Start /Stop button is turned OFF.
Map/Room Lamp Operation
Map Lamps – These lights produce spot beams for
convenient use as map lamps or as personal lamps for the
driver or the front passenger. Press the buttons A to turn the
map lamps ON/OFF.
Room button – Press the button B to turn the front and rear
lamps ON/OFF.
Door button – When the Door button C is pressed the
front and rear lamps will turn ON as follows:
§ When a door is opened or doors are unlocked with the
Smart Key, the lamps will turn ON for approximately
30 seconds
§ If the Engine Start /Stop button is in the ACC/OFF
position and a door is open, the lamps will stay ON for
approximately 20 minutes
§ If the Engine Start /Stop button is in the ACC/ON position
and a door is open, the lamps will stay ON
The lamps will turn OFF immediately if the Engine Start /Stop
button is turned ON or all doors are locked.
REMINDER: When room lamp lens is pressed ON it will remain ON, even when the map lamp switch is in the OFF position.
Quick Tips
§
When doors are unlocked by the Smart Key, the lamp turns ON for approximately 30 seconds
§ If your vehicle is equipped with the theft alarm system, the interior lights automatically turn off approximately 3 seconds after the system is in armed stage
§ Using interior lights for an extended period of time may cause battery discharge
AA
CB
*IF EQUIPPED ALWAYS CHECK THE OWNER’S MANUAL FOR COMPLE TE OPER ATING INFORMATION AND SAFE T Y WARNINGS.
Page 54 of 66

UVO
FRONTREAR
ONOFFDOOR
*IF EQUIPPED
Sunroof Operation*
The sunroof and sunshade operation is controlled by
a multi-directional switch/lever for the front and rear
sunroofs. The ignition needs to be in the ON position to
operate the sunroof/sunshade.
Slide the front sunshade and sunroof A:
Auto Open – Slide lever backward to the farthest position
and release.
Auto Close – Slide the lever forward to the farthest position
and release (manually close the Sunshade).
Tilt the sunroof (front only) A:
Raise – Press lever upward
Lower – Push lever forward
Slide the rear sunshade B:
Auto Open – Slide the lever backward
Auto Close – Slide the lever forward
REMINDERS:
§
Sunshade must remain OPEN while sunroof is open and vehicle is moving.
§
If the ignition is turned off with the Sunroof not fully closed, the Instrument Cluster LCD will display a warning message and a chime will sound for a few seconds.
§
Do not adjust the sunroof or sunshade while driving. This could result in loss of control of the vehicle.
Quick Tip
To stop the sunroof/sunshade at any position, press or pull the sunroof control lever in any direction.
OTHER KEY FEATURES
AB
SUNROOF OPERATION VIDEO
To view a video on your mobile device, snap this QR Code or visit the listed website. Refer to page 2 for more information.www.youtube.com/KiaFeatureVideos
52
Page 55 of 66
53
OTHER KEY FEATURES
Rear View Monitor (RVM) System†6
The Rear View Monitor system is not a safety device. It is a
supplemental system that displays the view behind the vehicle
through the Navigation screen* while the vehicle is in Reverse.
The Rear View Monitor activates when the:
§ Engine Start /Stop button is in the ON position
§ Gear Shift Lever is in the R (Reverse) position
REMINDERS:
§ The Rear View Monitor is not a substitute for proper and safe backing-up procedures
§ The Rear View Monitor may not display every object behind the vehicle
§ Always drive carefully and use caution when backing up
Images are for illustrative purposes only and may not reflect actual feature or operation.
ALWAYS CHECK THE OWNER’S MANUAL FOR COMPLE TE OPERATING INFORMATION AND SAFETY WARNINGS.*IF EQUIPPED†LEG AL DISCL AIMERS ON BACK INSIDE COVER
Page 56 of 66

OTHER KEY FEATURES
54
ABCDEFG
Auto-Dimming Rearview Mirror
Designed to help reduce glare from a vehicle’s headlights
located in the rear and also to connect up to three electronic
transmitters in one location.
REMINDER: Mirror indicator light will illuminate when automatic dimming is ON.
HomeLink® Setup - How to Sync Transmitter
If programming for the first time, begin with Step 1 (repeating this step will delete all information).
To program non-rolling and rolling code garage door openers and other devices:
1. Press and hold the left A and center D buttons simultaneously until the indicator light C begins
to flash (to reprogram buttons, skip this step)
2. Press and hold the desired button A, B or D and hold the button on the transmitter while it is
approximately 1 to 3 inches away from the mirror. The HomeLink® Indicator light C will flash
rapidly once the frequency signal has been successfully programmed
To finish programming rolling code garage door
openers, complete these steps:
3. Locate the “learn” or “smart” button on the garage door’s
motor head unit. Press and release the button and complete
Step 4 within 30 seconds
4. Firmly press and release the programmed HomeLink®
button up to three times
Operating HomeLink®:
Press one of the programmed HomeLink® buttons.
Erasing programmed buttons:
Press and hold the left A and center D buttons
simultaneously for approximately 20 seconds, and
then release both buttons within 30 seconds.
HomeLink® with Auto-Dimming Rearview Mirror† 13
A HomeLink® button B HomeLink® button C Indicator lightD HomeLink® button
E Glare detection sensorF Automatic dimming ONG Automatic dimming OFF
If your garage door opener was manufactured in 2011 or later, and you’re unable to program your vehicle’s HomeLink® system, you may need to purchase a HomeLink Repeater Kit. For more information, go to www.HomeLink.com or call (800) 355-3515.
Quick Tips
§ You can reprogram a single HomeLink® button by repeating Step 2
§ Erasing programmed buttons will delete all trained transmitters
HOMELINK REARVIEW MIRROR SETUP VIDEO
To view a video on your mobile device, snap this QR Code or visit the listed website. Refer to page 2 for more information.www.youtube.com/KiaFeatureVideos
*IF EQUIPPED†LEG AL DISCL AIMERS ON BACK INSIDE COVER


 System†6
The Rear View Monitor system is not a safety device. It is a
supplemental system that displays the view behind the vehicle
through the Naviga")