Page 20 of 611
Safety features of your vehicle
43
Front seat
(1) Seat adjustment, forward / backward
(2) Seatback recliner
(3) Seat adjustment, height*
(4) Lumbar support* (Driver`s seat)
(5) Headrest
Rear seat
(6) Seatback angle and folding
(7) Headrest
(8) Armrest
* : if equipped
SEAT
OQL035001
Page 24 of 611
Safety features of your vehicle
83
Front seat adjustment - manual
Forward and backward
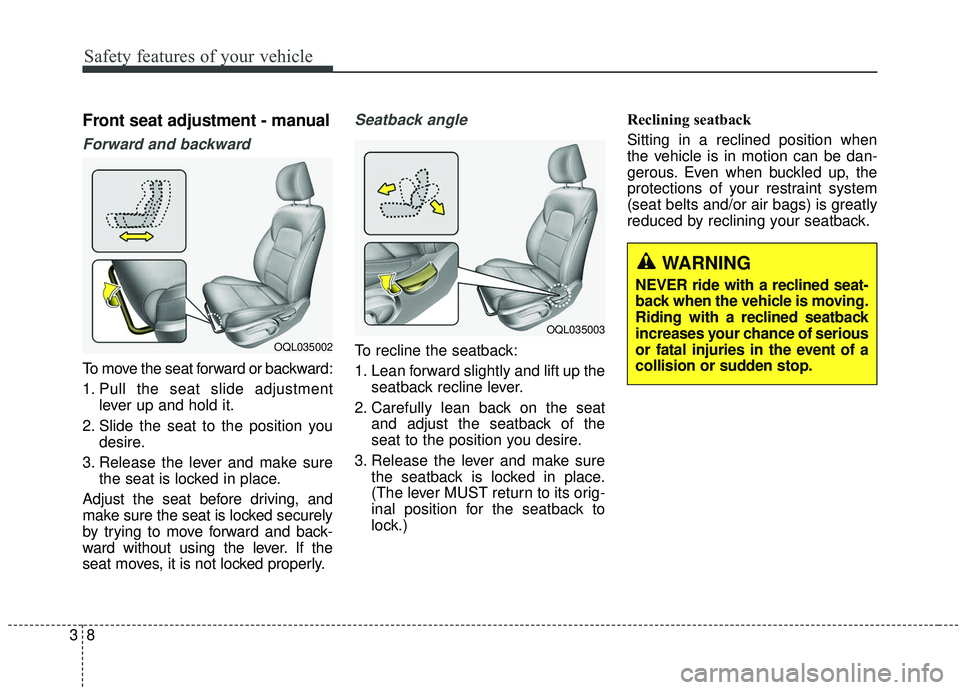
To move the seat forward or backward:
1. Pull the seat slide adjustmentlever up and hold it.
2. Slide the seat to the position you desire.
3. Release the lever and make sure the seat is locked in place.
Adjust the seat before driving, and
make sure the seat is locked securely
by trying to move forward and back-
ward without using the lever. If the
seat moves, it is not locked properly.
Seatback angle
To recline the seatback:
1. Lean forward slightly and lift up the seatback recline lever.
2. Carefully lean back on the seat and adjust the seatback of the
seat to the position you desire.
3. Release the lever and make sure the seatback is locked in place.
(The lever MUST return to its orig-
inal position for the seatback to
lock.) Reclining seatback
Sitting in a reclined position when
the vehicle is in motion can be dan-
gerous. Even when buckled up, the
protections of your restraint system
(seat belts and/or air bags) is greatly
reduced by reclining your seatback.OQL035002
OQL035003
WARNING
NEVER ride with a reclined seat-
back when the vehicle is moving.
Riding with a reclined seatback
increases your chance of serious
or fatal injuries in the event of a
collision or sudden stop.
Page 27 of 611
311
Safety features of your vehicle
Forward and backward
Push the control switch forward or
backward to move the seat to the
desired position. Release the switch
once the seat reaches the desired
position.
Seatback angle
Push the control switch forward or
backward to move the seatback to
the desired angle. Release the
switch once the seat reaches the
desired position.
Seat height
Pull the front portion of the control
switch up to raise or press down to
lower the front part of the seat cush-
ion. Pull the rear portion of the con-
trol switch up to raise or press down
to lower the seat cushion. Release
the switch once the seat reaches the
desired position.
OQL035008OQL035007OQL035006
Page 56 of 611
Safety features of your vehicle
40
3
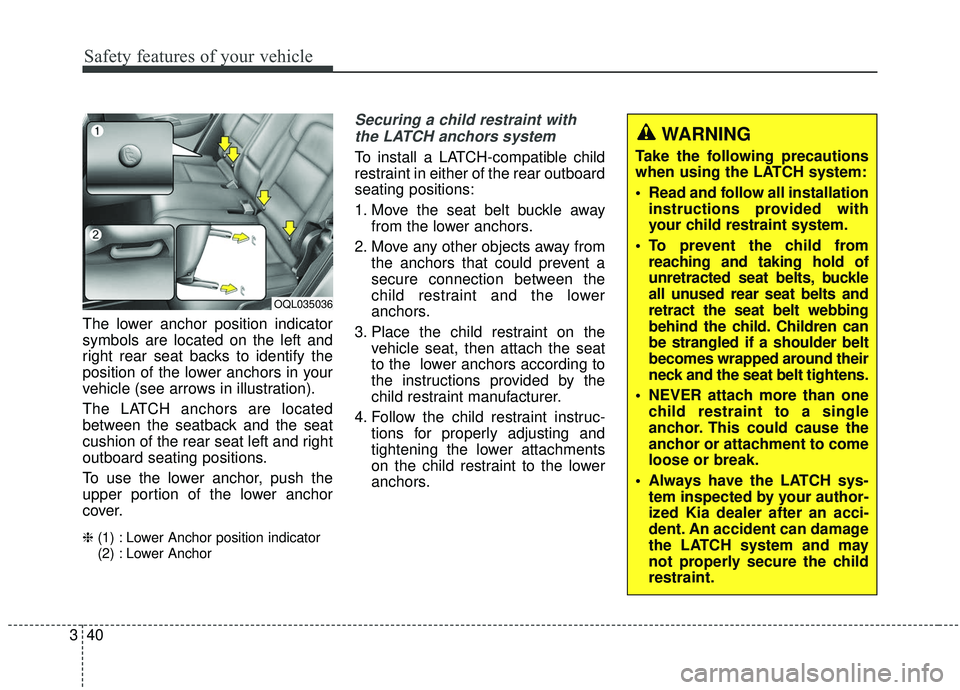
The lower anchor position indicator
symbols are located on the left and
right rear seat backs to identify the
position of the lower anchors in your
vehicle (see arrows in illustration).
The LATCH anchors are located
between the seatback and the seat
cushion of the rear seat left and right
outboard seating positions.
To use the lower anchor, push the
upper portion of the lower anchor
cover.
❈ (1) : Lower Anchor position indicator
(2) : Lower Anchor
Securing a child restraint with
the LATCH anchors system
To install a LATCH-compatible child
restraint in either of the rear outboard
seating positions:
1. Move the seat belt buckle away from the lower anchors.
2. Move any other objects away from the anchors that could prevent a
secure connection between the
child restraint and the lower
anchors.
3. Place the child restraint on the vehicle seat, then attach the seat
to the lower anchors according to
the instructions provided by the
child restraint manufacturer.
4. Follow the child restraint instruc- tions for properly adjusting and
tightening the lower attachments
on the child restraint to the lower
anchors.
OQL035036
WARNING
Take the following precautions
when using the LATCH system:
Read and follow all installationinstructions provided with
your child restraint system.
To prevent the child from reaching and taking hold of
unretracted seat belts, buckle
all unused rear seat belts and
retract the seat belt webbing
behind the child. Children can
be strangled if a shoulder belt
becomes wrapped around their
neck and the seat belt tightens.
NEVER attach more than one child restraint to a single
anchor. This could cause the
anchor or attachment to come
loose or break.
Always have the LATCH sys- tem inspected by your author-
ized Kia dealer after an acci-
dent. An accident can damage
the LATCH system and may
not properly secure the child
restraint.
Page 62 of 611
Safety features of your vehicle
46
3
How does the air bag system
operate?
Air bags are activated (able to
inflate if necessary) only when the
ignition switch is turned to the ON
or START position.
The appropriate air bags inflate instantly in the event of a serious
frontal collision or side collision in
order to help protect the occupants
from serious physical injury.
Generally, air bags are designed to inflate based upon the severity of a
collision and its direction. These
two factors determine whether the
sensors produce an electronic
deployment/ inflation signal.
Air bag deployment depends on a number of factors including vehicle
speed, angles of impact, and, the
density and stiffness of the vehi-
cles or objects which your vehicle
hits in the collision. The determin-
ing factors are not limited to those
mentioned above. The front air bags will completely
inflate and deflate in an instant.
It is virtually impossible for you to
see the air bags inflate during an
accident.
It is much more likely that you will
simply see the deflated air bags
hanging out of their storage com-
partments after the collision.
In addition to inflating in serious side collisions, side and/or curtain
air bags will inflate if the sensing
system detects a rollover.
When a rollover is detected curtain air bags will remain inflated longer
to help provide protection from
ejection, especially when used in
conjunction with the seat belts. In order to help provide protection,
the air bags must inflate rapidly.
The speed of the air bag inflation is
a consequence of extremely short
time in which to inflate the air bag
between the occupant and the
vehicle structures before the occu-
pant impacts those structures. This
speed of inflation reduces the risk
of serious or life-threatening
injuries and is thus a necessary
part of the air bag design.
However, air bag inflation can also
cause injuries which can include
facial abrasions, bruises and bro-
ken bones because the inflation
speed also causes the air bags to
expand with a great deal of force.
There are even circumstances under which contact with the
steering wheel or passenger air
bag can cause fatal injuries,
especially if the occupant is
positioned excessively close to
the steering wheel or passenger
air bag.
Page 83 of 611
367
Safety features of your vehicle
Problems may arise if the sensor
installation angles are changed due
to the deformation of the front
bumper, front end module, body or
front doors where side collision sen-
sors are installed. Have the vehicle
checked and repaired by an author-
ized Kia dealer.
Installing bumper guards (or side
step or running board) or replacing a
bumper (or front door module) with
non-genuine parts may adversely
affect your vehicle’s collision and air
bag deployment performance.Air bag inflation conditions
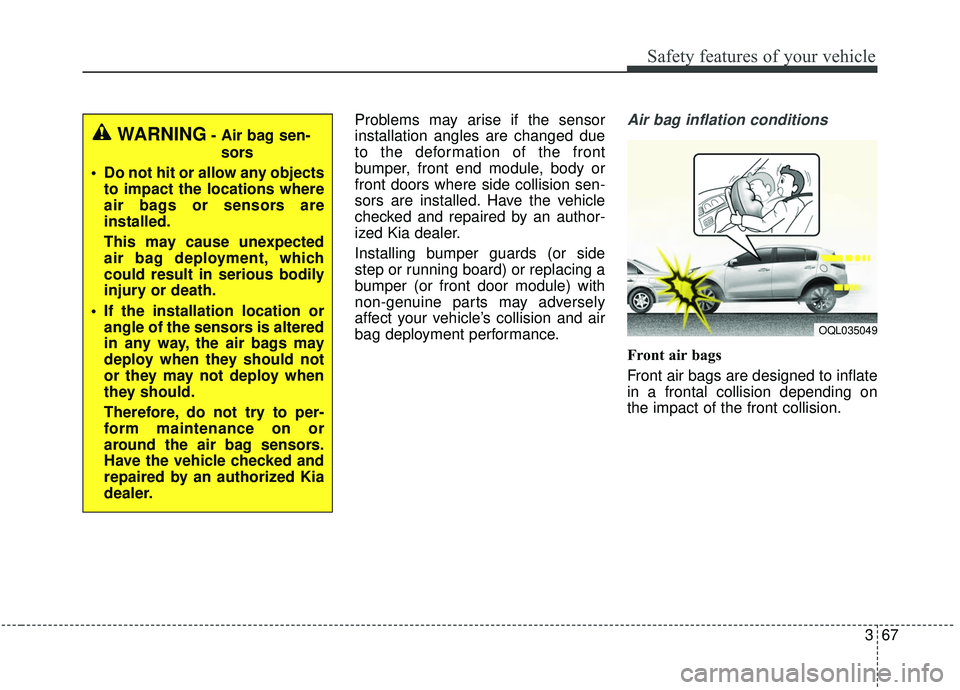
Front air bags
Front air bags are designed to inflate
in a frontal collision depending on
the impact of the front collision.
OQL035049
WARNING- Air bag sen-sors
Do not hit or allow any objects to impact the locations where
air bags or sensors are
installed.
This may cause unexpected
air bag deployment, which
could result in serious bodily
injury or death.
If the installation location or angle of the sensors is altered
in any way, the air bags may
deploy when they should not
or they may not deploy when
they should.
Therefore, do not try to per-
form maintenance on or
around the air bag sensors.
Have the vehicle checked and
repaired by an authorized Kia
dealer.
Page 86 of 611
Safety features of your vehicle
70
3
In an angled collision, the force of
impact may direct the occupants in
a direction where the air bags
would not be able to provide any
additional benefit, and thus the
sensors may not deploy any air
bags. Just before impact, drivers often
brake heavily. Such heavy braking
lowers the front portion of the vehi-
cle causing it to “ride” under a vehi-
cle with a higher ground clearance.
Air bags may not inflate in this
"under-ride" situation because
deceleration forces that are detect-
ed by sensors may be significantly
reduced by such “under-ride” colli-
sions. Front air bags may not inflate in all
rollover accidents where the
SRSCM indicates that the front air
bag deployment would not provide
additional occupant protection.
1VQA2089OQL0350551VQA2091
Page 147 of 611
459
Features of your vehicle
(Continued)
• When the charging system warninglight comes on due to the low volt-
age (When the alternator or bat-
tery) does not operate normally or
malfunctions), the steering wheel
may require increased steering
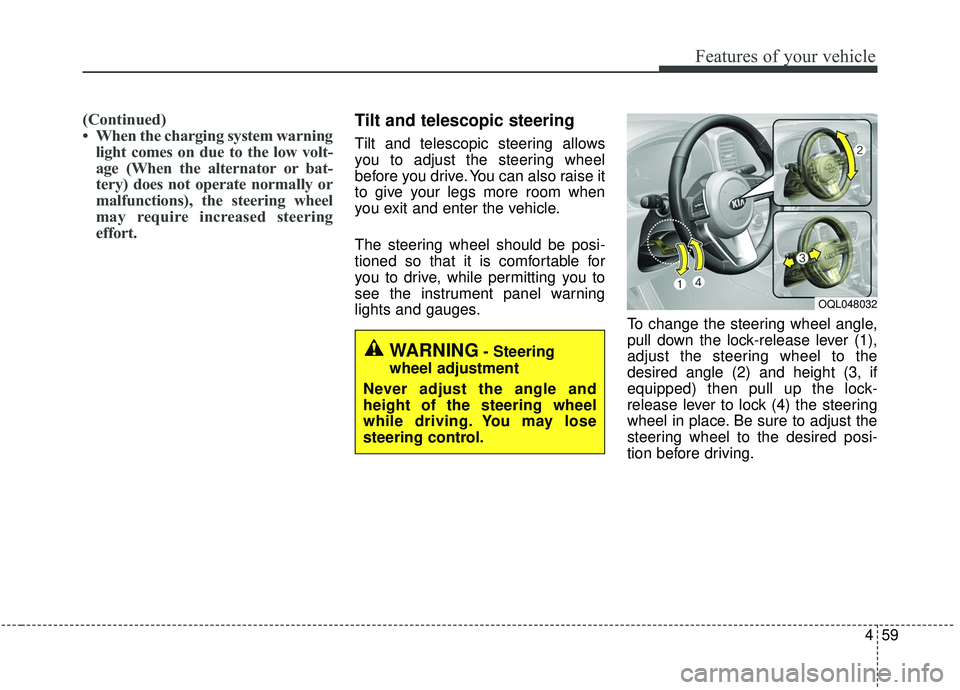
effort.Tilt and telescopic steering
Tilt and telescopic steering allows
you to adjust the steering wheel
before you drive. You can also raise it
to give your legs more room when
you exit and enter the vehicle.
The steering wheel should be posi-
tioned so that it is comfortable for
you to drive, while permitting you to
see the instrument panel warning
lights and gauges. To change the steering wheel angle,
pull down the lock-release lever (1),
adjust the steering wheel to the
desired angle (2) and height (3, if
equipped) then pull up the lock-
release lever to lock (4) the steering
wheel in place. Be sure to adjust the
steering wheel to the desired posi-
tion before driving.
WARNING- Steering
wheel adjustment
Never adjust the angle and
height of the steering wheel
while driving. You may lose
steering control.
OQL048032