Page 88 of 611
Adding equipment to or modi-
fying your air bag-equipped
vehicle
If you modify your vehicle by chang-
ing your vehicle's frame, bumper sys-
tem, front end or side sheet metal or
ride height, this may affect the opera-
tion of your vehicle's air bag system.
Air bag warning label
Air bag warning labels, some
required by the Canada Motor
Vehicle Safety Standards (CMVSS),
are attached to the sunvisor to alert
the driver and passengers of poten-
tial risks of the air bag system.
WARNING- Tamperingwith SRS
Do not tamper with or discon-
nect SRS wiring, or other com-
ponents of the SRS system.
Doing so could result in the
accidental inflation of the air
bags or by rendering the SRS
inoperative.
WARNING- Towing Vehicle
Always have the ignition off
when your vehicle is being
towed. The side air bags may
inflate if the vehicle is tilted
such as when being towed
because of the rollover sensors
in the vehicle.
OQLA035057
OQLA035058
372
Safety features of your vehicle
Page 104 of 611

Features of your vehicle
16
4
Loss of the smart key
A maximum of 2 smart keys can be
registered to a single vehicle.
If you happen to lose your smart key,
you will not be able to start the
engine. You should immediately take
the vehicle and remaining key to your
authorized Kia dealer(tow the vehi-
cle, if necessary) to protect it from
potential theft.
Smart key precautions
The smart key will not work if any
of the following occur:
- The smart key is close to a radio transmitter such as a radio sta-
tion or an airport which can inter-
fere with normal operation of the
smart key.
- The smart key is near a mobile two way radio system or a cellu-
lar phone.
- Another vehicle’s smart key is being operated close to your
vehicle.
When the smart key does not work correctly, open and close the door
with the mechanical key and contact
an authorized Kia dealer. If the smart key is in close proximity
to your cellular phone or smart
phone, the signal from the smart
key could be blocked by normal
operation of your cellular phone or
smart phone. This is especially
important when the phone is active
such as making a call, receiving
calls, text messaging, and/or send-
ing/receiving emails. Avoid placing
the smart key and your cellular
phone or smart phone in the same
pants or jacket pocket and maintain
adequate distance between the two
devices.
Do not leave the smart key near metallic objects such as golf bags,
metal cases and so on.
Door Lock/Unlock failure or poor starting can occur when the smart
key is placed near metallic objects.
Always carry your smart key when you leave the car. An unattended
smart key close to the vehicle can
cause the vehicle battery to be dis-
charged.
Page 111 of 611

423
Features of your vehicle
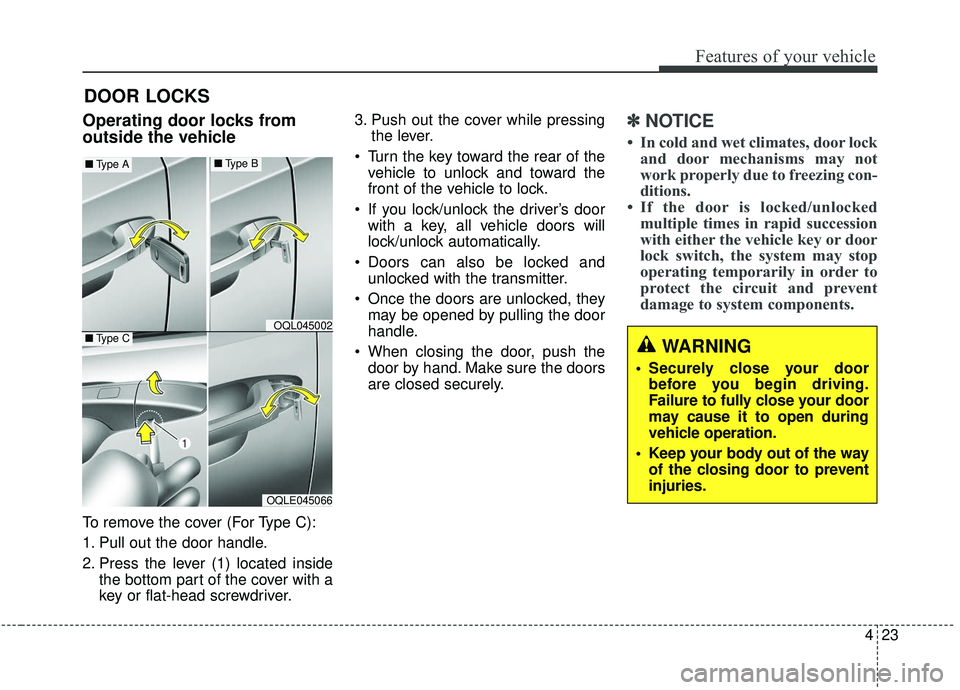
Operating door locks from
outside the vehicle
To remove the cover (For Type C):
1. Pull out the door handle.
2. Press the lever (1) located insidethe bottom part of the cover with a
key or flat-head screwdriver. 3. Push out the cover while pressing
the lever.
Turn the key toward the rear of the vehicle to unlock and toward the
front of the vehicle to lock.
If you lock/unlock the driver’s door with a key, all vehicle doors will
lock/unlock automatically.
Doors can also be locked and unlocked with the transmitter.
Once the doors are unlocked, they may be opened by pulling the door
handle.
When closing the door, push the door by hand. Make sure the doors
are closed securely.
✽ ✽ NOTICE
• In cold and wet climates, door lock
and door mechanisms may not
work properly due to freezing con-
ditions.
• If the door is locked/unlocked multiple times in rapid succession
with either the vehicle key or door
lock switch, the system may stop
operating temporarily in order to
protect the circuit and prevent
damage to system components.
DOOR LOCKS
OQLE045066
OQL045002
■ Type A■Type B
■Type CWARNING
• Securely close your door
before you begin driving.
Failure to fully close your door
may cause it to open during
vehicle operation.
Keep your body out of the way of the closing door to prevent
injuries.
Page 150 of 611
Features of your vehicle
62
4
MIRRORS
Inside rearview mirror
Adjust the rearview mirror so that the
center view through the rear window
is seen. Make this adjustment before
you start driving.
Do not place objects in the rear seat
or cargo area which would interfere
with your vision through the rear win-
dow.
Day/night rearview mirror
(if equipped)
Make this adjustment before you
start driving and while the day/night
lever (3) is in the day position.
Pull the day/night lever (3) toward
you to reduce the glare from the
headlights of the vehicles behind you
during night driving.
Remember that you lose somerearview clarity in the night position.
❈ (1) : Day, (2) : Night
WARNING- Mirror adjust-
ment
Do not adjust the rearview mir-
ror while the vehicle is moving.
This could result in loss of con-
trol.
WARNING
Do not modify the inside mirror
and don’t install a wide mirror. It
could result in injury during an
accident or deployment of the
air bag.
OQL045035
Page 151 of 611

463
Features of your vehicle
Electric chromatic mirror (ECM) (if equipped)
The electric rearview mirror automat-
ically controls the glare from the
headlights of the vehicles behind you
in nighttime or low light driving condi-
tions. The sensor mounted in the mir-
ror senses the light level around the
vehicle and automatically controls
the headlight glare from the vehicles
behind you.
When the engine is running, the
glare is automatically controlled by
the sensor mounted in the rearview
mirror.
Whenever the shift lever is shifted
into reverse (R), the mirror will auto-
matically go to the brightest setting in
order to improve the drivers view
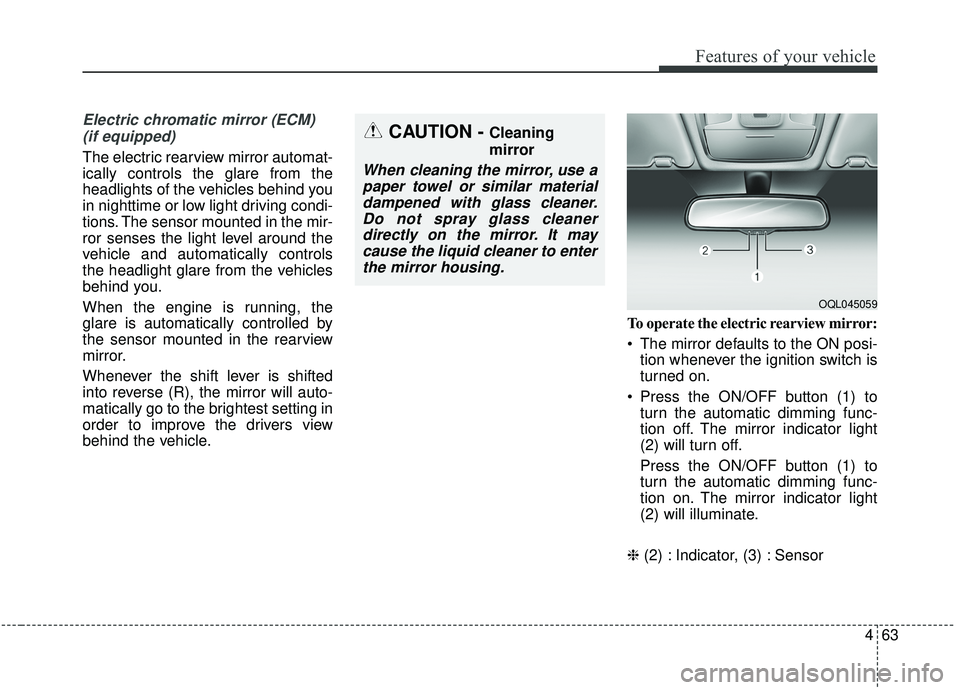
behind the vehicle. To operate the electric rearview mirror:
The mirror defaults to the ON posi-
tion whenever the ignition switch is
turned on.
Press the ON/OFF button (1) to turn the automatic dimming func-
tion off. The mirror indicator light
(2) will turn off.
Press the ON/OFF button (1) to
turn the automatic dimming func-
tion on. The mirror indicator light
(2) will illuminate.
❈ (2) : Indicator, (3) : Sensor
CAUTION - Cleaning
mirror
When cleaning the mirror, use a
paper towel or similar materialdampened with glass cleaner.Do not spray glass cleanerdirectly on the mirror. It maycause the liquid cleaner to enterthe mirror housing.
OQL045059
Page 167 of 611
479
Features of your vehicle
Manual type
To fold the outside rearview mirror,
grasp the housing of the mirror and
then fold it toward the rear of the
vehicle.
OQL045039
Page 170 of 611
Features of your vehicle
82
4
Gauges
Speedometer
The speedometer indicates the
speed of the vehicle and is calibrated
in miles per hour (mph) and/or kilo-
meters per hour (km/h).
Tachometer
The tachometer indicates the
approximate number of engine revo-
lutions per minute (rpm).
Use the tachometer to select the cor-
rect shift points and to prevent lug-
ging and/or over-revving the engine.
Engine Coolant Temperature
Gauge
This gauge indicates the tempera-
ture of the engine coolant when the
ignition switch or Engine Start/Stop
button is ON.
If the gauge pointer moves beyond
the normal range area toward the "H"
position, it indicates overheating that
may damage the engine.
Do not continue driving with an over-
heated engine. If your vehicle over-
heats, refer to “If the Engine
Overheats” in chapter 7.
CAUTION - Red zone
Do not operate the engine with-in the tachometer's RED ZONE.This may cause severe enginedamage.
OQL048183L
OQL048230LOQL045184C
Page 193 of 611

4105
Features of your vehicle
Parking Brake & BrakeFluid Warning Light
This warning light illuminates:
Once you set the ignition switch or Engine Start/Stop Button to the ON
position.
- It illuminates for approximately 3seconds
When the parking brake is applied, the warning light will remain on.
When the brake fluid level in the reservoir is low.
- If the warning light illuminateswith the parking brake released, it
indicates the brake fluid level in
reservoir is low. If the brake fluid level in the reservoir
is low:
1. Drive carefully to the nearest safe
location and stop your vehicle.
2. With the engine stopped, check the brake fluid level immediately and add
fluid as required (For more details,
refer to “Brake Fluid” in chapter 7).
Then check all brake components
for fluid leaks. If any leaks in the
brake system are still found, the
warning light remains on, or the
brakes do not operate properly, do
not drive the vehicle.
In this case, have your vehicle
towed to an authorized Kia dealer
and inspected. Dual-diagonal braking system
Your vehicle is equipped with dual-
diagonal braking systems. This
means you still have braking on two
wheels even if one of the dual sys-
tems should fail.
With only one of the dual systems
working, greater pedal pressure will
be required to stop the vehicle.
Also, the vehicle will require
increased stopping distance with
only a portion of the brake system
working.
If the brakes fail while you are driv-
ing, shift to a lower gear for addition-
al engine braking and stop the vehi-
cle as soon as it is safe to do so.
Driving the vehicle with a warning
light ON is dangerous. If the Parking
Brake & Brake Fluid Warning Light
illuminate with the parking brake
released, it indicates that the brake
fluid level is low.
In this case, have your vehicle inspect-
ed by an authorized Kia dealer.