Page 154 of 611
Features of your vehicle
66
4
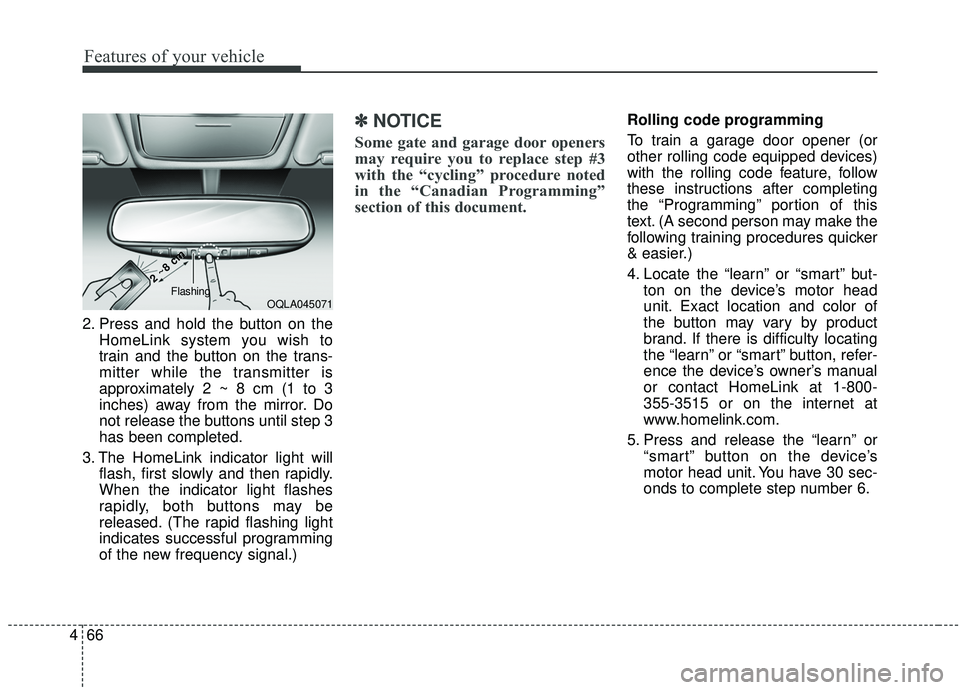
2. Press and hold the button on the
HomeLink system you wish to
train and the button on the trans-
mitter while the transmitter is
approximately 2 ~ 8 cm (1 to 3
inches) away from the mirror. Do
not release the buttons until step 3
has been completed.
3. The HomeLink indicator light will flash, first slowly and then rapidly.
When the indicator light flashes
rapidly, both buttons may be
released. (The rapid flashing light
indicates successful programming
of the new frequency signal.)
✽ ✽NOTICE
Some gate and garage door openers
may require you to replace step #3
with the “cycling” procedure noted
in the “Canadian Programming”
section of this document.
Rolling code programming
To train a garage door opener (or
other rolling code equipped devices)
with the rolling code feature, follow
these instructions after completing
the “Programming” portion of this
text. (A second person may make the
following training procedures quicker
& easier.)
4. Locate the “learn” or “smart” but-
ton on the device’s motor head
unit. Exact location and color of
the button may vary by product
brand. If there is difficulty locating
the “learn” or “smart” button, refer-
ence the device’s owner’s manual
or contact HomeLink at 1-800-
355-3515 or on the internet at
www.homelink.com.
5. Press and release the “learn” or “smart” button on the device’s
motor head unit. You have 30 sec-
onds to complete step number 6.
OQLA045071
2 ~8 cm
2 ~8 cmFlashing
Page 157 of 611
469
Features of your vehicle
FCC ID: NZLZTVHL3
IC: 4112A-ZTVHL3
This device complies with
Industry Canada licence-exempt
RSS standard(s).
Operation is subject to the following
two conditions:
(1) This device may not cause inter-ference, and
(2) This device must accept any interference, including interfer-
ence that may cause undesired
operation of the device.Electric chromic mirror (ECM)
with HomeLink®system, com-
pass (if equipped)
Your vehicle may be equipped with a
Gentex Automatic-Dimming Mirror
with a Z-Nav™ Electronic Compass
Display and an Integrated
HomeLink
®Wireless Control
System. During nighttime driving,
this feature will automatically detect
and reduce rearview mirror glare
while the compass indicates the
direction the vehicle is pointed. The
HomeLink
®Universal Transceiver
allows you to activate your garage
door(s), electric gate, home lighting,
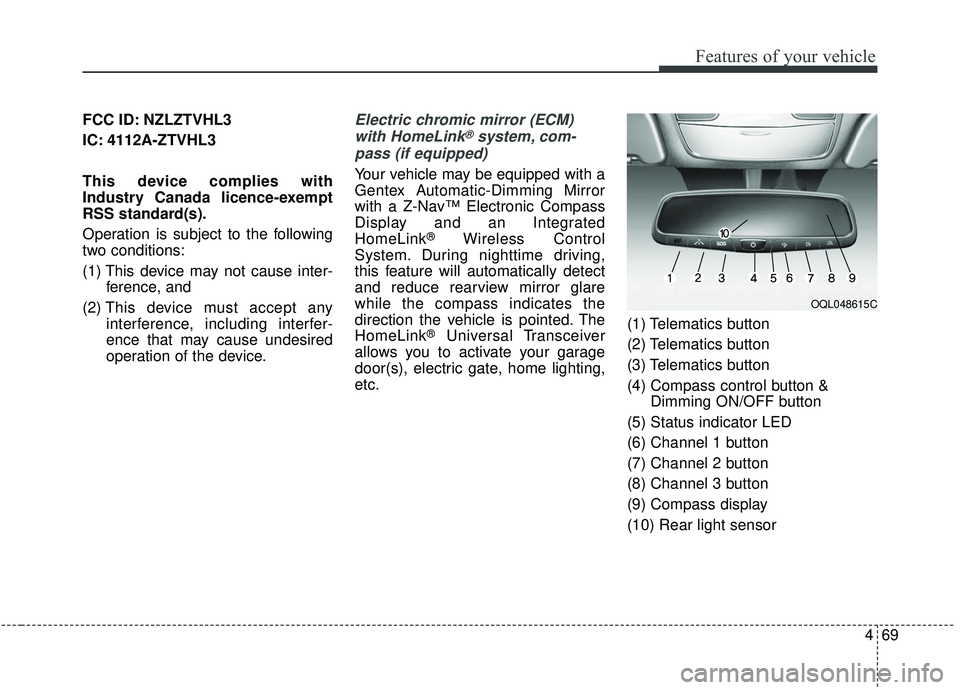
etc. (1) Telematics button
(2) Telematics button
(3) Telematics button
(4) Compass control button &
Dimming ON/OFF button
(5) Status indicator LED
(6) Channel 1 button
(7) Channel 2 button
(8) Channel 3 button
(9) Compass display
(10) Rear light sensor
OQL048615C
Page 158 of 611
Features of your vehicle
70
4
Automatic-Dimming Night Vision
Safety™ (NVS®) Mirror
(if equipped)
The NVS
®Mirror automatically
reduces glare by monitoring light lev-
els in the front and the rear of the
vehicle. Any object that obstructs
either light sensor will degrade the
automatic dimming control feature.
For more information regarding
NVS
®mirrors and other applica-
tions, please refer to the Gentex
website:
www.gentex.com Your mirror will automatically dim
upon detecting glare from the vehi-
cles traveling behind you. The auto-
dimming function can be controlled
by pressing the Dimming ON/OFF
button:
1. Pressing and holding the button
for 3 seconds turns the auto-dim-
ming function OFF which is indi-
cated by the green Status
Indicator LED turning off.
2. Pressing and holding the button for 3 seconds again turns the
auto-dimming function ON which
is indicated by the green Status
Indicator LED turning on.
The mirror defaults to the ON posi-
tion each time the vehicle is started.
Z-Nav™ Compass Display
The NVS™ Mirror in your vehicle is
also equipped with a Z-Nav™
Compass that shows the vehicle
Compass heading in the Display
Window using the 8 basic cardinal
headings (N, NE, E, SE, etc.).
Compass function
The Compass can be turned ON and
OFF and will remember the last state
when the ignition is cycled. To turn
the display feature ON/OFF:
1. Press and release the button within 1 second to turn the display
feature OFF.
2. Press and release the button again within 1 second to turn the
display back ON.
Additional options can be set with
press and hold sequences of the
button and are detailed below.
There is a difference between mag-
netic north and true north. To com-
pensate for this difference you will
need to adjust the Zone setting based
on where you live.
Page 164 of 611
Features of your vehicle
76
4
Erasing HomeLink®buttons
Individual buttons cannot be erased.
However, to erase all three pro-
grammed buttons:
1. Press and hold the two outer
HomeLink
®buttons until the indi-
cator light begins to flash after 10
seconds.
2. Release both buttons. Do not hold for longer than 20 seconds.
The Integrated HomeLink
®Wireless
Control System is now in the training
(learn) mode and can be pro-
grammed at any time following the
appropriate steps in the
Programming chapters above.
NVS
®is a registered trademark and
Z-Nav™ is a trademark of the Gentex
Corporation, Zeeland, Michigan.
HomeLink
®is a registered trademark
owned by Johnson Controls,
Incorporated, Milwaukee, Wisconsin. FCC ID: NZLZTVHL3
IC: 4112A-ZTVHL3
This device complies with
Industry Canada licence-exempt
RSS standard(s).
Operation is subject to the following
two conditions:
(1) This device may not cause inter-
ference, and
(2) This device must accept any
interference, including interfer-
ence that may cause undesired
operation of the device.
Outside rearview mirror
Be sure to adjust the mirror angles
before driving.
Your vehicle is equipped with both
left-hand and right-hand outside
rearview mirrors. The mirrors can be
adjusted remotely with the remote
switch. The mirror heads can be fold-
ed back to prevent damage during an
automatic vehicle wash or when
passing through a narrow street.
The right outside rearview mirror is
convex. Objects seen in the mirror
are closer than they appear.
Use your interior rearview mirror or
direct observation to determine the
actual distance of following vehicles
when changing lanes.
Page 165 of 611
477
Features of your vehicle
If the mirror is jammed with ice, do
not adjust the mirror by force. Use an
approved spray de-icer (not radiator
antifreeze) to release the frozen
mechanism or move the vehicle to a
warm place and allow the ice to melt.
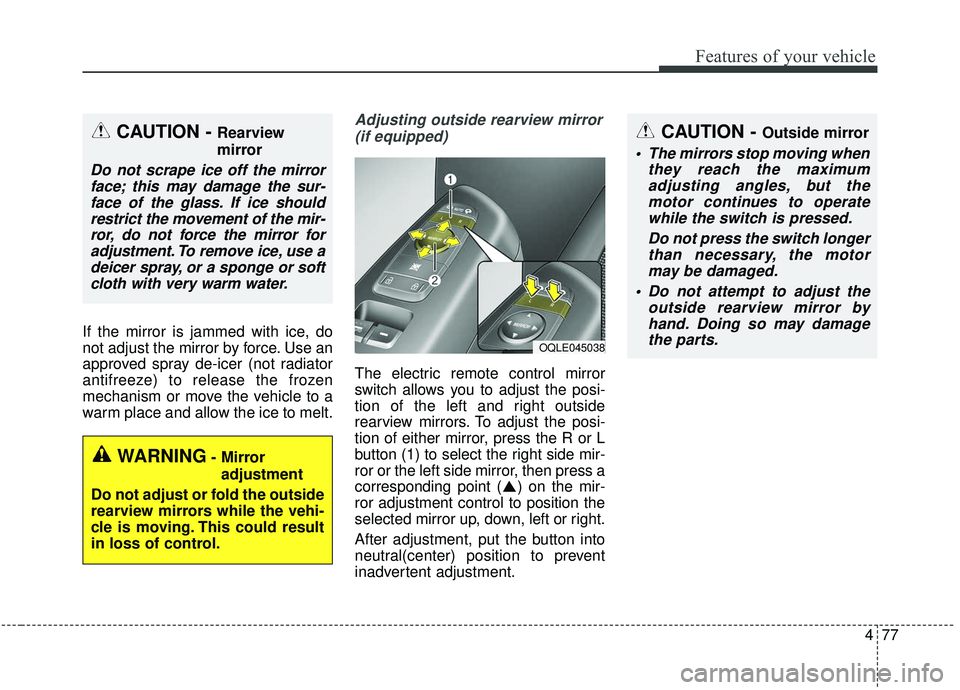
Adjusting outside rearview mirror(if equipped)
The electric remote control mirror
switch allows you to adjust the posi-
tion of the left and right outside
rearview mirrors. To adjust the posi-
tion of either mirror, press the R or L
button (1) to select the right side mir-
ror or the left side mirror, then press a
corresponding point ( ) on the mir-
ror adjustment control to position the
selected mirror up, down, left or right.
After adjustment, put the button into
neutral(center) position to prevent
inadvertent adjustment.
CAUTION - Outside mirror
The mirrors stop moving when they reach the maximumadjusting angles, but themotor continues to operatewhile the switch is pressed.
Do not press the switch longerthan necessary, the motormay be damaged.
Do not attempt to adjust the outside rearview mirror byhand. Doing so may damagethe parts.
OQLE045038
WARNING- Mirror
adjustment
Do not adjust or fold the outside
rearview mirrors while the vehi-
cle is moving. This could result
in loss of control.
CAUTION - Rearview
mirror
Do not scrape ice off the mirror face; this may damage the sur-face of the glass. If ice shouldrestrict the movement of the mir-ror, do not force the mirror foradjustment. To remove ice, use adeicer spray, or a sponge or softcloth with very warm water.
Page 166 of 611
Features of your vehicle
78
4
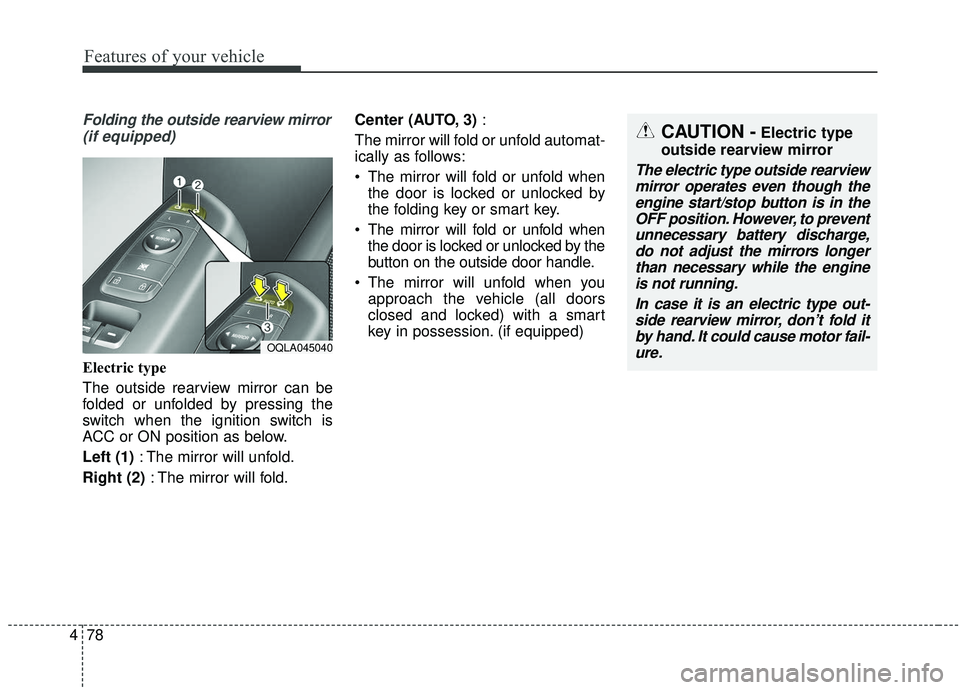
Folding the outside rearview mirror
(if equipped)
Electric type
The outside rearview mirror can be
folded or unfolded by pressing the
switch when the ignition switch is
ACC or ON position as below.
Left (1) : The mirror will unfold.
Right (2) : The mirror will fold. Center (AUTO, 3)
:
The mirror will fold or unfold automat-
ically as follows:
The mirror will fold or unfold when the door is locked or unlocked by
the folding key or smart key.
The mirror will fold or unfold when the door is locked or unlocked by the
button on the outside door handle.
The mirror will unfold when you approach the vehicle (all doors
closed and locked) with a smart
key in possession. (if equipped)
OQLA045040
CAUTION -Electric type
outside rearview mirror
The electric type outside rearview mirror operates even though theengine start/stop button is in theOFF position. However, to preventunnecessary battery discharge,do not adjust the mirrors longerthan necessary while the engineis not running.
In case it is an electric type out-side rearview mirror, don’t fold itby hand. It could cause motor fail-ure.
Page 167 of 611
479
Features of your vehicle
Manual type
To fold the outside rearview mirror,
grasp the housing of the mirror and
then fold it toward the rear of the
vehicle.
OQL045039
Page 180 of 611
Features of your vehicle
92
4
Sound
Cluster Voice Guidance Volume (if
equipped) :
- This used to set/adjust the voiceguidance volume.
Parking Distance Warning Volume (if equipped) :
- Adjust the Park Assist Systemvolume. (Level 1 ~ 3)
Welcome Sound (if equipped) : - If this item is checked, the wel-come sound function will be acti-
vated. Convenience
Welcome Mirror/Light (if equipped) :
- If this item is checked, the wel-come mirror/light function will be
activated.
Wireless Charging System (if equipped) :
- If this is checked, the wirelesscharging system function will be
activated.
Wiper/Light Display (if equipped) : - If this item is checked, thewiper/light display will be activated.
Auto rear wiper (in R) (if equipped) : - If this is checked, the rear wiper willautomatically activated when the
front wiper is in ON position and
shift lever is in R (reverse) position.
Gear Position Pop-up (if equipped) : - If this item is checked, the gearposition pop-up display will be
activated.
Icy Road Warning (if equipped) : - If this item is checked, the icyroad warning display will be acti-
vated. Service interval
Enable Service Interval :
- To activate or deactivate the serv-ice interval function.
Adjust Interval : - To adjust the interval by mileageand period.
Reset : - To reset the service interval func-tion.