2020 KIA SPORTAGE fuse
[x] Cancel search: fusePage 265 of 611
4177
Features of your vehicle
* The actual sunvisor lamp in the vehi-cle may differ from the illustration.Power outlet
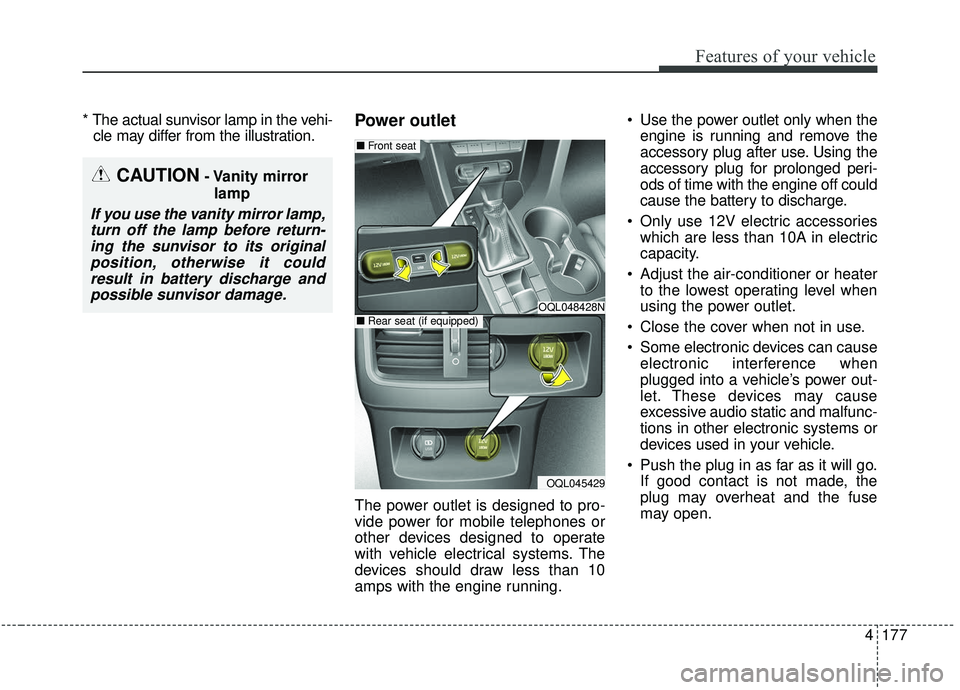
The power outlet is designed to pro-
vide power for mobile telephones or
other devices designed to operate
with vehicle electrical systems. The
devices should draw less than 10
amps with the engine running. Use the power outlet only when the
engine is running and remove the
accessory plug after use. Using the
accessory plug for prolonged peri-
ods of time with the engine off could
cause the battery to discharge.
Only use 12V electric accessories which are less than 10A in electric
capacity.
Adjust the air-conditioner or heater to the lowest operating level when
using the power outlet.
Close the cover when not in use.
Some electronic devices can cause electronic interference when
plugged into a vehicle’s power out-
let. These devices may cause
excessive audio static and malfunc-
tions in other electronic systems or
devices used in your vehicle.
Push the plug in as far as it will go. If good contact is not made, the
plug may overheat and the fuse
may open.
CAUTION- Vanity mirror
lamp
If you use the vanity mirror lamp,turn off the lamp before return-ing the sunvisor to its originalposition, otherwise it couldresult in battery discharge andpossible sunvisor damage.
OQL048428N
OQL045429
■ Front seat
■Rear seat (if equipped)
Page 295 of 611
Driving your vehicle
14
5
Even if the smart key is in the vehi-
cle, if it is far away from you, the
engine may not start.
When the ENGINE START/STOP button is in the ACC position or
above, if any door is opened, the
system checks for the smart key. If
the smart key is not in the vehicle,
a message "key is not in the vehi-
cle" will appear on the LCD display.
And if all doors are closed, the
chime will sound for 5 seconds. The
indicator or warning will turn off
while the vehicle is moving. Always
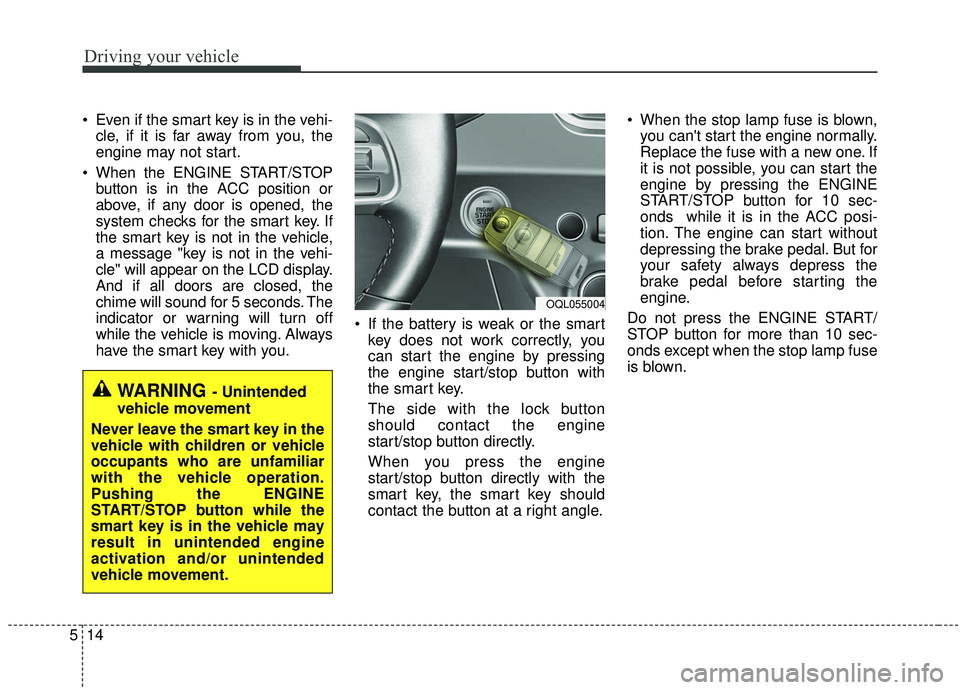
have the smart key with you. If the battery is weak or the smart
key does not work correctly, you
can start the engine by pressing
the engine start/stop button with
the smart key.
The side with the lock button
should contact the engine
start/stop button directly.
When you press the engine
start/stop button directly with the
smart key, the smart key should
contact the button at a right angle. When the stop lamp fuse is blown,
you can't start the engine normally.
Replace the fuse with a new one. If
it is not possible, you can start the
engine by pressing the ENGINE
START/STOP button for 10 sec-
onds while it is in the ACC posi-
tion. The engine can start without
depressing the brake pedal. But for
your safety always depress the
brake pedal before starting the
engine.
Do not press the ENGINE START/
STOP button for more than 10 sec-
onds except when the stop lamp fuse
is blown.
WARNING - Unintended
vehicle movement
Never leave the smart key in the
vehicle with children or vehicle
occupants who are unfamiliar
with the vehicle operation.
Pushing the ENGINE
START/STOP button while the
smart key is in the vehicle may
result in unintended engine
activation and/or unintended
vehicle movement.
OQL055004
Page 485 of 611
• Radial-ply tires . . . . . . . . . . . . . . . . . . . . . . . . . . . . . . 7-59
• Low aspect ratio tire . . . . . . . . . . . . . . . . . . . . . . . . . . 7-59
Fuses . . . . . . . . . . . . . . . . . . . . . . . . . . . . . . . . . . . . \
7-61
• Inner panel fuse replacement . . . . . . . . . . . . . . . . . . . 7-63
• Engine compartment fuse replacement. . . . . . . . . . . 7-65
• Fuse/relay panel description. . . . . . . . . . . . . . . . . . . . 7-67
Light bulbs . . . . . . . . . . . . . . . . . . . . . . . . . . . . . . . 7-79
• Bulb replacement precaution . . . . . . . . . . . . . . . . . . . 7-79
• Light bulb position (Front) . . . . . . . . . . . . . . . . . . . . 7-81
• Light bulb position (Rear) . . . . . . . . . . . . . . . . . . . . . 7-82
• Light bulb position (Side) . . . . . . . . . . . . . . . . . . . . . . 7-83
• Headlamp (High/Low beam) bulb replacement . . . . 7-83
• Front turn signal lamp bulb replacement . . . . . . . . . 7-84
• Position lamp + DRL bulb replacement . . . . . . . . . . 7-85
• Front fog lamp (Bulb and LED type) bulbreplacement . . . . . . . . . . . . . . . . . . . . . . . . . . . . . . . . 7-86
• Stop and tail lamp bulb replacement . . . . . . . . . . . . 7-86
• Tail lamp (inside) bulb replacement . . . . . . . . . . . . . 7-87
• Stop and tail lamp (LED type) bulb replacement . . 7-88
• Back-up lamp and Rear turn signal lamp (Bulb type) bulb replacement . . . . . . . . . . . . . . . . . 7-89
• High mounted stop lamp (LED type) bulb replacement . . . . . . . . . . . . . . . . . . . . . . . . . . . . . . . . 7-89
• License plate lamp (Bulb type) bulb replacement . . 7-89
• Side repeater lamp (LED type) bulb replacement . . 7-90 • Map lamp (Bulb and LED type)
bulb replacement. . 7-90
• Vanity mirror lamp (Bulb type) bulb replacement . . 7-91
• Room lamp (Bulb type) bulb replacement . . . . . . . 7-91
• Personal lamp (LED type) bulb replacement . . . . . . 7-92
• Glove box lamp (Bulb type) bulb replacement . . . . 7-92
• Liftgate room lamp (Bulb type) bulb replacement . . 7-93
Appearance care . . . . . . . . . . . . . . . . . . . . . . . . . . . 7-94
• Exterior care . . . . . . . . . . . . . . . . . . . . . . . . . . . . . . . . 7-94
• Interior care . . . . . . . . . . . . . . . . . . . . . . . . . . . . . . . . . 7-99
Emission control system . . . . . . . . . . . . . . . . . . . 7-102
• Crankcase emission control system . . . . . . . . . . . . . 7-102
• Evaporative emission control (including ORVR: Onboard Refueling Vapor Recovery) system . . . . . 7-102
• Exhaust emission control system . . . . . . . . . . . . . . . 7-103
7
Page 486 of 611
73
Maintenance
ENGINE COMPARTMENT
OQLE075095/OQLA075109
■ ■Theta II 2.4L GDI
❈ The actual engine compartment in the vehicle may differ from the illustration.
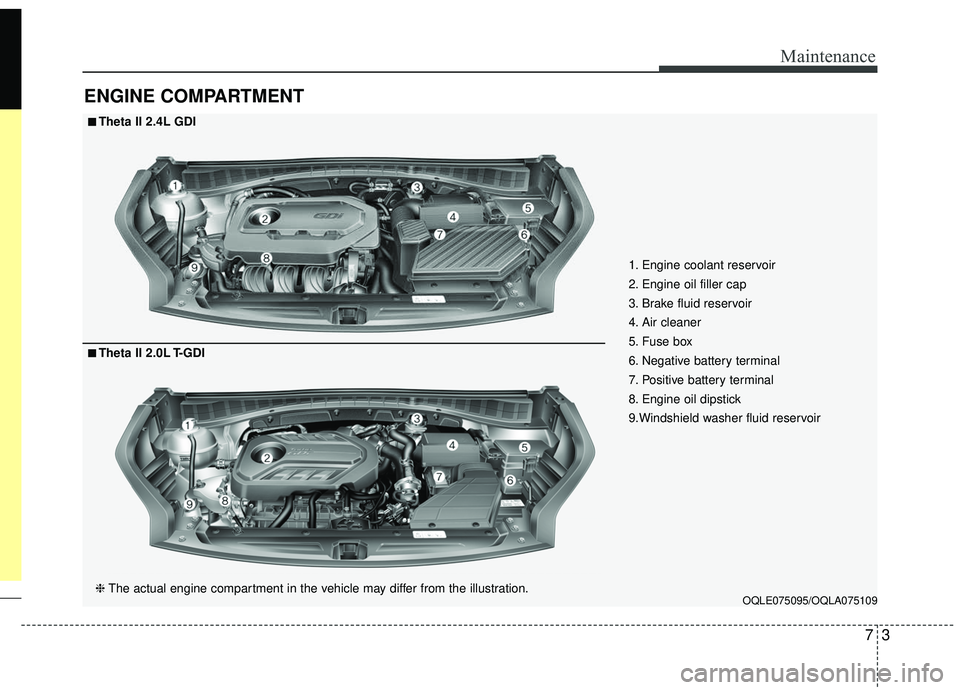
■ ■Theta II 2.0L T-GDI 1. Engine coolant reservoir
2. Engine oil filler cap
3. Brake fluid reservoir
4. Air cleaner
5. Fuse box
6. Negative battery terminal
7. Positive battery terminal
8. Engine oil dipstick
9.Windshield washer fluid reservoir
Page 544 of 611
761
Maintenance
FUSES
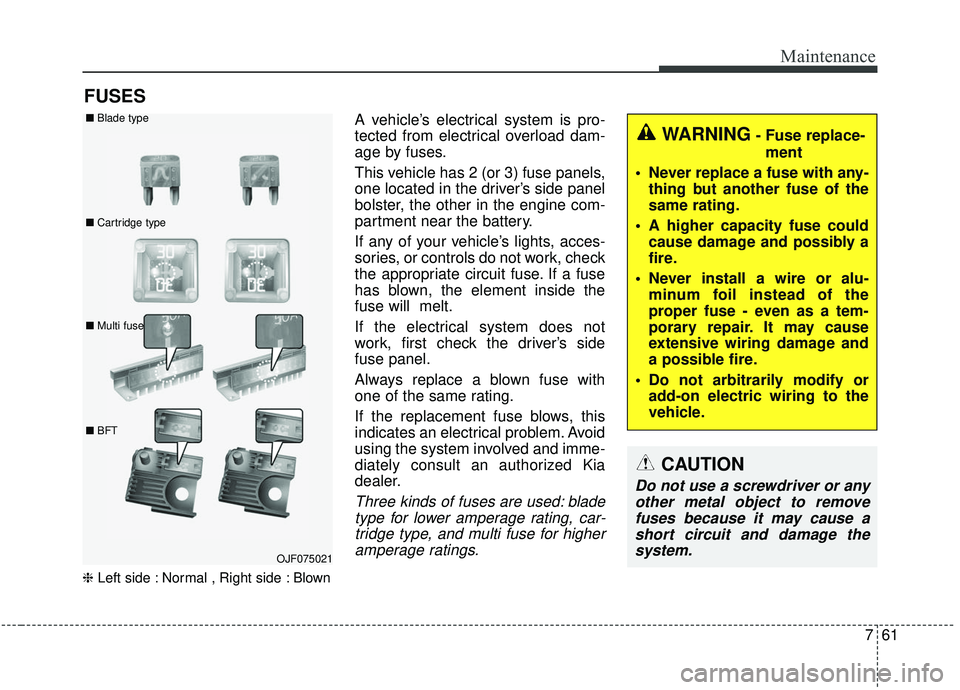
❈Left side : Normal , Right side : Blown
A vehicle’s electrical system is pro-
tected from electrical overload dam-
age by fuses.
This vehicle has 2 (or 3) fuse panels,
one located in the driver’s side panel
bolster, the other in the engine com-
partment near the battery.
If any of your vehicle’s lights, acces-
sories, or controls do not work, check
the appropriate circuit fuse. If a fuse
has blown, the element inside the
fuse will melt.
If the electrical system does not
work, first check the driver’s side
fuse panel.
Always replace a blown fuse with
one of the same rating.
If the replacement fuse blows, this
indicates an electrical problem. Avoid
using the system involved and imme-
diately consult an authorized Kia
dealer.
Three kinds of fuses are used: blade
type for lower amperage rating, car-tridge type, and multi fuse for higheramperage ratings.
WARNING- Fuse replace-
ment
Never replace a fuse with any- thing but another fuse of the
same rating.
A higher capacity fuse could cause damage and possibly a
fire.
Never install a wire or alu- minum foil instead of the
proper fuse - even as a tem-
porary repair. It may cause
extensive wiring damage and
a possible fire.
Do not arbitrarily modify or add-on electric wiring to the
vehicle.
CAUTION
Do not use a screwdriver or anyother metal object to removefuses because it may cause ashort circuit and damage thesystem.
OJF075021
■
Blade type
■ Cartridge type
■ Multi fuse
■ BFT
Page 545 of 611
Maintenance
62
7
✽ ✽
NOTICE
• When replacing fuse, turn the
ignition “OFF” and turn off
switches of all electrical devices
then remove battery (-) terminal.
• The actual fuse/relay panel label may differ from equipped items.
WARNING- Electrical Fire
Always ensure replacements
fuses and relays are securely
fastened when installed. Failure
to do so can result in a vehicle
fire.
WARNING- Electrical wiring repairs
All electrical repairs should be
performed by authorized Kia
dealerships using approved Kia
parts. Using other wiring com-
ponents, especially when retro-
fitting the audio system or theft
alarm system, or remote engine
control may cause vehicle dam-
age and increase the risk of a
vehicle fire.
CAUTION
When replacing a blown fuse or relay, make sure the newfuse or relay fits tightly intothe clips. Failure to tightlyinstall the fuse or relay maycause damage to the wiringand electric systems.
Do not remove fuses, relays and terminals fastened withbolts or nuts. The fuses, relaysand terminals may not be fas-tened correctly which maycause vehicle damage.
CAUTION
Do not input any other objects except fuses or relays intofuse/relay terminals such as adriver or wiring. It may causecontact failure and systemmalfunction.
Do not plug in screwdrivers or aftermarket wiring into the ter-minal originally designed forfuse and relays only.
(Continued)
(Continued)The electrical system andwiring of the vehicle interiormay be damaged or burneddue to contact failure.
If you directly connect the wire on the taillight or replacethe bulb which is over the reg-ulated capacity to install trail-ers etc., the inner junctionblock can get burned.
Page 546 of 611
763
Maintenance
✽ ✽NOTICE- Remodeling
Prohibited
Do not rewire your vehicle in any
way as doing so may affect the per-
formance of several safety features
in your vehicle. Rewiring your vehi-
cle may also void your warranty and
cause you to be responsible for any
subsequent vehicle damage which
may result.
✽ ✽ NOTICE- Window tinting
precaution
Window tint(especially metallic
film) might cause communication
disorder or poor radio reception,
and malfunction of the automatic
lighting system due to excessive
change of illumination inside the
vehicle. The solution used might also
flow into electric, electronic devices
causing disorder and failure.
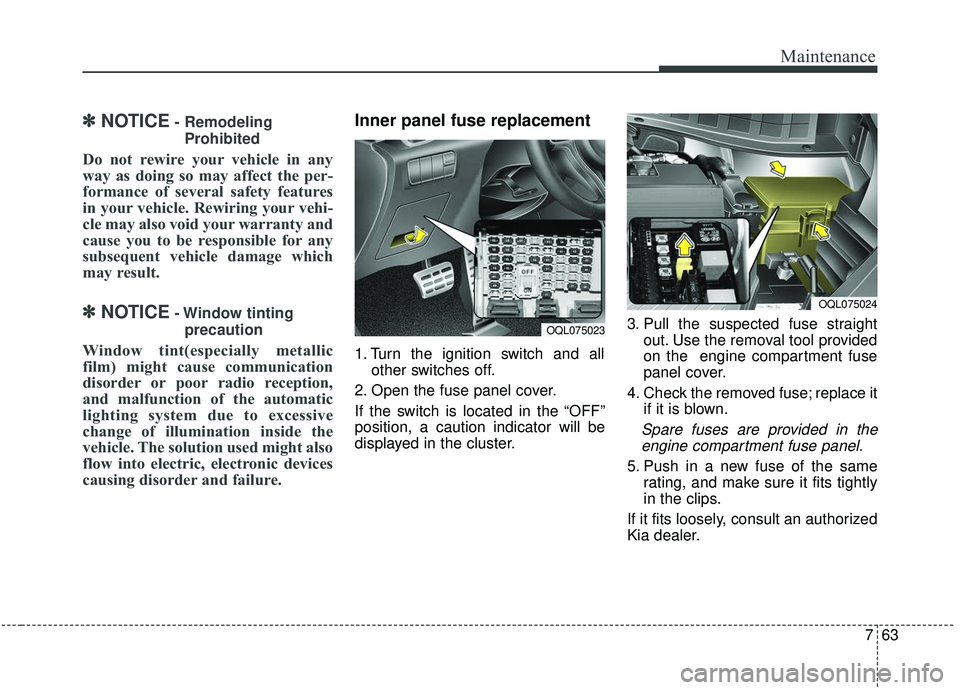
Inner panel fuse replacement
1. Turn the ignition switch and all other switches off.
2. Open the fuse panel cover.
If the switch is located in the “OFF”
position, a caution indicator will be
displayed in the cluster. 3. Pull the suspected fuse straight
out. Use the removal tool provided
on the engine compartment fuse
panel cover.
4. Check the removed fuse; replace it if it is blown.
Spare fuses are provided in theengine compartment fuse panel.
5. Push in a new fuse of the same rating, and make sure it fits tightly
in the clips.
If it fits loosely, consult an authorized
Kia dealer.
OQL075023
OQL075024
Page 547 of 611
Maintenance
64
7
If you do not have a spare, use a
fuse of the same rating from a circuityou may not need for operating thevehicle, such as the power outletfuse.
If the head lamp, turn signal lamp,
stop signal lamp, fog lamp, DRL, tail
lamp, HMSL do not work and the
fuses are not blown, check the fuse
panel in the engine compartment. If a
fuse is blown, it must be replaced.
✽ ✽ NOTICE
If the headlamp, fog lamp, turn sig-
nal lamp, or tail lamp malfunction
even without any problem to the
lamps, have the vehicle checked by
an authorized Kia dealer for assis-
tance.
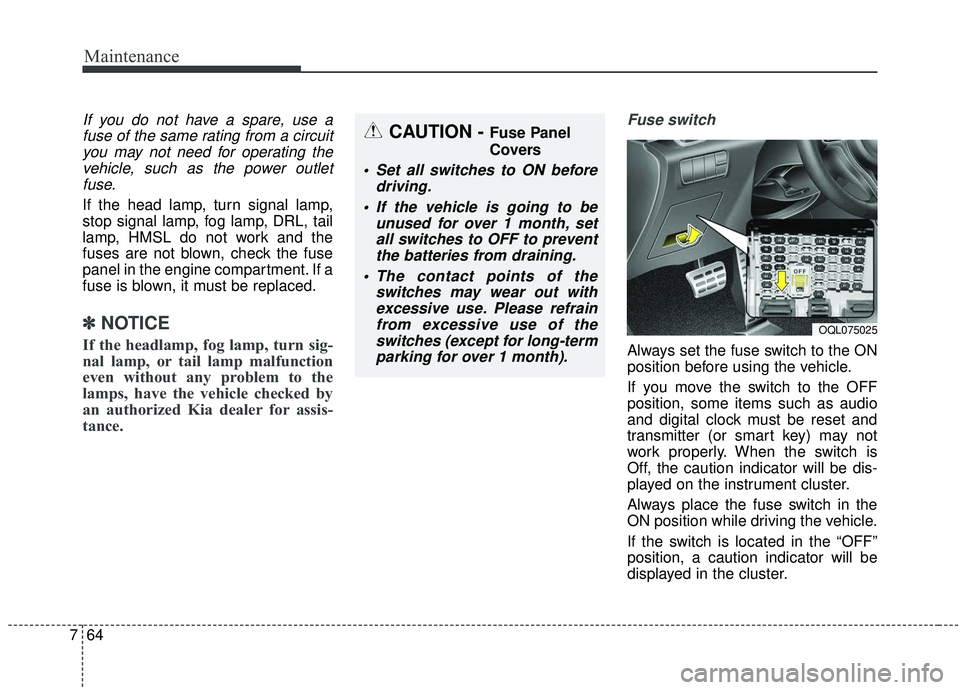
Fuse switch
Always set the fuse switch to the ON
position before using the vehicle.
If you move the switch to the OFF
position, some items such as audio
and digital clock must be reset and
transmitter (or smart key) may not
work properly. When the switch is
Off, the caution indicator will be dis-
played on the instrument cluster.
Always place the fuse switch in the
ON position while driving the vehicle.
If the switch is located in the “OFF”
position, a caution indicator will be
displayed in the cluster.
CAUTION - Fuse Panel
Covers
Set all switches to ON before
driving.
If the vehicle is going to be unused for over 1 month, setall switches to OFF to preventthe batteries from draining.
The contact points of the switches may wear out withexcessive use. Please refrainfrom excessive use of theswitches (except for long-termparking for over 1 month).
OQL075025