Page 28 of 50

SOUL FEATURES & FUNCTIONS GUIDE26*IF EQUIPPED
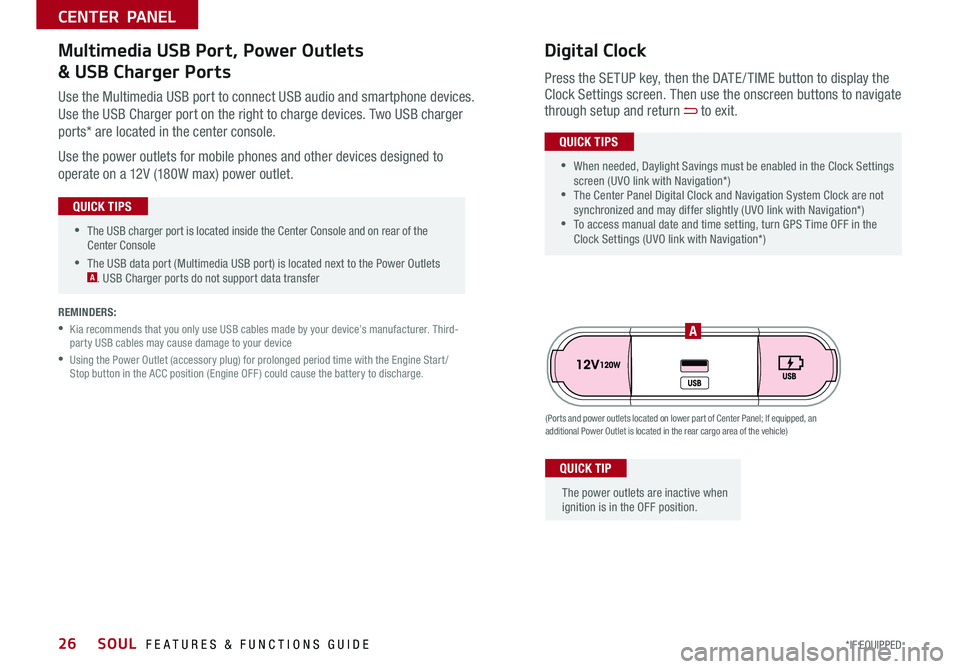
•The USB charger port is located inside the Center Console and on rear of the Center Console
•The USB data port (Multimedia USB port) is located next to the Power Outlets A USB Charger ports do not support data transfer
QUICK TIPS
CENTER PANEL
Use the Multimedia USB port to connect USB audio and smartphone devices
Use the USB Charger port on the right to charge devices Two USB charger
ports* are located in the center console
Use the power outlets for mobile phones and other devices designed to
operate on a 12V (180W max) power outlet
(Ports and power outlets located on lower part of Center Panel; If equipped, an additional Power Outlet is located in the rear cargo area of the vehicle)
Press the SETUP key, then the DATE / TIME button to display the Clock Settings screen Then use the onscreen buttons to navigate through setup and return to exit
•
•When needed, Daylight Savings must be enabled in the Clock Settings screen (UVO link with Navigation*) •The Center Panel Digital Clock and Navigation System Clock are not synchronized and may differ slightly (UVO link with Navigation*) •To access manual date and time setting, turn GPS Time OFF in the Clock Settings (UVO link with Navigation*)
QUICK TIPS
Digital ClockMultimedia USB Port, Power Outlets
& USB Charger Ports
The power outlets are inactive when ignition is in the OFF position
QUICK TIP
A
REMINDERS:
•
Kia recommends that you only use USB cables made by your device’s manufacturer Third-party USB cables may cause damage to your device
•
Using the Power Outlet (accessory plug) for prolonged period time with the Engine Start /Stop button in the ACC position (Engine OFF ) could cause the battery to discharge
Page 31 of 50

29ALWAYS CHECK THE OWNER’S MANUAL FOR COMPLETE OPER ATING INFORMATION AND SAFET Y WARNINGS *IF EQUIPPED
CENTER PANEL
68ºF 68ºFSYNC
Auto Defogging System Video
To view video on your mobile device, snap this QR Code or visit the listed website Refer to page 2 for more information
www.youtube.com/KiaFeatureVideos
QR CODE
Fan Speed Control buttonMode Selection button
A /C displayRear Windshield Defroster button
AUTO (Automatic Control) button
Air Intake Control buttonFront Windshield Defroster button
Air ConditioningON/OFF button
SYNC button
Driver’s TemperatureControl KnobPassenger’s TemperatureControl Knob
Blower OFF button
REMINDERS:
•
Cold or warm ambient air may flow in through vents if Recirculated Air button is not pressed ON (LED lit)
•
Pressing any button during AUTO operation will deactivate the AUTO function and switch to manual mode, except for Temperature Control
•
When in AUTO mode, Air Flow Mode and Fan Speed do not display on the Climate Control Display
Your Automatic Climate Control system may differ from those in the illustrations. See your Owner’s Manual for more details.
Defog Inside Windshield:
1 Set desired Fan Speed
2 Set desired Temperature
3 Press the Defrost button
Defrost Outside Windshield:
1 Set Fan Speed to the
highest position
2 Set Temperature to Hot
3 Press the Defrost button
Auto Defogging System:
Auto Defogging is set ON by default To cancel Auto Defogging,
press the Front Defrost button for three seconds, when
the ignition is in on (ADS OFF icon will illuminate) To turn Auto
Defogging on again, press the Front Defrost button for three
seconds
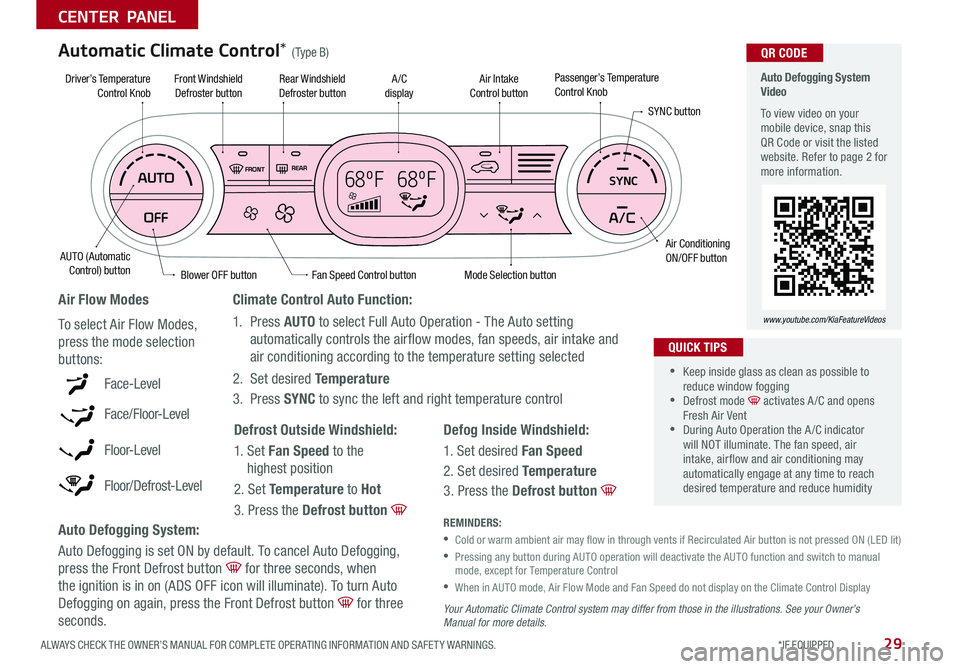
Climate Control Auto Function:
1 Press AUTO to select Full Auto Operation - The Auto setting
automatically controls the airflow modes, fan speeds, air intake and
air conditioning according to the temperature setting selected
2 Set desired Temperature
3 Press SYNC to sync the left and right temperature controlFace-Level
Face/Floor-Level
F lo o r- L evel
Floor/Defrost-Level
Air Flow Modes
To select Air Flow Modes,
press the mode selection
buttons:
Automatic Climate Control* (Type B)
•
•Keep inside glass as clean as possible to reduce window fogging •Defrost mode activates A /C and opens Fresh Air Vent •During Auto Operation the A /C indicator will NOT illuminate The fan speed, air intake, air flow and air conditioning may automatically engage at any time to reach desired temperature and reduce humidity
QUICK TIPS
Page 34 of 50
SOUL FEATURES & FUNCTIONS GUIDE32
CENTER PANEL
*IF EQUIPPED
A
DC
B
E
Manual Gear Shift*
Starting the Engine
1 Pull up to apply Parking Brake A
2 Fully depress Clutch and Brake Pedals to floor B
3 Shift into Neutral C
4 Turn Ignition to START
Shifting into Reverse
1 Fully depress Clutch and Brake Pedals to
floor B
2 Shift into Neutral C
3 Press Gearshift Button D
4 Shift into Reverse E
When shifting into gears 1-6, the Shift Lever can be moved without pulling the Shift Lever Ring
QUICK TIP
Page 41 of 50

39
OTHER KEY FEATURES
ALWAYS CHECK THE OWNER’S MANUAL FOR COMPLETE OPER ATING INFORMATION AND SAFET Y WARNINGS *IF EQUIPPED
( Type A )
B
For illustrative purposes only. Display may vary
Sunroof Operation Video To view a video on your mobile device, snap this QR Code or visit the listed website
Refer to page 2 for more information
www.youtube.com/KiaFeatureVideos
QR CODE
Do not adjust the sunroof or sunshade while driving. This could result in loss of control of the vehicle.
Sunroof Open Warning*
If the Sunroof is not fully closed, the warning will chime and display on the LCD screen* B when:
•The ignition is turned off (Smart Key*)
•The ignition key is removed
•The driver’s door is opened
To stop the Sunroof/Sunshade at any position, push or pull the sunroof control lever in any direction (one detent)
QUICK TIP
To slide the Sunshade and Sunroof:
•Open automatically: Slide the lever A backward to the farthest
position (second detent)
•Close automatically: Slide the lever A forward to the farthest
position (second detent)
Tilt the Sunroof:
•Raise: Push lever A upward
•Lower: Push lever A forward
•Auto Close: Slide the lever A forward
REMINDERS:
•If open, the Sunroof will also close when the toggle button is pressed
•Sunshade needs to remain OPEN while Sunroof is open and vehicle is moving
The sunroof and sunshade operation is controlled through a multidirectional button/lever A
The ignition needs to be in the ON position to operate the Sunroof and Sunshade
Sunroof Operation with Power Sunshade*
A
Page 43 of 50

41
OTHER KEY FEATURES
ALWAYS CHECK THE OWNER’S MANUAL FOR COMPLETE OPER ATING INFORMATION AND SAFET Y WARNINGS *IF EQUIPPED †LEGAL DISCL AIMERS ON BACK INSIDE COVER
Driver Attention Warning (DAW)*†6
The DAW system is designed to alert the driver if it detects a drowsy or fatigued driver and, in certain
situations, can give a warning signal to take a break
The DAW System is set to OFF by default To turn the DAW System ON, turn the ignition on and then
select User Settings in the LCD Display on the Instrument Cluster Then go to Driving Assist and select
Driver Attention Warning Set the DAW System to Normal or High Sensitivity
Driver Attention Warning (DAW) System modes:
OFF: The Driver Attention Warning system is deactivated A
Normal Sensitivity: The Driver Attention Warning system alerts the driver of his/her inattentive
driving practices
High Sensitivity: The Driver Attention Warning system alerts the driver of his/her inattentive
driving practices faster than Normal mode
If the DAW System is activated, DAW information will appear on the LCD Display B when you select
the ASSIST mode
A message, “Consider taking a break,” appears on the LCD display and a warning sounds to suggest the
driver to take a break when the driver’s attention level is below one bar C
REMINDERS:
•The setup of the DAW System will be maintained, as selected, when the ignition is cycled
•
When activated, the DAW System does not display “Consider taking a break” message when the total trip driving time is less than 10 minutes
•
The DAW System will enter a standby mode if the camera does not detect the lanes and/or the driving speed remains under 40 mph
Driver Attention Warning
System Off
Level Time