2020 KIA SOUL audio
[x] Cancel search: audioPage 27 of 50

25ALWAYS CHECK THE OWNER’S MANUAL FOR COMPLETE OPER ATING INFORMATION AND SAFET Y WARNINGS *IF EQUIPPED †LEGAL DISCL AIMERS ON BACK INSIDE COVER
AUDIO SYSTEMS
RADIO
SEEK
TRACK
N AV
MAP MEDIASETUP
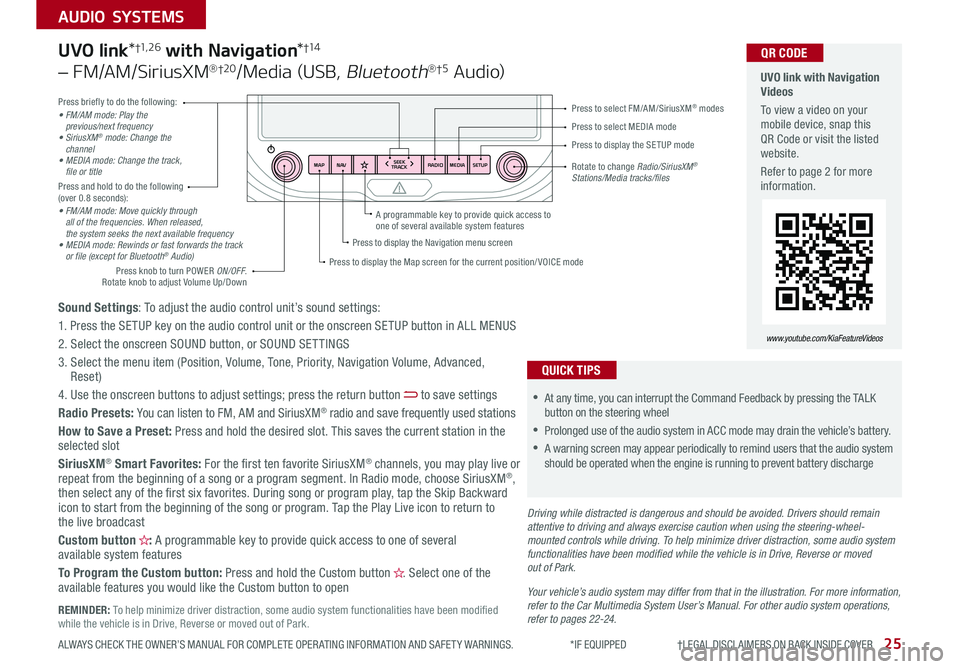
A programmable key to provide quick access to one of several available system features
Driving while distracted is dangerous and should be avoided. Drivers should remain attentive to driving and always exercise caution when using the steering-wheel-mounted controls while driving. To help minimize driver distraction, some audio system functionalities have been modified while the vehicle is in Drive, Reverse or moved out of Park.
Press briefly to do the following:• FM/AM mode: Play the previous/next frequency• SiriusXM® mode: Change the channel• MEDIA mode: Change the track, file or titlePress and hold to do the following (over 0 8 seconds):• FM/AM mode: Move quickly through all of the frequencies. When released, the system seeks the next available frequency• MEDIA mode: Rewinds or fast forwards the track or file (except for Bluetooth® Audio)
Press to select MEDIA mode
Press to select FM/AM/SiriusXM® modes
Rotate to change Radio/SiriusXM® Stations/Media tracks/files
Press to display the Map screen for the current position/ VOICE mode
Press to display the Navigation menu screen
Press to display the SE TUP mode
UVO link with Navigation Videos
To view a video on your mobile device, snap this QR Code or visit the listed website
Refer to page 2 for more information
QR CODE
www.youtube.com/KiaFeatureVideos
Sound Settings: To adjust the audio control unit’s sound settings:
1 Press the SETUP key on the audio control unit or the onscreen SETUP button in ALL MENUS
2 Select the onscreen SOUND button, or SOUND SET TINGS
3 Select the menu item (Position, Volume, Tone, Priority, Navigation Volume, Advanced, Reset)
4 Use the onscreen buttons to adjust settings; press the return button to save settings
Radio Presets: You can listen to FM, AM and SiriusXM® radio and save frequently used stations
How to Save a Preset: Press and hold the desired slot This saves the current station in the selected slot
SiriusXM® Smart Favorites: For the first ten favorite SiriusXM® channels, you may play live or repeat from the beginning of a song or a program segment In Radio mode, choose SiriusXM®, then select any of the first six favorites During song or program play, tap the Skip Backward icon to start from the beginning of the song or program Tap the Play Live icon to return to the live broadcast
Custom button : A programmable key to provide quick access to one of several available system features
To Program the Custom button: Press and hold the Custom button Select one of the available features you would like the Custom button to open
UVO link*†1, 2 6 with Navigation*†1 4
– FM/AM/SiriusXM®†2 0/Media (USB, Bluetooth®†5 Au d io)
•
•At any time, you can interrupt the Command Feedback by pressing the TALK button on the steering wheel
•Prolonged use of the audio system in ACC mode may drain the vehicle’s battery
•A warning screen may appear periodically to remind users that the audio system should be operated when the engine is running to prevent battery discharge
QUICK TIPS
Your vehicle’s audio system may differ from that in the illustration. For more information, refer to the Car Multimedia System User’s Manual. For other audio system operations, refer to pages 22-24.
Press knob to turn POWER ON/OFF Rotate knob to adjust Volume Up/Down
REMINDER: To help minimize driver distraction, some audio system functionalities have been modified while the vehicle is in Drive, Reverse or moved out of Park
Page 28 of 50

SOUL FEATURES & FUNCTIONS GUIDE26*IF EQUIPPED
•The USB charger port is located inside the Center Console and on rear of the Center Console
•The USB data port (Multimedia USB port) is located next to the Power Outlets A USB Charger ports do not support data transfer
QUICK TIPS
CENTER PANEL
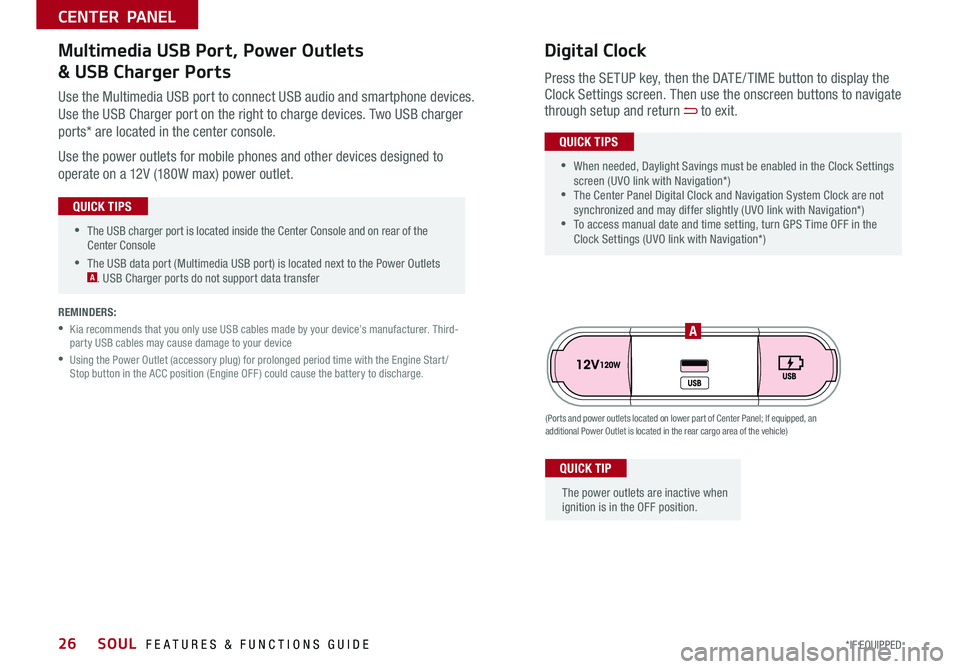
Use the Multimedia USB port to connect USB audio and smartphone devices
Use the USB Charger port on the right to charge devices Two USB charger
ports* are located in the center console
Use the power outlets for mobile phones and other devices designed to
operate on a 12V (180W max) power outlet
(Ports and power outlets located on lower part of Center Panel; If equipped, an additional Power Outlet is located in the rear cargo area of the vehicle)
Press the SETUP key, then the DATE / TIME button to display the Clock Settings screen Then use the onscreen buttons to navigate through setup and return to exit
•
•When needed, Daylight Savings must be enabled in the Clock Settings screen (UVO link with Navigation*) •The Center Panel Digital Clock and Navigation System Clock are not synchronized and may differ slightly (UVO link with Navigation*) •To access manual date and time setting, turn GPS Time OFF in the Clock Settings (UVO link with Navigation*)
QUICK TIPS
Digital ClockMultimedia USB Port, Power Outlets
& USB Charger Ports
The power outlets are inactive when ignition is in the OFF position
QUICK TIP
A
REMINDERS:
•
Kia recommends that you only use USB cables made by your device’s manufacturer Third-party USB cables may cause damage to your device
•
Using the Power Outlet (accessory plug) for prolonged period time with the Engine Start /Stop button in the ACC position (Engine OFF ) could cause the battery to discharge
Page 42 of 50

SOUL FEATURES & FUNCTIONS GUIDE40
OTHER KEY FEATURES
*IF EQUIPPED †LEGAL DISCL AIMERS ON BACK INSIDE COVER
(Rear Camera)
(Rear-Camera Display)
P
R
N
DSHIFTL OCK
RELEASE
Rear View Monitor*†6
The Rear View Monitor is a supplemental system that displays the view behind the
vehicle through the audio system screens while the vehicle is in Reverse
The Rear View Monitor activates when the:
1 Engine Start /Stop button* is in the ON position (green light)
2
Gear Shift Lever is in the R (Reverse) position
The Rear View Monitor is not a substitute for proper and safe backing-up procedures. The Rear View Monitor may not display every object behind the vehicle. Always drive safely and use caution when backing up.
For illustrative purposes only. Display may vary.
REMINDER: Always drive carefully and use caution when backing up
Page 48 of 50

ECO Mode (Active ECO)* – page 9 USB Port, Power Outlets & USB Charger – page 26 Digital Clock – page 26 Engine Start /Stop Button* – page 28 Folding Rear Seatback – page 35 Sunroof Operation* – page 39 Passenger Airbag Off Indicator – page 43
Rear View Monitor* – page 40 Seat Warmers* – page 33 Smart Key* – page 36 Tire Pressure Monitoring System ( TPMS) – page 5
*IF EQUIPPED
Explain first service process and schedule first service appointment Tour Parts & Service departments, introduce staff & explain value of Kia Parts and Service Review recommended maintenance schedule and maintenance requirements to validate warranty Review business hours & Customer 360° Care Review the Kia 10-year/100,000-mile warranty program Ensure 100% satisfaction with sales and delivery process and no problems with the vehicle Confirm time and best contact number for initial dealer follow-up
Standard Audio System*
– page 24
For more information, refer to the
Car Multimedia System User’s Manual.
Sales Consultant:
______________________________________________________________
Date:
____________________
Sales Manager:
________________________________________________________________
Date:
____________________
Customer:
_____________________________________________________________________
Date:
____________________
Cruise Control*
– page 18
Demonstrate operation
Bluetooth
® Wireless Technology
– page 20
Demonstrate operation
UVO link with
Navigation*
– page 25
For further system operation, refer to the Car Multimedia System User’s Manual.
SOUL
CUSTOMER DELIVERY CHECKLIST
KEY FEATURE WALKTHROUGHDURING DELIVERY
Demonstrate UVO link features and functions with the customer. Discuss UVO eServices setup.
RADIO
SEEK
TRACK
N AV
MAP MEDIASETUP
RADIO
MEDIA
TRACK SEEK
HOME
PHONE
SETUP
UVO link Activation /
Android Auto
™ / Apple CarPlay
® Setup*
– page 22-23
For further UVO link operations, refer to the
Car Multimedia System User’s Manual. For other audio system information, refer to pages 24-25
RESSET+ _
<
SET+ _<
+>>-MODE+
>>
-MODE
RES
SET+ _
<<
CRUISE
CANCEL OKRES
SET+ _<
+>>-MODE
+
>>
-MODE
RES
SET+ _
<<
CRUISE
CANCEL OKRES
SET+ _<
+>>-MODE
+
>>
-MODE