2020 KIA SEDONA manual transmission
[x] Cancel search: manual transmissionPage 155 of 604

Features of your vehicle
46
4
Power liftgate non-opening condi-
tions
The power liftgate will not open auto-
matically, but will close under the fol-
lowing conditions.
When the ignition switch is in the ON
position,
1. Vehicle is moving above 3 km/h (2 mph).
2. The gearshift lever is not in P (Park) for automatic transmission.
The chime will sound continuously if
you drive over 3 km/h (2 mph) with
the liftgate opened. Stop your vehicle
at a safe place as soon as possible
to check if your liftgate is opened.
Power liftgate opening height
user setting
The driver may set the height of a
fully opened liftgate by following the
below instruction.
1. Confirm the position of the power door ON/OFF button is ON (not
depressed).
2. Position the liftgate manually or via automatic operation to the
height you prefer.
OYP048446
WARNING
• Make sure there are no peopleor objects around the liftgate
before operating the power
liftgate. Wait until the liftgate
is open fully and stopped
before loading or unloading
cargo or passengers from the
vehicle.
Make sure the liftgate is closed firmly before driving. If
the liftgate is open, you will
draw dangerous exhaust
fumes into your vehicle which
can cause serious injury or
death to vehicle occupants.
Page 346 of 604

517
Driving your vehicle
D (Drive)
This is the normal forward driving
position. The transmission will auto-
matically shift through a 8-gear
sequence, providing the best fuel
economy and power.
For extra power when passing anoth-
er vehicle or climbing grades,
depress the accelerator fully, at which
time the transmission will automati-
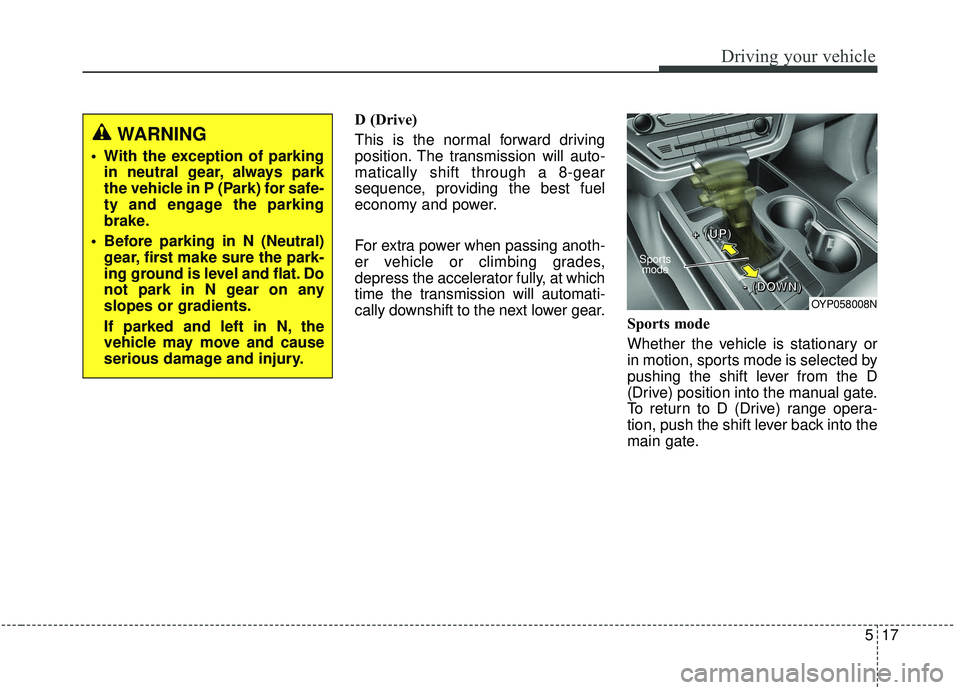
cally downshift to the next lower gear.Sports mode
Whether the vehicle is stationary or
in motion, sports mode is selected by
pushing the shift lever from the D
(Drive) position into the manual gate.
To return to D (Drive) range opera-
tion, push the shift lever back into the
main gate.
WARNING
With the exception of parking
in neutral gear, always park
the vehicle in P (Park) for safe-
ty and engage the parking
brake.
Before parking in N (Neutral) gear, first make sure the park-
ing ground is level and flat. Do
not park in N gear on any
slopes or gradients.
If parked and left in N, the
vehicle may move and cause
serious damage and injury.
OYP058008N
Sports
mode
+ +
+ +
( (
( (
U U
U U
P P
P P
) )
) )
- -
- -
( (
( (
D D
D D
O O
O O
W W
W W
N N
N N
) )
) )
Page 347 of 604

Driving your vehicle
18
5
In sports mode, moving the shift
lever backwards and forwards will
allow you to make gearshifts rapidly.
In contrast to a manual transmission,
the sports mode allows gearshifts
with the accelerator pedal
depressed.
Up (+) : Push the lever forward once
to shift up one gear.
Down (-) : Pull the lever backwards once to shift down one
gear.
In sports mode, the driver must execute upshifts in accordance
with road conditions, taking care to
keep the engine speed below the
red zone.
In sports mode, only the 8 forward gears can be selected. To reverse
or park the vehicle, move the shift
lever to the R (Reverse) or P (Park)
position as required. In sports mode, downshifts are
made automatically when the vehi-
cle slows down. When the vehicle
stops, 1st gear is automatically
selected.
In sports mode, when the engine rpm approaches the red zone shift
points are varied to upshift auto-
matically.
To maintain the required levels of vehicle performance and safety,
the system may not execute cer-
tain gearshifts when the shift lever
is operated.
When driving on a slippery road, push the shift lever forward into the
+(up) position. This causes the
transmission to shift into the 2nd
gear which is better for smooth
driving on a slippery road. Push
the shift lever to the -(down) side to
shift back to the 1st gear.Shift lock system
For your safety, the automatic trans-
mission has a shift lock system
which prevents shifting the transmis-
sion from P (Park) into R (Reverse)
unless the brake pedal is depressed.
To shift the transmission from P
(Park) into R (Reverse):
1. Depress and hold the brake pedal.
2. Start the engine or turn the ignition switch to the ON position.
3. Move the shift lever.
If the brake pedal is repeatedly
depressed and released with the shift
lever in the P (Park) position, a chat-
tering noise near the shift lever may
be heard. It is a normal condition.
Page 355 of 604

Driving your vehicle
26
5
To release EPB (electronic parking
brake) automatically:
• Shift lever in P (Park)
With the engine running depress
the brake pedal and shift out of P
(Park) to R (Reverse) or D (Drive).
Shift lever in N (Neutral) With the engine running depress
the brake pedal and shift out of N
(Neutral) to R (Reverse) or D
(Drive).
Automatic transmission vehicle 1. Start the engine.
2. Fasten the driver's seat belt.
3. Close the driver's door, engine hood and trunk.
4. Depress the accelerator pedal while the shift lever is in R
(Rear), D (Drive) or Sports
mode.
Make sure the brake warning light
goes off.✽ ✽ NOTICE
• For your safety, you can engage
the EPB even though the ignition
switch or engine stop/start button
is in the OFF position, but you
cannot release it.
• For your safety, depress the brake pedal and release the parking
brake manually with the EPB
switch when you drive downhill or
when backing up the vehicle.
Do not follow the above procedure
when driving on a flat level ground.
The vehicle may suddenly move for-
ward.CAUTION
• If the parking brake warning
light is still on even thoughthe EPB has been released,have the system checked byan authorized Kia dealer.
Do not drive your vehicle with the EPB applied. It may causeexcessive brake pad andbrake rotor wear.
Page 449 of 604

Driving your vehicle
120
5
Maintenance when trailer towing
Your vehicle will need service more
often when you regularly pull a trail-
er. Important items to pay particular
attention to include engine oil, auto-
matic transmission fluid, axle lubri-
cant and cooling system fluid. Brake
condition is another important item to
frequently check. Each item is cov-
ered in this manual, and the Index
will help you find them quickly. If
you’re trailering, it’s a good idea to
review these sections before you
start your trip.
Don’t forget to also maintain your
trailer and hitch. Follow the mainte-
nance schedule that accompanied
your trailer and check it periodically.
Preferably, conduct the check at the
start of each day’s driving. Most
importantly, all hitch nuts and bolts
should be tight. When towing check transmission
fluid more frequently.
If you do decide to pull a trailer
Here are some important points if
you decide to pull a trailer:
Consider using a sway control. Youcan ask a hitch dealer about sway
control.
Do not do any towing with your vehicle during its first 2,000 km
(1,200 miles) in order to allow the
engine to properly break in. Failure
to heed this caution may result in
serious engine or transmission
damage.
When towing a trailer, be sure to consult an authorized Kia dealer
for further information on additional
requirements such as a towing kit,
etc.CAUTION - Air condition-
ing
Do not use the A/C while usingyour vehicle to tow uphill. Dueto higher load during trailerusage, overheating might occuron hot days or during uphilldriving.
Page 544 of 604

761
Maintenance
Fuse Name Fuse ratingCircuit Protected
MULTIMEDIA 15A USB Charger #1/#2, A/V & Navigation Head Unit S/ROOF FRT 20A Front Sunroof Motor AMP 25A AMP IG1 20A PCB BLOCK (Fuse - ABS3, TCU, MDPS, CRUISE)
SMART KEY2 7.5A Smart Key Control Module
INTERIOR LAMP 10A Portable Lamp, Overhead Console Lamp, Cargo Lamp, Front Vinity Lamp Switch LH/RH, Glove Box
Lamp, Key Warning Switch
START 7.5A With IMMO./Smart Key : Transmission Range Switch, W/O IMMO. : PCB Block (B/Alarm Relay)
S/ROOF RR 25A Rear Sunroof Motor
DOOR LOCK 20A Tail Gate Relay, Door Lock/Unlock Relay, Sliding Door Lock/Unlock Relay
FOG LAMP REAR 10A -
MODULE1 10A Audio, A/V & Navigation Head Unit, Around View Unit, BCM, Overhead Console Lamp, MTS Module,
Digital Clock, USB Charger #1/#2
AIR BAG 15A SRS Control Module, Passenger Occupant Detection Sensor
A/CON2 7.5A A/C Control Module, Blower Resistor (Manual)
HEATED MIRROR 10A Passenger Power Outside Mirror, A/C Control Module BRAKE SWITCH 7.5A Smart Key Control Module, Stop Lamp Switch S/HEATER RR 25A Rear Seat Heater Control Module
P/WINDOW LH 25ADriver Safety Window Module, Driver Door Module, Rear Power Window Switch LH, Rear Safety Power
Window Switch LH, Rear Safety Power Window Module LH
MODULE7 7.5A Key Inter Lock Solenoid, Fuel Lid Switch, ATM Lever Switch, Rear A/C Control Switch, Electro Chromic Mirror
POWER OUTLET1 20A Front Power Outlet P/SEAT (DRV) 30A Driver Manual Switch, Driver Lumbar Support Switch, Driver IMS Control Module
P/WINDOW RH 25APassenger Safety Window Module, Passenger Power Window Motor, Passenger Door Module, Rear Power
Window Switch RH, Rear Safety Power Window Switch RH, Rear Safety Power Window Module RH
S/HEATER FRT 20A Heater Control Module, Passenger Ventilation Seat Control Module
Page 546 of 604
![KIA SEDONA 2020 Owners Manual 763
Maintenance
Engine compartment fuse panel
Fuse Name Fuse ratingCircuit Protected ]
COOLING FAN 80A Cooling Fan Unit ABS1 40A ESC Module, Multipurpose Check Connector
ABS2 40A ESC Module
INVERTER KIA SEDONA 2020 Owners Manual 763
Maintenance
Engine compartment fuse panel
Fuse Name Fuse ratingCircuit Protected ]
COOLING FAN 80A Cooling Fan Unit ABS1 40A ESC Module, Multipurpose Check Connector
ABS2 40A ESC Module
INVERTER](/manual-img/2/40439/w960_40439-545.png)
763
Maintenance
Engine compartment fuse panel
Fuse Name Fuse ratingCircuit Protected ]
COOLING FAN 80A Cooling Fan Unit ABS1 40A ESC Module, Multipurpose Check Connector
ABS2 40A ESC Module
INVERTER 30A AC Inverter Unit
H/LAMP HI 10A H/LAMP HI Solenoid
EPB1 15A EPB Unit
EPB2 15A EPB Unit
TCU 15A Transmission Unit
P/SEAT (PASS) 30A Passenger Manual Switch B+4 50A Smart Junction Block (IPS Control Module, IPS3, IPS4, IPS5, IPS6, Fuse - MODULE7)
POWER TAIL GATE 40A Power Tail Gate Module
B+2 50ASmart Junction Block (Leak Current Autocut Device, Fuse - P/SEAT DRV, P/WDW RH), Seat Heater
Rear, Interior Lamp, Multimedia, Memory
IG1 40A With Smart Key : PDM1/2 Relay, W/O Smart Key : Ignition Switch
IG2 40A Start Relay, With Smart Key : PDM3 Relay, W/O Smart Key : Ignition Switch,
B+1 50A Smart Junction Block (IPS Control Module, Fuse - P/WDW LH, S/HEATER FRT, DR LOCK)
BLOWER 40A Blower Relay
TRAILER 30A Trailer Power Outlet
B+5 50ASmart Junction Block (Motor Driver, Power Outlet Relay, Fuse - S/ROOF FRT, S/ROOF RR, BRAKE
SWITCH, SMART KEY1, SMART KEY3, AMP), Power Outlet1, Power Outlet2
PSD1 40A Power Sliding Door Module
PSD2 40A Power Sliding Door Module
B+3 50A Smart Junction Block (IPS Control Module, IPS1, IPS2)
MDPS 125A MDPS Unit (Rack)
BLOWER RR 40A Blower RR Relay
Page 595 of 604

Index
2I
Active ECO system........................................................5-82Active ECO operation ................................................5-82
Limitation of Active ECO operation ..........................5-82
When Active ECO is activated ..................................5-82
Air bag - advanced supplemental restraint system (SRS) ........................................................................\
..3-65Adding equipment to or modifying your air bag-equipped vehicle ..........................................3-93
Air bag warning label ................................................3-93
Air bag warning light ..................................................3-68
Curtain air bag ............................................................3-85
Driver's and passenger's front air bag ........................3-80
How does the air bag system operate ........................3-66
Occupant Detection System (ODS) ............................3-72
Side air bag ................................................................3-83
SRS Care ....................................................................3-92\
SRS components and functions ..................................3-69
Air cleaner ....................................................................7-28\
Filter replacement ......................................................7-28
Air conditioning system ..................................................8-5
Appearance care ............................................................7-89 Exterior care ................................................................7-89
Interior care ................................................................7-95 Audio system ..............................................................4-216
Antenna ....................................................................4-21\
6
AUX, USB port ........................................................4-216
How vehicle radio works ..........................................4-217
Automatic climate control system ..............................4-172 Automatic heating and air conditioning ..................4-173
Checking the amount of air conditioner refrigerant and compressor lubricant ..............................................4-189
Climate control air filter ..........................................4-188
Manual heating and air conditioning ........................4-174
Outside thermometer ................................................4-178
Rear climate control ..................................................4-183
System operation ......................................................4-186
Automatic transmission ................................................5-14 Automatic transmission operation ..............................5-14
Good driving practices ................................................5-20
Battery........................................................................\
....7-36 Battery recharging ......................................................7-37
For best battery service ..............................................7-36
Recharging battery ......................................................7-37
Reset items ..................................................................7-38
Before driving ..................................................................5-5 Before entering vehicle ................................................5-5
Before starting ..............................................................5-5
Necessary inspections ..................................................5-5
A
B