Page 446 of 604
5117
Driving your vehicle
Following distance
Stay at least twice as far behind the
vehicle ahead as you would when
driving your vehicle without a trailer.
This can help you avoid situations
that require heavy braking and sud-
den turns.
Passing
You’ll need more passing distance
up ahead when you’re towing a trail-
er. And, because of the increased
vehicle length, you’ll need to go
much farther beyond the passed
vehicle before you can return to your
lane. Due to the added load to the
engine when going uphill the vehicle
may also take longer to pass than it
would on flat ground.
Backing up
Hold the bottom of the steering
wheel with one hand. Then, to move
the trailer to the left, just move your
hand to the left. To move the trailer to
the right, move your hand to the
right. Always back up slowly and, if
possible, have someone guide you.
Making turns
When you’re turning with a trailer,
make wider turns than normal. Do
this so your trailer won’t strike soft
shoulders, curbs, road signs, trees,
or other objects near the edge of the
road. Avoid jerky or sudden maneu-
vers. Signal well in advance before
turning or lane changes.
Turn signals when towing a trailer
When you tow a trailer, your vehicle
has to have a different turn signal
flasher and extra wiring. The green
arrows on your instrument panel will
flash whenever you signal a turn or
lane change. Properly connected,
the trailer lights will also flash to alert
other drivers you’re about to turn,
change lanes, or stop.
When towing a trailer, the green
arrows on your instrument panel will
flash for turns even if the bulbs on the
trailer are burned out. Thus, you may
think drivers behind you are seeing
your signals when, in fact, they are
not. It’s important to check occasion-
ally to be sure the trailer bulbs are still
working. You must also check the
lights every time you disconnect and
then reconnect the wires.
Do not connect a trailer lighting sys-
tem directly to your vehicle’s lighting
system. Use only an approved trailer
wiring harness.
An authorized Kia dealer can assist
you in installing the wiring harness.
Page 448 of 604
5119
Driving your vehicle
Parking on hills
Generally, if you have a trailer
attached to your vehicle, you should
not park your vehicle on a hill. People
can be seriously or fatally injured,
and both your vehicle and the trailer
can be damaged if they unexpected-
ly roll downhill.
However, if you ever have to park your
trailer on a hill, here's how to do it:
1. Pull the vehicle into the parkingspace. Turn the steering wheel in
the direction of the curb (right if
headed downhill, left if headed up
hill).
2. If the vehicle has an automatic transmission, place the vehicle in
P (Park).
3. Set the parking brake and shut off the engine.
4. Place chocks under the trailer wheels on the down hill side of the
wheels. 5. Start the vehicle, hold the brakes,
shift to neutral, release the parking
brake and slowly release the
brakes until the trailer chocks
absorb the load.
6. Reapply the brakes, reapply the parking brake and shift the vehicle
to P (Park) for automatic transmis-
sion.
7. Shut off the vehicle and release the vehicle brakes but leave the
parking brake set. When you are ready to leave after
parking on a hill
1. With the automatic transmission in
P (Park), apply your brakes and
hold the brake pedal down while
you:
and
2. Slowly remove your foot from the brake pedal.
3. Drive slowly until the trailer is clear of the chocks.
4. Stop and have someone pick up and store the chocks.
Page 469 of 604
611
What to do in an emergency
4. After the spare tire reaches theground, continue to turn the tool
counterclockwise, and draw the
spare tire outside. Never rotate the
tool excessively, otherwise the
spare tire carrier may be dam-
aged.
5. Remove the retainer from the cen- ter of the spare tire.
6. Remove the cover from the spare tire.
Storing the spare tire
1. Assemble the cover and spare tirewith valve center aligning together.
2. Lay the tire on the ground with the valve stem facing down. 3. Place the wheel under the vehicle
and install the retainer through the
wheel center.
4. Turn the tool clockwise until it clicks.
Ensure the spare tire retainer is
properly aligned with the center of
the spare tire to prevent the spare
tire from "rattling".
Otherwise, it may cause the spare
tire to fall off the carrier and lead to
an accident.
OYP054164N
OYP054165N
OYP058166L
Page 470 of 604
What to do in an emergency
12
6
A flat tire indoor storage
� In the 3rd row seats unfolded
upright
1. With the flat tires in the center of the third row seats, place the outer
part of the wheel facing the lift-
gate.
2. Pass the fixing belt through the inside of the wheel. 3. Connect the fixing belt to the strik-
er (a) located at the bottom
left/right side of the back of the
third row seats.
4. Tighten the fixing belt securely. �
In the 3rd row seats folded flat
1. Place the flat tire with its outer part facing upwards in the middle of the
three-row seats.
2. Pass the fixing belt through the inside of the wheel.
OYP068034N
OYP068035N
OYP068036N
OYP068037N
Page 472 of 604
What to do in an emergency
14
6
4. Remove the tool, jack and spare
tire from the vehicle.
5. Block both the front and rear of the wheel that is diagonally opposite
from the jack position. 6. Loosen the wheel lug nuts coun-
terclockwise one turn each, but do
not remove any nut until the tire
has been raised off the ground.
OYP068044L
WARNING- Jack location
To reduce the possibility of
injury, be sure to use only the
jack provided with the vehicle in
the correct jack position; never
use any other part of the vehicle
for jack support.
WARNING- Changing a tire
• To prevent vehicle movement while changing a tire, always
set the parking brake fully,
and always block the wheel
diagonally opposite the wheel
being changed.
We recommend that the wheels of the vehicle be
blocked, and that no person
remain in a vehicle that is
being jacked.OYP068028N
Page 473 of 604
615
What to do in an emergency
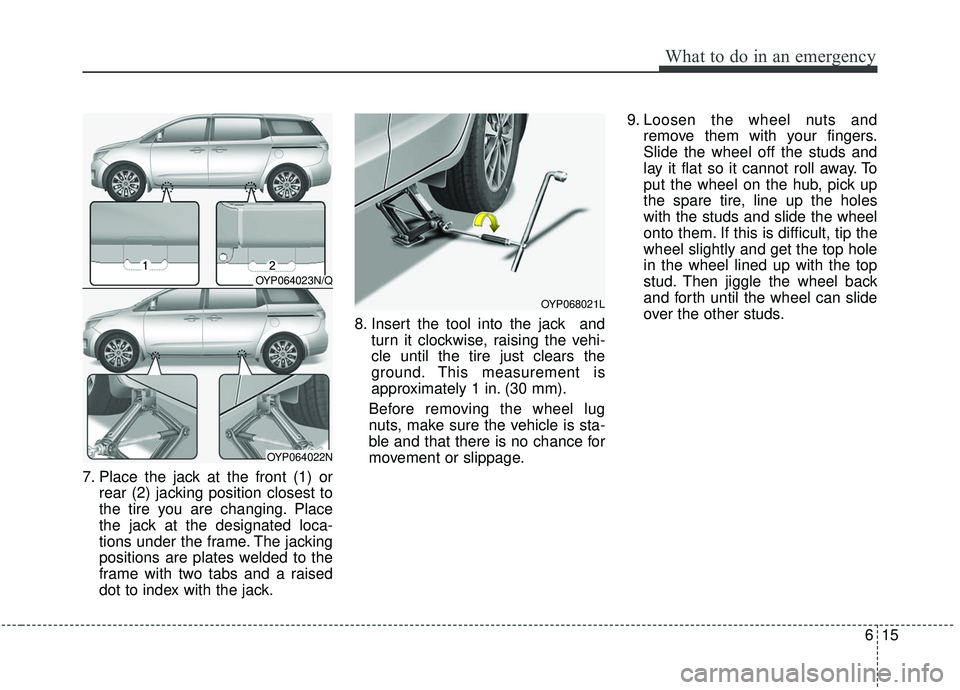
7. Place the jack at the front (1) orrear (2) jacking position closest to
the tire you are changing. Place
the jack at the designated loca-
tions under the frame. The jacking
positions are plates welded to the
frame with two tabs and a raised
dot to index with the jack. 8. Insert the tool into the jack and
turn it clockwise, raising the vehi-
cle until the tire just clears the
ground. This measurement is
approximately 1 in. (30 mm).
Before removing the wheel lug
nuts, make sure the vehicle is sta-
ble and that there is no chance for
movement or slippage. 9. Loosen the wheel nuts and
remove them with your fingers.
Slide the wheel off the studs and
lay it flat so it cannot roll away. To
put the wheel on the hub, pick up
the spare tire, line up the holes
with the studs and slide the wheel
onto them. If this is difficult, tip the
wheel slightly and get the top hole
in the wheel lined up with the top
stud. Then jiggle the wheel back
and forth until the wheel can slide
over the other studs.
OYP064023N/Q
OYP064022N
OYP068021L
Page 474 of 604
What to do in an emergency
16
6
Wheels may have sharp edges.
Handle them carefully to avoid possi-
ble severe injury. Before putting the
wheel into place, be sure that there
is nothing on the hub or wheel (such
as mud, tar, gravel, etc.) that pre-
vents the wheel from fitting solidly
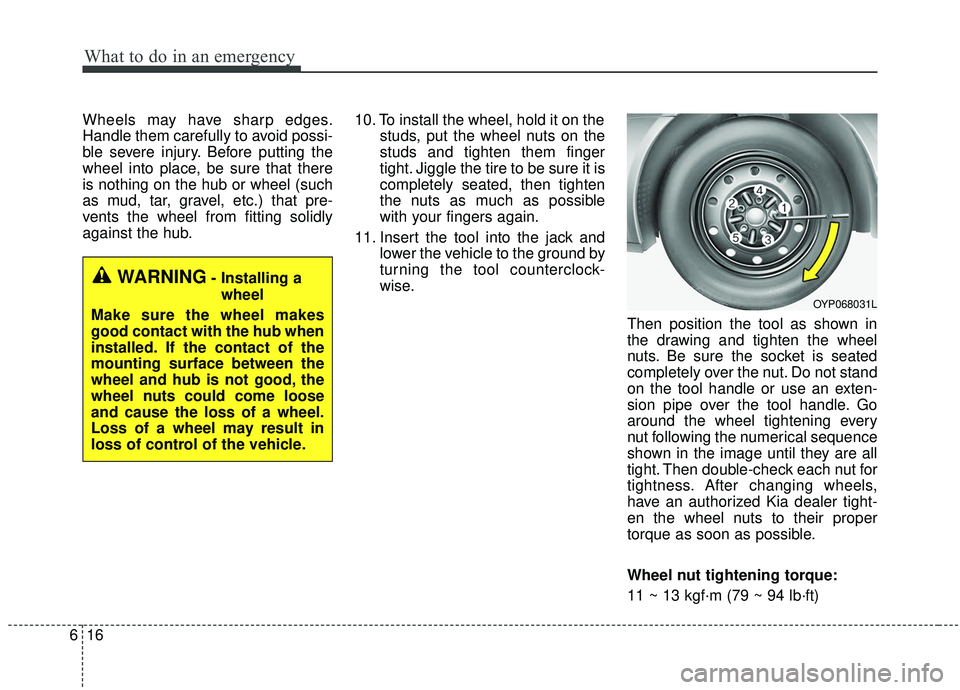
against the hub. 10. To install the wheel, hold it on the
studs, put the wheel nuts on the
studs and tighten them finger
tight. Jiggle the tire to be sure it is
completely seated, then tighten
the nuts as much as possible
with your fingers again.
11. Insert the tool into the jack and lower the vehicle to the ground by
turning the tool counterclock-
wise.
Then position the tool as shown in
the drawing and tighten the wheel
nuts. Be sure the socket is seated
completely over the nut. Do not stand
on the tool handle or use an exten-
sion pipe over the tool handle. Go
around the wheel tightening every
nut following the numerical sequence
shown in the image until they are all
tight. Then double-check each nut for
tightness. After changing wheels,
have an authorized Kia dealer tight-
en the wheel nuts to their proper
torque as soon as possible.
Wheel nut tightening torque:
11 ~ 13 kgf·m (79 ~ 94 lb·ft)
WARNING- Installing awheel
Make sure the wheel makes
good contact with the hub when
installed. If the contact of the
mounting surface between the
wheel and hub is not good, the
wheel nuts could come loose
and cause the loss of a wheel.
Loss of a wheel may result in
loss of control of the vehicle.
OYP068031L
Page 475 of 604
617
What to do in an emergency
If you have a tire gauge, remove the
valve cap and check the air pressure.
If the pressure is lower than recom-
mended, drive slowly to the nearest
service station and inflate to the cor-
rect pressure. If it is too high, adjust
it until it is correct. Always reinstall
the valve cap after checking or
adjusting the tire pressure. If the cap
is not replaced, dust and dirt may get
into the tire valve and air may leak
from the tire. If you lose a valve cap,
buy another and install it as soon as
possible.
After you have changed the wheels,
always secure the flat tire in its place
and return the jack and tools to their
proper storage locations.Note that most lug nuts do not have
metric threads. Be sure to use
extreme care in checking for thread
style before installing aftermarket lug
nuts or wheels. If in doubt, consult an
authorized Kia dealer.To prevent the jack, tool and spare
tire from rattling while the vehicle is
in motion, store them properly.
Check the inflation pressures as
soon as possible after installing the
spare tire. Adjust it to the specified
pressure, if necessary. Refer to
"Tires and wheels" in chapter 8.CAUTION- Reusing lug
nuts
Make certain during wheelremoval that the same nuts thatwere removed are reinstalled -or, if replaced, that nuts withmetric threads and the samechamfer configuration are used.Your vehicle has metric threadson the wheel studs and nuts.Installation of a non-metricthread nut on a metric stud willnot secure the wheel to the hubproperly and will damage thestud so that it must be replaced.
WARNING- Wheel studs
If the studs are damaged, they
may lose their ability to retain
the wheel. This could lead to the
loss of the wheel and a collision
resulting in serious injuries.