Page 416 of 604

587
Driving your vehicle
Warning type
The system will activate when:
1. The system is on.
2. Vehicle speed is above 30 km/h(20 mph).
3. Other vehicles are detected in blind spot.
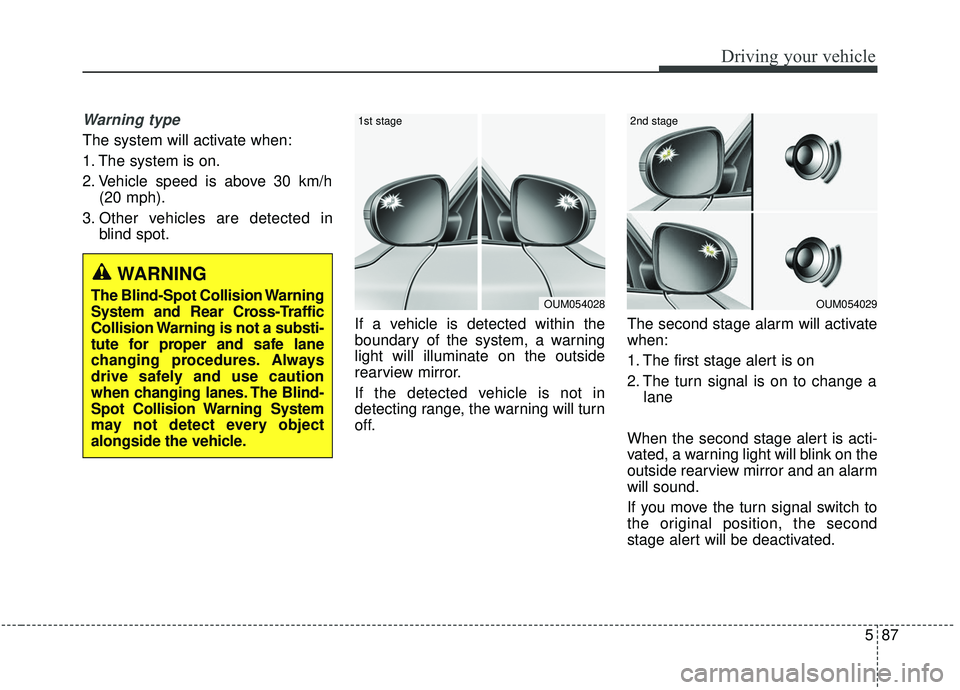
If a vehicle is detected within the
boundary of the system, a warning
light will illuminate on the outside
rearview mirror.
If the detected vehicle is not in
detecting range, the warning will turn
off. The second stage alarm will activate
when:
1. The first stage alert is on
2. The turn signal is on to change a
lane
When the second stage alert is acti-
vated, a warning light will blink on the
outside rearview mirror and an alarm
will sound.
If you move the turn signal switch to
the original position, the second
stage alert will be deactivated.
OUM054029
2nd stage
OUM054028
1st stage
WARNING
The Blind-Spot Collision Warning
System and Rear Cross-Traffic
Collision Warning is not a substi-
tute for proper and safe lane
changing procedures. Always
drive safely and use caution
when changing lanes. The Blind-
Spot Collision Warning System
may not detect every object
alongside the vehicle.
Page 430 of 604

5101
Driving your vehicle
The LDW does not operate
when:
The driver turns on the turn signalto change lanes or operates the
hazard warning flasher.
Driving on the lane marker.
✽ ✽ NOTICE
Always operate the turn signal
before changing lanes.
Limitations of the system
The LDW may not warn you even if
the vehicle leaves the lane, or may
warn you even if the vehicle does not
leave the lane when recognition of
the lane marker is poor or limited:
� � When lane and road condition is
poor
It is difficult to distinguish the lane marker when the lane marker is
covered with dust, sand or other
factors.
It is difficult to distinguish the color of the lane marker from road.
There is something looks like a lane marker.
The lane marker is indistinct or damaged.
The number of lanes increases/decreases or the lanes
are intersecting (Driving through a
toll plaza/toll gate, merged/divided
lane).
There are more than two lane markers. The lane marker is very thick or
thin.
The lane marker is not visible due to snow, rain, stain, a puddle or
other factors.
A shadow is on the lane marker because of a median strip,
guardrail, noise barriers and oth-
ers.
When the lane markers are compli- cated or a structure substitutes for
the lines such as a construction
area.
There are crosswalk signs or other symbols on the road.
The lane suddenly disappears such as at the intersection.
The lane marker in a tunnel is cov- ered with dirt or oil and etc.
Page 446 of 604

5117
Driving your vehicle
Following distance
Stay at least twice as far behind the
vehicle ahead as you would when
driving your vehicle without a trailer.
This can help you avoid situations
that require heavy braking and sud-
den turns.
Passing
You’ll need more passing distance
up ahead when you’re towing a trail-
er. And, because of the increased
vehicle length, you’ll need to go
much farther beyond the passed
vehicle before you can return to your
lane. Due to the added load to the
engine when going uphill the vehicle
may also take longer to pass than it
would on flat ground.
Backing up
Hold the bottom of the steering
wheel with one hand. Then, to move
the trailer to the left, just move your
hand to the left. To move the trailer to
the right, move your hand to the
right. Always back up slowly and, if
possible, have someone guide you.
Making turns
When you’re turning with a trailer,
make wider turns than normal. Do
this so your trailer won’t strike soft
shoulders, curbs, road signs, trees,
or other objects near the edge of the
road. Avoid jerky or sudden maneu-
vers. Signal well in advance before
turning or lane changes.
Turn signals when towing a trailer
When you tow a trailer, your vehicle
has to have a different turn signal
flasher and extra wiring. The green
arrows on your instrument panel will
flash whenever you signal a turn or
lane change. Properly connected,
the trailer lights will also flash to alert
other drivers you’re about to turn,
change lanes, or stop.
When towing a trailer, the green
arrows on your instrument panel will
flash for turns even if the bulbs on the
trailer are burned out. Thus, you may
think drivers behind you are seeing
your signals when, in fact, they are
not. It’s important to check occasion-
ally to be sure the trailer bulbs are still
working. You must also check the
lights every time you disconnect and
then reconnect the wires.
Do not connect a trailer lighting sys-
tem directly to your vehicle’s lighting
system. Use only an approved trailer
wiring harness.
An authorized Kia dealer can assist
you in installing the wiring harness.
Page 460 of 604
What to do in an emergency
26
ROAD WARNING
Hazard warning flasher
The hazard warning flasher serves
as a warning to other drivers to exer-
cise extreme caution when
approaching, overtaking, or passing
your vehicle.It should be used whenever emer-
gency repairs are being made or
when the vehicle is stopped near the
edge of a roadway.
Depress the flasher switch with the
ignition switch in any position. The
flasher switch is located in the center
facia panel. All turn signal lights will
flash simultaneously.
• The hazard warning flasher oper-
ates whether your vehicle is run-
ning or not.
The turn signals do not work when the hazard flasher is on.
Care must be taken when using the hazard warning flasher while
the vehicle is being towed.
OYP064001N
OYP064014K
■ Type A
■Type B
Page 491 of 604

Maintenance
87
At least monthly:
Check the coolant level in theengine coolant reservoir.
Check the operation of all exterior lights, including the stoplights, turn
signals and hazard warning flash-
ers.
Check the inflation pressures of all tires including the spare for tires
that are worn, show uneven wear,
or are damaged.
Check for loose wheel lug nuts.
At least twice a year (i.e., every Spring and Fall):
Check the radiator, heater and air conditioning hoses for leaks or
damage.
Check the windshield washer spray and wiper operation. Clean
the wiper blades with clean cloth
dampened with washer fluid.
Check the headlight alignment.
Check the muffler, exhaust pipes, shields and clamps.
Check the lap/shoulder belts for wear and function.
At least once a year:
Clean the body and door drainholes.
Lubricate the door hinges and checks, and hood hinges.
Lubricate the door and hood locks and latches.
Lubricate the door rubber weather- strips.
Check the air conditioning system.
Inspect and lubricate the automatic transmission linkage and controls.
Clean the battery and terminals.
Check the brake fluid level.
Page 539 of 604

Maintenance
56
7
3. Pull the suspected fuse straight
out. Use the removal tool provided
on the engine compartment fuse
panel cover.
4. Check the removed fuse; replace it if it is blown.
Spare fuses are provided in theengine compartment fuse panel.
5. Push in a new fuse of the same rating, and make sure it fits tightly
in the clips.
If it fits loosely, consult an authorized
Kia dealer.
If you do not have a spare, use a fuse of the same rating from a circuityou may not need for operating thevehicle, such as the power outletfuse.
If the head lamp, turn signal lamp,
stop signal lamp, fog lamp, DRL, tail
lamp, HMSL do not work and the
fuses are not blown, check the fuse
panel in the engine compartment. If a
fuse is blown, it must be replaced.
✽ ✽ NOTICE
If the headlamp, fog lamp, turn sig-
nal lamp, or tail lamp malfunction
even without any problem to the
lamps, have the vehicle checked by
an authorized Kia dealer for assis-
tance.
Fuse switch
Always set the fuse switch to the ON
position before using the vehicle.
If you move the switch to the OFF
position, some items such as audio
and digital clock must be reset and
transmitter (or smart key) may not
work properly. When the switch is
Off, the caution indicator will be dis-
played on the instrument cluster.
Always place the fuse switch in the
ON position while driving the vehicle.
If the switch is located in the “OFF”
position, a caution indicator will be
displayed in the cluster.
OYP074010K
OYP076011
Page 550 of 604
767
Maintenance
Light bulb position (Front)(1) Headlamp (Low) (Bulb type)
(2) Headlamp (High) (Bulb type)
(3) Front turn signal lamp (Bulb type)or Front turn signal lamp /
Position lamp (if equipped) (Bulb
type)
(4) Position lamp (if equipped) (LED type) or Dummy (if equipped)
(5) Side marker (Bulb type)
(6) Headlamp (Low/High) (LED type)
(7) Headlamp (Low Assist) (LED
type)
(8) Front turn signal lamp (Bulb type)
(9) P osition lamp (LED type) or
Position lamp / Day time running
lamp (if equipped) (LED type)
(10) Side marker (LED type)
(11) Front fog lamp (Bulb type)
(12) Front fog lamp (Bulb type)
(13) Front fog lamp (LED type)
OYP078104N
OYP078105N
■ Head lamp – Type B
■Head lamp – Type A
OYP078106N
OYP078107N
OYP078108N
■Fog lamp - Type A
■Fog lamp - Type B
■Fog lamp - Type C
Page 551 of 604
Maintenance
68
7
Light bulb position (Rear)(1) Stop and tail lamp (Bulb type)
(2) Tail lamp (Bulb type)
(3) Back up lamp (Bulb type)
(4) Rear turn signal lamp (Bulb type)
(5) Side marker (Bulb type)
(6,7,8,9) Stop and tail lamp (LED
type)
(10) Side marker (LED type)
(11) License plate lamp (Bulb type)
(12) High mounted stop lamp (LED type)
OYP078109N
OYP078110N
■Rear combination lamp - Type B
■Rear combination lamp - Type A
OYP078111N
OYP078112N
■High mounted stop lamp
■License plate lamp