2020 KIA SEDONA bulb
[x] Cancel search: bulbPage 223 of 604

Features of your vehicle
114
4
Align steering wheel
This warning message illuminates
if you start the engine when the
steering wheel is turned to more
than 90 degrees to the left or right.
It means that you should turn the steering wheel and make the angle
of the steering wheel be less than
30 degrees.
Low Washer Fluid
This warning message illuminateson the service reminder mode if
the washer fluid level in the reser-
voir is nearly empty.
It means that you should refill the washer fluid.
Turn on FUSE SWITCH
This warning message illuminatesif the fuse switch on the fuse box is
OFF.
It means that you should turn the fuse switch on.
❈ For more details, refer to “Fuses”
in chapter 7.
Low Fuel
This warning message illuminates if
the fuel tank is nearly empty.
- When the low fuel level warning
light is illuminated.
- When the trip computer displays "--- km (or mile)" as range.
Add fuel as soon as possible.
Check high beam assist system (if equipped)
This warning message illuminates if
there is a malfunction (burned-out
bulb or circuit malfunction) with the
headlamp. In this case, have your
vehicle inspected by an authorized
Kia dealer.
Check headlight
This warning message illuminates if
there is a malfunction (burned-out
bulb except LED lamp or circuit mal-
function) with the headlamp. In this
case, have your vehicle inspected by
an authorized Kia dealer.
✽ ✽ NOTICE
When replacing the bulb, use the
same wattage bulb.
❈ ❈
For more information, refer to
“BULB WATTAGE” in chapter 8.
Page 255 of 604

Features of your vehicle
146
4
Turn signals and lane change
signals
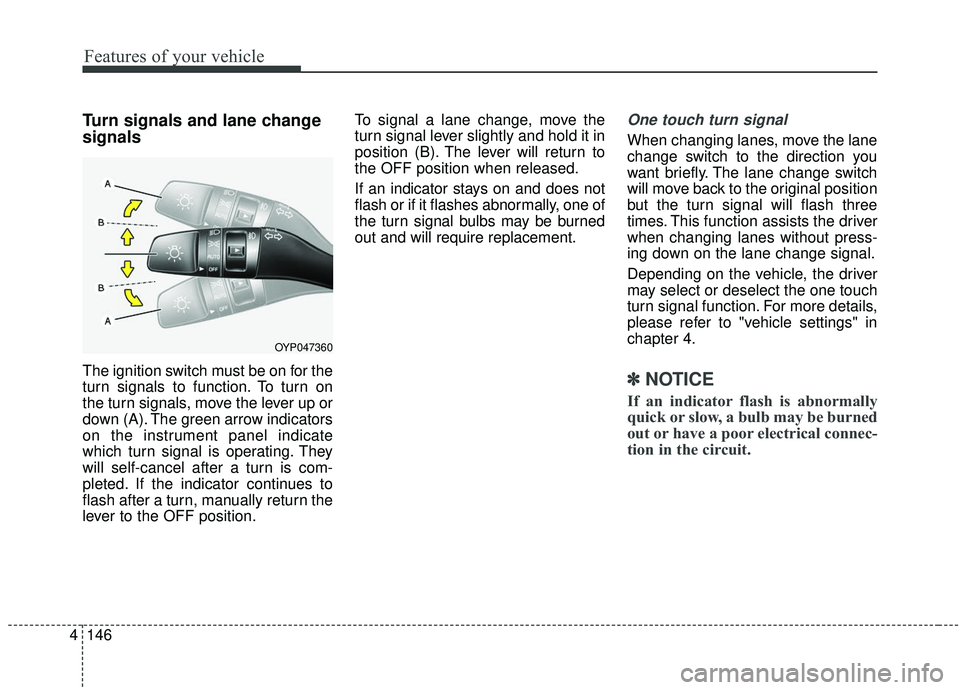
The ignition switch must be on for the
turn signals to function. To turn on
the turn signals, move the lever up or
down (A). The green arrow indicators
on the instrument panel indicate
which turn signal is operating. They
will self-cancel after a turn is com-
pleted. If the indicator continues to
flash after a turn, manually return the
lever to the OFF position. To signal a lane change, move the
turn signal lever slightly and hold it in
position (B). The lever will return to
the OFF position when released.
If an indicator stays on and does not
flash or if it flashes abnormally, one of
the turn signal bulbs may be burned
out and will require replacement.
One touch turn signal
When changing lanes, move the lane
change switch to the direction you
want briefly. The lane change switch
will move back to the original position
but the turn signal will flash three
times. This function assists the driver
when changing lanes without press-
ing down on the lane change signal.
Depending on the vehicle, the driver
may select or deselect the one touch
turn signal function. For more details,
please refer to "vehicle settings" in
chapter 4.
✽ ✽
NOTICE
If an indicator flash is abnormally
quick or slow, a bulb may be burned
out or have a poor electrical connec-
tion in the circuit.
OYP047360
Page 446 of 604

5117
Driving your vehicle
Following distance
Stay at least twice as far behind the
vehicle ahead as you would when
driving your vehicle without a trailer.
This can help you avoid situations
that require heavy braking and sud-
den turns.
Passing
You’ll need more passing distance
up ahead when you’re towing a trail-
er. And, because of the increased
vehicle length, you’ll need to go
much farther beyond the passed
vehicle before you can return to your
lane. Due to the added load to the
engine when going uphill the vehicle
may also take longer to pass than it
would on flat ground.
Backing up
Hold the bottom of the steering
wheel with one hand. Then, to move
the trailer to the left, just move your
hand to the left. To move the trailer to
the right, move your hand to the
right. Always back up slowly and, if
possible, have someone guide you.
Making turns
When you’re turning with a trailer,
make wider turns than normal. Do
this so your trailer won’t strike soft
shoulders, curbs, road signs, trees,
or other objects near the edge of the
road. Avoid jerky or sudden maneu-
vers. Signal well in advance before
turning or lane changes.
Turn signals when towing a trailer
When you tow a trailer, your vehicle
has to have a different turn signal
flasher and extra wiring. The green
arrows on your instrument panel will
flash whenever you signal a turn or
lane change. Properly connected,
the trailer lights will also flash to alert
other drivers you’re about to turn,
change lanes, or stop.
When towing a trailer, the green
arrows on your instrument panel will
flash for turns even if the bulbs on the
trailer are burned out. Thus, you may
think drivers behind you are seeing
your signals when, in fact, they are
not. It’s important to check occasion-
ally to be sure the trailer bulbs are still
working. You must also check the
lights every time you disconnect and
then reconnect the wires.
Do not connect a trailer lighting sys-
tem directly to your vehicle’s lighting
system. Use only an approved trailer
wiring harness.
An authorized Kia dealer can assist
you in installing the wiring harness.
Page 485 of 604

. . . . . . . . . . . . . . . . . . . . . . . . . . . . . . . 7-51
. . . . . . . . . . . . . . . . . . . . . . . . . . . . . . . . 7-51
. . . . . . . . . . . . . . . . . . . . . . . . . . . . . . . . . . . 7-\
51
. . . . . . . . . . . . . . . . . . . . . . . . . . . . . . 7-51
Fuses . . . . . . . . . . . . . . . . . . . . . . . . . . . . . . . . . . . . \
7-53
. . . . . . . . . . . . . . . . . . . 7-55
Light bulbs . . . . . . . . . . . . . . . . . . . . . . . . . . . . . . . 7-65
. . . . . . . . . . . . . . . . . . . 7-65
. . . . . . . . . . . . . . . . . . . . . 7-68
. . . . . . . . . . . . . . . . . . . . . . 7-69
(Headlamp Type A) . . . . . . . . . . . . . . . . . . . . . . . . . . 7-69
(Headlamp Type A) . . . . . . . . . . . . . . . . . . . . . . . . . . 7-70
(Headlamp Type A) . . . . . . . . . . . . . . . . . . . . . . . . . . 7-72
(Headlamp Type A) . . . . . . . . . . . . . . . . . . . . . . . . . . 7-72
(Headlamp Type A) . . . . . . . . . . . . . . . . . . . . . . . . . . 7-73
(Headlamp Type B) . . . . . . . . . . . . . . . . . . . . . . . . . . 7-73
(Headlamp Type B) . . . . . . . . . . . . . . . . . . . . . . . . . . 7-74
. . 7-74
. . . . . . . . . . . . . . . 7-75
(Rear combination lamp Type A) . . . . . . . . . . . . . . 7-75
(Rear combination lamp Type A) . . . . . . . . . . . . . . 7-77
(Rear combination lamp Type A) . . . . . . . . . . . . . . 7-78
(Rear combination lamp Type A) . . . . . . . . . . . . . . 7-79
lamp Type A) . . . . . . . . . . . . . . . . . . . . . . . . . . . . . . . 7-80
(Rear combination lamp Type B) . . . . . . . . . . . . . . 7-81
(Rear combination lamp Type B) . . . . . . . . . . . . . . 7-81
(Rear combination lamp Type B) . . . . . . . . . . . . . . 7-82
(Rear combination lamp Type B) . . . . . . . . . . . . . . 7-83
replacement . . . . . . . . . . . . . . . . . . . . . . . . . . . . . . . . 7-84
. . . . . . . . . . . . 7-84
7
Page 537 of 604

Maintenance
54
7
✽ ✽
NOTICE
• When replacing a fuse, turn the
ignition “OFF” and turn off
switches of all electrical devices
then remove battery (-) terminal.
• The actual fuse/relay panel label may differ from equipped items.
CAUTION
Do not use a screwdriver or any
other metal object to removefuses because it may cause ashort circuit and damage thesystem.
WARNING- Electrical Fire
Always ensure replacements
fuses and relays are securely
fastened when installed. Failure
to do so can result in a vehicle
fire.
CAUTION
When replacing a blown fuse or relay, make sure the newfuse or relay fits tightly intothe clips. Failure to tightlyinstall the fuse or relay maycause damage to the wiringand electric systems.
Do not remove fuses, relays and terminals fastened withbolts or nuts. The fuses, relaysand terminals may not be fas-tened correctly which maycause vehicle damage.
CAUTION
Do not input any other objects except fuses or relays intofuse/relay terminals such as ascrewdriver or wiring. It maycause contact failure and sys-tem malfunction.
Do not plug in screwdrivers or aftermarket wiring into the ter-minal originally designed forfuse and relays only. The elec-trical system and wiring of thevehicle interior may be dam-aged or burned due to contactfailure.
If you directly connect the wire on the taillight or replacethe bulb which is over the reg-ulated capacity to install trail-ers etc., the inner junctionblock can get burned.
Page 548 of 604

765
Maintenance
LIGHT BULBS
Bulb replacement precaution
Please keep extra bulbs on hand
with appropriate wattage ratings in
case of emergencies.
Refer to “Bulb Wattage” in chapter 8.
When changing lamps, first turn off
the engine at a safe place, firmly
apply the parking brake and detach
the battery’s negative (-) terminal.
Use only bulbs of the specifiedwattage. net-work failure
The headlamp, taillight, and fog light
may light up when the head lamp
switch is turned ON, and not light up
when the taillight or for light switch is
turned ON. This may be cause by
network failure or vehicle electrical
control system malfunction. If there is
a problem, we recommend the sys-
tem be serviced by an authorized Kia
dealer.
trical control system stabilization
A normally functioning lamp may
flicker momentarily. This momentary
occurrence is due to stabilization
function of the vehicle's electrical on
control system. If the lamp soon
returns to normal, the vehicle does
not require service.
However, if the lamp goes out after
the momentary flickering, or the flick-
ering continues, we recommend the
system be serviced by an authorized
Kia dealer.
WARNING- Working on the lights
Prior to working on the light,
firmly apply the parking brake,
ensure that the ignition switch
is turned to the LOCK position
and turn off the lights to avoid
sudden movement of the vehi-
cle and burning your fingers or
receiving an electric shock.
CAUTION -Light replace-
ment
Be sure to replace the burned- out bulb with one of the samewattage rating. Otherwise, itmay cause damage to the fuseor electric wiring system.
CAUTION -Headlamp
Lens
To prevent damage, do notclean the headlamp lens withchemical solvents or strongdetergents.
Page 549 of 604

Maintenance
66
7
✽ ✽
NOTICE
• If the light bulb or lamp connector
is removed while the lamp is still
on, the fuse box's electronic sys-
tem may log it as a malfunction.
Therefore, a lamp malfunction
incident may be recorded as a
Diagnostic Trouble Code (DTC) in
the fuse box.
• It is normal for an operating lamp to flicker momentarily. This is due
to a stabilization function of the
vehicle’s electronic control device.
If the lamp lights up normally
after momentarily blinking, then
it is functioning as normal.
However, if the lamp continues to
flicker several times or turns off
completely, there may be an error
in the vehicle’s electronic control
device. Please have the vehicle
checked by an authorized Kia
dealer immediately.
✽ ✽ NOTICE
We recommend that the headlight
aiming be adjusted after an accident
or after the headlight assembly is rein-
stalled at an authorized Kia dealer.
✽ ✽NOTICE
After driving in heavy rain or wash-
ing, headlamp and taillamp lenses
could appear frosty. This condition is
caused by the temperature differ-
ence between the lamp inside and
outside. This is similar to the con-
densation on your windows inside
your vehicle during the rain and
doesn’t indicate a problem with your
vehicle. If the water leaks into the
lamp bulb circuitry, we recommend
that you have the vehicle checked by
an authorized Kia dealer.
If you don’t have the necessary tools,
the correct bulbs and the expertise,
consult an authorized Kia dealer. In
many cases, it is difficult to replace
vehicle light bulbs because other
parts of the vehicle must be removed
before you can get to the bulb. This is
especially true if you have to remove
the headlamp assembly to get to the
bulb(s).
Removing/installing the headlamp
assembly can result in damage to
the vehicle.
If non-genuine parts or substandard
bulbs are used, it may lead to blow-
ing a fuse or other wiring damages.
Do not install extra lamps or LEDs to
the vehicle. If additional lights are
installed, it may lead to lamp mal-
functions and flickering. Additionally,
the fuse box and other writing may
be damaged.
Page 550 of 604

767
Maintenance
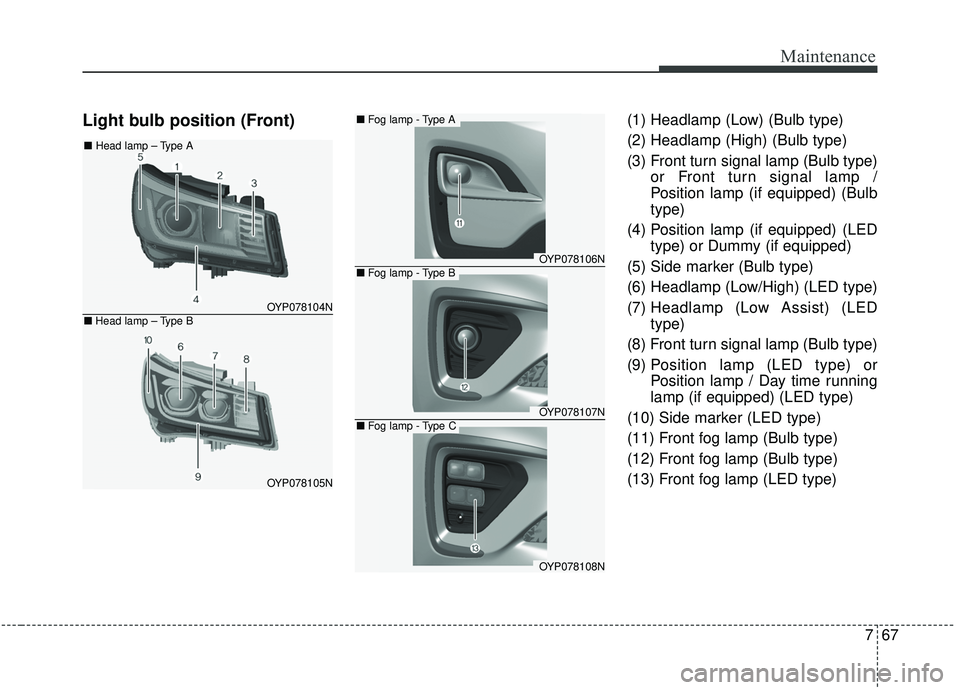
Light bulb position (Front)(1) Headlamp (Low) (Bulb type)
(2) Headlamp (High) (Bulb type)
(3) Front turn signal lamp (Bulb type)or Front turn signal lamp /
Position lamp (if equipped) (Bulb
type)
(4) Position lamp (if equipped) (LED type) or Dummy (if equipped)
(5) Side marker (Bulb type)
(6) Headlamp (Low/High) (LED type)
(7) Headlamp (Low Assist) (LED
type)
(8) Front turn signal lamp (Bulb type)
(9) P osition lamp (LED type) or
Position lamp / Day time running
lamp (if equipped) (LED type)
(10) Side marker (LED type)
(11) Front fog lamp (Bulb type)
(12) Front fog lamp (Bulb type)
(13) Front fog lamp (LED type)
OYP078104N
OYP078105N
■ Head lamp – Type B
■Head lamp – Type A
OYP078106N
OYP078107N
OYP078108N
■Fog lamp - Type A
■Fog lamp - Type B
■Fog lamp - Type C