2020 KIA OPTIMA PHEV brake
[x] Cancel search: brakePage 29 of 54

27
STEERING WHEEL CONTROLS
ALWAYS CHECK THE OWNER’S MANUAL FOR COMPLETE OPER ATING INFORMATION AND SAFET Y WARNINGS . *IF EQUIPPED †LEGAL DISCL AIMERS ON BACK INSIDE COVER
The SCC system is a supplemental system and is not a substitute for safe driving. It is the responsibility of the driver to always check the speed and distance to the vehicle ahead.These illustrations are for demonstration purposes only. Actual images or buttons on vehicle may vary.
Smart Cruise Control with Stop & Go Video
To view a video on your mobile device, snap this QR Code or visit the listed website . Refer to page 2 for more information .
www.youtube.com/KiaFeatureVideos
QR CODESmart Cruise Control (SCC) with Stop & Go System*†6
The Smart Cruise Control (SCC) with Stop & Go System is designed to maintain a predetermined distance from vehicles detected
ahead by automatically adjusting the driving speed as needed . When traffic is detected, the vehicle will
slow down to maintain a set distance behind traffic without depressing the accelerator or brake pedal .
With the SCC on and activated, the vehicle-to-vehicle distance set, and the system detects a vehicle
slowing or stopping, the system can bring the vehicle to a complete stop . The system will hold the
vehicle until the accelerator pedal is pressed – when pressed and when the vehicle ahead starts to
move forward, the SCC re-engages .
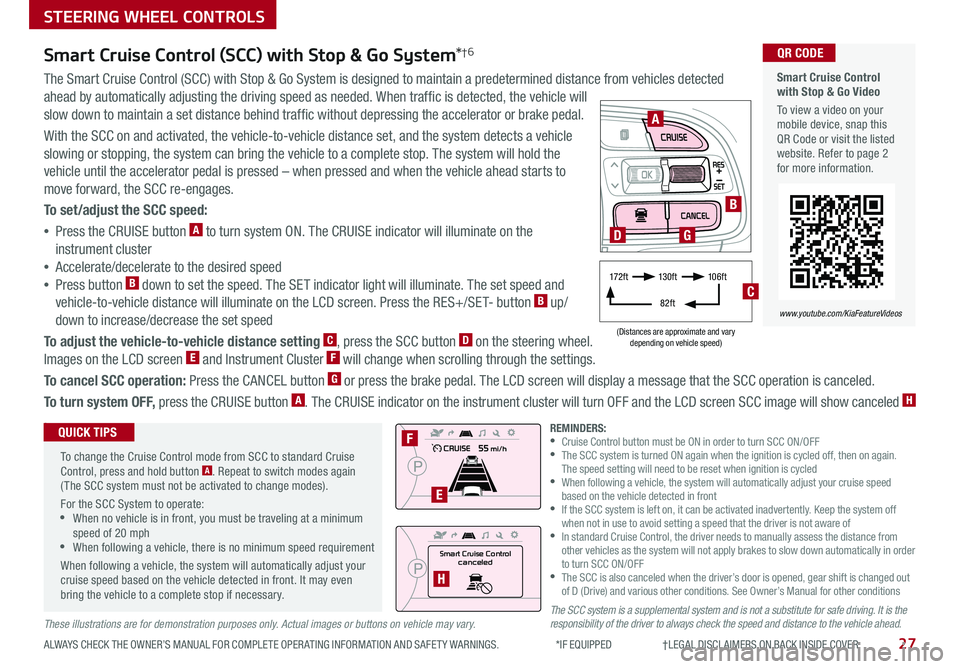
To set/adjust the SCC speed:
•Press the CRUISE button A to turn system ON . The CRUISE indicator will illuminate on the
instrument cluster
•Accelerate/decelerate to the desired speed
•Press button B down to set the speed . The SET indicator light will illuminate . The set speed and
vehicle-to-vehicle distance will illuminate on the LCD screen . Press the RES+/SET- button B up/
down to increase/decrease the set speed
To adjust the vehicle-to-vehicle distance setting C, press the SCC button D on the steering wheel .
Images on the LCD screen E and Instrument Cluster F will change when scrolling through the settings .
To cancel SCC operation: Press the CANCEL button G or press the brake pedal . The LCD screen will display a message that the SCC operation is canceled .
To turn system OFF, press the CRUISE button A . The CRUISE indicator on the instrument cluster will turn OFF and the LCD screen SCC image will show canceled H
.
Smart Cruise Control
canceled
A
B
D
F
E
H
(Distances are approximate and vary depending on vehicle speed)
17 2 f t13 0 f t
82ft
10 6 f t
C
G
To change the Cruise Control mode from SCC to standard Cruise Control, press and hold button A . Repeat to switch modes again ( The SCC system must not be activated to change modes) .
For the SCC System to operate: •When no vehicle is in front, you must be traveling at a minimum speed of 20 mph •When following a vehicle, there is no minimum speed requirement
When following a vehicle, the system will automatically adjust your cruise speed based on the vehicle detected in front . It may even bring the vehicle to a complete stop if necessary .
QUICK TIPSREMINDERS: •Cruise Control button must be ON in order to turn SCC ON/OFF •
The SCC system is turned ON again when the ignition is cycled off, then on again . The speed setting will need to be reset when ignition is cycled •
When following a vehicle, the system will automatically adjust your cruise speed based on the vehicle detected in front •
If the SCC system is left on, it can be activated inadvertently . Keep the system off when not in use to avoid setting a speed that the driver is not aware of •
In standard Cruise Control, the driver needs to manually assess the distance from other vehicles as the system will not apply brakes to slow down automatically in order to turn SCC ON/OFF •
The SCC is also canceled when the driver’s door is opened, gear shift is changed out of D (Drive) and various other conditions . See Owner’s Manual for other conditions
Page 38 of 54

36OPTIMA HYBRID / PLUG-IN HYBRID FEATURES & FUNCTIONS GUIDE*IF EQUIPPED †LEGAL DISCL AIMERS ON BACK INSIDE COVER
To view these videos on your mobile device, snap these QR codes . Refer to page 2 for more information .
Sportmatic® Shifting Video
Heated and Ventilated Seats Video
QR CODES
www.youtube.com/KiaFeatureVideos
Yellow Color: WarmingBlue Color: Ventilating
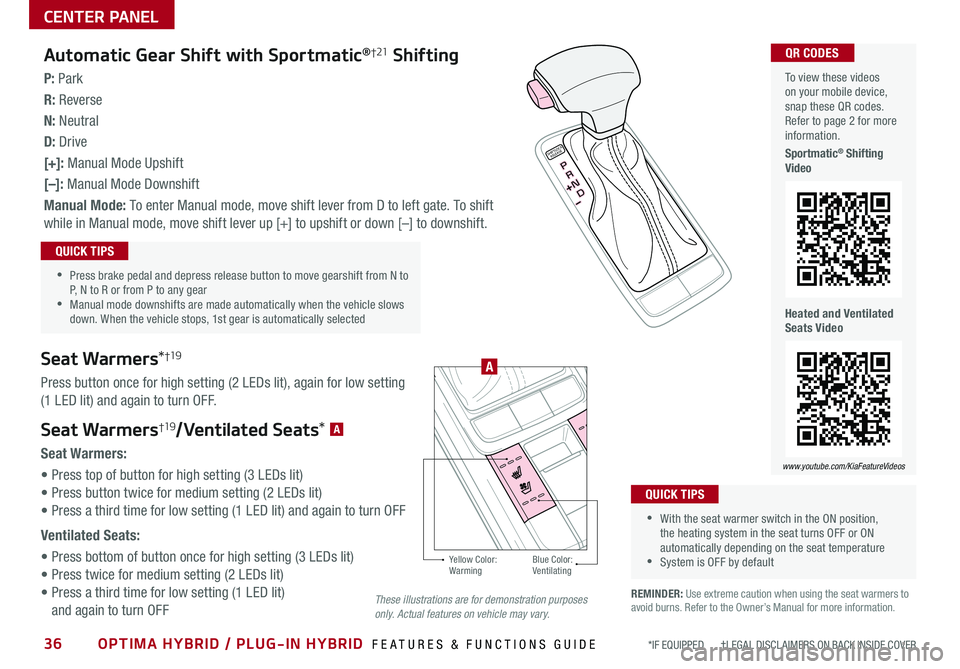
Automatic Gear Shift with Sportmatic®†21 Shifting
P: Park
R: Reverse
N: Neutral
D: Drive
[+]: Manual Mode Upshift
[–]: Manual Mode Downshift
Manual Mode: To enter Manual mode, move shift lever from D to left gate . To shift
while in Manual mode, move shift lever up [+] to upshift or down [–] to downshift .
Seat Warmers*†19
Press button once for high setting (2 LEDs lit), again for low setting
(1 LED lit) and again to turn OFF .
Seat Warmers†19/Ventilated Seats* A
Seat Warmers:
• Press top of button for high setting (3 LEDs lit)
• Press button twice for medium setting (2 LEDs lit)
• Press a third time for low setting (1 LED lit) and again to turn OFF
Ventilated Seats:
• Press bottom of button once for high setting (3 LEDs lit)
• Press twice for medium setting (2 LEDs lit)
• Press a third time for low setting (1 LED lit)
and again to turn OFF
•With the seat warmer switch in the ON position, the heating system in the seat turns OFF or ON automatically depending on the seat temperature •System is OFF by default
QUICK TIPS
•Press brake pedal and depress release button to move gearshift from N to P, N to R or from P to any gear •Manual mode downshifts are made automatically when the vehicle slows down . When the vehicle stops, 1st gear is automatically selected
QUICK TIPS
SHIFTLOCK
RELEASE
CENTER PANEL
A
REMINDER: Use extreme caution when using the seat warmers to avoid burns . Refer to the Owner’s Manual for more information .These illustrations are for demonstration purposes only. Actual features on vehicle may vary.
Page 39 of 54

37ALWAYS CHECK THE OWNER’S MANUAL FOR COMPLETE OPER ATING INFORMATION AND SAFET Y WARNINGS . *IF EQUIPPED
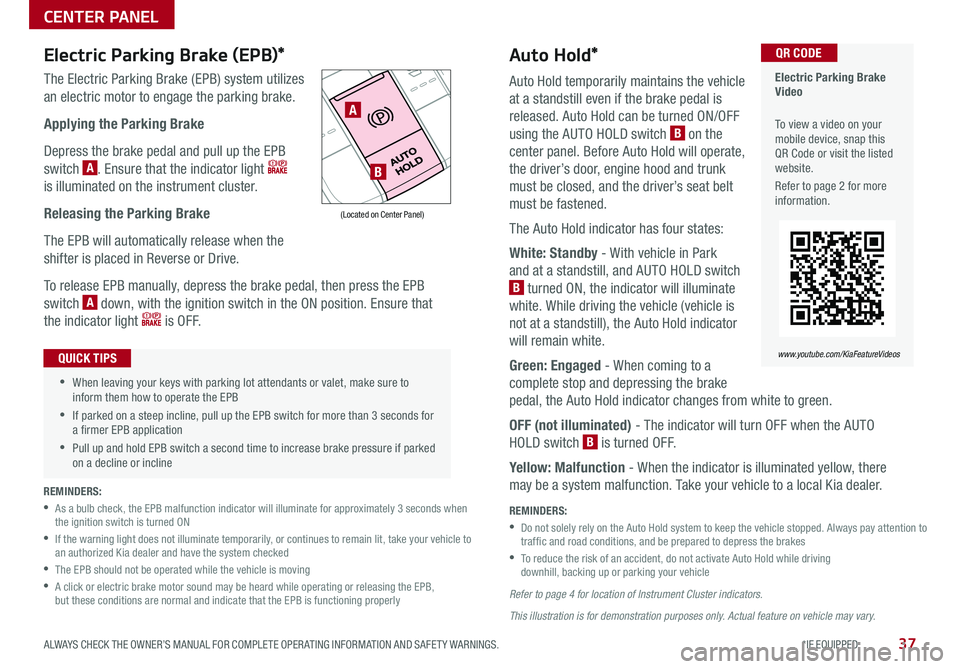
Auto Hold*
Auto Hold temporarily maintains the vehicle
at a standstill even if the brake pedal is
released . Auto Hold can be turned ON/OFF
using the AUTO HOLD switch B on the
center panel . Before Auto Hold will operate,
the driver’s door, engine hood and trunk
must be closed, and the driver’s seat belt
must be fastened .
The Auto Hold indicator has four states:
White: Standby - With vehicle in Park
and at a standstill, and AUTO HOLD switch
B turned ON, the indicator will illuminate
white . While driving the vehicle (vehicle is
not at a standstill), the Auto Hold indicator
will remain white .
Green: Engaged - When coming to a
complete stop and depressing the brake
pedal, the Auto Hold indicator changes from white to green .
OFF (not illuminated) - The indicator will turn OFF when the AUTO
HOLD switch B is turned OFF .
Yellow: Malfunction - When the indicator is illuminated yellow, there
may be a system malfunction . Take your vehicle to a local Kia dealer .
Electric Parking Brake (EPB)*
The Electric Parking Brake (EPB) system utilizes
an electric motor to engage the parking brake .
Applying the Parking Brake
Depress the brake pedal and pull up the EPB
switch A . Ensure that the indicator light
is illuminated on the instrument cluster .
Releasing the Parking Brake
The EPB will automatically release when the
shifter is placed in Reverse or Drive .
To release EPB manually, depress the brake pedal, then press the EPB
switch A down, with the ignition switch in the ON position . Ensure that
the indicator light i s O F F .
Electric Parking Brake Video
To view a video on your mobile device, snap this QR Code or visit the listed website .
Refer to page 2 for more information .
QR CODE
www.youtube.com/KiaFeatureVideos
A
B
(Located on Center Panel)
REMINDERS:
•
As a bulb check, the EPB malfunction indicator will illuminate for approximately 3 seconds when the ignition switch is turned ON
•
If the warning light does not illuminate temporarily, or continues to remain lit, take your vehicle to an authorized Kia dealer and have the system checked
•The EPB should not be operated while the vehicle is moving
•
A click or electric brake motor sound may be heard while operating or releasing the EPB, but these conditions are normal and indicate that the EPB is functioning properly
REMINDERS:
•
Do not solely rely on the Auto Hold system to keep the vehicle stopped . Always pay attention to traf fic and road conditions, and be prepared to depress the brakes
• To reduce the risk of an accident, do not activate Auto Hold while driving downhill, backing up or parking your vehicle
•When leaving your keys with parking lot attendants or valet, make sure to inform them how to operate the EPB
•If parked on a steep incline, pull up the EPB switch for more than 3 seconds for a firmer EPB application
•Pull up and hold EPB switch a second time to increase brake pressure if parked on a decline or incline
QUICK TIPS
CENTER PANEL
Refer to page 4 for location of Instrument Cluster indicators.
This illustration is for demonstration purposes only. Actual feature on vehicle may vary.
Page 54 of 54

*IF EQUIPPED
(up to 60,000 miles)AMAINTENANCE INTERVALS (MILES)
MAINTENANCE ITEMS7, 5 0 015,00022,50030,0003 7, 5 0 045,00052,50060,000
Add fuel additiveCPPPPPPPP
Rotate tiresPPPPPPPP
Engine oil and filter RRRRRRRR
Climate control air filterRRRR
Brake lines, hoses and connectionsIIIIIIII
Brake discs and padsIIIIIIII
Vacuum hoseIIIIIIII
Steering gear rack, linkage & bootsIIIIIIII
Drive shafts and bootsIIIIIIII
Suspension ball jointsIIIIIIII
Air conditioner compressor/refrigerantIIIIIIII
Exhaust systemIIIIIIII
Air cleaner filterIIIRIIIR
HSG beltDIIIRIIIR
Brake fluidIIII
Fuel tank air filterEIIII
Parking brake (foot type)IIII
Vapor hose and fuel filler capIIII
Cooling SystemIII
Fuel lines, fuel hoses and connectionsII
OPTIMA HYBRID / PLUG-IN HYBRID NORMAL MAINTENANCE SCHEDULE P=Perform • R=Replace • I=InspectB
‡ If equipped.A . See the Owner’s Manual for complete maintenance schedule.B. And, if necessary, adjust, correct, clean or replace.C. If TOP TIER detergent gasoline is not available, one bottle of additive is recommended. Additives are available from your authorized Kia dealer along with information on how to use them. Do not mix other additives.
D. Inspect HSG belt for evidence of cuts, cracks, excessive wear or oil saturation and replace if necessary. If HSG belt noise occurred, readjust HSG belt tension before replace.E. Both the fuel filter & fuel tank air filter are generally considered to be maintenance free, depending on fuel quality being used. However, periodic inspection is recommended. If your vehicle is having issues like fuel flow restriction, power surging, loss of power, difficulty starting, etc., replace the fuel filter immediately and consult an authorized Kia dealer for service.
See your Owner’s Manual for more details and complete maintenance information, including severe maintenance schedule. Warranty may be voided if maintenance schedule is not followed.
© 2019 Kia Motors America, Inc. All rights reserved.Consumer - Roadside Assistance†17: 1-800-333-4KIA (4542)
Check your Maintenance Schedule or schedule an appointment with a dealer using your UVO link account by logging into your Kia Access with UVO link App ( Vehicles equipped with UVO link only – See page 29 for setup information)
QUICK TIP
Part Number: UH200-PS-004†LEG AL DISCL AIMERS ON BACK INSIDE COVER