Page 238 of 597

Features of your vehicle
100
4
Types of warning sound
When an object is 47 in. to 24 in.
(120 cm to 61 cm) from the rear
bumper: Buzzer beeps intermit-
tently.
When an object is 24 in. to 12 in. (60 cm to 31 cm) from the rear
bumper: Buzzer beeps more fre-
quently.
When an object is within 12 in. (30 cm) of the rear bumper:
Buzzer sounds continuously.
Non-operational conditions of
the parking distance warning-
reverse system
The parking distance warning-
reverse system may not operate
properly when:
1. Moisture is frozen to the sensor. (It will operate normally once the
moisture clears.)
2. The sensor is covered with foreign matter, such as snow or water, or
the sensor cover is blocked. (It will
operate normally when the materi-
al is removed or the sensor is no
longer blocked.)
3. Driving on uneven road surfaces (unpaved roads, gravel, bumps,
gradient).
4. Objects generating excessive noise (vehicle horns, loud motor-
cycle engines, or truck air brakes)
are within range of the sensor.
5. Heavy rain or water spray exists.
6. Wireless transmitters or mobile phones are within range of the
sensor.
7. The sensor is covered with snow.
8. Trailer towing. The detecting range may decrease
when:
1. The sensor is covered with foreign
matter such as snow or water.
(The sensing range will return to
normal when removed.)
2. Outside air temperature is extremely hot or cold.
The following objects may not be
recognized by the sensor:
1. Sharp or slim objects such as ropes, chains or small poles.
2. Objects which tend to absorb the sensor frequency such as clothes,
sound absorbent material or snow.
3. Undetectable objects smaller than 40 in. (1 m) in height and narrower
than 6 in. (14 cm) in diameter.
Page 244 of 597

Features of your vehicle
106
4
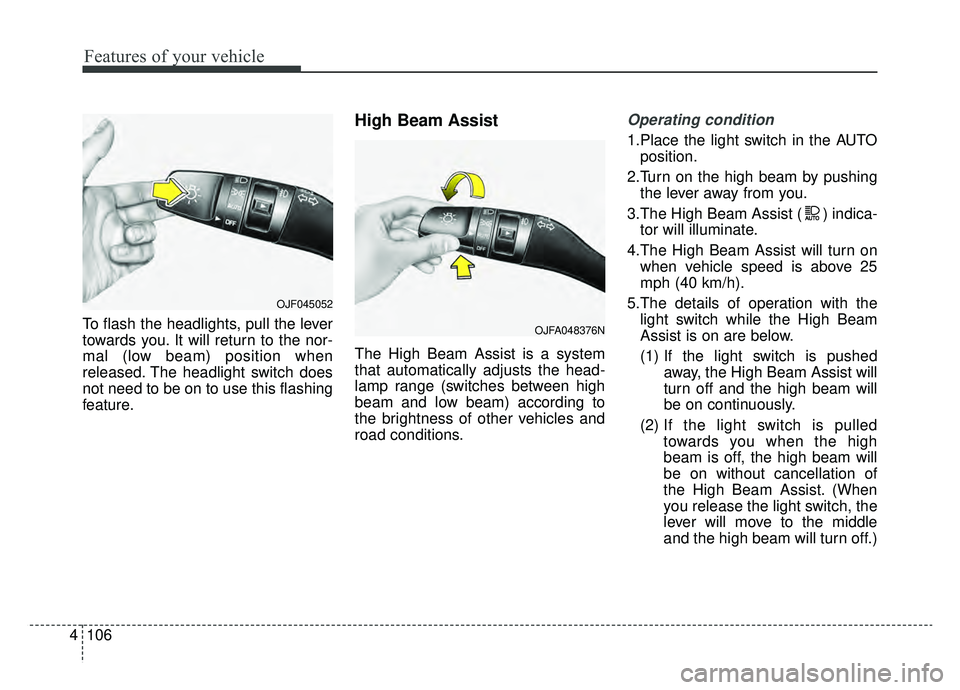
To flash the headlights, pull the lever
towards you. It will return to the nor-
mal (low beam) position when
released. The headlight switch does
not need to be on to use this flashing
feature.
High Beam Assist
The High Beam Assist is a system
that automatically adjusts the head-
lamp range (switches between high
beam and low beam) according to
the brightness of other vehicles and
road conditions.
Operating condition
1.Place the light switch in the AUTO
position.
2.Turn on the high beam by pushing the lever away from you.
3.The High Beam Assist ( ) indica- tor will illuminate.
4.The High Beam Assist will turn on when vehicle speed is above 25
mph (40 km/h).
5.The details of operation with the light switch while the High Beam
Assist is on are below.
(1) If the light switch is pushed away, the High Beam Assist will
turn off and the high beam will
be on continuously.
(2) If the light switch is pulled
towards you when the high
beam is off, the high beam will
be on without cancellation of
the High Beam Assist. (When
you release the light switch, the
lever will move to the middle
and the high beam will turn off.)
OJFA048376N
OJF045052
Page 245 of 597

4107
Features of your vehicle
(3) If the light switch is pulledtowards you when the high
beam is on by the High Beam
Assist, the low beam will be on
and the High Beam Assist will
turn off.
(4) If the light switch is turned to the headlamp position ( )
from AUTO position, the High
Beam Assist will turn off and
the low beam will be on contin-
uously. When the High Beam Assist is oper-
ating, the high beam switches to low
beam in the following conditions.
When the headlamp is detected
from the on-coming vehicle.
When the tail lamp is detected from the front vehicle.
When headlamp/tail lamp of bicy- cle/motorcycle is detected.
When the surrounding is sufficient- ly bright that high beams are not
needed.
When streetlights or other lights are detected.
When the light switch is not in the AUTO position.
When the High Beam Assist is off.
When vehicle speed is below 15 mph (24 km/h).Warning light and message
When the High Beam Assist System
is not working properly, the warning
message will come on for a few sec-
ond. After the message disappears,
the master warning light ( ) will
illuminate. Take your vehicle to an
authorized Kia dealer and have the
system checked.
OJF045194L
Page 246 of 597

Features of your vehicle
108
4
(Continued)
- When driving on a narrowcurved road, rough road,downhill or uphill.
- When only part of the vehicle in front is visible on a cross-road or curved road.
- When there is a traffic light, reflecting sign, flashing signor mirror ahead.
- When there is a temporary reflector or flash ahead (con-struction area).
- When the road conditions are bad such as being wet, iced orcovered with snow.
- When a vehicle suddenly appears from a curve.
- When the vehicle is tilted from a flat tire or being towed.
(Continued)(Continued) When front visibility is poor - When the lamp from a vehicleis covered with dust, snow orwater.
- When the light from a vehicle is not detected because ofexhaust fume, smoke, fog,snow, etc.
- When the front window is cov- ered with foreign matters.
- When it is hard to see because of fog, heavy rain or snow andetc.CAUTION
The driver must be cautious inthe following situations as theHigh Beam Assist system maynot operate:
When the light from on-coming or front vehicle is poor
- When the light from a vehicle is not detected because oflamp damage, hidden fromsight, etc.
- When the lamp of a vehicle is covered with dust, snow orwater.
When external condition is intervened
- When there is a similar shape as a vehicle's lamps.
- When the headlamp is not repaired or replaced at anauthorized Kia dealer.
- When the headlamp aiming is not properly adjusted.
(Continued)
Page 251 of 597

4113
Features of your vehicle
Front windshield washers
In the OFF position, pull the lever
gently toward you to spray washer
fluid on the windshield and to run the
wipers 1-3 cycles.
Use this function when the wind-
shield is dirty.
The spray and wiper operation will
continue until you release the lever.
If the washer does not work, check
the washer fluid level. If the fluid level
is not sufficient, you will need to add
appropriate non-abrasive windshield
washer fluid to the washer reservoir.The reservoir filler neck is located in
the front of the engine compartment
on the passenger side.
CAUTION - Washer pump
To prevent possible damage to
the washer pump, do not oper-ate the washer when the fluidreservoir is empty.
WARNING - Obscured
visibility
Do not use the washer in freez-
ing temperatures without first
warming the windshield with
the defrosters; the washer solu-
tion could freeze on the wind-
shield and obscure your vision.
CAUTION -Wipers & windshields
To prevent possible damage to the wipers or windshield,do not operate the wiperswhen the windshield is dry.
To prevent damage to the wiper blades, do not use gasoline,kerosene, paint thinner, orother solvents on or near them.
To prevent damage to the wiper arms and other compo-nents, do not attempt to movethe wipers manually.
OJF045063
Page 261 of 597

4123
Features of your vehicle
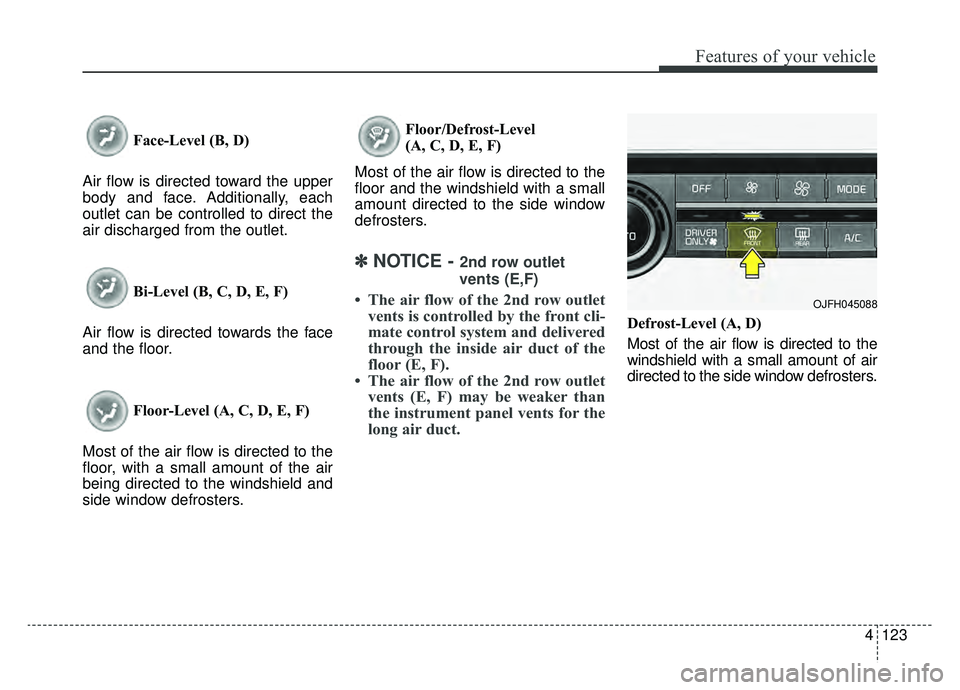
Face-Level (B, D)
Air flow is directed toward the upper
body and face. Additionally, each
outlet can be controlled to direct the
air discharged from the outlet.
Bi-Level (B, C, D, E, F)
Air flow is directed towards the face
and the floor.
Floor-Level (A, C, D, E, F)
Most of the air flow is directed to the
floor, with a small amount of the air
being directed to the windshield and
side window defrosters. Floor/Defrost-Level
(A, C, D, E, F)
Most of the air flow is directed to the
floor and the windshield with a small
amount directed to the side window
defrosters.
✽ ✽ NOTICE - 2nd row outlet
vents (E,F)
• The air flow of the 2nd row outlet vents is controlled by the front cli-
mate control system and delivered
through the inside air duct of the
floor (E, F).
• The air flow of the 2nd row outlet vents (E, F) may be weaker than
the instrument panel vents for the
long air duct.
Defrost-Level (A, D)
Most of the air flow is directed to the
windshield with a small amount of air
directed to the side window defrosters.
OJFH045088
Page 274 of 597

Features of your vehicle
136
4
Automatic climate control system
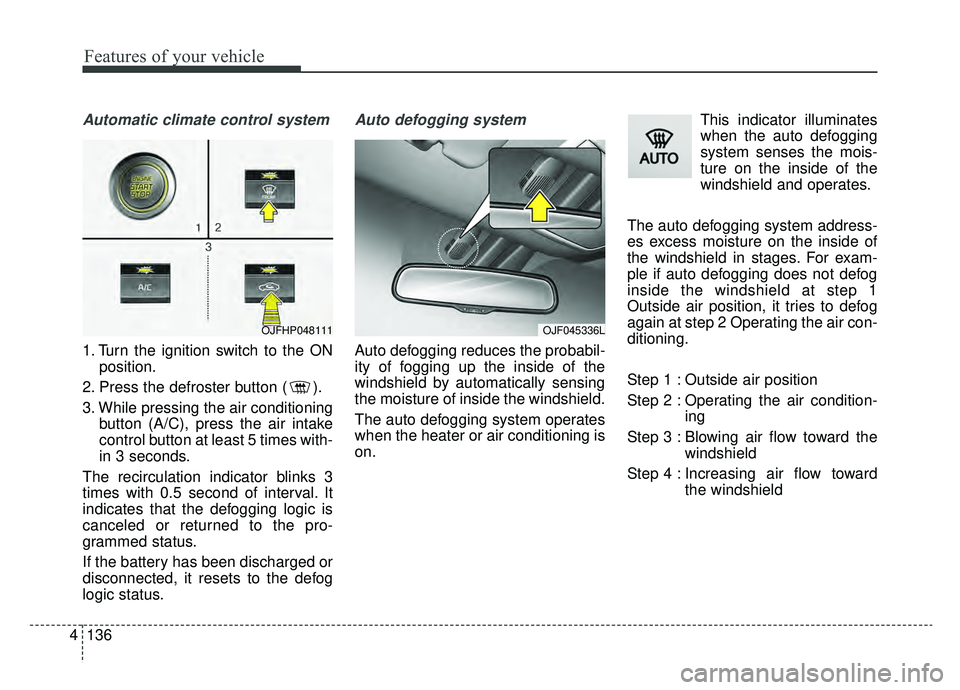
1. Turn the ignition switch to the ON
position.
2. Press the defroster button ( ).
3. While pressing the air conditioning button (A/C), press the air intake
control button at least 5 times with-
in 3 seconds.
The recirculation indicator blinks 3
times with 0.5 second of interval. It
indicates that the defogging logic is
canceled or returned to the pro-
grammed status.
If the battery has been discharged or
disconnected, it resets to the defog
logic status.
Auto defogging system
Auto defogging reduces the probabil-
ity of fogging up the inside of the
windshield by automatically sensing
the moisture of inside the windshield.
The auto defogging system operates
when the heater or air conditioning is
on. This indicator illuminates
when the auto defogging
system senses the mois-
ture on the inside of the
windshield and operates.
The auto defogging system address-
es excess moisture on the inside of
the windshield in stages. For exam-
ple if auto defogging does not defog
inside the windshield at step 1
Outside air position, it tries to defog
again at step 2 Operating the air con-
ditioning.
Step 1 : Outside air position
Step 2 : Operating the air condition- ing
Step 3 : Blowing air flow toward the windshield
Step 4 : Increasing air flow toward the windshield
OJF045336LOJFHP048111
Page 281 of 597

4143
Features of your vehicle
Air ventilation seat (if equipped)
The temperature setting of the seat
changes according to the switch
position.
If you want to ventilate your seatcushion, press the switch (blue
color).
Each time you press the button, the airflow will change as follows: The seat warmer (with air ventila-
tion) defaults to the OFF position
whenever the ignition switch is
turned on.
Sunvisor
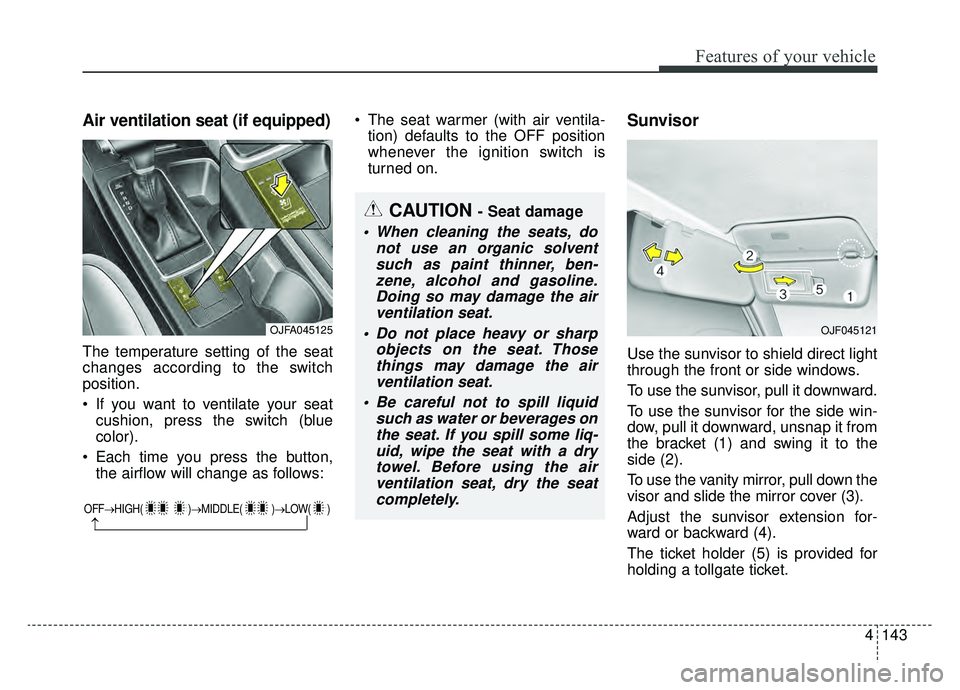
Use the sunvisor to shield direct light
through the front or side windows.
To use the sunvisor, pull it downward.
To use the sunvisor for the side win-
dow, pull it downward, unsnap it from
the bracket (1) and swing it to the
side (2).
To use the vanity mirror, pull down the
visor and slide the mirror cover (3).
Adjust the sunvisor extension for-
ward or backward (4).
The ticket holder (5) is provided for
holding a tollgate ticket.
OFF→ HIGH( )→ MIDDLE( )→LOW( )
→
CAUTION - Seat damage
When cleaning the seats, do
not use an organic solventsuch as paint thinner, ben-zene, alcohol and gasoline.Doing so may damage the airventilation seat.
Do not place heavy or sharp objects on the seat. Thosethings may damage the airventilation seat.
Be careful not to spill liquid such as water or beverages onthe seat. If you spill some liq-uid, wipe the seat with a drytowel. Before using the airventilation seat, dry the seatcompletely.
OJFA045125OJF045121