Page 505 of 568

Maintenance
68
7
Fuse NameFuse ratingCircuit Protected
MEMORY 110ADriver IMS (Integrated memory system) Module,Air Conditioner Control Module, Instrument Cluster
MODULE 110AKey Interlock Switch,Data Link Connector, Hazard Switch, Driver/Passenger Smart Key Outside Handle,
ICM (Integrated Circuit Module) Relay Box (Outside Mirror Folding/Unfolding Relay), Mood_LP_Unit
TRUNK10ATrunk Relay
POWER
WINDOW RH25APower Window Right Handle side Relay
POWER
WINDOW LH25APower Window Left Handle side Relay, Driver Safety Power Window Module
POWER SEAT DRIVER25ADriver Seat Manual Switch
MODULE 47.5ALane Keeping Assist Unit, IBU (Integrated Body Control Unit), Forward Collision Avoidance Assist Unit,
Blind-Spot Collision Warning Unit Left Handle side/Right Handle side
SEAT HEATER REAR15ARear Seat Warmer Control Module
HEATED MIRROR10ADriver/Passenger Power Outside Mirror, Air Conditioner Control Module, ECM (Engine Control
Module)/PCM (Power train Control Module)
SEAT HEATERFRONT20AFront Seat Warmer Control Module, Front Air Ventilation Seat Control Module
AMP25AAMP (Amplifier)
MULTI MEDIA15AAudio/Video & Navigation Head Unit
Instrument panel (Driver’s side fuse panel)
Page 509 of 568
Maintenance
72
7
Engine room compartment fuse panel
Fuse Name Fuse ratingCircuit Protected
MULTI
FUSE-1ALTERNATOR
200A
(NU 2.0L AKS) 150A
(GAMMA 1.6L T-GDI)
Fuse : BURGLAR ALARM, ABS1, ABS2, POWER OUTLET1, Alternator
MDPS80AMDPS (Motor Driven Power Steering) Unit
MULTI
FUSE-2
B+560AFuse : ECU 3, ECU 4, HORN, WIPER, A/C, Engine Control Relay
B+260AInstrument Panel Junction Block
B+360AInstrument Panel Junction Block
B+450AInstrument Panel Junction Block (Fuse : POWER WINDOW LH, POWER WINDOW RH,
TRUNK, SUNROOF 1, SEAT HEATER FRONT, AMP, POWER SEAT DRIVER)
COOLING FAN 160A[GAMMA 1.6L T-GDI] Cooling Fan 1 Relay
REAR HEATED40ARear Heated Relay
BLOWER40ABLOWER Relay
IG140AIgnition Switch, PDM #2 (ACC) Relay, PDM #3 (IG1) Relay
IG240AIgnition Switch, PDM #4 (IG2) Relay, START Relay
MULTI
FUSE-3PTC HEATER50APTC Heater Relay
Page 524 of 568
787
Maintenance
Side repeater lamp (Bulb type)
bulb replacement
1. Remove the lamp assembly fromthe vehicle by prying the lens and
pulling the assembly out.
2. Disconnect the bulb electrical con- nector.
3. Separate the socket and the lens parts by turning the socket coun-
terclockwise until the tabs on the
socket align with the slots on the
lens part.
4. Remove the bulb by pulling it straight out. 5. Insert a new bulb in the socket.
6. Reassemble the socket and the
lens part.
7. Connect the bulb electrical con- nector.
8. Reinstall the lamp assembly to the body of the vehicle.
Stop and tail lamp/side marker
(Bulb type) bulb replacement
(Rear combination lamp Type A)
1. Open the trunk lid.
2. Open the service cover.
3. Remove the nuts from the vehicle.
OBD078045
OBD078046
OTA070028
Page 525 of 568

Maintenance
88
7
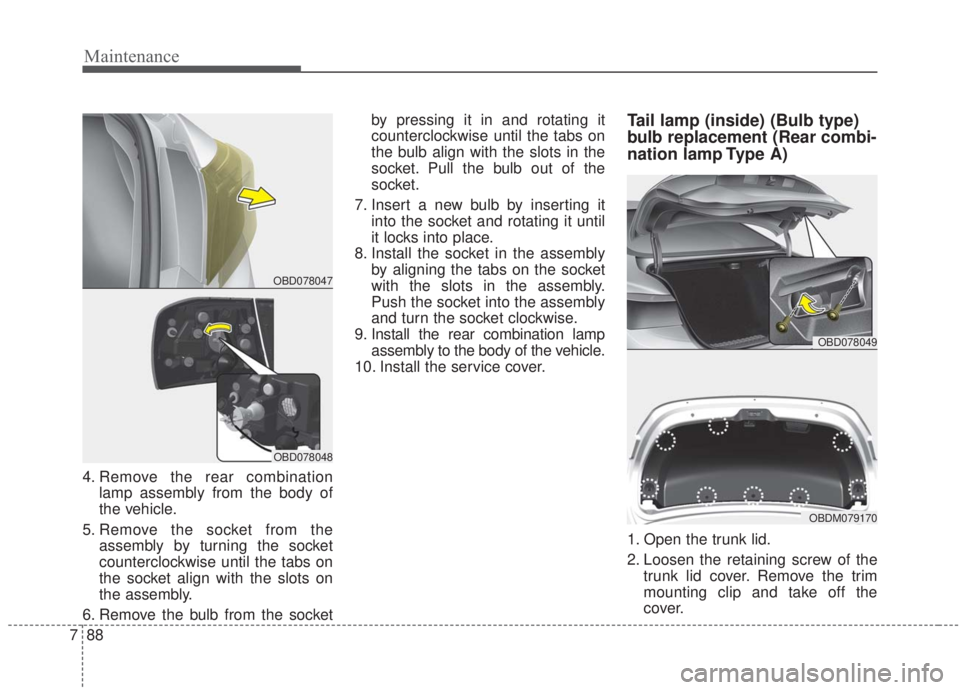
4. Remove the rear combination
lamp assembly from the body of
the vehicle.
5. Remove the socket from the assembly by turning the socket
counterclockwise until the tabs on
the socket align with the slots on
the assembly.
6. Remove the bulb from the socket by pressing it in and rotating it
counterclockwise until the tabs on
the bulb align with the slots in the
socket. Pull the bulb out of the
socket.
7. Insert a new bulb by inserting it into the socket and rotating it until
it locks into place.
8. Install the socket in the assembly by aligning the tabs on the socket
with the slots in the assembly.
Push the socket into the assembly
and turn the socket clockwise.
9. Install the rear combination lamp assembly to the body of the vehicle.
10. Install the service cover.
Tail lamp (inside) (Bulb type)
bulb replacement (Rear combi-
nation lamp Type A)
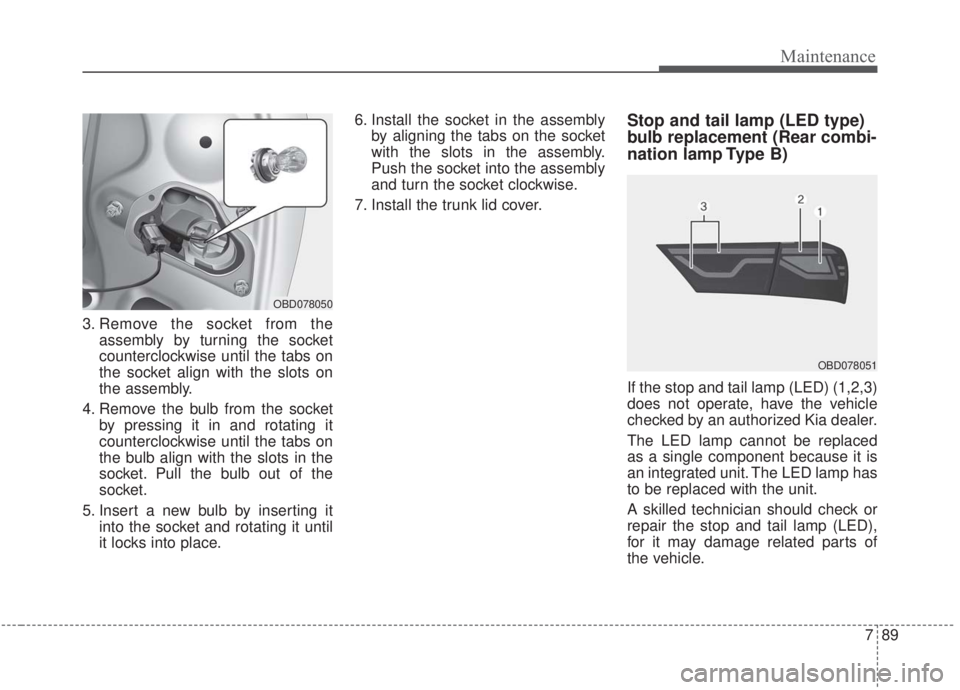
1. Open the trunk lid.
2. Loosen the retaining screw of the trunk lid cover. Remove the trim
mounting clip and take off the
cover.
OBD078049
OBDM079170
OBD078047
OBD078048
Page 526 of 568

789
Maintenance
3. Remove the socket from theassembly by turning the socket
counterclockwise until the tabs on
the socket align with the slots on
the assembly.
4. Remove the bulb from the socket by pressing it in and rotating it
counterclockwise until the tabs on
the bulb align with the slots in the
socket. Pull the bulb out of the
socket.
5. Insert a new bulb by inserting it into the socket and rotating it until
it locks into place. 6. Install the socket in the assembly
by aligning the tabs on the socket
with the slots in the assembly.
Push the socket into the assembly
and turn the socket clockwise.
7. Install the trunk lid cover.
Stop and tail lamp (LED type)
bulb replacement (Rear combi-
nation lamp Type B)
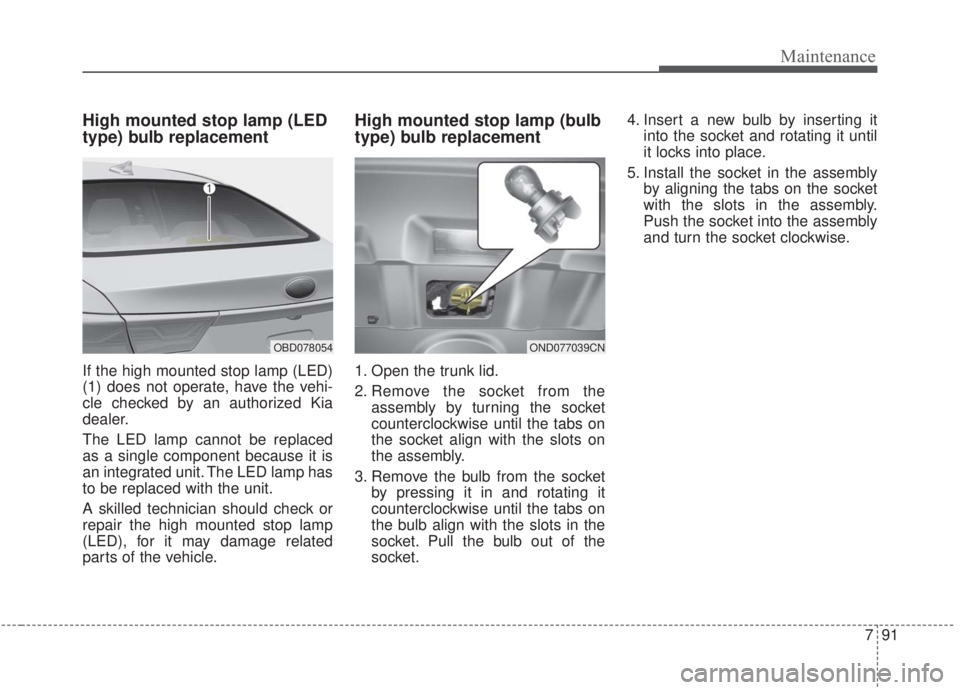
If the stop and tail lamp (LED) (1,2,3)
does not operate, have the vehicle
checked by an authorized Kia dealer.
The LED lamp cannot be replaced
as a single component because it is
an integrated unit. The LED lamp has
to be replaced with the unit.
A skilled technician should check or
repair the stop and tail lamp (LED),
for it may damage related parts of
the vehicle.
OBD078051
OBD078050
Page 528 of 568

791
Maintenance
High mounted stop lamp (LED
type) bulb replacement
If the high mounted stop lamp (LED)
(1) does not operate, have the vehi-
cle checked by an authorized Kia
dealer.
The LED lamp cannot be replaced
as a single component because it is
an integrated unit. The LED lamp has
to be replaced with the unit.
A skilled technician should check or
repair the high mounted stop lamp
(LED), for it may damage related
parts of the vehicle.
High mounted stop lamp (bulb
type) bulb replacement
1. Open the trunk lid.
2. Remove the socket from theassembly by turning the socket
counterclockwise until the tabs on
the socket align with the slots on
the assembly.
3. Remove the bulb from the socket by pressing it in and rotating it
counterclockwise until the tabs on
the bulb align with the slots in the
socket. Pull the bulb out of the
socket. 4. Insert a new bulb by inserting it
into the socket and rotating it until
it locks into place.
5. Install the socket in the assembly by aligning the tabs on the socket
with the slots in the assembly.
Push the socket into the assembly
and turn the socket clockwise.
OND077039CNOBD078054
Page 533 of 568
Maintenance
96
7
Trunk room lamp replacement
1. Open the trunk lid.
2. Remove the lamp assembly by
using a flat-blade screwdriver.
3. Remove the cover from the lamp assembly.
4. Remove the bulb by pulling it straight out.
5. Install a new bulb in the socket.
6. Install the cover to the lamp assembly.
7. Install the lamp assembly to the body of the vehicle.
CAUTION
Be careful not to dirty or dam-age the lens, lens tab, and plas-tic housings.
OND077040CN
Page 563 of 568

Index
6I
Floor mat anchor (s)..................................................\
4-154
Power outlet ..............................................................4-148
Seat warmer ..............................................................4-144
Sliding armrest ..........................................................4-147
Sunvisor ....................................................................4-14\
6
USB charger ..............................................................4-149
Wireless smart phone charging system ....................4-150
Interior lights ..............................................................4-110 Glove box lamp ........................................................4-112
Map lamp ..................................................................4-110
Room lamp ................................................................4-110
Trunk room lamp ......................................................4-111
Vanity mirror lamp ....................................................4-112
Interior overview..............................................................2-4
Key positions ..................................................................5-7 Ignition switch position ................................................5-7
Illuminated ignition switch ..........................................5-7
Starting the engine ........................................................5-9
Stopping the gasoline engine (Manual transmission) .. 5-10
Keys ........................................................................\
........4-4 Key operations ..............................................................4-4
Record your key number ..............................................4-4 Lane Keeping Assist (LKA) system ..........................5-125
Driver's attention ......................................................5-131
LKA function change................................................5-133\
LKA malfunction ......................................................5-132
LKA operation ..........................................................5-126
LCD windows ................................................................4-63 Distance to empty ......................................................4-63
LCD modes (For type B, C cluster) ..........................4-69
Over view ....................................................................4-63\
Service mode ..............................................................4-70
Trip information (Trip computer) ..............................4-63
User settings mode (For type B, C cluster) ................4-71
Light bulbs ....................................................................7-77\
Back up lamp bulb replacement ................................7-90
Bulb replacement precaution ....................................7-77
Day time running lamp (Bulb type) replacement ......7-86
Front fog lamp bulb replacement................................7-86
Front turn signal lamp bulb replacement ....................7-85
Glove box lamp replacement ......................................7-95
Headlamp (High beam) bulb replacement (Headlamp Type A,B) ..............................................7-83
Headlamp (LED type) replacement (Headlamp Type C) ..................................................7-85
Headlamp (Low beam) bulb replacement (Headlamp Type A,B) ..............................................7-81L
K