2020 JEEP WRANGLER display
[x] Cancel search: displayPage 142 of 276
CAUTION!
• To avoid fuel spillage and overfilling, do
not “top off” the fuel tank after filling.
NOTE:
• When the fuel nozzle “clicks” or shuts off,
the fuel tank is full.
• Tighten the fuel filler cap about 1/4 turn
until you hear one click. This is an indica-
tion that the cap is properly tightened.
• If the fuel filler cap is not tightened prop-
erly, the MIL will come on. Be sure the cap
is tightened every time the vehicle is
refueled.
Loose Fuel Filler Cap Message
After fuel has been added, the vehicle diag-
nostic system can determine if the fuel filler
cap is possibly loose, improperly installed, or
damaged. If the system detects a malfunc-
tion, the “gASCAP” message will display in
the odometer display. Tighten the gas cap
until a "clicking" sound is heard. This is an
indication that the gas cap is properly tight-
ened. Push the odometer reset button to turn
the message off. If the problem persists, the
message will appear the next time the vehicleis started. This might indicate a damaged
cap. If the problem is detected twice in a row,
the system will turn on the MIL. Resolving
the problem will turn the MIL off.
TRAILER TOWING
Trailer Towing Weights (Maximum Trailer
Weight Ratings)
The following chart provides the maximum
trailer weight ratings towable for your given
drivetrain.
Body Style Engine Transmission Axle Ratio Max. GTW (Gross Trailer Wt.) Max. Tongue Wt. (See Note)
2–Door3.6L EngineManual 3.21/3.73 2,205 lbs (1,000 kg) 110 lbs (50 kg)
Automatic 3.21/3.73/4.10 2,205 lbs (1,000 kg) 110 lbs (50 kg)
2.8L Diesel En-
gineManual/
Automatic3.21 2,205 lbs (1,000 kg) 110 lbs (50 kg)
3.73 3,307 lbs (1,500 kg) 330 lbs (150 kg)
STARTING AND OPERATING
140
Page 172 of 276

SCHEDULED SERVICING
Scheduled Servicing — Gasoline Engine
The scheduled services listed in this manual
must be done at the times or mileages speci-
fied to protect your vehicle warranty and
ensure the best vehicle performance and re-
liability. More frequent maintenance may be
needed for vehicles in severe operating con-
ditions, such as dusty areas and very short
trip driving. Inspection and service should
also be done anytime a malfunction is sus-
pected.
The oil change indicator system will remind
you that it is time to take your vehicle in for
scheduled maintenance.
On non-instrument cluster display equipped
vehicles, “CHANgE OIL” will flash in the
instrument cluster odometer and a single
chime will sound, indicating that an oil
change is necessary.The oil change indicator message will illumi-
nate approximately 7,000 miles
(11,200 km) after the most recent oil change
was performed. Have your vehicle serviced as
soon as possible, within 500 miles (800 km).
However, an earlier oil change at 4,500 miles
(7,500 km) may be required if the vehicle is
operated under “Severe Duty Conditions”
later in this section.
NOTE:
• The oil change indicator message will not
monitor the time since the last oil change.
Change your vehicle's oil if it has been
6 months since your last oil change even if
the oil change indicator message is NOT
illuminated.
• Change your engine oil more often if you
drive your vehicle off-road for an extended
period of time.
• Under no circumstances should oil change
intervals exceed 7,500 miles (12,000 km)
or 6 months, whichever comes first.
Your authorized dealer will reset the oil
change indicator message after completing
the scheduled oil change.Once A Month Or Before A Long Trip
• Check the engine oil level about five min-
utes after a fully warmed engine is shut off.
Checking the oil level while the vehicle is
on level ground will improve the accuracy of
the oil level reading. Add oil only when the
level is at or below the ADD or MIN mark.
• Check the windshield washer solvent and
add if required.
• Check tire pressure and look for unusual
wear or damage. Rotate tires at the first
sign of irregular wear, even if it occurs
before the oil indicator system turns on.
• Inspect the battery and clean and tighten
the terminals as required.
• Check the fluid levels of coolant reservoir,
automatic transmission, brake master cyl-
inder and power steering and fill as needed.
• Check all lights and other electrical items
for correct operation.
SERVICING AND MAINTENANCE
170
Page 220 of 276
NOTE:
• Your radio has many features that add to
the comfort and convenience for you and
your passengers.
• Some of these radio features should not be
used when driving because they take your
eyes from the road or your attention from
driving.
Clock Setting
1. Push and hold the TIME button until the
hours blink.
2. Turn the TUNE/SCROLL control knob to
set the hours.
3. Push the TUNE/SCROLL control knob un-
til the minutes begin to blink.
4. Turn the TUNE/SCROLL control knob to
set the minutes.
5. Push the TUNE/SCROLL control knob to
save the changes.
6. Push any button/knob or wait five seconds
to exit.
Equalizer, Balance And Fade
1. Push the TUNE/SCROLL control knob and
“BASS” will display.
2. Rotate the TUNE/SCROLL control knob to
select the desired setting.
3. Continue pushing the TUNE/SCROLL
control knob to display and set “MID
RANGE,” “TREBLE,” “BALANCE” and
“FADE.”
Radio Operation
Seek Up/Down Buttons
• Push the seek up or down button to seek
through radio stations in AM or FM bands.
• Hold either button to bypass stations with-
out stopping.
Store Radio Presets Manually
• Tune to the desired station.
• Push the SET/RND or SET (depending on
the radio) button once and SET 1 will show
in the display. Then select a preset button
(1–6).• A second station may be added to each
push button. Push the SET/RND or SET
(depending on the radio) button twice and
SET 2 will show in the display. Then select
a preset button (1–6).
CD/DISC Operation
Seek Up/Down Buttons
• Push to seek through CD tracks.
• Hold either button to bypass tracks without
stopping.
SET/RND Or RND (Depending On Radio) Button
(Random Play)
• Push this button while the CD is playing to
activate Random Play.
• This feature plays the selections on the CD
in random order to provide an interesting
change of pace.MULTIMEDIA
218
Page 222 of 276
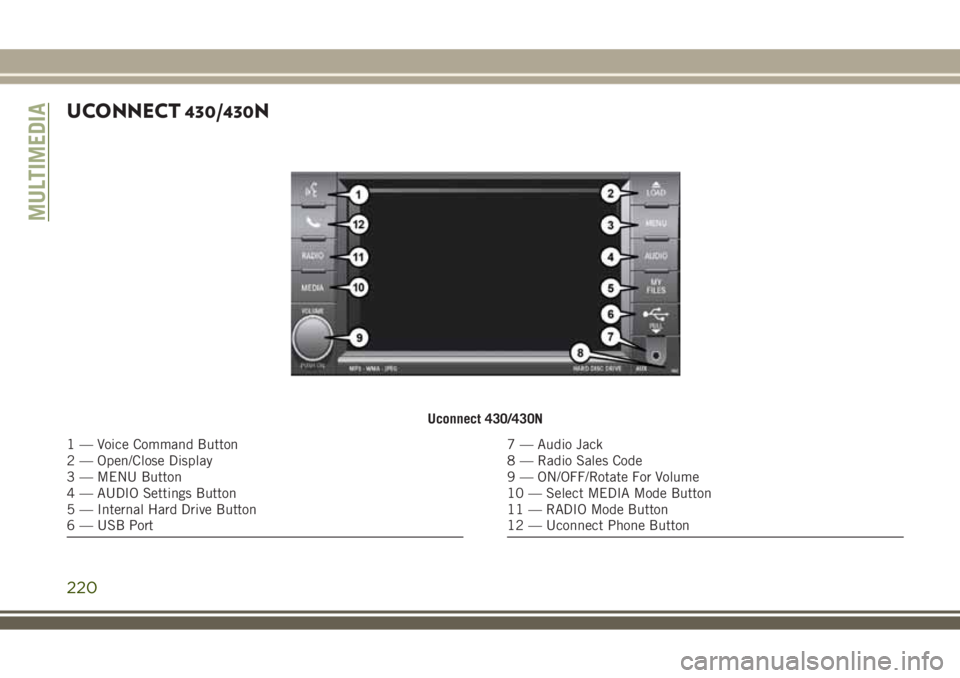
UCONNECT 430/430N
Uconnect 430/430N
1 — Voice Command Button
2 — Open/Close Display
3 — MENU Button
4 — AUDIO Settings Button
5 — Internal Hard Drive Button
6 — USB Port7 — Audio Jack
8 — Radio Sales Code
9 — ON/OFF/Rotate For Volume
10 — Select MEDIA Mode Button
11 — RADIO Mode Button
12 — Uconnect Phone Button
MULTIMEDIA
220
Page 223 of 276
NOTE:
• Your radio may not be equipped with the
Uconnect Voice Command and Uconnect
Phone features. To determine if your radio
has these features, push the Voice Com-
mand button on the radio. You will hear a
voice prompt if you have the feature, or see
a message on the radio stating “Uconnect
Phone not available” if you do not.
• Your radio has many features that add to
the comfort and convenience of you and
your passengers. Some of these radio fea-
tures should not be used when driving be-
cause they take your eyes from the road or
your attention from driving.Clock Setting
1. Turn the radio on, then press the screen
where the time is displayed.
2. Press the “User Clock” button on the
touchscreen or the time display (Naviga-
tion radio only).
3. To adjust the hours, press either the “Hour
Forward” or “Hour Backward” button on
the touchscreen.
4. To adjust the minutes, press either the
“Minute Forward” or “Minute Backward”
button on the touchscreen.
5. To save the new time setting, press the
screen where the word “Save” is
displayed.
Menu
• Push the MENU button on the faceplate to
access the System Setup menu and the My
Files menu.
• Push the MENU button on the faceplate in
an active mode (CD, AUX, etc.) to change
mode specific settings.
221
Page 224 of 276
Equalizer, Balance And Fade
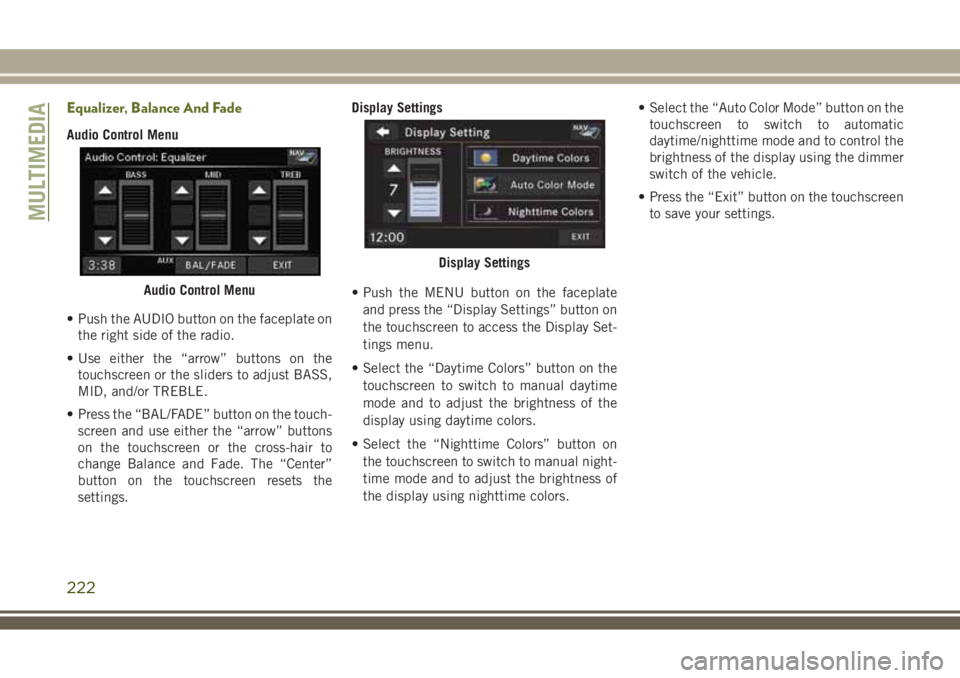
Audio Control Menu
• Push the AUDIO button on the faceplate on
the right side of the radio.
• Use either the “arrow” buttons on the
touchscreen or the sliders to adjust BASS,
MID, and/or TREBLE.
• Press the “BAL/FADE” button on the touch-
screen and use either the “arrow” buttons
on the touchscreen or the cross-hair to
change Balance and Fade. The “Center”
button on the touchscreen resets the
settings.Display Settings
• Push the MENU button on the faceplate
and press the “Display Settings” button on
the touchscreen to access the Display Set-
tings menu.
• Select the “Daytime Colors” button on the
touchscreen to switch to manual daytime
mode and to adjust the brightness of the
display using daytime colors.
• Select the “Nighttime Colors” button on
the touchscreen to switch to manual night-
time mode and to adjust the brightness of
the display using nighttime colors.• Select the “Auto Color Mode” button on the
touchscreen to switch to automatic
daytime/nighttime mode and to control the
brightness of the display using the dimmer
switch of the vehicle.
• Press the “Exit” button on the touchscreen
to save your settings.
Audio Control Menu
Display Settings
MULTIMEDIA
222
Page 228 of 276
• Push the MEDIA button on the faceplate to
display the media source tabs at the top of
the screen. Select the source by pressing
the “HDD,” “DISC” or “AUX” media source
button on the touchscreen.
NOTE:
Your Touchscreen Radio will usually auto-
matically switch to the appropriate mode
when something is first connected or inserted
into the system.
Insert A CD/DVD Disc
• To insert a disc, push the LOAD button on
the faceplate.
• With the printed side upwards, insert the
disc into the disc slot of the radio. The radio
pulls the disc in automatically and closes
the flip screen. The radio selects the appro-
priate mode after the disc is recognized,
and starts playing the first track. The dis-
play shows “Reading...” during this
process.Seek Up/Seek Down
• Push the SEEK UP or SEEK DOWN buttons
on the faceplate to seek through tracks in
Disc Mode. Holding the SEEK UP button on
the touchscreen will fast forward through
the track until the beginning of the track is
reached; if still held it will fast-forward
through the next sequential track(s) (if ran-
dom play mode is not active) until released.
Holding the SEEK DOWN button on the
touchscreen will fast-reverse through the
track until the beginning of the track is
reached; if still held it will fast-reverse
through the next sequential track(s) (if ran-
dom play mode is not active) until released.
Audio Jack Operation
The AUX/Audio Jack provides a means to
connect a portable audio device, such as an
MP3 player or an iPod, to the vehicle’s sound
system. This requires the use of a 3.5 mm
stereo audio patch cable.• Push the MEDIA button on the faceplate
then the “AUX” button on the touchscreen
to change the mode to auxiliary device if
the Audio Jack is connected, allowing the
music from your portable device to play
through the vehicle's speakers.
NOTE:
The functions of the portable device are con-
trolled using the device itself, not the buttons
on the radio. However, the volume may be
controlled using the radio or portable device.
Hard Disk Drive (HDD) Operation
• The Hard Disk Drive (HDD) mode gives you
access to the audio files on the internal
hard disk drive. It functions similar to a CD
player, with the exception that the internal
HDD can hold more tracks.
• It is also possible to import display pictures
to the internal hard disk drive. The pictures
can be displayed on the right half of the
radio screen.
MULTIMEDIA
226
Page 230 of 276
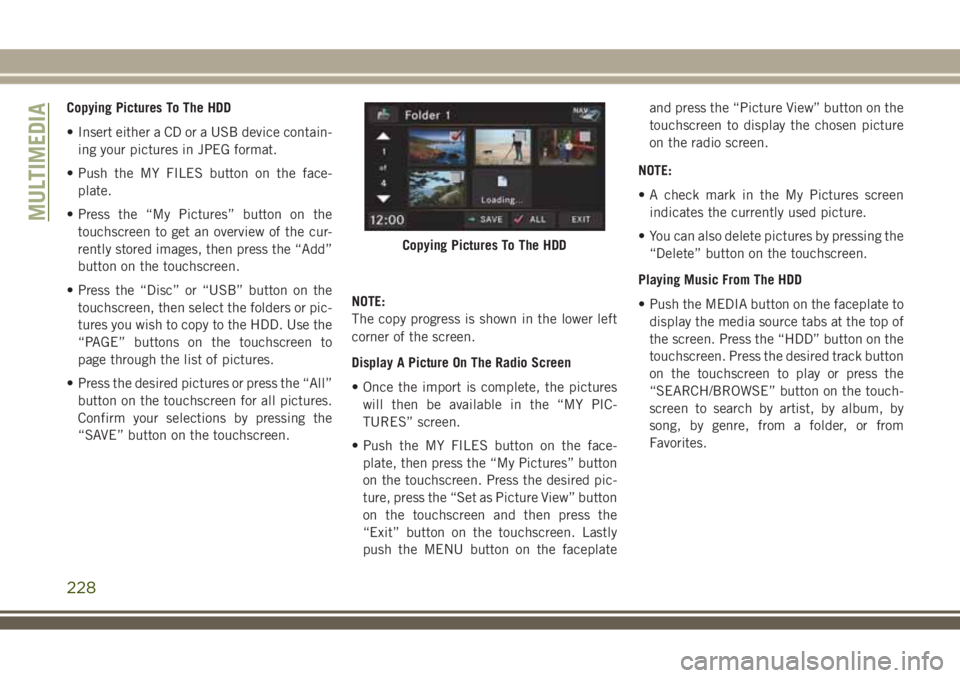
Copying Pictures To The HDD
• Insert either a CD or a USB device contain-
ing your pictures in JPEG format.
• Push the MY FILES button on the face-
plate.
• Press the “My Pictures” button on the
touchscreen to get an overview of the cur-
rently stored images, then press the “Add”
button on the touchscreen.
• Press the “Disc” or “USB” button on the
touchscreen, then select the folders or pic-
tures you wish to copy to the HDD. Use the
“PAGE” buttons on the touchscreen to
page through the list of pictures.
• Press the desired pictures or press the “All”
button on the touchscreen for all pictures.
Confirm your selections by pressing the
“SAVE” button on the touchscreen.NOTE:
The copy progress is shown in the lower left
corner of the screen.
Display A Picture On The Radio Screen
• Once the import is complete, the pictures
will then be available in the “MY PIC-
TURES” screen.
• Push the MY FILES button on the face-
plate, then press the “My Pictures” button
on the touchscreen. Press the desired pic-
ture, press the “Set as Picture View” button
on the touchscreen and then press the
“Exit” button on the touchscreen. Lastly
push the MENU button on the faceplateand press the “Picture View” button on the
touchscreen to display the chosen picture
on the radio screen.
NOTE:
• A check mark in the My Pictures screen
indicates the currently used picture.
• You can also delete pictures by pressing the
“Delete” button on the touchscreen.
Playing Music From The HDD
• Push the MEDIA button on the faceplate to
display the media source tabs at the top of
the screen. Press the “HDD” button on the
touchscreen. Press the desired track button
on the touchscreen to play or press the
“SEARCH/BROWSE” button on the touch-
screen to search by artist, by album, by
song, by genre, from a folder, or from
Favorites.
Copying Pictures To The HDD
MULTIMEDIA
228