2020 JEEP WRANGLER ABS
[x] Cancel search: ABSPage 186 of 276

WARNING!
• Use only manufacturer's recommended
brake fluid. Refer to “Fluids And Lubri-
cants” in “Technical Specifications” for
further information. Using the wrong
type of brake fluid can severely damage
your brake system and/or impair its per-
formance. The proper type of brake fluid
for your vehicle is also identified on the
original factory installed hydraulic mas-
ter cylinder reservoir.
• To avoid contamination from foreign
matter or moisture, use only new brake
fluid or fluid that has been in a tightly
closed container. Keep the master cylin-
der reservoir cap secured at all times.
Brake fluid in a open container absorbs
moisture from the air resulting in a lower
boiling point. This may cause it to boil
unexpectedly during hard or prolonged
braking, resulting in sudden brake fail-
ure. This could result in a collision.
• Overfilling the brake fluid reservoir can
result in spilling brake fluid on hot en-
gine parts, causing the brake fluid to
WARNING!
catch fire. Brake fluid can also damage
painted and vinyl surfaces, care should
be taken to avoid its contact with these
surfaces.
• Do not allow petroleum based fluid to
contaminate the brake fluid. Brake seal
components could be damaged, causing
partial or complete brake failure. This
could result in a collision.
Manual Transmission
Fluid Level Check
Check the fluid level by removing the fill
plug. The fluid level should be between the
bottom of the fill hole and a point not more
than 3/16 of an inch (4.76 mm) below the
bottom of the hole.
Add fluid, if necessary, to maintain the
proper level.
Automatic Transmission
Fluid Level Check — Gasoline Engine
It is best to check the fluid level when the
transmission is at normal operating tempera-
ture (approximately 180°F/82°C). This oc-
curs after at least 15 miles (25 km) of driv-
ing. At normal operating temperature, the
fluid cannot be held comfortably between the
fingertips.
Use the following procedure to check the
transmission fluid level properly:
1. Park the vehicle on level ground.
2. Remove the engine cover by pulling it up
off the mounting studs (two in the front
and two in the rear).
3. Run the engine at normal idle speed for at
least 60 seconds, and leave the engine
running for the rest of this procedure.
4. Fully apply the parking brake, and press
the brake pedal.
SERVICING AND MAINTENANCE
184
Page 190 of 276

3. Pivot the glove compartment downward.
4. Disengage the two retaining tabs that se-
cure the two air filter access doors to the
HVAC housing.5. Open the two air filter access doors.
6. Remove the two particulate air filters from
the HVAC air inlet housing. Pull the filter
elements straight out of the housing, one
at a time.7. Install the A/C air filter with the air filter
position indicators pointing in the same
direction as removal.
Glove Compartment
1 — Glove Compartment Travel Stops
2 — Glove Compartment
Air Filter Retaining Tabs
1 — Left Retaining Tab
2 — Right Retaining Tab
Air Filter Access Door Open
1—Air Conditioning Filter Access Door
2 — Air Conditioning Air FilterSERVICING AND MAINTENANCE
188
Page 191 of 276

CAUTION!
The cabin air filter is identified with an
arrow to indicate airflow direction through
the filter. Failure to properly install the
filter will result in the need to replace it
more often.
8. Close A/C Air Filter access doors and se-
cure retaining tabs.
9. Rotate the glove compartment door back
into position.
Refer to the “Maintenance Plan” for the
proper maintenance intervals.
DEALER SERVICE
An authorized dealer has the qualified service
personnel, special tools, and equipment to
perform all service operations in an expert
manner. Service Manuals are available which
include detailed service information for your
vehicle. Refer to these Service Manuals be-
fore attempting any procedure yourself.NOTE:
Intentional tampering with emissions control
systems may void your warranty and could
result in civil penalties being assessed
against you.
WARNING!
You can be badly injured working on or
around a motor vehicle. Only do service
work for which you have the knowledge
and the proper equipment. If you have any
doubt about your ability to perform a ser-
vice job, take your vehicle to a competent
mechanic.
Windshield Wiper Blades
Clean the rubber edges of the wiper blades
and the windshield periodically with a sponge
or soft cloth and a mild nonabrasive cleaner.
This will remove accumulations of salt or road
film.Operation of the wipers on dry glass for long
periods may cause deterioration of the wiper
blades. Always use washer fluid when using
the wipers to remove salt or dirt from a dry
windshield.
Avoid using the wiper blades to remove frost
or ice from the windshield. Keep the blade
rubber out of contact with petroleum prod-
ucts such as engine oil, gasoline, etc.
NOTE:
Life expectancy of wiper blades varies de-
pending on geographical area and frequency
of use. Poor performance of blades may be
present with chattering, marks, water lines or
wet spots. If any of these conditions are
present, clean the wiper blades or replace as
necessary.
The wiper blades and wiper arms should be
inspected periodically, not just when wiper
performance problems are experienced. This
inspection should include the following
points:
• Wear Or Uneven Edges
• Foreign Material
189
Page 192 of 276

• Hardening Or Cracking
• Deformation Or Fatigue
If a wiper blade or wiper arm is damaged,
replace the affected wiper arm or blade with
a new unit. Do not attempt to repair a wiper
arm or blade that is damaged.
Wiper Blade Removal/Installation
CAUTION!
Do not allow the wiper arm to spring back
against the glass without the wiper blade
in place or the glass may be damaged.
1. Lift the wiper arm to raise the wiper blade
off of the glass, until the wiper arm is in
the full up position.
2. To disengage the wiper blade from the
wiper arm, press the release tab on the
wiper blade and while holding the wiper
arm with one hand, slide the wiper blade
down towards the base of the wiper arm.
Wiper Blade With Release Tab In
Locked Position
1 — Wiper Blade
2 — Wiper Arm
3 — Release Tab
Wiper Blade With Release Tab In
Unlocked Position
1 — Wiper Blade
2 — Wiper Arm
3 — Release TabSERVICING AND MAINTENANCE
190
Page 225 of 276

Radio Operation
Radio Operation
1 — Radio Tuner Tabs
2 — Individual Presets
3 — Search/Browse
4 — Radio Station/Track Info
5 — Sort Presets6 — Station Scan
7 — Seek Down
8 — Direct Tune
9 — Seek Up
223
Page 227 of 276

CD/DVD Disc Operation
CD/DVD Disc Operation
1 — Media Source Tabs
2 — Folder/Track
3 — Open Folder
4 — Track Information
5 — Sort Tracks6 — Track Scan
7 — Seek Down
8 — Play/Pause
9 — Seek Up
225
Page 228 of 276

• Push the MEDIA button on the faceplate to
display the media source tabs at the top of
the screen. Select the source by pressing
the “HDD,” “DISC” or “AUX” media source
button on the touchscreen.
NOTE:
Your Touchscreen Radio will usually auto-
matically switch to the appropriate mode
when something is first connected or inserted
into the system.
Insert A CD/DVD Disc
• To insert a disc, push the LOAD button on
the faceplate.
• With the printed side upwards, insert the
disc into the disc slot of the radio. The radio
pulls the disc in automatically and closes
the flip screen. The radio selects the appro-
priate mode after the disc is recognized,
and starts playing the first track. The dis-
play shows “Reading...” during this
process.Seek Up/Seek Down
• Push the SEEK UP or SEEK DOWN buttons
on the faceplate to seek through tracks in
Disc Mode. Holding the SEEK UP button on
the touchscreen will fast forward through
the track until the beginning of the track is
reached; if still held it will fast-forward
through the next sequential track(s) (if ran-
dom play mode is not active) until released.
Holding the SEEK DOWN button on the
touchscreen will fast-reverse through the
track until the beginning of the track is
reached; if still held it will fast-reverse
through the next sequential track(s) (if ran-
dom play mode is not active) until released.
Audio Jack Operation
The AUX/Audio Jack provides a means to
connect a portable audio device, such as an
MP3 player or an iPod, to the vehicle’s sound
system. This requires the use of a 3.5 mm
stereo audio patch cable.• Push the MEDIA button on the faceplate
then the “AUX” button on the touchscreen
to change the mode to auxiliary device if
the Audio Jack is connected, allowing the
music from your portable device to play
through the vehicle's speakers.
NOTE:
The functions of the portable device are con-
trolled using the device itself, not the buttons
on the radio. However, the volume may be
controlled using the radio or portable device.
Hard Disk Drive (HDD) Operation
• The Hard Disk Drive (HDD) mode gives you
access to the audio files on the internal
hard disk drive. It functions similar to a CD
player, with the exception that the internal
HDD can hold more tracks.
• It is also possible to import display pictures
to the internal hard disk drive. The pictures
can be displayed on the right half of the
radio screen.
MULTIMEDIA
226
Page 230 of 276

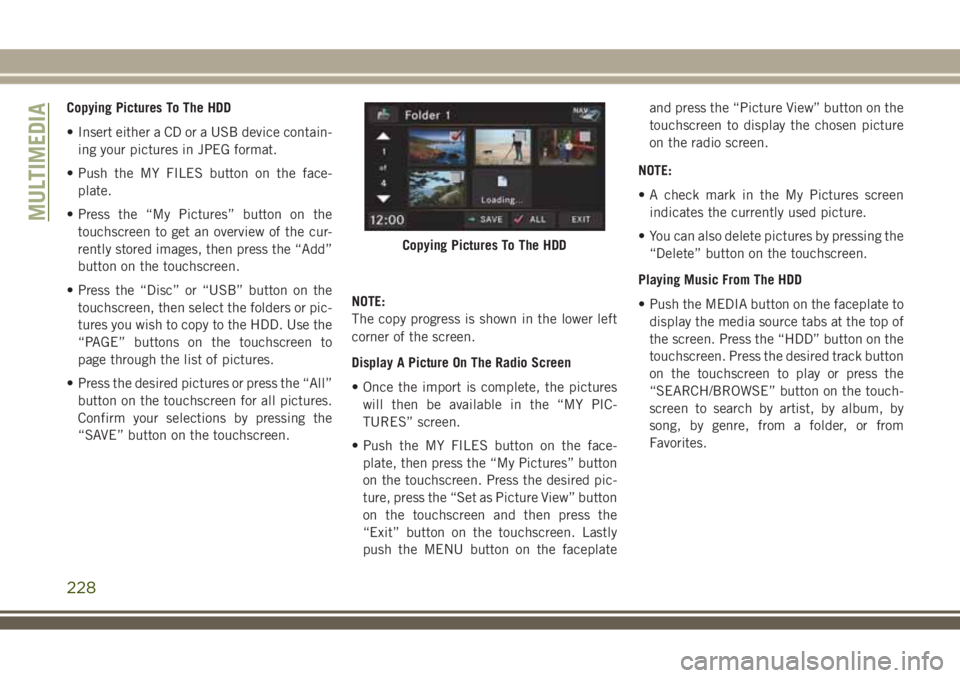
Copying Pictures To The HDD
• Insert either a CD or a USB device contain-
ing your pictures in JPEG format.
• Push the MY FILES button on the face-
plate.
• Press the “My Pictures” button on the
touchscreen to get an overview of the cur-
rently stored images, then press the “Add”
button on the touchscreen.
• Press the “Disc” or “USB” button on the
touchscreen, then select the folders or pic-
tures you wish to copy to the HDD. Use the
“PAGE” buttons on the touchscreen to
page through the list of pictures.
• Press the desired pictures or press the “All”
button on the touchscreen for all pictures.
Confirm your selections by pressing the
“SAVE” button on the touchscreen.NOTE:
The copy progress is shown in the lower left
corner of the screen.
Display A Picture On The Radio Screen
• Once the import is complete, the pictures
will then be available in the “MY PIC-
TURES” screen.
• Push the MY FILES button on the face-
plate, then press the “My Pictures” button
on the touchscreen. Press the desired pic-
ture, press the “Set as Picture View” button
on the touchscreen and then press the
“Exit” button on the touchscreen. Lastly
push the MENU button on the faceplateand press the “Picture View” button on the
touchscreen to display the chosen picture
on the radio screen.
NOTE:
• A check mark in the My Pictures screen
indicates the currently used picture.
• You can also delete pictures by pressing the
“Delete” button on the touchscreen.
Playing Music From The HDD
• Push the MEDIA button on the faceplate to
display the media source tabs at the top of
the screen. Press the “HDD” button on the
touchscreen. Press the desired track button
on the touchscreen to play or press the
“SEARCH/BROWSE” button on the touch-
screen to search by artist, by album, by
song, by genre, from a folder, or from
Favorites.
Copying Pictures To The HDD
MULTIMEDIA
228