2020 JEEP CHEROKEE tow
[x] Cancel search: towPage 138 of 332

SAFETY
136
(Continued)
(Continued)
(Continued)
Defroster
Check operation by selecting the defrost
mode and place the blower control on high
speed. You should be able to feel the air
directed against the windshield. See an
authorized dealer for service if your defroster
is inoperable.
Floor Mat Safety Information
Always use floor mats designed to fit your
vehicle. Only use a floor mat that does not
interfere with the operation of the acceler -
ator, brake or clutch pedals. Only use a floor
mat that is securely attached using the floor
mat fasteners so it cannot slip out of position
and interfere with the accelerator, brake or
clutch pedals or impair safe operation of your
vehicle in other ways.
WARNING!
An improperly attached, damaged, folded,
or stacked floor mat, or damaged floor mat
fasteners may cause your floor mat to
interfere with the accelerator, brake, or
clutch pedals and cause a loss of vehicle
control. To prevent SERIOUS INJURY or
DEATH:
ALWAYS securely attach your floor
mat using the floor mat fasteners. DO
NOT install your floor mat upside down
or turn your floor mat over. Lightly pull to
confirm mat is secured using the floor
mat fasteners on a regular basis.
ALWAYS REMOVE THE EXISTING
FLOOR MAT FROM THE VEHICLE
before installing any other floor mat.
NEVER install or stack an additional
floor mat on top of an existing floor mat.
ONLY install floor mats designed to fit
your vehicle. NEVER install a floor mat
that cannot be properly attached and
secured to your vehicle. If a floor mat
needs to be replaced, only use a FCA
approved floor mat for the specific make,
model, and year of your vehicle.
WARNING! (Continued)
ONLY use the driver’s side floor mat on
the driver’s side floor area. To check for
interference, with the vehicle properly
parked with the engine off, fully depress
the accelerator, the brake, and the
clutch pedal (if present) to check for
interference. If your floor mat interferes
with the operation of any pedal, or is not
secure to the floor, remove the floor mat
from the vehicle and place the floor mat
in your trunk.
ONLY use the passenger’s side floor mat
on the passenger’s side floor area.
ALWAYS make sure objects cannot fall
or slide into the driver’s side floor area
when the vehicle is moving. Objects can
become trapped under accelerator,
brake, or clutch pedals and could cause
a loss of vehicle control.
NEVER place any objects under the floor
mat (e.g., towels, keys, etc.). These
objects could change the position of the
floor mat and may cause interference
with the accelerator, brake, or clutch
pedals.
WARNING! (Continued)
2020_JEEP_CHEROKEE_UG_RHD_UK.book Page 136
Page 150 of 332

STARTING AND OPERATING
148
Only shift from DRIVE to PARK or REVERSE
when the accelerator pedal is released and
the vehicle is stopped. Be sure to keep your
foot on the brake pedal when shifting
between these gears.
The transmission gear selector provides
PARK, REVERSE, NEUTRAL, DRIVE, and
MANUAL (AutoStick) shift positions. Manual
shifts can be made using the AutoStick shift
control. Moving the gear selector into the
MANUAL (-/+) position (beside the DRIVE
position) activates AutoStick mode,
providing manual shift control and displaying
the current gear in the instrument cluster (as
1, 2, 3, etc.). Toggling the gear selector
forward (-) or rearward (+) while in the
MANUAL position will manually select the
transmission gear.
Refer to “AutoStick” in the Owner’s Manual.
NOTE:
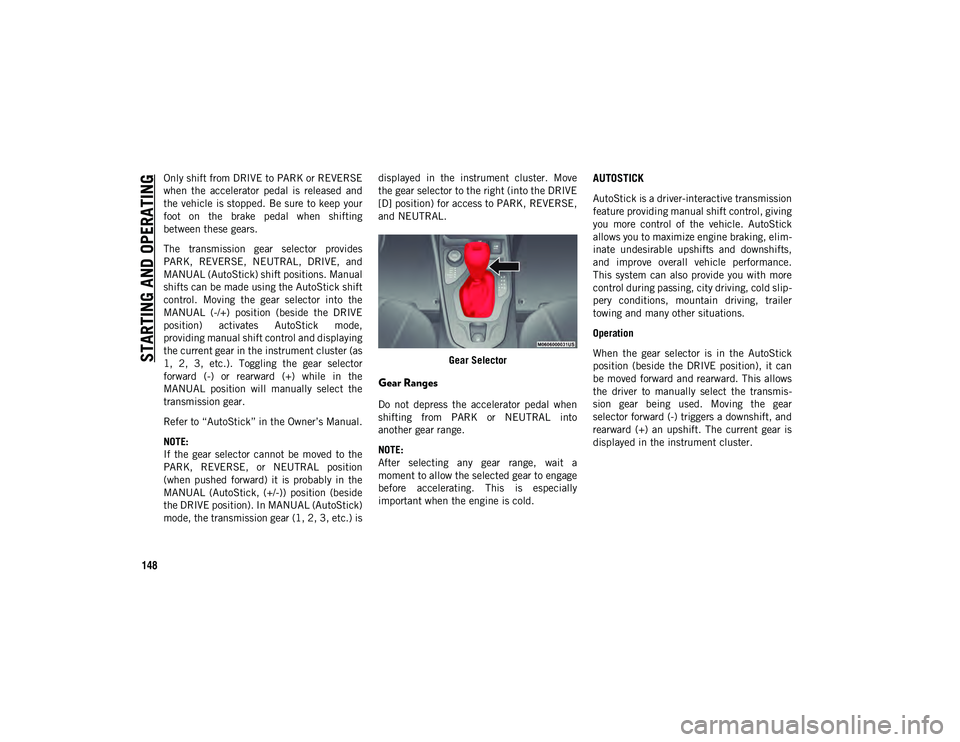
If the gear selector cannot be moved to the
PARK, REVERSE, or NEUTRAL position
(when pushed forward) it is probably in the
MANUAL (AutoStick, (+/-)) position (beside
the DRIVE position). In MANUAL (AutoStick)
mode, the transmission gear (1, 2, 3, etc.) isdisplayed in the instrument cluster. Move
the gear selector to the right (into the DRIVE
[D] position) for access to PARK, REVERSE,
and NEUTRAL.
Gear Selector
Gear Ranges
Do not depress the accelerator pedal when
shifting from PARK or NEUTRAL into
another gear range.
NOTE:
After selecting any gear range, wait a
moment to allow the selected gear to engage
before accelerating. This is especially
important when the engine is cold.
AUTOSTICK
AutoStick is a driver-interactive transmission
feature providing manual shift control, giving
you more control of the vehicle. AutoStick
allows you to maximize engine braking, elim -
inate undesirable upshifts and downshifts,
and improve overall vehicle performance.
This system can also provide you with more
control during passing, city driving, cold slip -
pery conditions, mountain driving, trailer
towing and many other situations.
Operation
When the gear selector is in the AutoStick
position (beside the DRIVE position), it can
be moved forward and rearward. This allows
the driver to manually select the transmis -
sion gear being used. Moving the gear
selector forward (-) triggers a downshift, and
rearward (+) an upshift. The current gear is
displayed in the instrument cluster.
2020_JEEP_CHEROKEE_UG_RHD_UK.book Page 148
Page 154 of 332

STARTING AND OPERATING
152
Refer to “Instrument Cluster Display” in
“Getting To know Your Instrument Panel” for
further information.
Shifting Out Of 4X4 LOW
With the vehicle at speeds of 0 to 3 mph (0
to 5 km/h), the ignition in the ON mode and
the engine running, shift the transmission
into NEUTRAL, and push the “4WD LOW”
button once. The “4WD LOW” indicator light
in the instrument cluster will flash and go
out when the shift is complete.
NOTE:
If shift conditions/interlocks are not met, a
message will flash from the instrument
cluster display with instructions on how to
complete the requested shift. Refer to
“Instrument Cluster Display” in “Getting
To Know Your Instrument Panel” for
further information.
Shifting into or out of 4WD LOW is
possible with the vehicle completely
stopped; however, difficulty may occur
due to the mating clutch teeth not being
properly aligned. Several attempts may be
required for clutch teeth alignment and
shift completion to occur. The preferred
method is with the vehicle rolling 0 to3 mph (0 to 5 km/h). If the vehicle is
moving faster than 3 mph (5 km/h), the
4WD system will not allow the shift.
NEUTRAL Shift Procedure
For the neutral shift procedure refer to
“Recreational Towing” in chapter for further
information.
Rear Electronic Locker (E-Locker) System
— If Equipped
The Rear E-Locker System features a
mechanical locking rear differential to
provide better traction in the 4WD LOW posi
-
tion. The “REAR LOCK” button is on the
Selec-Terrain Knob.
Activating The Rear E-Locker
To activate the Rear E-Locker System, the
following conditions must be met:
1. The 4WD system must be in 4WD LOW.
2. The ignition in the ON mode and the engine running.
3. Vehicle speed must be below 15 mph (24 km/h).
4. To engage Rear E-Locker, push the REAR LOCK button once. NOTE:
When engaging Rear E-Locker, the indicator
lights in the instrument cluster and on the
REAR LOCK button will begin to flash. When
the shift is complete the REAR LOCK indi
-
cator lights will remain on.
Rear Lock Button
Deactivating The Rear E-Locker System
To deactivate the Rear E-Locker System, the
following conditions must be met:
1. Rear E-Locker must be engaged, and the REAR LOCK indicator light on.
2. The ignition in the ON mode and the engine running.
3. To disengage Rear E-Locker, push the REAR LOCK button once.
2020_JEEP_CHEROKEE_UG_RHD_UK.book Page 152
Page 164 of 332

STARTING AND OPERATING
162
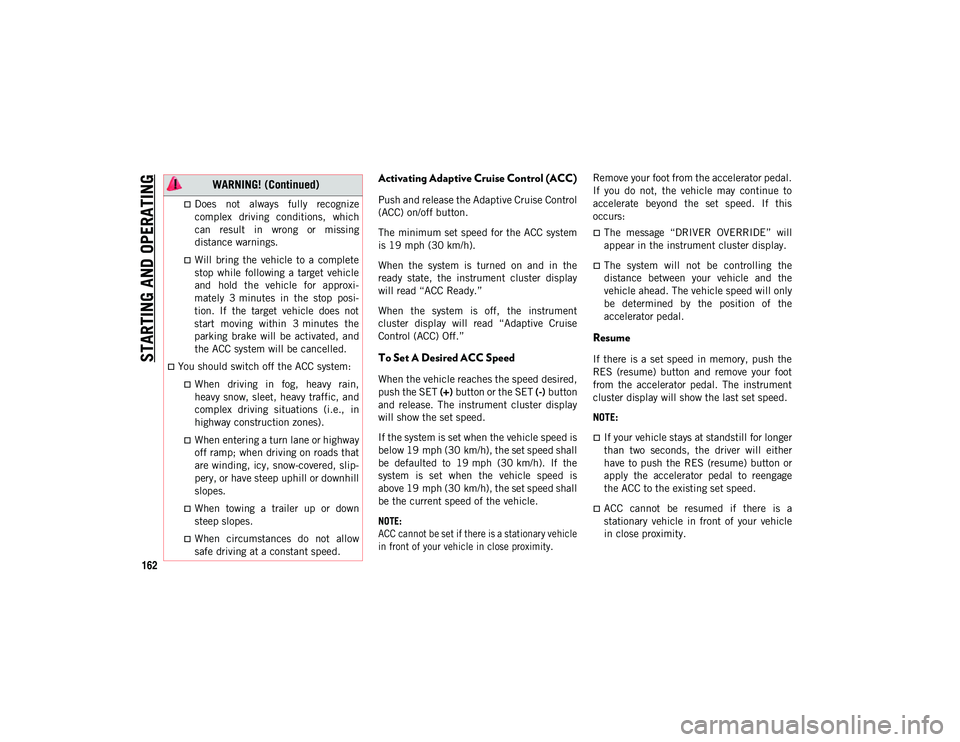
Activating Adaptive Cruise Control (ACC)
Push and release the Adaptive Cruise Control
(ACC) on/off button.
The minimum set speed for the ACC system
is 19 mph (30 km/h).When the system is turned on and in the
ready state, the instrument cluster display
will read “ACC Ready.”
When the system is off, the instrument
cluster display will read “Adaptive Cruise
Control (ACC) Off.”
To Set A Desired ACC Speed
When the vehicle reaches the speed desired,
push the SET (+) button or the SET (-) button
and release. The instrument cluster display
will show the set speed.
If the system is set when the vehicle speed is
below 19 mph (30 km/h), the set speed shall be defaulted to 19 mph (30 km/h). If the
system is set when the vehicle speed is
above 19 mph (30 km/h), the set speed shall
be the current speed of the vehicle.
NOTE:
ACC cannot be set if there is a stationary vehicle
in front of your vehicle in close proximity.
Remove your foot from the accelerator pedal.
If you do not, the vehicle may continue to
accelerate beyond the set speed. If this
occurs:
The message “DRIVER OVERRIDE” will
appear in the instrument cluster display.
The system will not be controlling the
distance between your vehicle and the
vehicle ahead. The vehicle speed will only
be determined by the position of the
accelerator pedal.
Resume
If there is a set speed in memory, push the
RES (resume) button and remove your foot
from the accelerator pedal. The instrument
cluster display will show the last set speed.
NOTE:
If your vehicle stays at standstill for longer
than two seconds, the driver will either
have to push the RES (resume) button or
apply the accelerator pedal to reengage
the ACC to the existing set speed.
ACC cannot be resumed if there is a
stationary vehicle in front of your vehicle
in close proximity.
Does not always fully recognize
complex driving conditions, which can result in wrong or missing
distance warnings.
Will bring the vehicle to a complete
stop while following a target vehicle
and hold the vehicle for approxi-
mately 3 minutes in the stop posi-
tion. If the target vehicle does not
start moving within 3 minutes the parking br ake will be activated, and
the ACC system will be cancelled.
You should switch off the ACC system:
When driving in fog, heavy rain,
heavy snow, sleet, heavy traffic, and complex driving situations (i.e., inhighway construction zones).
When entering a turn lane or highway
off ramp; when driving on roads that are winding, icy, snow-covered, slip-
pery, or have steep uphill or downhill
slopes.
When towing a trailer up or down
steep slopes.
When circumstances do not allow
safe driving at a constant speed.
WARNING! (Continued)
2020_JEEP_CHEROKEE_UG_RHD_UK.book Page 162
Page 168 of 332

STARTING AND OPERATING
166
PARKSENSE FRONT AND
REAR PARK ASSIST — IF
EQUIPPED
The ParkSense Park Assist system provides
visual and audible indications of the
distance between the rear and/or front fascia
and a detected obstacle when backing up or
moving forward (e.g. during a parking
maneuver). The vehicle brakes may be auto-
matically applied and released when
performing a reverse parking maneuver if the
system detects a possible collision with an
obstacle.
Refer to “ParkSense System Usage Precau -
tions” in “Starting And Operating” in the
Owner’s Manual for limitations of this system
and recommendations.
ParkSense will retain the last system state
(enabled or disabled) from the last ignition
cycle when the ignition is changed to the ON/
RUN position.
WARNING!
Drivers must be careful when backing up
even when using ParkSense. Always
check carefully behind your vehicle, look
behind you, and be sure to check for
pedestrians, animals, other vehicles,
obstructions, and blind spots before
backing up. You are responsible for
safety and must continue to pay atten -
tion to your surroundings. Failure to do
so can result in serious injury or death.
Before using ParkSense, it is strongly
recommended that the ball mount and
hitch ball assembly is disconnected from
the vehicle when the vehicle is not used
for towing. Failure to do so can result in
injury or damage to vehicles or obstacles
because the hitch ball will be much
closer to the obstacle than the rear fascia
when the loudspeaker sounds the contin -
uous tone. Also, the sensors could detect
the ball mount and hitch ball assembly,
depending on its size and shape, giving
a false indication that an obstacle is
behind the vehicle.
CAUTION!
ParkSense is only a parking aid and it is
unable to recognize every obstacle,
including small obstacles. Parking curbs
might be temporarily detected or not
detected at all. Obstacles located above
or below the sensors will not be detected
when they are in close proximity.
The vehicle must be driven slowly when
using ParkSense in order to be able to
stop in time when an obstacle is
detected. It is recommended that the
driver looks over his/her shoulder when
using ParkSense.
2020_JEEP_CHEROKEE_UG_RHD_UK.book Page 166
Page 180 of 332

STARTING AND OPERATING
178
Gross Vehicle Weight Rating (GVWR)
The Gross Vehicle Weight Rating (GVWR) is
the total permissible weight of your vehicle
including driver, passengers, vehicle,
options and cargo. The label also specifies
maximum capacities of front and rear axle
systems (GAWR). Total load must be limited
so GVWR and front and rear GAWR are not
exceeded.
Payload
The payload of a vehicle is defined as the
allowable load weight a truck can carry,
including the weight of the driver, all passen-
gers, options and cargo.
Gross Axle Weight Rating (GAWR)
The Gross Axle Weight Rating (GAWR) is the
maximum permissible load on the front and
rear axles. The load must be distributed in
the cargo area so that the GAWR of each axle
is not exceeded.
Each axle GAWR is determined by the
components in the system with the lowest
load carrying capacity (axle, springs, tires or
wheels). Heavier axles or suspension compo -nents sometimes specified by purchasers for
increased durability does not necessarily
increase the vehicle's GVWR.
Curb Weight
The curb weight of a vehicle is defined as the
total weight of the vehicle with all fluids,
including vehicle fuel, at full capacity condi
-
tions, and with no occupants or cargo loaded
into the vehicle. The front and rear curb
weight values are determined by weighing
your vehicle on a commercial scale before
any occupants or cargo are added.
Loading
The actual total weight and the weight of the
front and rear of your vehicle at the ground
can best be determined by weighing it when
it is loaded and ready for operation.
The entire vehicle should first be weighed on
a commercial scale to ensure that the GVWR
has not been exceeded. The weight on the
front and rear of the vehicle should then be
determined separately to be sure that the
load is properly distributed over the front and
rear axle. Weighing the vehicle may show
that the GAWR of either the front or rear
axles has been exceeded but the total load is
within the specified GVWR. If so, weight must be shifted from front to rear or rear to
front as appropriate until the specified
weight limitations are met. Store the heavier
items down low and be sure that the weight
is distributed equally. Stow all loose items
securely before driving.
Improper weight distributions can have an
adverse effect on the way your vehicle steers
and handles and the way the brakes operate.
CAUTION!
Do not load your vehicle any heavier than
the GVWR or the maximum front and rear
GAWR. If you do, parts on your vehicle can
break, or it can change the way your
vehicle handles. This could cause you to
lose control. Also overloading can shorten
the life of your vehicle.
2020_JEEP_CHEROKEE_UG_RHD_UK.book Page 178
Page 181 of 332

179
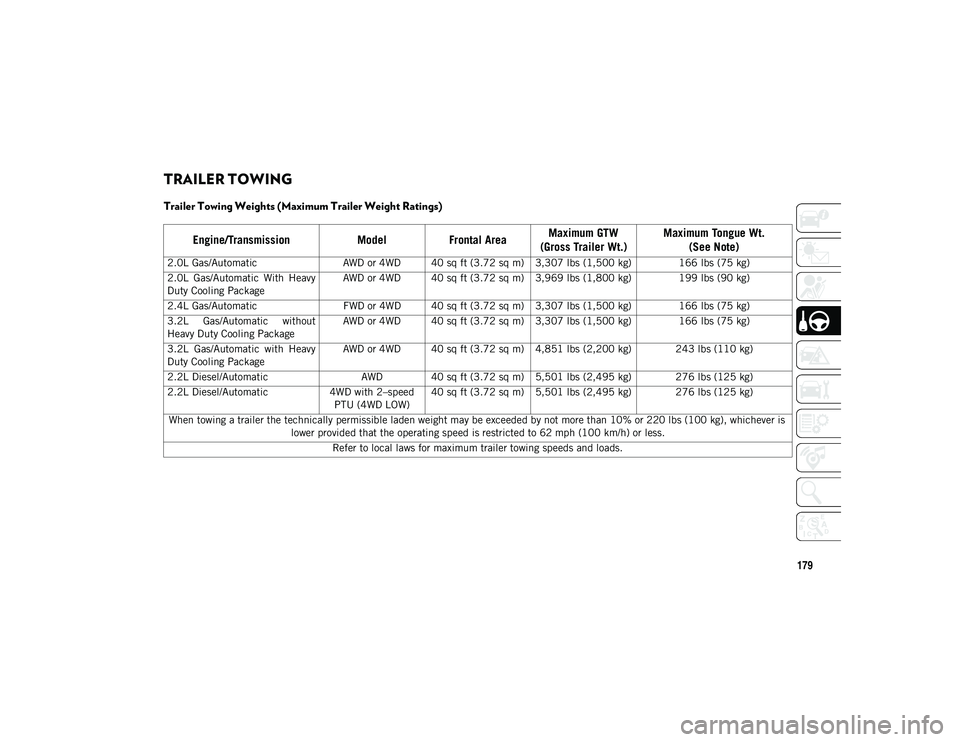
TRAILER TOWING
Trailer Towing Weights (Maximum Trailer Weight Ratings)
Engine/TransmissionModelFrontal Area Maximum GTW
(Gross Trailer Wt.) Maximum Tongue Wt.
(See Note)
2.0L Gas/Automatic AWD or 4WD 40 sq ft (3.72 sq m) 3,307 lbs (1,500 kg) 166 lbs (75 kg)
2.0L Gas/Automatic With Heavy
Duty Cooling Package AWD or 4WD 40 sq ft (3.72 sq m) 3,969 lbs (1,800 kg) 199 lbs (90 kg)
2.4L Gas/Automatic FWD or 4WD 40 sq ft (3.72 sq m) 3,307 lbs (1,500 kg) 166 lbs (75 kg)
3.2L Gas/Automatic without
Heavy Duty Cooling Package AWD or 4WD 40 sq ft (3.72 sq m) 3,307 lbs (1,500 kg) 166 lbs (75 kg)
3.2L Gas/Automatic with Heavy
Duty Cooling Package AWD or 4WD 40 sq ft (3.72 sq m) 4,851 lbs (2,200 kg) 243 lbs (110 kg)
2.2L Diesel/Automatic AWD 40 sq ft (3.72 sq m) 5,501 lbs (2,495 kg) 276 lbs (125 kg)
2.2L Diesel/Automatic 4WD with 2–speed
PTU (4WD LOW) 40 sq ft (3.72 sq m) 5,501 lbs (2,495 kg) 276 lbs (125 kg)
When towing a trailer the technically permissible laden weight may be exceeded by not more than 10% or 220 lbs (100 kg), whichever is lower provided that the operating speed is restricted to 62 mph (100 km/h) or less.
Refer to local laws for maximum trailer towing speeds and loads.
2020_JEEP_CHEROKEE_UG_RHD_UK.book Page 179
Page 182 of 332

STARTING AND OPERATING
180
RECREATIONAL TOWING (BEHIND MOTORHOME, ETC.)
Towing This Vehicle Behind Another Vehicle
NOTE:
You must ensure that the Auto Park Brake feature is disabled before towing this vehicle, to avoid inadvertent Electric Park Brake engage-
ment. The Auto Park Brake feature is enabled or disabled via the customer programmable features in the Uconnect Settings.
When towing your vehicle, always follow applicable state and provincial laws. Contact local authorities for additional details.
Front-Wheel Drive (FWD) Models Four Wheel Drive (4WD)
Models
Towing Condition Wheels OFF The Ground NOT ALLOWEDNOT ALLOWED
Flat Tow NONE
Dolly Tow FrontOKNOT ALLOWED
Rear NOT ALLOWED NOT ALLOWED
On Trailer ALLOK OK
2020_JEEP_CHEROKEE_UG_RHD_UK.book Page 180