2020 JEEP CHEROKEE towing
[x] Cancel search: towingPage 90 of 332

SAFETY
88
The BSM system sensors operate when the
vehicle is in any forward gear or REVERSE
(R) and enters standby mode when the
vehicle is in PARK (P).
The BSM detection zone covers approxi-
mately one lane width on both sides of the
vehicle, 12 ft (3.7 m). The zone length starts
at the outside mirror and extends approxi -
mately 10 ft (3 m) beyond the rear bumper
of the vehicle. The BSM system monitors the
detection zones on both sides of the vehicle
when the vehicle speed reaches approxi -
mately 6 mph (10 km/h) or higher and will
alert the driver of vehicles in these areas.
NOTE:
The BSM system does NOT alert the driver
about rapidly approaching vehicles that
are outside the detection zones.
The BSM system detection zone does NOT
change if your vehicle is towing a trailer.
Therefore, visually verify the adjacent lane
is clear for both your vehicle and trailer
before making a lane change. If the trailer
or other object (i.e., bicycle, sports equip -ment) extends beyond the side of your
vehicle, this may result in the BSM
warning light remaining illuminated the
entire time the vehicle is in a forward gear.
The Blind Spot Monitoring (BSM) system
may experience drop outs (blinking on and
off) of the side mirror Warning Indicator
lamps when a motorcycle or any small
object remains at the side of the vehicle
for extended periods of time (more than a
couple of seconds).
The area on the rear fascia where the radar
sensors are located must remain free of
snow, ice, and dirt/road contamination so
that the BSM system can function properly.
Do not block the area of the rear fascia where
the radar sensors are located with foreign
objects (bumper stickers, bicycle racks,
etc.).
The BSM system will provide a visual alert in
the appropriate side view mirror based on a
detected object. If the turn signal is then
activated, and it corresponds to an alert
present on that side of the vehicle, an
audible chime will also be sounded. When -
ever a turn signal and detected object are present on the same side at the same time,
both the visual and audio alerts will be
issued. In addition to the audible alert the
radio (if on) will also be muted.
Warning Light Location
The BSM system monitors the detection
zone from three different entry points (side,
rear, front) while driving to see if an alert is
necessary. The BSM system will issue an
alert during these types of zone entries.
Entering From The Side
Vehicles that move into your adjacent lanes
from either side of the vehicle.
2020_JEEP_CHEROKEE_UG_RHD_UK.book Page 88
Page 150 of 332

STARTING AND OPERATING
148
Only shift from DRIVE to PARK or REVERSE
when the accelerator pedal is released and
the vehicle is stopped. Be sure to keep your
foot on the brake pedal when shifting
between these gears.
The transmission gear selector provides
PARK, REVERSE, NEUTRAL, DRIVE, and
MANUAL (AutoStick) shift positions. Manual
shifts can be made using the AutoStick shift
control. Moving the gear selector into the
MANUAL (-/+) position (beside the DRIVE
position) activates AutoStick mode,
providing manual shift control and displaying
the current gear in the instrument cluster (as
1, 2, 3, etc.). Toggling the gear selector
forward (-) or rearward (+) while in the
MANUAL position will manually select the
transmission gear.
Refer to “AutoStick” in the Owner’s Manual.
NOTE:
If the gear selector cannot be moved to the
PARK, REVERSE, or NEUTRAL position
(when pushed forward) it is probably in the
MANUAL (AutoStick, (+/-)) position (beside
the DRIVE position). In MANUAL (AutoStick)
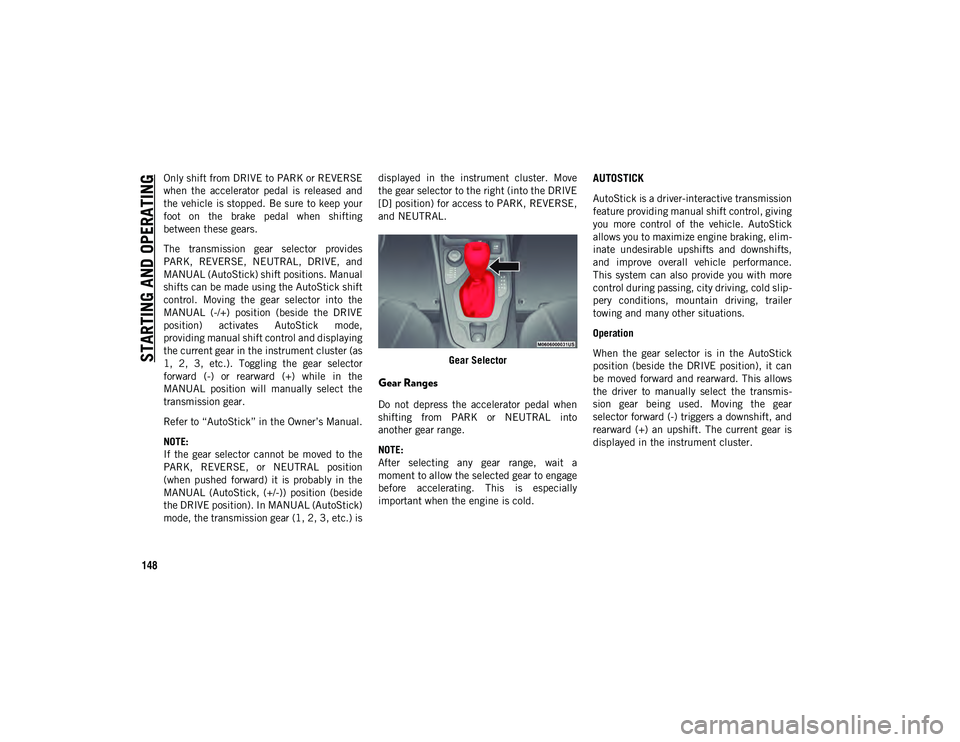
mode, the transmission gear (1, 2, 3, etc.) isdisplayed in the instrument cluster. Move
the gear selector to the right (into the DRIVE
[D] position) for access to PARK, REVERSE,
and NEUTRAL.
Gear Selector
Gear Ranges
Do not depress the accelerator pedal when
shifting from PARK or NEUTRAL into
another gear range.
NOTE:
After selecting any gear range, wait a
moment to allow the selected gear to engage
before accelerating. This is especially
important when the engine is cold.
AUTOSTICK
AutoStick is a driver-interactive transmission
feature providing manual shift control, giving
you more control of the vehicle. AutoStick
allows you to maximize engine braking, elim -
inate undesirable upshifts and downshifts,
and improve overall vehicle performance.
This system can also provide you with more
control during passing, city driving, cold slip -
pery conditions, mountain driving, trailer
towing and many other situations.
Operation
When the gear selector is in the AutoStick
position (beside the DRIVE position), it can
be moved forward and rearward. This allows
the driver to manually select the transmis -
sion gear being used. Moving the gear
selector forward (-) triggers a downshift, and
rearward (+) an upshift. The current gear is
displayed in the instrument cluster.
2020_JEEP_CHEROKEE_UG_RHD_UK.book Page 148
Page 154 of 332

STARTING AND OPERATING
152
Refer to “Instrument Cluster Display” in
“Getting To know Your Instrument Panel” for
further information.
Shifting Out Of 4X4 LOW
With the vehicle at speeds of 0 to 3 mph (0
to 5 km/h), the ignition in the ON mode and
the engine running, shift the transmission
into NEUTRAL, and push the “4WD LOW”
button once. The “4WD LOW” indicator light
in the instrument cluster will flash and go
out when the shift is complete.
NOTE:
If shift conditions/interlocks are not met, a
message will flash from the instrument
cluster display with instructions on how to
complete the requested shift. Refer to
“Instrument Cluster Display” in “Getting
To Know Your Instrument Panel” for
further information.
Shifting into or out of 4WD LOW is
possible with the vehicle completely
stopped; however, difficulty may occur
due to the mating clutch teeth not being
properly aligned. Several attempts may be
required for clutch teeth alignment and
shift completion to occur. The preferred
method is with the vehicle rolling 0 to3 mph (0 to 5 km/h). If the vehicle is
moving faster than 3 mph (5 km/h), the
4WD system will not allow the shift.
NEUTRAL Shift Procedure
For the neutral shift procedure refer to
“Recreational Towing” in chapter for further
information.
Rear Electronic Locker (E-Locker) System
— If Equipped
The Rear E-Locker System features a
mechanical locking rear differential to
provide better traction in the 4WD LOW posi
-
tion. The “REAR LOCK” button is on the
Selec-Terrain Knob.
Activating The Rear E-Locker
To activate the Rear E-Locker System, the
following conditions must be met:
1. The 4WD system must be in 4WD LOW.
2. The ignition in the ON mode and the engine running.
3. Vehicle speed must be below 15 mph (24 km/h).
4. To engage Rear E-Locker, push the REAR LOCK button once. NOTE:
When engaging Rear E-Locker, the indicator
lights in the instrument cluster and on the
REAR LOCK button will begin to flash. When
the shift is complete the REAR LOCK indi
-
cator lights will remain on.
Rear Lock Button
Deactivating The Rear E-Locker System
To deactivate the Rear E-Locker System, the
following conditions must be met:
1. Rear E-Locker must be engaged, and the REAR LOCK indicator light on.
2. The ignition in the ON mode and the engine running.
3. To disengage Rear E-Locker, push the REAR LOCK button once.
2020_JEEP_CHEROKEE_UG_RHD_UK.book Page 152
Page 164 of 332

STARTING AND OPERATING
162
Activating Adaptive Cruise Control (ACC)
Push and release the Adaptive Cruise Control
(ACC) on/off button.
The minimum set speed for the ACC system
is 19 mph (30 km/h).When the system is turned on and in the
ready state, the instrument cluster display
will read “ACC Ready.”
When the system is off, the instrument
cluster display will read “Adaptive Cruise
Control (ACC) Off.”
To Set A Desired ACC Speed
When the vehicle reaches the speed desired,
push the SET (+) button or the SET (-) button
and release. The instrument cluster display
will show the set speed.
If the system is set when the vehicle speed is
below 19 mph (30 km/h), the set speed shall be defaulted to 19 mph (30 km/h). If the
system is set when the vehicle speed is
above 19 mph (30 km/h), the set speed shall
be the current speed of the vehicle.
NOTE:
ACC cannot be set if there is a stationary vehicle
in front of your vehicle in close proximity.
Remove your foot from the accelerator pedal.
If you do not, the vehicle may continue to
accelerate beyond the set speed. If this
occurs:
The message “DRIVER OVERRIDE” will
appear in the instrument cluster display.
The system will not be controlling the
distance between your vehicle and the
vehicle ahead. The vehicle speed will only
be determined by the position of the
accelerator pedal.
Resume
If there is a set speed in memory, push the
RES (resume) button and remove your foot
from the accelerator pedal. The instrument
cluster display will show the last set speed.
NOTE:
If your vehicle stays at standstill for longer
than two seconds, the driver will either
have to push the RES (resume) button or
apply the accelerator pedal to reengage
the ACC to the existing set speed.
ACC cannot be resumed if there is a
stationary vehicle in front of your vehicle
in close proximity.
Does not always fully recognize
complex driving conditions, which can result in wrong or missing
distance warnings.
Will bring the vehicle to a complete
stop while following a target vehicle
and hold the vehicle for approxi-
mately 3 minutes in the stop posi-
tion. If the target vehicle does not
start moving within 3 minutes the parking br ake will be activated, and
the ACC system will be cancelled.
You should switch off the ACC system:
When driving in fog, heavy rain,
heavy snow, sleet, heavy traffic, and complex driving situations (i.e., inhighway construction zones).
When entering a turn lane or highway
off ramp; when driving on roads that are winding, icy, snow-covered, slip-
pery, or have steep uphill or downhill
slopes.
When towing a trailer up or down
steep slopes.
When circumstances do not allow
safe driving at a constant speed.
WARNING! (Continued)
2020_JEEP_CHEROKEE_UG_RHD_UK.book Page 162
Page 168 of 332

STARTING AND OPERATING
166
PARKSENSE FRONT AND
REAR PARK ASSIST — IF
EQUIPPED
The ParkSense Park Assist system provides
visual and audible indications of the
distance between the rear and/or front fascia
and a detected obstacle when backing up or
moving forward (e.g. during a parking
maneuver). The vehicle brakes may be auto-
matically applied and released when
performing a reverse parking maneuver if the
system detects a possible collision with an
obstacle.
Refer to “ParkSense System Usage Precau -
tions” in “Starting And Operating” in the
Owner’s Manual for limitations of this system
and recommendations.
ParkSense will retain the last system state
(enabled or disabled) from the last ignition
cycle when the ignition is changed to the ON/
RUN position.
WARNING!
Drivers must be careful when backing up
even when using ParkSense. Always
check carefully behind your vehicle, look
behind you, and be sure to check for
pedestrians, animals, other vehicles,
obstructions, and blind spots before
backing up. You are responsible for
safety and must continue to pay atten -
tion to your surroundings. Failure to do
so can result in serious injury or death.
Before using ParkSense, it is strongly
recommended that the ball mount and
hitch ball assembly is disconnected from
the vehicle when the vehicle is not used
for towing. Failure to do so can result in
injury or damage to vehicles or obstacles
because the hitch ball will be much
closer to the obstacle than the rear fascia
when the loudspeaker sounds the contin -
uous tone. Also, the sensors could detect
the ball mount and hitch ball assembly,
depending on its size and shape, giving
a false indication that an obstacle is
behind the vehicle.
CAUTION!
ParkSense is only a parking aid and it is
unable to recognize every obstacle,
including small obstacles. Parking curbs
might be temporarily detected or not
detected at all. Obstacles located above
or below the sensors will not be detected
when they are in close proximity.
The vehicle must be driven slowly when
using ParkSense in order to be able to
stop in time when an obstacle is
detected. It is recommended that the
driver looks over his/her shoulder when
using ParkSense.
2020_JEEP_CHEROKEE_UG_RHD_UK.book Page 166
Page 181 of 332

179
TRAILER TOWING
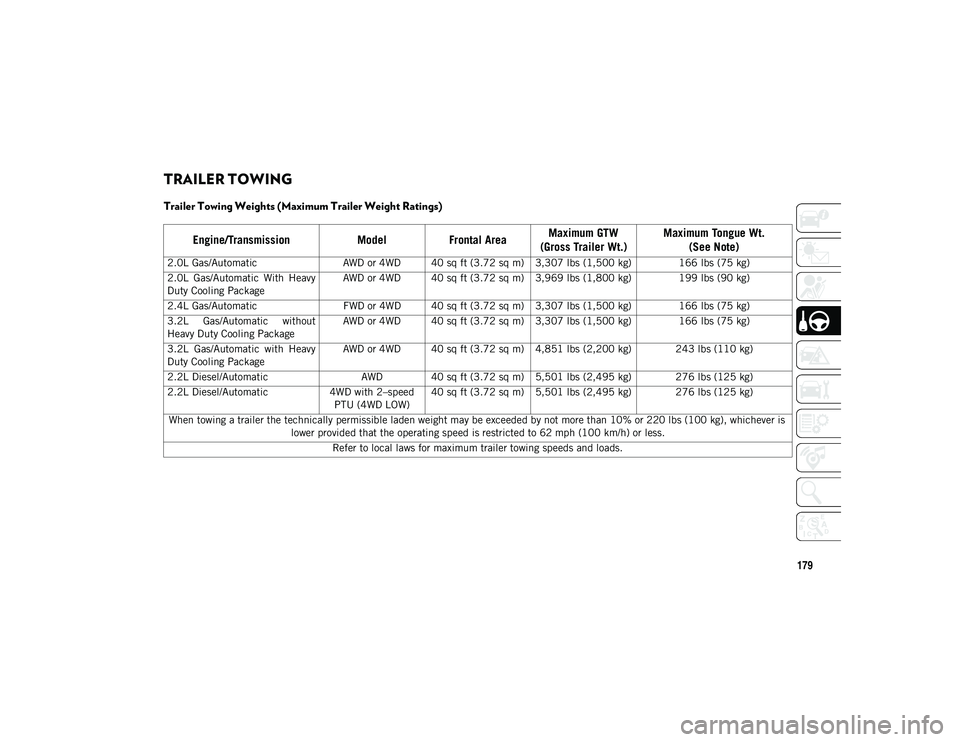
Trailer Towing Weights (Maximum Trailer Weight Ratings)
Engine/TransmissionModelFrontal Area Maximum GTW
(Gross Trailer Wt.) Maximum Tongue Wt.
(See Note)
2.0L Gas/Automatic AWD or 4WD 40 sq ft (3.72 sq m) 3,307 lbs (1,500 kg) 166 lbs (75 kg)
2.0L Gas/Automatic With Heavy
Duty Cooling Package AWD or 4WD 40 sq ft (3.72 sq m) 3,969 lbs (1,800 kg) 199 lbs (90 kg)
2.4L Gas/Automatic FWD or 4WD 40 sq ft (3.72 sq m) 3,307 lbs (1,500 kg) 166 lbs (75 kg)
3.2L Gas/Automatic without
Heavy Duty Cooling Package AWD or 4WD 40 sq ft (3.72 sq m) 3,307 lbs (1,500 kg) 166 lbs (75 kg)
3.2L Gas/Automatic with Heavy
Duty Cooling Package AWD or 4WD 40 sq ft (3.72 sq m) 4,851 lbs (2,200 kg) 243 lbs (110 kg)
2.2L Diesel/Automatic AWD 40 sq ft (3.72 sq m) 5,501 lbs (2,495 kg) 276 lbs (125 kg)
2.2L Diesel/Automatic 4WD with 2–speed
PTU (4WD LOW) 40 sq ft (3.72 sq m) 5,501 lbs (2,495 kg) 276 lbs (125 kg)
When towing a trailer the technically permissible laden weight may be exceeded by not more than 10% or 220 lbs (100 kg), whichever is lower provided that the operating speed is restricted to 62 mph (100 km/h) or less.
Refer to local laws for maximum trailer towing speeds and loads.
2020_JEEP_CHEROKEE_UG_RHD_UK.book Page 179
Page 182 of 332

STARTING AND OPERATING
180
RECREATIONAL TOWING (BEHIND MOTORHOME, ETC.)
Towing This Vehicle Behind Another Vehicle
NOTE:
You must ensure that the Auto Park Brake feature is disabled before towing this vehicle, to avoid inadvertent Electric Park Brake engage-
ment. The Auto Park Brake feature is enabled or disabled via the customer programmable features in the Uconnect Settings.
When towing your vehicle, always follow applicable state and provincial laws. Contact local authorities for additional details.
Front-Wheel Drive (FWD) Models Four Wheel Drive (4WD)
Models
Towing Condition Wheels OFF The Ground NOT ALLOWEDNOT ALLOWED
Flat Tow NONE
Dolly Tow FrontOKNOT ALLOWED
Rear NOT ALLOWED NOT ALLOWED
On Trailer ALLOK OK
2020_JEEP_CHEROKEE_UG_RHD_UK.book Page 180
Page 183 of 332

181
Recreational Towing — Front-Wheel Drive
(FWD) Models
DO NOT flat tow this vehicle.
Recreational towing (for front-wheel drive
models) is allowed ONLY if the front wheels
are OFF the ground. This may be accom -
plished using a tow dolly or vehicle trailer. If
using a tow dolly, follow this procedure:
1. Properly secure the dolly to the tow vehicle, following the dolly manufac -
turer's instructions.
2. Drive the front wheels onto the tow dolly.
3. Apply the parking brake. Place automatic transmission in PARK, or manual trans -
mission in gear. Turn the engine OFF.
4. Properly secure the front wheels to the dolly, following the dolly manufacturer's
instructions. 5. Turn the ignition to the ON/RUN mode,
but do not start the engine.
6. Press and hold the brake pedal.
7. Release the parking brake.
8. Turn the ignition OFF, remove the key fob, and release the brake pedal.
Recreational Towing — 4x4 Models
Recreational towing is not allowed.
NOTE:
This vehicle may be towed on a flatbed or
vehicle trailer provided all four wheels are
OFF the ground.
CAUTION!
Towing with the front wheels on the
ground will cause severe transmission
damage. Damage from improper towing
is not covered under the New Vehicle
Limited Warranty.
Ensure that the Electric Park Brake is
released, and remains released, while
being towed.
CAUTION!
Towing this vehicle with ANY of its wheels
on the ground can cause severe
transmission and/or power transfer unit
damage. Damage from improper towing is
not covered under the New Vehicle
Limited Warranty.
2020_JEEP_CHEROKEE_UG_RHD_UK.book Page 181