2020 HYUNDAI TUCSON ULTIMATE check engine
[x] Cancel search: check enginePage 486 of 546

7-52
Maintenance
Instrument Panel Fuse
Replacement
1. Turn the engine off.
2. Turn all other switches OFF.
3. Open the fuse panel cover.
4. Refer to the label on the inside of
the fuse panel cover to locate the
suspected fuse location.5. Pull the suspected fuse straight
out. Use the removal tool provided
in the engine compartment fuses
panel.
6. Check the removed fuse; replace
it if it is blown. Spare fuses are
provided in the instrument panel
fuse panels (or in the engine com-
partment fuse panel).
7. Push in a new fuse of the same
rating, and make sure it fits tightly
in the clips. If it fits loosely, consult
an authorized HYUNDAI dealer.In an emergency, if you do not have
a spare fuse, use a fuse of the same
rating from a circuit you may not
need for operating the vehicle, such
as the cigarette lighter fuse.
If the headlamps or other electrical
components do not work and the
fuses are OK, check the fuse panel
in the engine compartment. If a fuse
is blown, it must be replaced with the
same rating.
OTLE078026
OTLE078023
Page 487 of 546

7-53
Maintenance
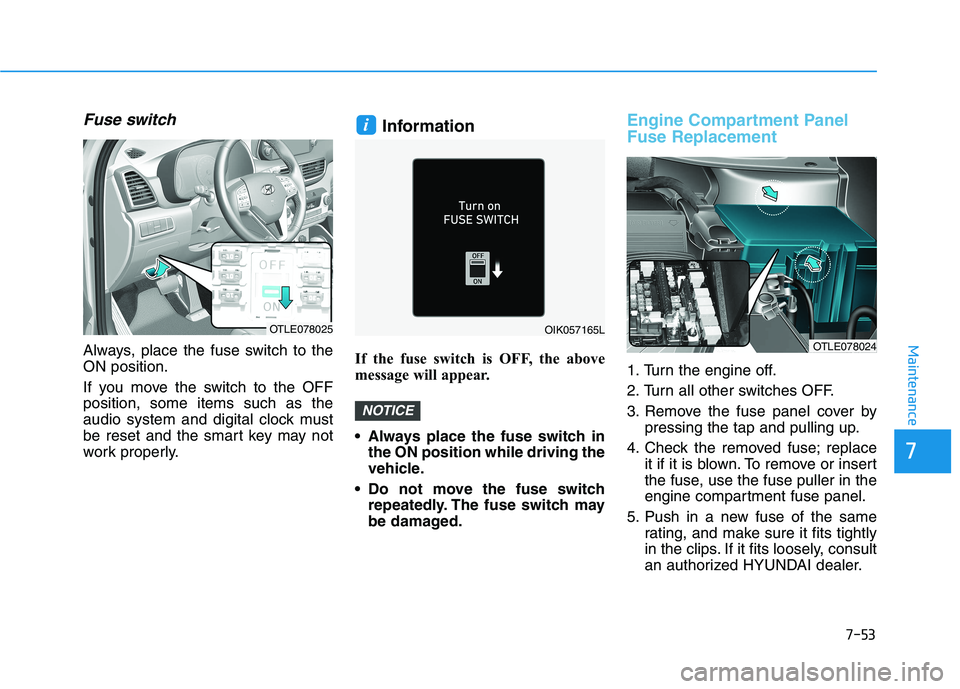
Fuse switch
Always, place the fuse switch to the
ON position.
If you move the switch to the OFF
position, some items such as the
audio system and digital clock must
be reset and the smart key may not
work properly.
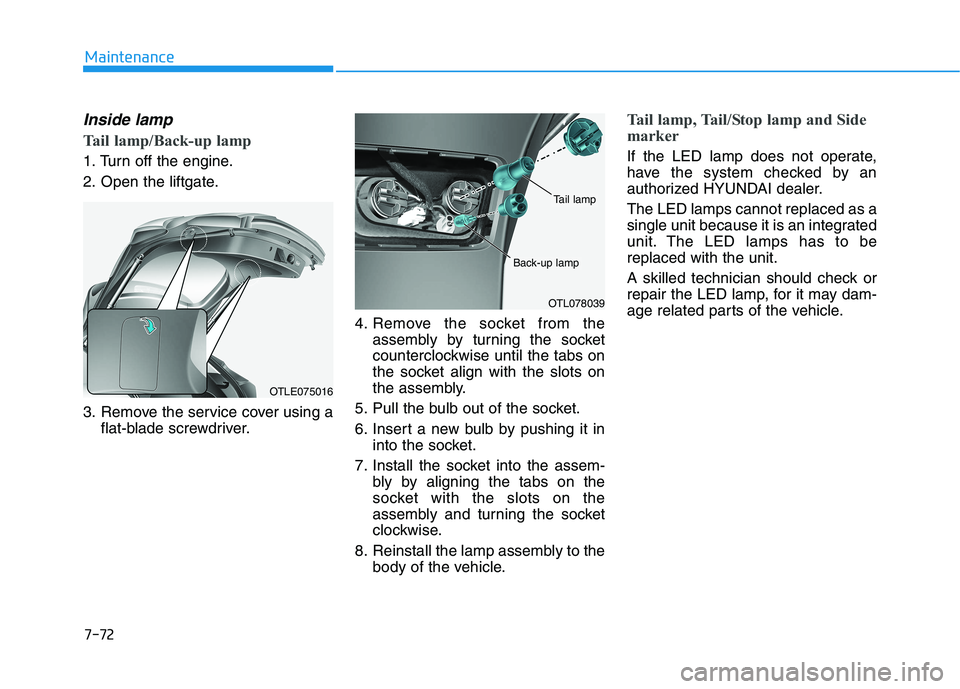
Information
If the fuse switch is OFF, the above
message will appear.
Always place the fuse switch in
the ON position while driving the
vehicle.
Do not move the fuse switch
repeatedly. The fuse switch may
be damaged.
Engine Compartment Panel
Fuse Replacement
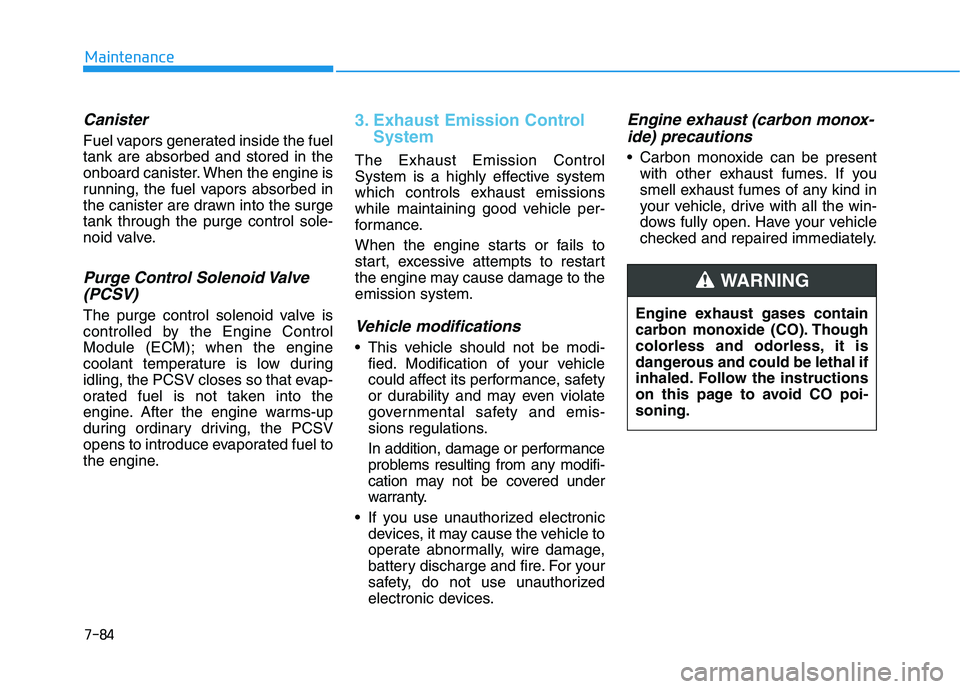
1. Turn the engine off.
2. Turn all other switches OFF.
3. Remove the fuse panel cover by
pressing the tap and pulling up.
4. Check the removed fuse; replace
it if it is blown. To remove or insert
the fuse, use the fuse puller in the
engine compartment fuse panel.
5. Push in a new fuse of the same
rating, and make sure it fits tightly
in the clips. If it fits loosely, consult
an authorized HYUNDAI dealer.
NOTICE
i
OIK057165LOTLE078025
OTLE078024
7
Page 488 of 546

7-54
Maintenance
Main fuse
If the main fuse is blown, it must be
removed as follows:
1. Turn off the engine.
2. Disconnect the negative battery
cable.
3. Remove the fuse panel cover by
pressing the tab and pulling it up.
4. Remove the nuts shown in the pic-
ture above.
5. Replace the fuse with a new one
of the same rating.
6. Reinstall in the reverse order of
removal.
Information
If the main fuse is blown, consult an
authorized HYUNDAI dealer.
i
After checking the fuse box in
the engine compartment
securely close the fuse box
cover inside the engine com-
partment, until it clicks.
If the fuse box is not closed
properly, water may leak in side,
possibly causing a malfunction
with the electrical system.
CAUTION
OTLA075027
Page 495 of 546

7
Maintenance
Engine compartment main fuse panel
Fuse NameFuse rating Circuit Protected
MULTI
FUSE-1
MDPS 80AMDPS Unit
B+1 60ASmart Junction Block (ARISU-LT IPS 1, IPS 2, IPS 3, IPS 4, Fuse - AMP)
B+2 60ASmart Junction Block (ARISU-LT IPS 5, IPS 6, IPS 7, IPS 8, Fuse - SMART KEY1,
SMART KEY2, BRAKE SWITCH, MODULE9)
B+3 50ASmart Junction Block (Fuse - SUNROOF1, SUNROOF2, S/HEATER FRT, S/HEATER RR,
SAFETY P/WINDOW DRV),
Power Window Relay (Fuse - P/WINDOW LH, P/WINDOW RH)
ABS1 40AESC Module, Multipurpose Check Connector
ABS2 40AESC Module, Multipurpose Check Connector
IG1 40AIgnition Switch (W/O Smart Key),
PCB Block (PDM (IG1)/PDM (ACC) Relay - With Smart Key)
IG2 30AStart Relay, Ignition Switch (W/O Smart Key),
PCB Block (PDM (IG2) Relay - With Smart Key)
MULTI
FUSE-2PTC HEATER 150APTC 1 Relay
PTC HEATER 250APTC 2 Relay
FUSE
B+450A Smart Junction Block (Fuse - MODULE8, 4WD, P/SEAT (DRV), P/SEAT (PASS),
TAILGATE OPEN, DOOR LOCK,
Leak Current Autocut Device - Fuse Switch, INTERIOR LAMP, MULTIMEDIA, MEMORY2)
COOLING FAN140A [G4NC/G4KJ] Cooling Fan High Relay
50A [G4FJ] Cooling Fan High Relay
TCU340A [G4FJ - 7DCT] TCM
TCU440A [G4FJ - 7DCT] TCM
BLOWER40A Blower Relay
POWER TAILGATE40A Power Tail Gate Module
REAR HEATED40A Rear Defogger Relay
7-61
Page 506 of 546

7-72
Maintenance
Inside lamp
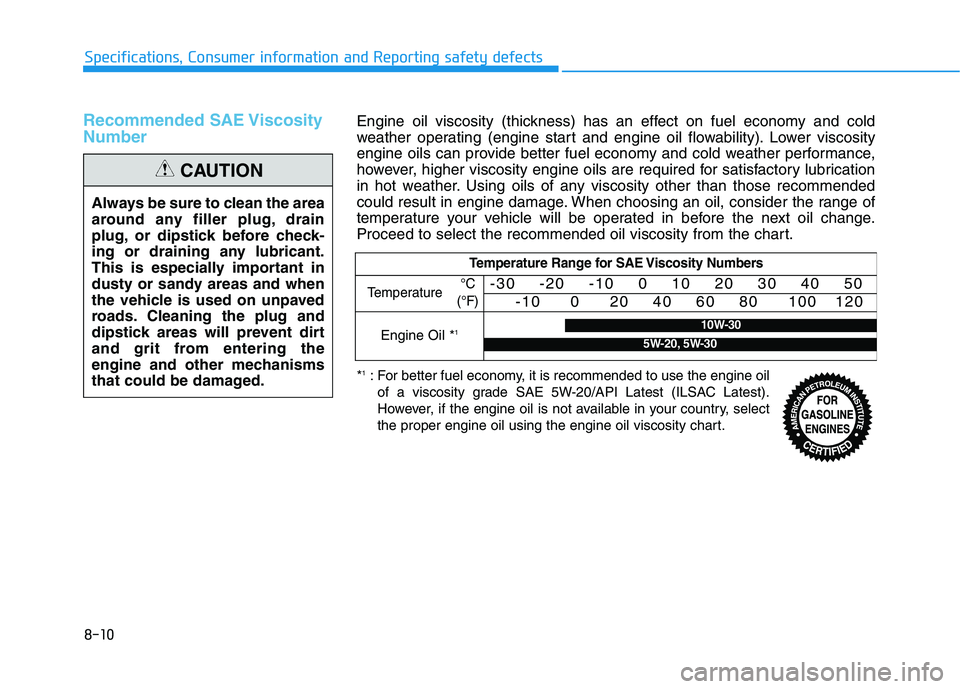
Tail lamp/Back-up lamp
1. Turn off the engine.
2. Open the liftgate.
3. Remove the service cover using a
flat-blade screwdriver.4. Remove the socket from the
assembly by turning the socket
counterclockwise until the tabs on
the socket align with the slots on
the assembly.
5. Pull the bulb out of the socket.
6. Insert a new bulb by pushing it in
into the socket.
7. Install the socket into the assem-
bly by aligning the tabs on the
socket with the slots on the
assembly and turning the socket
clockwise.
8. Reinstall the lamp assembly to the
body of the vehicle.
Tail lamp, Tail/Stop lamp and Side
marker
If the LED lamp does not operate,
have the system checked by an
authorized HYUNDAI dealer.
The LED lamps cannot replaced as a
single unit because it is an integrated
unit. The LED lamps has to be
replaced with the unit.
A skilled technician should check or
repair the LED lamp, for it may dam-
age related parts of the vehicle.
OTLE075016
OTL078039
Tail lamp
Back-up lamp
Page 518 of 546

7-84
Maintenance
Canister
Fuel vapors generated inside the fuel
tank are absorbed and stored in the
onboard canister. When the engine is
running, the fuel vapors absorbed in
the canister are drawn into the surge
tank through the purge control sole-
noid valve.
Purge Control Solenoid Valve
(PCSV)
The purge control solenoid valve is
controlled by the Engine Control
Module (ECM); when the engine
coolant temperature is low during
idling, the PCSV closes so that evap-
orated fuel is not taken into the
engine. After the engine warms-up
during ordinary driving, the PCSV
opens to introduce evaporated fuel to
the engine.
3. Exhaust Emission Control
System
The Exhaust Emission Control
System is a highly effective system
which controls exhaust emissions
while maintaining good vehicle per-
formance.
When the engine starts or fails to
start, excessive attempts to restart
the engine may cause damage to the
emission system.
Vehicle modifications
This vehicle should not be modi-
fied. Modification of your vehicle
could affect its performance, safety
or durability and may even violate
governmental safety and emis-
sions regulations.
In addition, damage or performance
problems resulting from any modifi-
cation may not be covered under
warranty.
If you use unauthorized electronic
devices, it may cause the vehicle to
operate abnormally, wire damage,
battery discharge and fire. For your
safety, do not use unauthorized
electronic devices.
Engine exhaust (carbon monox-
ide) precautions
Carbon monoxide can be present
with other exhaust fumes. If you
smell exhaust fumes of any kind in
your vehicle, drive with all the win-
dows fully open. Have your vehicle
checked and repaired immediately.
Engine exhaust gases contain
carbon monoxide (CO). Though
colorless and odorless, it is
dangerous and could be lethal if
inhaled. Follow the instructions
on this page to avoid CO poi-
soning.
WARNING
Page 531 of 546

8-10
Specifications, Consumer information and Reporting safety defects
Recommended SAE Viscosity
Number
Always be sure to clean the area
around any filler plug, drain
plug, or dipstick before check-
ing or draining any lubricant.
This is especially important in
dusty or sandy areas and when
the vehicle is used on unpaved
roads. Cleaning the plug and
dipstick areas will prevent dirt
and grit from entering the
engine and other mechanisms
that could be damaged.
CAUTION
Engine oil viscosity (thickness) has an effect on fuel economy and cold
weather operating (engine start and engine oil flowability). Lower viscosity
engine oils can provide better fuel economy and cold weather performance,
however, higher viscosity engine oils are required for satisfactory lubrication
in hot weather. Using oils of any viscosity other than those recommended
could result in engine damage. When choosing an oil, consider the range of
temperature your vehicle will be operated in before the next oil change.
Proceed to select the recommended oil viscosity from the chart.
Temperature Range for SAE Viscosity Numbers
Temperature -30 -20 -10 0 10 20 30 40 50
-10 0 20 40 60 80 100 120
Engine Oil *110W-30
5W-20, 5W-30
°C
(°F)
*1: For better fuel economy, it is recommended to use the engine oil
of a viscosity grade SAE 5W-20/API Latest (ILSAC Latest).
However, if the engine oil is not available in your country, select
the proper engine oil using the engine oil viscosity chart.
Page 539 of 546

I-4
Driver Attention Warning (DAW) System......................5-96
Resetting the System ..................................................5-97
System Malfunction ...................................................5-98
System Setting and Activation ...................................5-96
System Standby ..........................................................5-98
Driver's front air bag .......................................................2-50
Electric Power Steering (EPS) ........................................3-21
Electronic Parking Brake (EPB) .....................................5-24
Electronic Stability Control (ESC) .................................5-35
Emission Control System ...............................................7-83
Crankcase Emission Control System .........................7-83
Evaporative Emission Control System Including
Onboard Refueling Vapor Recovery (ORVR) ........7-83
Exhaust Emission Control System .............................7-84
Engine ...............................................................................8-2
Engine compartment..................................................1-6, 7-3
Engine Coolant ...............................................................7-19
Changing Engine Coolant ..........................................7-22
Checking the Engine Coolant Level ..........................7-19
Engine Number ...............................................................8-12
Engine Oil .......................................................................7-17
Checking the Engine Oil and Filter ...........................7-18
Checking the Engine Oil Level ..................................7-17
Explanation Of Scheduled Maintenance Items ..............7-14Exterior Features .................................................3-47, 3-171
Fuel Filler Door ..........................................................3-48
Hood ...........................................................................3-47
Roof Rack.................................................................3-171
Exterior Lights ..............................................................3-107
AUTO headlamp position ........................................3-108
Battery saver function ..............................................3-114
Daytime running light (DRL) ..................................3-107
Front fog lamp ..........................................................3-114
Headlamp delay function..........................................3-115
Headlamp position....................................................3-109
High Beam Assist (HBA) .........................................3-110
High beam operation ................................................3-109
Lane change signals..................................................3-113
Parking lamp position ..............................................3-108
Turn signals ..............................................................3-113
Exterior overview .............................................................1-2
Floor Mat Anchor(s) .....................................................3-166
Forward Collision-Avoidance Assist (FCA) System
- Camera Type .............................................................5-60
FCA Sensor ................................................................5-65
FCA Warning Message and System Control..............5-63
Limitations of the System ..........................................5-68
System Not Operating ................................................5-67
System Setting and Activation ...................................5-60
Index
E
F