2020 Hyundai Sonata Screen
[x] Cancel search: ScreenPage 220 of 537

Convenient Features5-90
Operating conditions
Reverse Parking Collision-Avoidance
Assist system enters the ready status,
when ‘Active Assist’ or ‘Warning Only’ is
selected in the AVN system screen and
the following conditions are satisfied:
• The trunk is closed
• The shift lever is in R (Reverse)
• Vehicle speed is below 6 mph (10 km/h)
• System components such as the rear view camera and the rear ultrasonic
sensors are in normal conditions
The driver needs to select ‘Active Assist’
on the LCD display or infotainment
system display for collision-avoidance
assist.
The solid lines behind the vehicle in the
cluster LCD display indicates that the
system is ready to assist the driver.
Note that the system assists the driver
only once. The driver has to shift the gear
to R (Reverse) from another gear position
to reactivate the system.
The performance of Reverse Parking
Collision-Avoidance Assist system may
vary under certain conditions. If the
vehicle speed exceeds 2 mph (3 km/h),
the system can assist only pedestrian
collision avoidance.
As always, be careful when backing
up your vehicle and be aware of your
surroundings.
Warning and System Control
Active assist
Cluster LCD displayCluster LCD display
ODN8A049043ODN8A049043
Infotainment system display Infotainment system display
OHI059255NOHI059255N
• If the system detects a risk of collision with a pedestrian or an object behind
the vehicle, the system will warn the
driver with audible warning, steering
wheel vibration, and warnings on
the cluster LCD display and the
infotainment system display.
• If the system detects imminent collision with a pedestrian or an object
behind the vehicle, the system may
apply braking power. The driver needs
to pay attention as the brake will
release within 2 seconds. The driver
must immediately depress the brake
pedal and check surroundings.
Page 225 of 537
![Hyundai Sonata 2020 Owners Manual 05
5-95
(IF EQUIPPED)
ODN8A059056ODN8A059056[A] : Rear Sensor
Reverse Parking Distance Warning
system assists the driver during reverse
movement of the vehicle by chiming if an
object is sensed wit Hyundai Sonata 2020 Owners Manual 05
5-95
(IF EQUIPPED)
ODN8A059056ODN8A059056[A] : Rear Sensor
Reverse Parking Distance Warning
system assists the driver during reverse
movement of the vehicle by chiming if an
object is sensed wit](/manual-img/35/16773/w960_16773-224.png)
05
5-95
(IF EQUIPPED)
ODN8A059056ODN8A059056[A] : Rear Sensor
Reverse Parking Distance Warning
system assists the driver during reverse
movement of the vehicle by chiming if an
object is sensed within the distance of 48
in (120 cm) behind the vehicle.
This system is a supplemental system
that senses objects within the range and
location of the sensors, it cannot detect
objects in other areas where sensors are
not installed.
WARNING
• ALWAYS look around your vehicle to
make sure there are not any objects
or obstacles before moving the
vehicle in any direction to prevent a
collision.
• Always pay close attention when the
vehicle is driven close to objects,
particularly pedestrians, and
especially children.
• Be aware that some objects may
not be visible on the screen or be
detected by the sensors, due to the
objects distance, size or material, all
of which can limit the effectiveness
of the sensor.
Operation of Reverse Parking
Distance Warning System
Operating condition
• This system will activate when
backing up with the ignition switch in
the ON position. However, if vehicle
speed exceeds 3 mph (5 km/h), the
system may not detect objects.
• If vehicle speed exceeds 6 mph (10 km/h), the system will not warn you
even though objects are detected.
• When more than two objects are sensed at the same time, the closest
one will be recognized first.
REVERSE PARKING DISTANCE WARNING (PDW)
Page 229 of 537
![Hyundai Sonata 2020 Owners Manual 05
5-99
FORWARD/REVERSE PARKING DISTANCE WARNING (PDW)
(IF EQUIPPED)
ODN8A059055ODN8A059055
ODN8059056LODN8059056L[A] : Front sensor, [B] : Rear sensor
Forward/Reverse Parking Distance
Warning syst Hyundai Sonata 2020 Owners Manual 05
5-99
FORWARD/REVERSE PARKING DISTANCE WARNING (PDW)
(IF EQUIPPED)
ODN8A059055ODN8A059055
ODN8059056LODN8059056L[A] : Front sensor, [B] : Rear sensor
Forward/Reverse Parking Distance
Warning syst](/manual-img/35/16773/w960_16773-228.png)
05
5-99
FORWARD/REVERSE PARKING DISTANCE WARNING (PDW)
(IF EQUIPPED)
ODN8A059055ODN8A059055
ODN8059056LODN8059056L[A] : Front sensor, [B] : Rear sensor
Forward/Reverse Parking Distance
Warning system assists the driver during
movement of the vehicle by chiming if
an object is sensed within the distance of
40 in (100 cm) in front and 48 in (120 cm)
behind the vehicle.
This system is a supplemental system
that senses objects within the range and
location of the sensors, it cannot detect
objects in other areas where sensors are
not installed.
WARNING
• ALWAYS look around your vehicle
to make sure there are no objects or
obstacles before moving the vehicle
in any direction to prevent a collision.
• Always pay close attention when the
vehicle is driven close to objects,
particularly pedestrians, and
especially children.
• Be aware that some objects may
not be visible on the screen or be
detected by the sensors, due to the
objects distance, size or material, all
of which can limit the effectiveness
of the sensor.
• Do not tamper with the location
or size of the license plate
discretionally.
Page 257 of 537

5-127
05
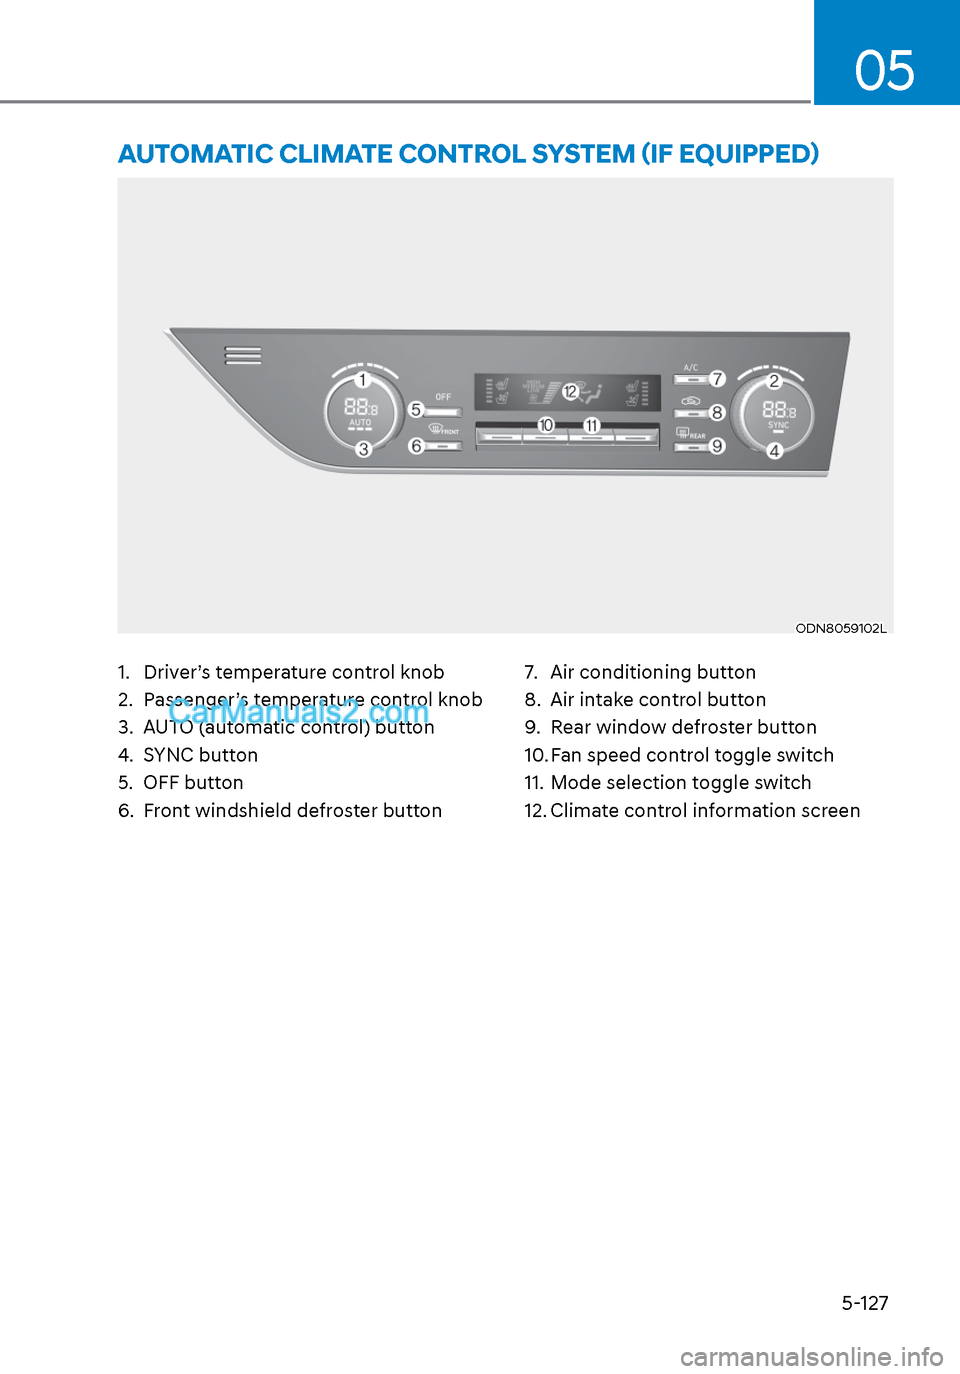
1. Driver’s temperature control knob
2. Passenger’s temperature control knob
3. AUTO (automatic control) button
4. SYNC button
5. OFF button
6. Front windshield defroster button7. Air conditioning button
8. Air intake control button
9. Rear window defroster button
10. Fan speed control toggle switch
11. Mode selection toggle switch
12. Climate control information screen
AUTOMATIC CLIMATE CONTROL SYSTEM (IF EQUIPPED)
ODN8059102LODN8059102L
Page 258 of 537

Convenient Features5-128
Automatic Heating and Air
Conditioning
ODN8059115ODN8059115
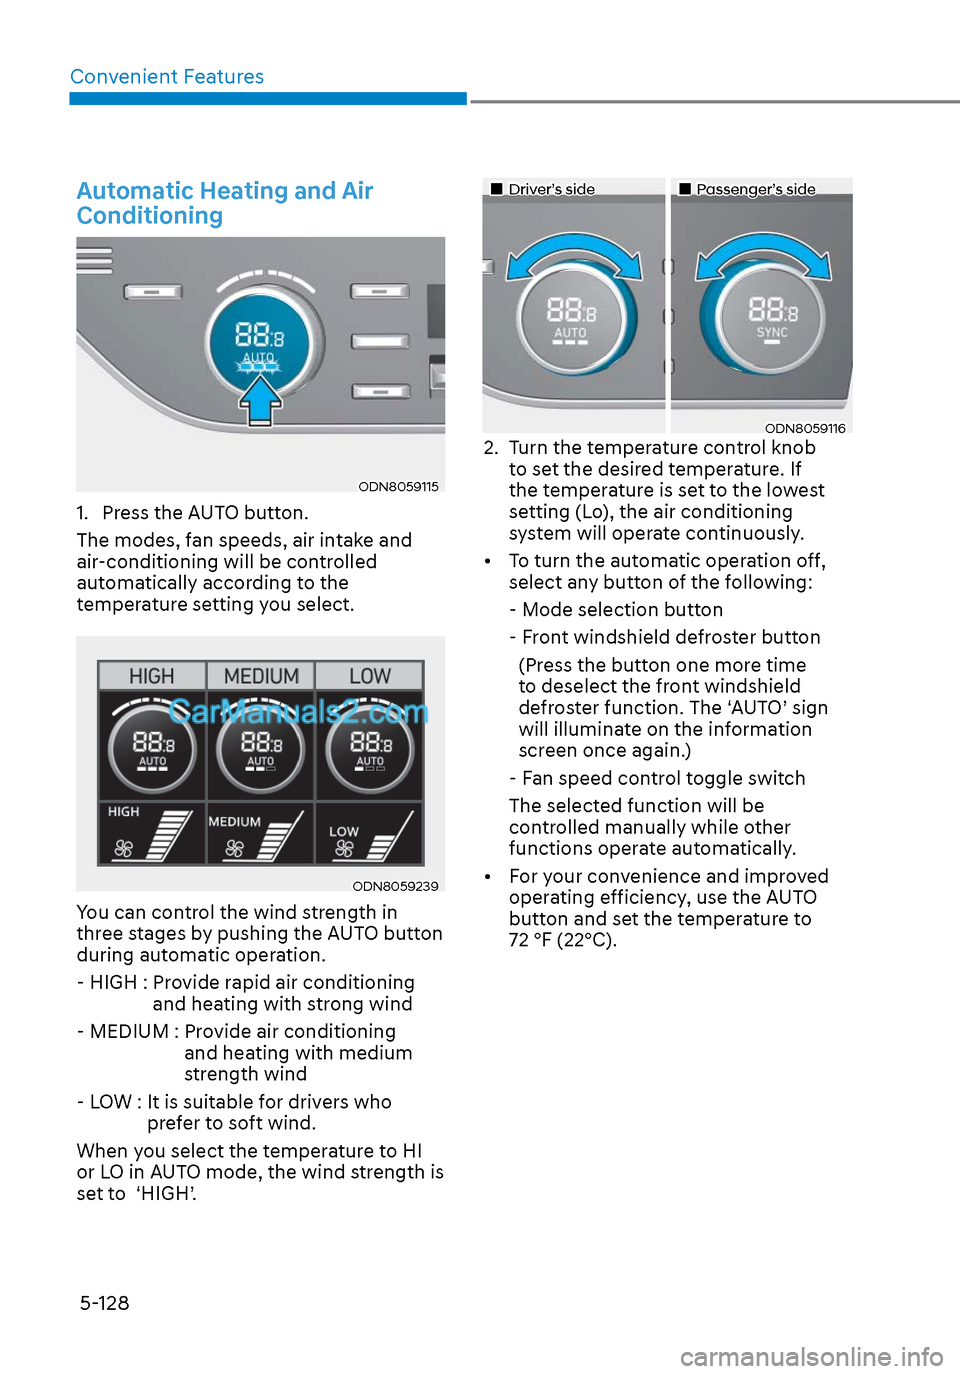
1. Press the AUTO button.
The modes, fan speeds, air intake and
air-conditioning will be controlled
automatically according to the
temperature setting you select.
ODN8059239ODN8059239
You can control the wind strength in
three stages by pushing the AUTO button
during automatic operation.
- HIGH : Provide rapid air conditioning and heating with strong wind
- MEDIUM : Provide air conditioning and heating with medium
strength wind
- LOW : It is suitable for drivers who prefer to soft wind.
When you select the temperature to HI
or LO in AUTO mode, the wind strength is
set to ‘HIGH’.
Driver’s sideDriver’s sidePassenger’s sidePassenger’s side
ODN8059116ODN80591162. Turn the temperature control knob to set the desired temperature. If
the temperature is set to the lowest
setting (Lo), the air conditioning
system will operate continuously.
• To turn the automatic operation off, select any button of the following:
- Mode selection button
- Front windshield defroster button
(Press the button one more time to deselect the front windshield
defroster function. The ‘AUTO’ sign
will illuminate on the information
screen once again.)
- Fan speed control toggle switch
The selected function will be controlled manually while other
functions operate automatically.
• For your convenience and improved operating efficiency, use the AUTO
button and set the temperature to
72 °F (22°C).
Page 263 of 537

05
5-133
Temperature conversion
If the battery has been discharged or
disconnect
ed, the temperature mode
display will reset to Centigrade.
To change the temperature unit from °C
to °F or °F to °C :
- Automatic climate control system
Press the AUTO button for 3 seconds while pressing the OFF button.
- Instrument cluster
Go to User Settings → Other → Temperature Unit.
The temperature unit on both the cluster
LCD display and the climate control
screen will change.
Air intake control
This is used to select the outside (fresh)
air position or recirculated air position.
To change the air intake control position,
push the control button.
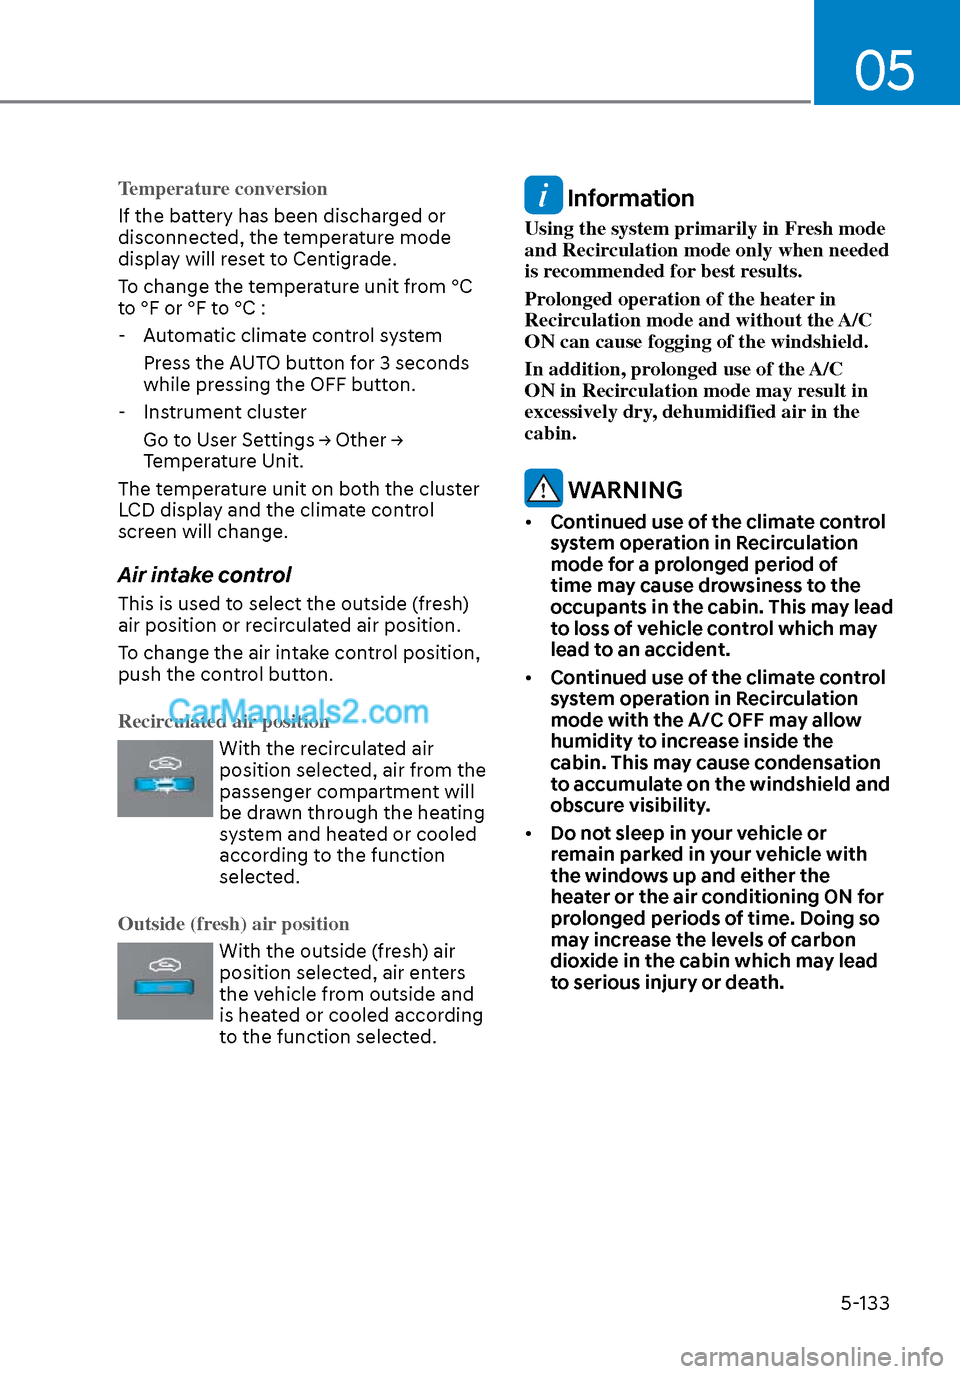
Recirculated air position
With the recirculated air
position selected, air from the
passenger compartment will
be drawn through the heating
system and heated or cooled
according to the function
selected.
Outside (fresh) air position
With the outside (fresh) air
position selected, air enters
the vehicle from outside and
is heated or cooled according
to the function selected.
Information
Using the system primarily in Fresh mode
and Recirculation mode only when needed
is recommended for best results.
Prolonged operation of the heater in
Recirculation mode and without the A/C
ON can cause fogging of the windshield.
In addition, prolonged use of the A/C
ON in Recirculation mode may result in
excessively dry, dehumidified air in the
cabin.
WARNING
• Continued use of the climate control
system operation in Recirculation
mode for a prolonged period of
time may cause drowsiness to the
occupants in the cabin. This may lead
to loss of vehicle control which may
lead to an accident.
• Continued use of the climate control
system operation in Recirculation
mode with the A/C OFF may allow
humidity to increase inside the
cabin. This may cause condensation
to accumulate on the windshield and
obscure visibility.
• Do not sleep in your vehicle or
remain parked in your vehicle with
the windows up and either the
heater or the air conditioning ON for
prolonged periods of time. Doing so
may increase the levels of carbon
dioxide in the cabin which may lead
to serious injury or death.
Page 270 of 537

Convenient Features5-140
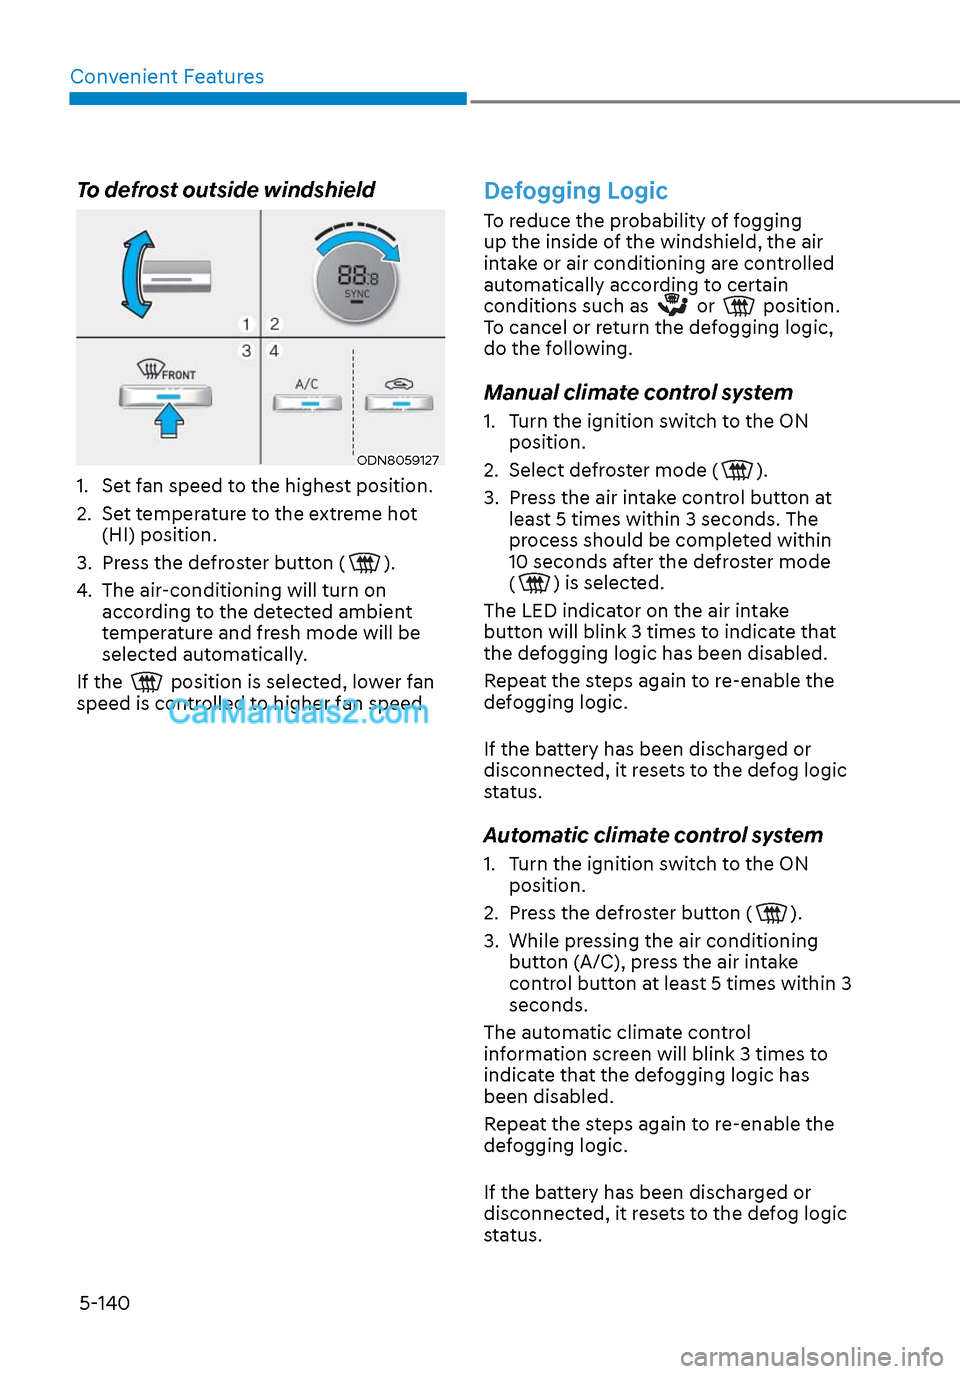
To defrost outside windshield
ODN8059127ODN8059127
1. Set fan speed to the highest position.
2. Set temperature to the extreme hot (HI) position.
3. Press the defroster button (
).
4. The air-conditioning will turn on according to the detected ambient
temperature and fresh mode will be
selected automatically.
If the
position is selected, lower fan
speed is controlled to higher fan speed.
Defogging Logic
To reduce the probability of fogging
up the inside of the windshield, the air
intake or air conditioning are controlled
automatically according to certain
conditions such as
or position.
To cancel or return the defogging logic,
do the following.
Manual climate control system
1. Turn the ignition switch to the ON position.
2. Select defroster mode (
).
3. Press the air intake control button at least 5 times within 3 seconds. The
process should be completed within
10 seconds after the defroster mode
(
) is selected.
The LED indicator on the air intake
button will blink 3 times to indicate that
the defogging logic has been disabled.
Repeat the steps again to re-enable the
defogging logic.
If the battery has been discharged or
disconnected, it resets to the defog logic
status.
Automatic climate control system
1. Turn the ignition switch to the ON position.
2. Press the defroster button (
).
3. While pressing the air conditioning button (A/C), press the air intake
control button at least 5 times within 3
seconds.
The automatic climate control
information screen will blink 3 times to
indicate that the defogging logic has
been disabled.
Repeat the steps again to re-enable the
defogging logic.
If the battery has been discharged or
disconnected, it resets to the defog logic
status.
Page 282 of 537

Convenient Features5-152
INFOTAINMENT SYSTEM
NOTICE
• If you install an aftermarket HID
head lamp, your vehicle’s audio and
electronic devices may not function
properly.
• Prevent chemicals such as perfume,
cosmetic oil, sunscreen, hand
cleaner, and air freshener from
contacting the interior parts
because they may cause damage or
discoloration.
USB and iPod® Port
ODN8059229ODN8059229
You can use an AUX or USB cable to
connect audio devices to the vehicle AUX
or USB port.
Information
When using a portable audio device
connected to the power outlet, noise may
occur during playback. If this happens,
use the portable audio device’s power
source.
iPod® is a trademark of Apple Inc.
Antenna
ODN8059226ODN8059226
Shark fin antenna (1, if equipped)
The shark fin antenna receives
transmitted data. (for example : GPS)
Glass antenna (2)
Your vehicle uses a glass antenna to
receive both AM and FM signals.
WARNING
• Do not clean the inside of the rear
window glass with a cleaner or
scraper to remove foreign deposits
as this may cause damage to the
antenna elements.
• To prevent damage to the rear glass antenna, never use sharp
instruments or window cleaner
containing abrasives to clean the
window. Clean the inside surface of
the rear glass window with a piece of
soft cloth.
• Avoid adding metallic coatings such as Ni, Cd, etc. These can degrade
the receiving AM and FM broadcast
signals.
• When putting a sticker on the inside surface of the rear window, be
careful not to damage the rear glass
antenna.
• Do not put sharp instruments nearby the rear glass antenna.